The Xbox Game Bar is a convenient screen recording tool built into Windows. This article provides a detailed guide on how to record with Xbox Game Bar easily. Additionally, for content that cannot be captured, we offer a professional screen recording alternative, MiniTool Screen Recorder, to enhance your recording experience.
What Is Xbox Game Bar
The Xbox Game Bar is a built-in screen recording tool in the Windows system. Its operation is simple and intuitive: users can launch screen recording by pressing the Windows + G shortcut key without leaving the current interface. Additionally, the Xbox Game Bar supports simultaneous recording of both system audio and microphone audio.
Whether you're a gamer looking to capture thrilling gameplay or a user needing to record online courses or presentations, the Xbox Game Bar delivers a seamless recording experience.

How to Record with Xbox Game Bar
Below is a step-by-step guide on how to record on Xbox Game Bar. Now, let's get straight to the point.
#1 Record a Game with Xbox Game Bar
Game recording is the most classic recording mode in the Xbox Game Bar. Below is our detailed game recording tutorial.
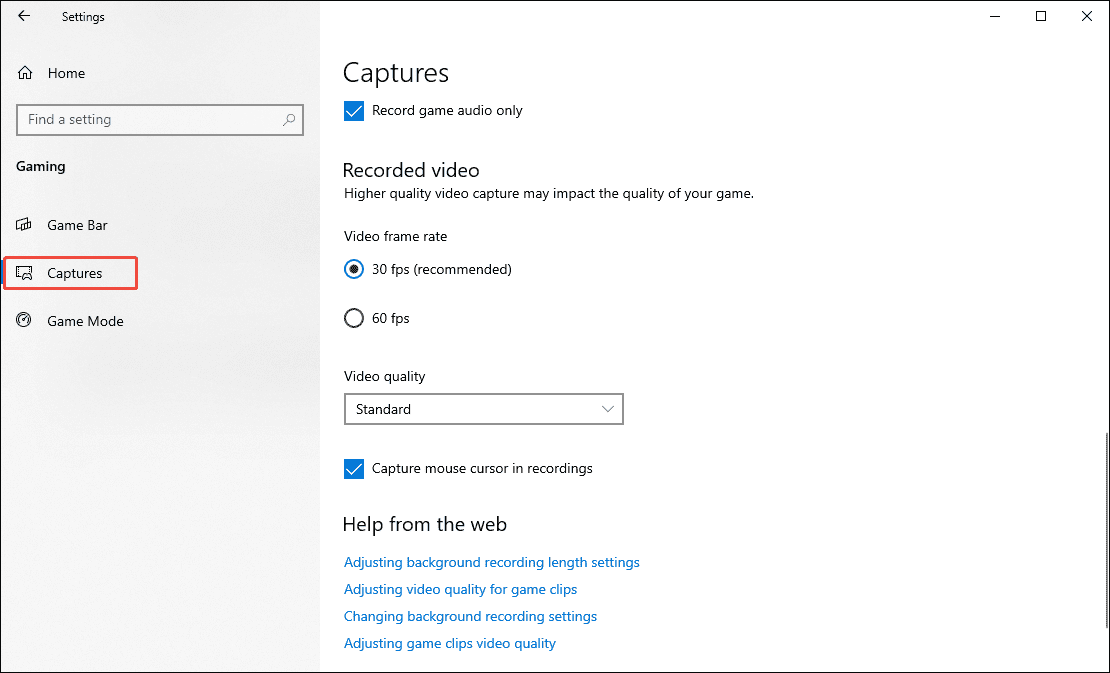
Step 1: Customize Xbox Game Bar Settings
1. Launch Windows Settings on your PC and navigate to the Gaming module.
2. Click on the Captures option in the new interface.
3. Then you can select parameters such as maximum recording duration, frame rate, and video quality, and decide whether to grant Xbox Game Bar permission to record audio.
Step 2: Launch the PC Game
Launch the game on your computer and make sure it’s ready.
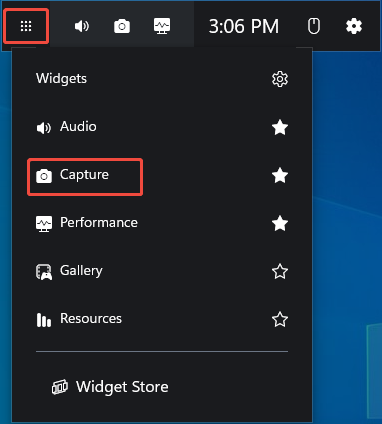
Step 3: Open Xbox Game Bar Screen Recording Mode
1. To open Xbox Game Bar, press Windows + G on your keyboard.
2. Then click on the Capture option under the Widgets module to enter the recording mode.
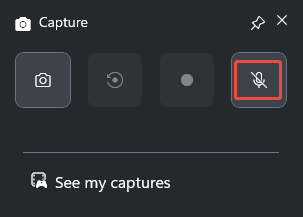
Step 4: Control the Audio Recording
Click on the Microphone icon to determine whether to enable the audio recording feature while recording.
Step 5: Start and End Recording
1. When you want to start recording the game, click the Start recording icon or press Windows + Alt + R on your keyboard.
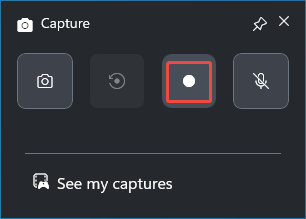
2. To end the recording process, press Windows + Alt + R again.
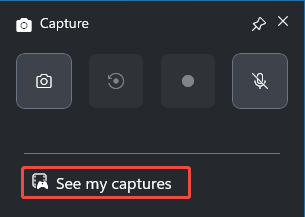
Step 6: Check the Recorded Video
After the recording is complete, you can click on See my captures to check the recorded video.
#2 Record a Specific Application with Xbox Game Bar
Although the Xbox Game Bar is designed for gamers, it can also be used to record activity within specific Windows applications. The recording process is identical to game recording: simply open the Xbox Game Bar when you're ready to start recording activity within a specific application or window.
#3 Record Your Desktop with Xbox Game Bar
Although the Xbox Game Bar provides users with convenient gameplay and recording capabilities for specific software or applications, it unfortunately does not support recording on the desktop or in File Explorer.
When you attempt to use the Xbox Game Bar record desktop, it will display the following message: “Gaming features aren’t available for the Windows desktop or File Explorer.”
Given this situation, the optimal solution is to adopt a screen recording alternative that can capture both the desktop and File Explorer simultaneously. Therefore, the following section presents carefully selected suitable alternatives to help you understand how to screen record on Windows without Game Bar.

Professional Alternatives to the Xbox Game Bar
When it comes to a screen recording tool that can capture your computer desktop or File Explorer, MiniTool Screen Recorder, which I frequently use, immediately comes to mind. Therefore, this article will use MiniTool Screen Recorder as an example to demonstrate how to record your desktop on Windows systems.
MiniTool Screen Recorder is a free screen recording software with no watermarks. Beyond desktop recording, it supports game recording, online meeting recording, webcam capture, and system or microphone audio recording to meet diverse user needs.
Additionally, MiniTool Screen Recorder offers features like preset recording duration, customizable hotkeys, and frame rate selection to help users create personalized videos. What’s more, during recording, users can also utilize the built-in annotation tools to mark up and annotate the screen.
Below is the detailed step-by-step guide for recording your desktop using MiniTool Screen Recorder.
Step 1: Get MiniTool Screen Recorder
Click on the button below to download and install the latest version of MiniTool Screen Recorder.
MiniTool Screen RecorderClick to Download100%Clean & Safe
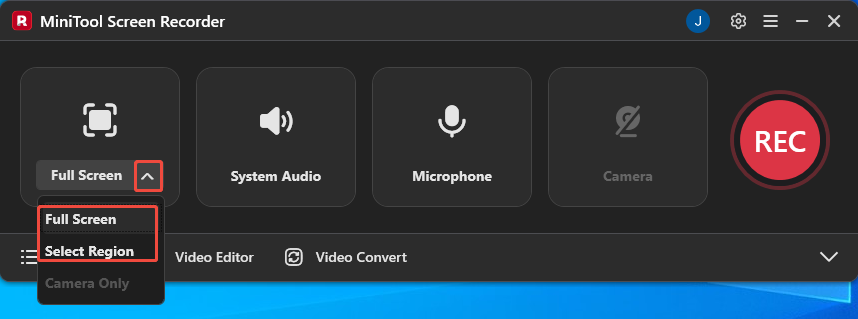
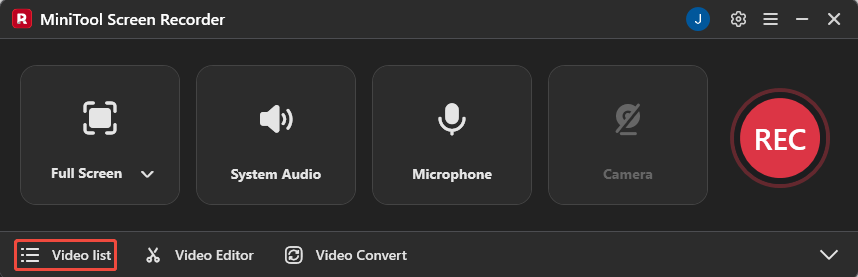
Step 2: Choose the Recording Area
1. Open MiniTool Screen Recorder and keep it on the desktop window.
2. Expand the drop-down menu of the Full Screen option.
3. Then choose whether to record the full screen or a specific area.
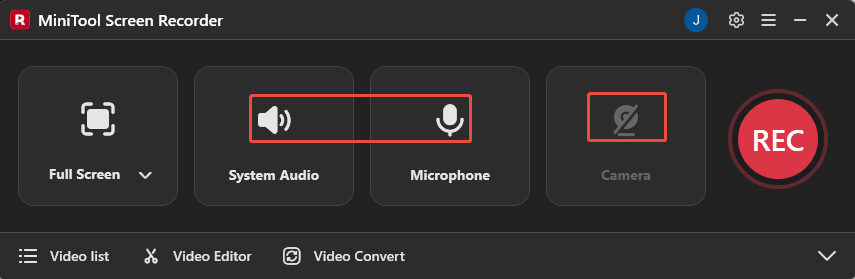
Step 3: Set the Audio and Camera Recording
1. Click on the System Audio icon or the Microphone icon to determine whether to record the system audio or the voiceover.
2. If you want to record the webcam footage, click on the Camera icon on the right.
Step 4: Start and End Recording
1. When you want to start recording the desktop, click on the REC button on the right side of the main interface or press the F6 key. After a 3-second countdown, it will start recording.
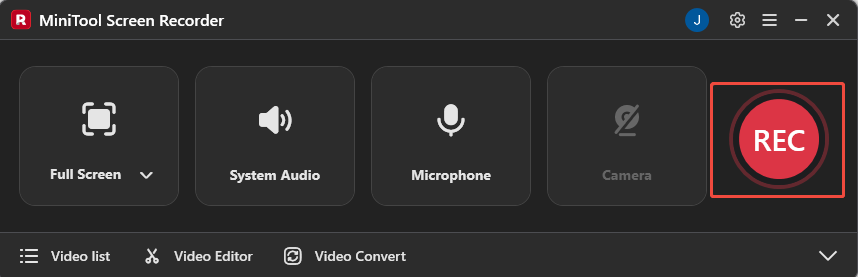
2. During the recording process, you can press the F9 key to pause or resume.
3. To end the recording process, press the F6 key again.
4. Finally, you can check the recorded video under the Video list module.
Conclusion
In summary, the Xbox Game Bar can meet users' basic recording needs. This article details how to record with Xbox Game Bar. Additionally, if users need to record desktop content or require more advanced features, consider trying MiniTool Screen Recorder, a free third-party alternative software.
If you encounter any issues or have suggestions while using MiniTool Screen Recorder, you can reach out for assistance by emailing us via support@minitool.com or sending a message on X.