This article tells when and why capture videos on Windows 10 and shares how to record videos on Windows 10 with the top 3 video recorders, including Xbox Game Bar, MiniTool Screen Recorder, and Free Screen Online Recorder. It also tells the common issues during the recording on Windows 10.
Why Record Videos on Windows 10
Before learning how to capture videos on Windows 10, let’s take a glance at why record the screen on Windows 10.
Benefits of Recording Videos on Windows 10 for Employees
Capturing your screen on Windows 10 can save online meetings, which is convenient for employees to review the content of previous meetings. Moreover, video recordings demonstrate meeting content and operational steps more clearly than text explanations or screenshots.

Benefits of Recording Videos on Windows 10 for Learners
Screen recording on Windows 10 is also very useful for online learning. Recorded videos allow learners to pause and reverse to review key knowledge points at their own pace. Recorded videos can also be easily used for discussion, exploration, and sharing with others.
Benefits of Recording Videos on Windows 10 for Gamers
Recording videos on Windows 10 can help gamers capture exciting moments in games and record professional gameplay. For example, recording gameplay on Steam or other PC games.
Preparation Before Recording Video
Before starting to record video on Windows 10, effective preparations can significantly improve recording efficiency.
Preparation 1. Plan the Recording Content
Before recording, outline the content and decide the recording order, practice the pace of screen operations during recording, and arrange the supplementary documents or video materials. By making the plans above, the recording won’t be frequently paused or re-recorded.
Preparation 2. Disable Unnecessary Software
Closing unnecessary applications can prevent interruptions such as pop-up notifications or system lag during recording. This also helps the video content focus on the main information.
Preparation 3. Check Your Audio Settings
Before the recording process, determine whether you need to record system audio and microphone sound, or both. Testing the audio before recording helps avoid common audio problems.
Preparation 4. Check the Camera State
If you want to record content from your camera, you need to activate it or prepare an external webcam. Then turn on the webcam and test its image quality. Also, check the audio and video sync.
Preparation 5. Ensure Your Computer Has Enough Storage Space
It is important to ensure that there is sufficient available storage space, especially when recording long or high-resolution videos. Insufficient space may lead the recorded video to fail to store on your computer.
Are you still looking for a Windows 10 recorder? I want to share with you 3 recording tools that I have tried.
How to Record Videos on Windows 10 with Built-in Tool
Xbox Game Bar helps efficiently record videos on Windows 10. It allows recording system audio, microphone sound, or both simultaneously. Xbox Game Bar also supports quick recording using hotkeys. Additionally, it's a free Windows 10 overlay tool that enhances the gaming and screen recording experience.
Xbox Game Bar requires no third-party software, comes pre-installed, and updates with your Windows system. It's compatible with most PC games and Windows desktop applications.
Besides recording, Xbox Game Bar also supports cross-platform communication with Xbox friends, real-time monitoring of CPU and GPU usage and FPS, and Spotify music control.
Step 1. Enable Xbox Game Bar
Go to Windows Settings > Gaming > Game Bar. There, turn on theGame Bar enable button.
Step 2. Start Recording
After enabling the Xbox Game Bar, open the tutorial or gameplay you want to record. Then, press Windows + Alt + R to start recording.
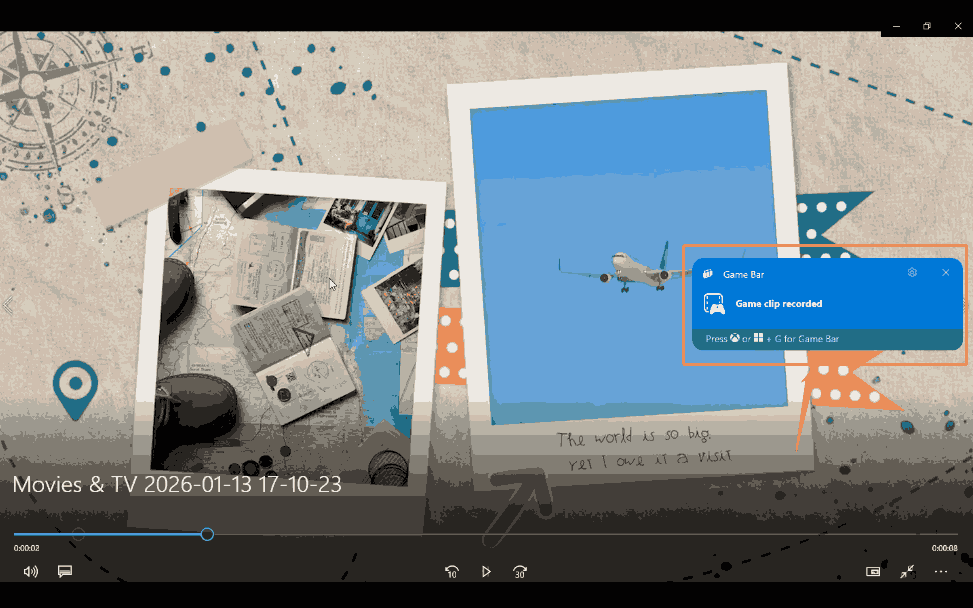
Step 3. Stop the Recording Process
When you want to end this recording, press Windows + Alt + R again to stop it. Then, a Game clip recorded shear board will appear on your screen. Click on it to trigger the Gallery window.
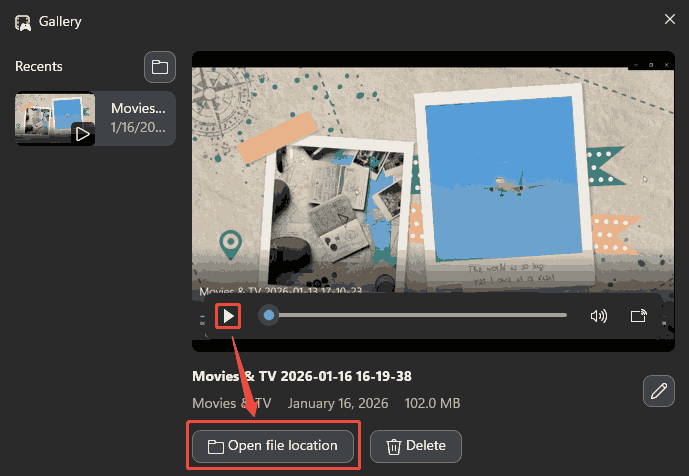
Step 4. Check and Locate the Recorded Video
In the Gallery window, click on the Play button to check the recorded video. Then, click on the Open file location icon to find this recorded video on your hard drive.
As the Windows native recording tool, Xbox Game Bar saves you time opening online screen recorders and downloading desktop screen recorders. However, it only supports a limited selection of frame rates, including 30 fps and 60 fps.
How to Record Videos on Windows 10 with MiniTool Screen Recorder
MiniTool Screen Recorder is a free screen recorder with no ads or watermarks. It's designed specifically for Windows users and offers full-screen and selected region recording models. Additionally, MiniTool Screen Recorder allows you to record the webcam during the recording process, making a PiP (Picture-in-Picture) effect.
MiniTool Screen Recorder supports 4K resolution recording. It also offers flexible resolution and adjustable recording quality, including standard, high, and original options. MiniTool Screen Recorder provides multiple frame rates for you to choose from, including 15 fps, 20 fps, 25 fps, 30 fps, and 50 fps.
MiniTool Screen Recorder also provides real-time annotation, like arrows, brushes, highlighters, text, shapes, and whiteboards in the recording to enhance the clarity and depth of explanations and tutorials. MiniTool Screen Recorder has no recording time limits and allows preset recording durations. Therefore, you don't have to stay in front of the screen all the time.
Let’s take a look at how to record videos on Windows 10 using MiniTool Screen Recorder.
Step 1. Get MiniTool Screen Recorder
Download MiniTool Screen Recorder by simply clicking the download button below. Then, follow the on-screen instructions to install it.
MiniTool Screen RecorderClick to Download100%Clean & Safe
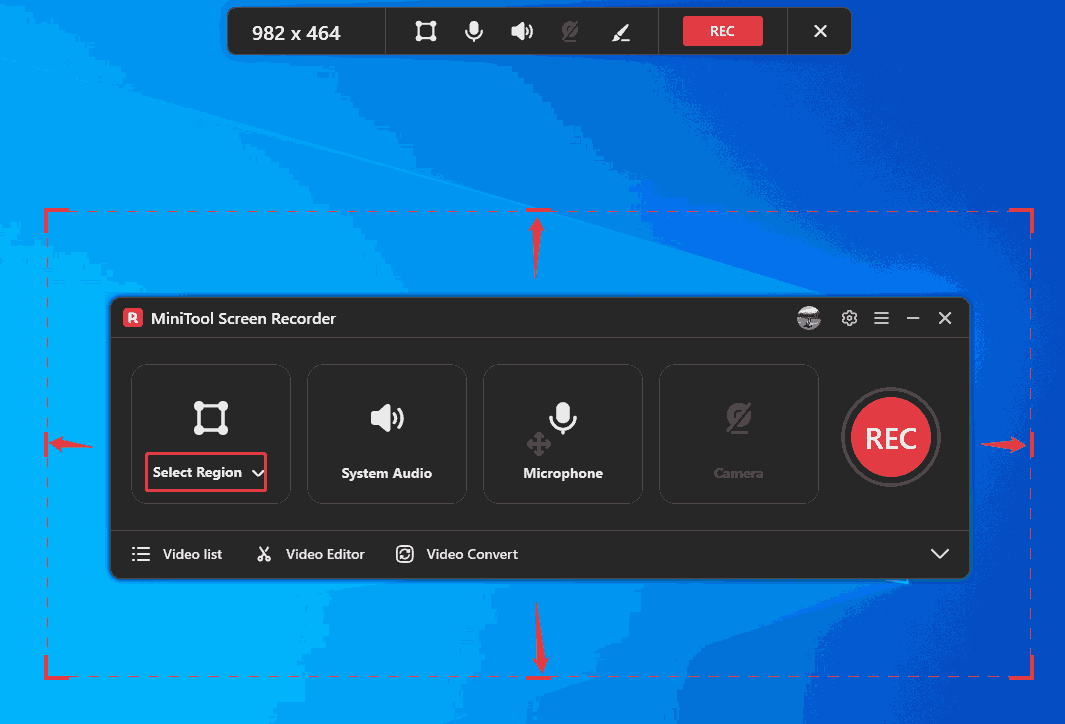
Step 2. Choose the Recording Area
Launch MiniTool Screen Recorder. In the first section of the main interface, select your desired recording type. There, I chose the Selected Region option. Then, drag the red border to frame the area you want to record.
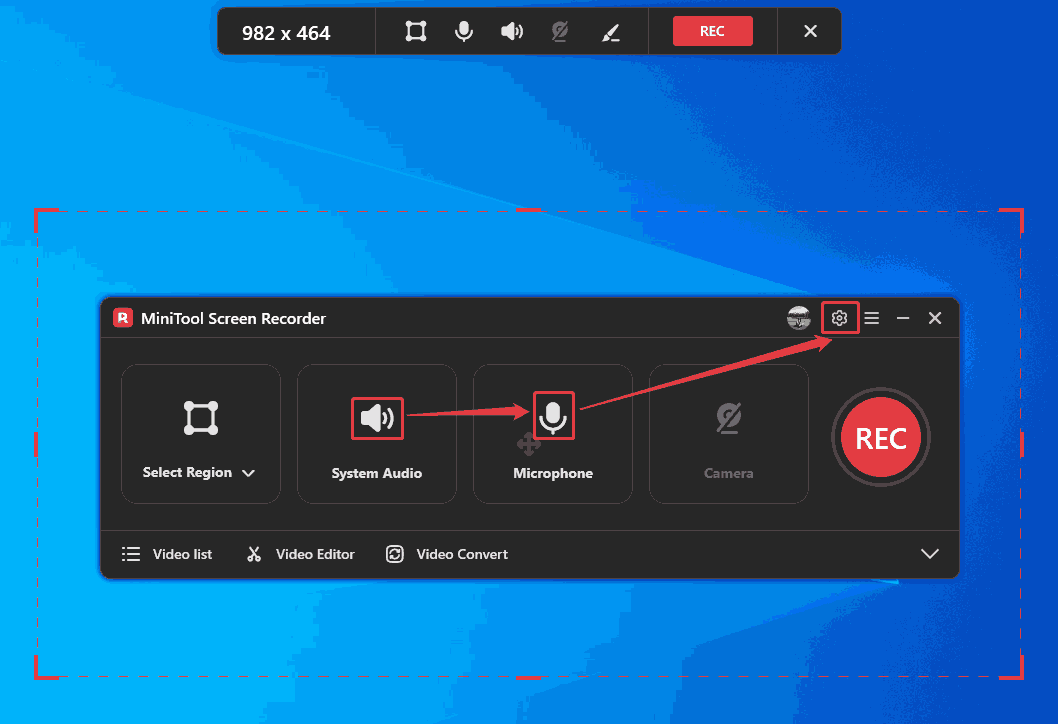
Step 3. Set Whether to Record Audio
Click on the System Audio icon and the Microphone icon to confirm whether to record computer audio and voiceover. Then, click the Settings icon in the upper right to enter the Setting pop-up window.
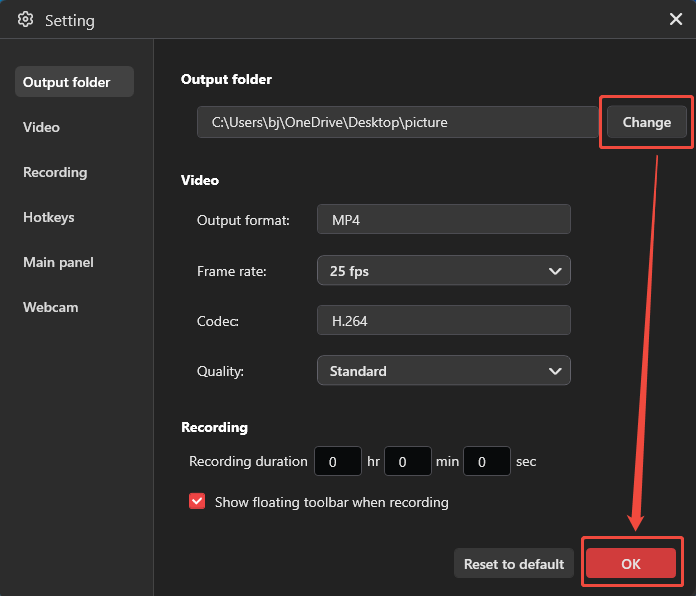
Step 4. Configure a Storage Destination
In the Setting window, click on the Change button to specify a storage location. Plus, there are various settings for the recorded videos, such as frame rate, video quality, hotkeys, recording duration, and more. You can adjust them according to your needs. Then, click on the OK button to save the changes.
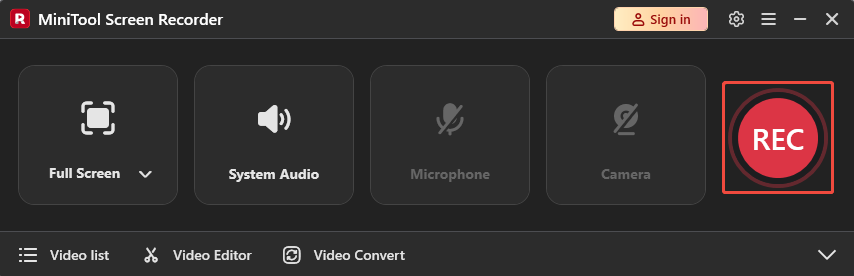
Step 5. Start the Recording Process
After completing the setup, you will return to the main interface. Here, click the REC button and start recording the video after a 3-second countdown. Then, show the material you intend to record. During the recording process, you can press the F9 key to pause or resume this recording. Or press the F6 key to end the recording.
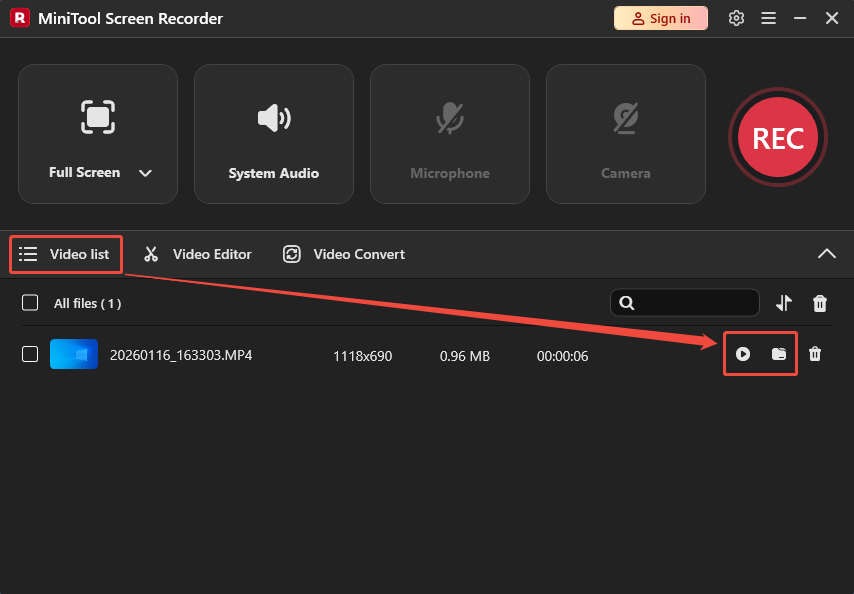
Step 6. Check the Recorded Video
Once recording is completed, the recorded video will appear in the Video list tab. There, click on the Play icon to play and check the recorded video. Alternatively, click on the Folder icon to locate it on your PC.
How to Record Videos on Windows 10 with Free Online Screen Recorder
Free Online Screen Recorder is a user-friendly screen recording tool for Windows 10 that requires no registration or installation. It runs smoothly on Google Chrome, Firefox, Edge, and Safari browsers. Free Online Screen Recorder allows you to record specific windows, full screen, or browser windows.
Free Online Screen Recorder empowers you to record webcam and adjust its size and position. It also allows you to add a voiceover. Free Online Screen Recorder has no strict recording duration limit, but it is subject to device storage limitations.
Next, let's try recording a video on Windows 10 using Free Online Screen Recorder.
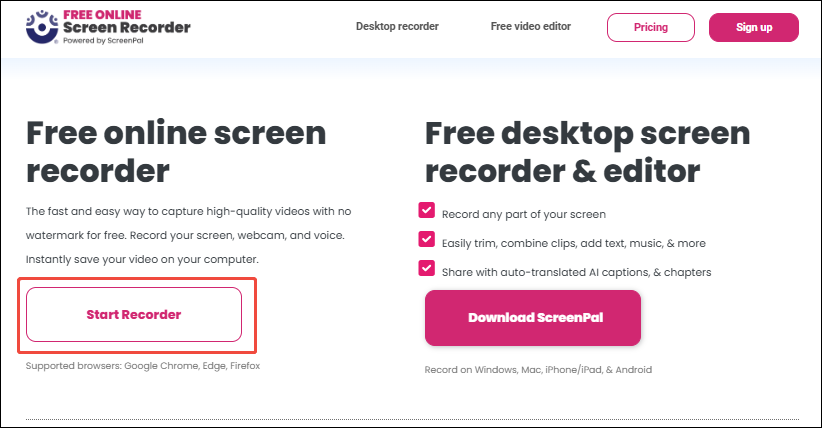
Step 1. Navigate Free Online Screen Recorder’s Webpage
Go to https://screen-recorder.com/ to open Free Online Screen Recorder’s webpage.
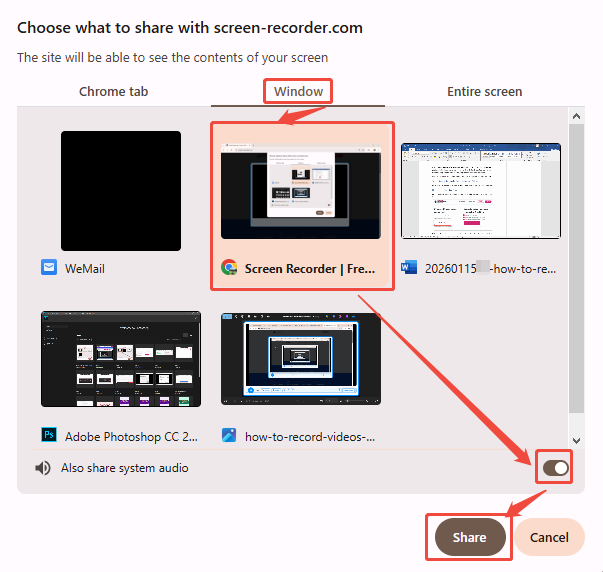
Step 2. Select Recording Type
Click on the Start Recorder option to trigger the window for selecting the recording type.
In this window, switch to the Window tab. Here, choose a window you need and enable the Also share system audio button. Then, click on the Share button to go to the recording interface.
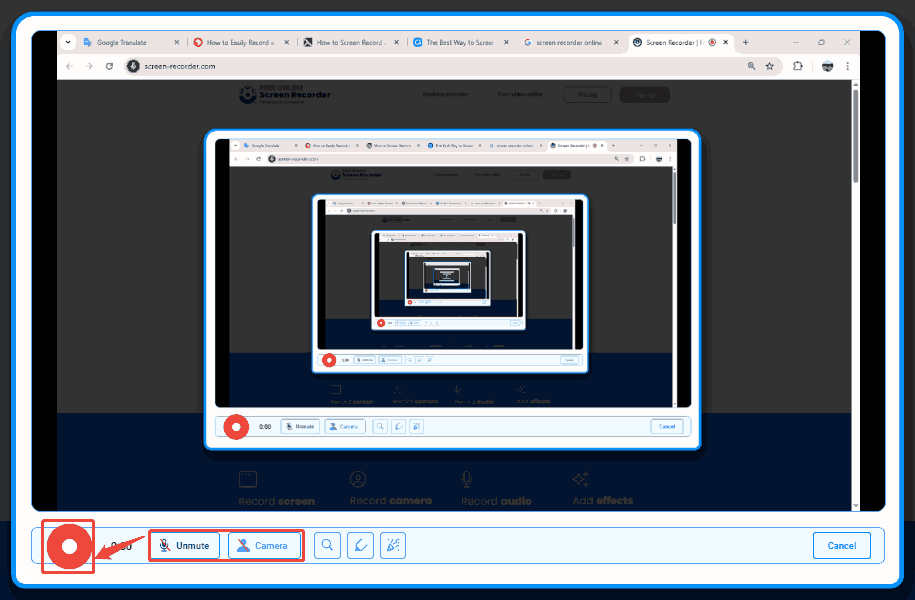
Step 3. Start Recording
On the recording page, click on the Microphone option and the Camera option to decide whether to add voiceover and picture-in-picture during recording. Then, click on the Record button to start recording and present the content you want to record.
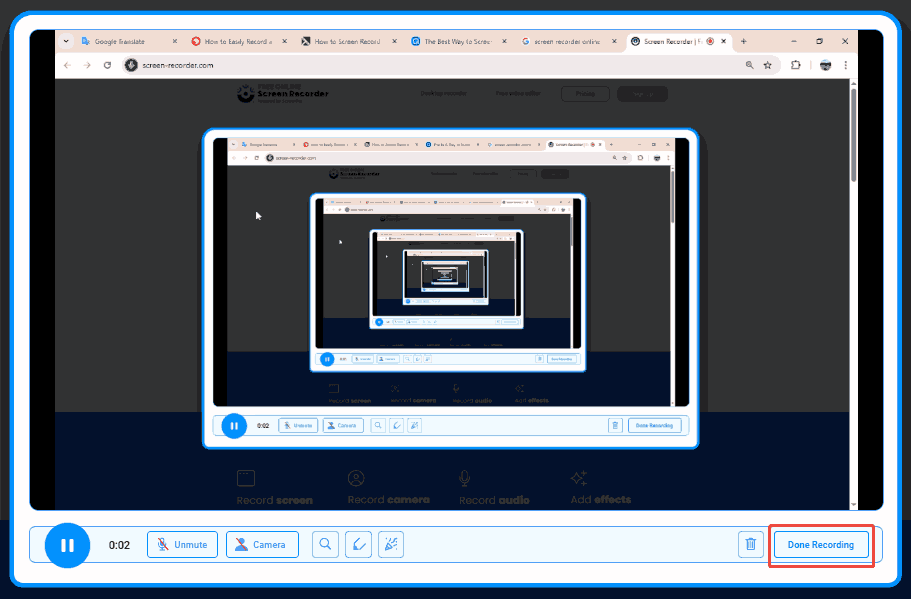
Step 4. End the Recording Process
Click on the Done Recording option to end this recording process.
Step 5. Check and Save the Recorded Video
When you end this recording, this online recorder will take you to the download page. Here, click on the Play icon to check the recorded video. Also, click on the Download button to save it on your computer.
Free Online Screen Recorder requires no installation and is perfect for quick recording tasks.
Common Recording Issues on Windows 10
In most cases, you can record videos on Windows 10 successfully. However, there are still a series of common problems.
#1 No Sound
One of the problems is that recorded videos don’t have sound, which may be caused by the wrong audio source selection or the disabled audio recording by default. So, checking the audio settings before recording is essential.
#2 Lag and Latency
Another notable problem is lag. Screen recording stuttering may be related to insufficient hardware configuration. Additionally, a high computer resolution and high frame rate can also cause latency and stuttering.
You can solve lag and latency by lowering the recording frame rate or bitrate, closing background programs, or fine-tuning the recording settings.
#3 Black Screen
A black screen during recording might be caused by the screen recording tool you’re using, such as Xbox Game Bar or Free Online Screen Recorder. In this case, you can try restarting your computer or the application. Or you can adjust the recording tool’s settings.
Bonus: How to Compress Large Videos After Recording
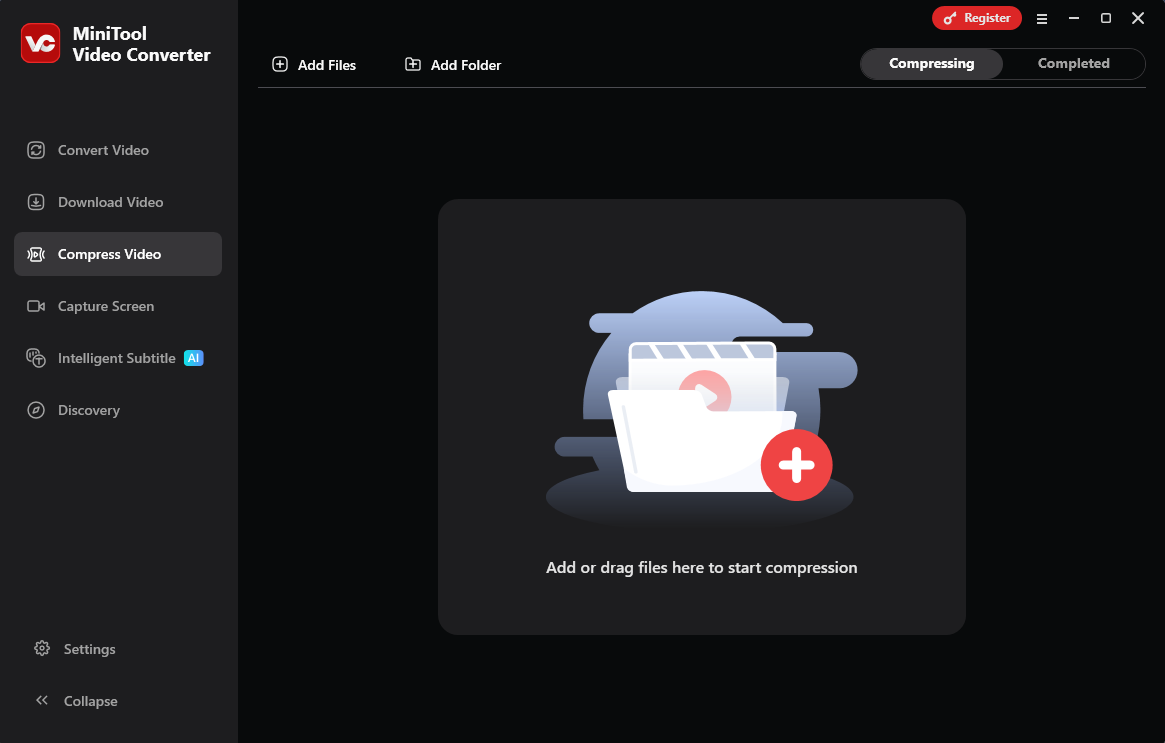
If you record a large video, it may consume your PC's storage space. Compressing the video is an ideal method. I would like to recommend MiniTool Video Converter to you. It is a practical compressor for shrinking videos without size limitations.
MiniTool Video Converter helps you reduce file size by up to 90% of the original one. It also supports batch compression within 5 tasks. Moreover, MiniTool Video Converter supports customizing advanced parameters, including video resolution, frame rate, encoder, and bitrate, for the compressed videos
MiniTool Video ConverterClick to Download100%Clean & Safe
Wrap Things Up
This article introduces the applicable scenarios for screen recording and explains how to record videos on Windows 10 using 3 effective tools: Xbox Game Bar, MiniTool Screen Recorder, and Free Online Screen Recorder.
Xbox Game Bar is suitable for completing tasks without downloading applications or launching browsers. MiniTool Screen Recorder is well-suited for more advanced settings for the recorded videos. The Free Online Screen Recorder is better for recording content from browsers.
If you would like to learn more about MiniTool Screen Recorder or MiniTool Video Converter, please feel free to contact us at support@minitool.com. Alternatively, you can message me on X. I will reply as soon as possible.