This article introduces the Xbox Game Bar to you and explains why the Xbox Game Bar recording greyed out happens. Meanwhile, it offers you 9 workable methods to fix that issue, including checking whether it can run in the background, using an Xbox Game Bar alternative for screen recording, and more.
As time goes on, more and more Windows users use the Xbox Game Bar to capture computer activities due to its pre-installed, easy-to-use nature. However, some users recently complained that the problem of the Xbox Game Bar recording greyed out has given them a headache. To help you solve that problem, the following content is written here.
What Is Xbox Game Bar
Available on Windows, the Xbox Game Bar refers to a built-in, rich-featured overlay. It enables you to capture the gameplay videos and take screenshots with simple clicks. In addition, the Xbox Game Bar allows you to check GPU, CPU, FPS, and RAM usage in real time. Furthermore, it empowers you to chat with your friends.
Why Is the Xbox Game Bar Recording Greyed out
Here are a variety of reasons for the Xbox Game Bar recording button greyed out.
Reason 1. The Lack of Permissions
On Windows, capturing audio/videos is a computer activity related to sensitive privacy. As such, if you want to use the Xbox Game Bar to record the screen, ensure that you have turned on the relevant permissions. If not, the recording feature of the Xbox Game Bar can be unavailable, which finally leads to the Xbox Game Bar start recording greyed out.
For instance, on condition that you toggle off the microphone access of the Xbox Game Bar, you cannot configure the audio settings. Eventually, its whole recording feature will become unusable.
Reason 2. Limited Storage Space
Limited storage space is also a cause for the Xbox Game Bar screen recording greyed out. Specifically, storing the recorded videos from this tool requires sufficient storage space on your storage drive. Hence, if the space is limited, your recordings cannot be saved, which finally triggers the problem of the Xbox Game Bar recording button greyed out.
Reason 3. Outdated Graphics Drivers
During the recording process, the Xbox Game Bar will use the graphics card (GPU) for encoding the recorded videos. However, some outdated graphic drivers may not support the necessary video codecs, which can finally frustrate the recording.
In addition, some outdated drivers make the Xbox Game Bar not able to send instructions to the GPU. This way, the recording can’t be started, which generates the issue of the Xbox Game Bar recording button greyed out.
Reason 4. Unsupported Recording Interfaces
Admittedly, the Xbox Game Bar is a popular gameplay recorder. However, it only enables you to capture the application that Windows identifies as a game. Provided that you want to record an unsupported interface like Desktop or File Explorer, you can still encounter the problem of Xbox Game Bar recording greyed out Windows 11.
Reason 5. Misconfigured Audio Devices
Active input/output devices have much to offer in sustaining the audio recording within the Xbox Game Bar. However, if you haven’t configured audio devices, the recording button may be greyed out.
Reason 6. Disabled GameDVR
DVR (Digital Video Recording) is an integral part of the Xbox Game Bar recording. Specifically, it is used to record gameplay videos. If you have disabled GameDVR, you will finally find the recording function unavailable.
Reason 7. Corrupted/Buggy Xbox Game Bar
If the Xbox Game Bar itself is corrupted or buggy, the recording function will also be broken, which ultimately leads to the problem of the Xbox Game Bar screen recording greyed out. To solve that problem, you need to repair, reset, or even reinstall the Xbox Game Bar.
Before trying the other methods below, restart the PC to check whether the recording function of the Xbox Game Bar is available.
Method 1. Check the Background Running Permission
To ensure that the Xbox Game Bar is allowed to run in the background, you can follow these steps below to check the background running permission.
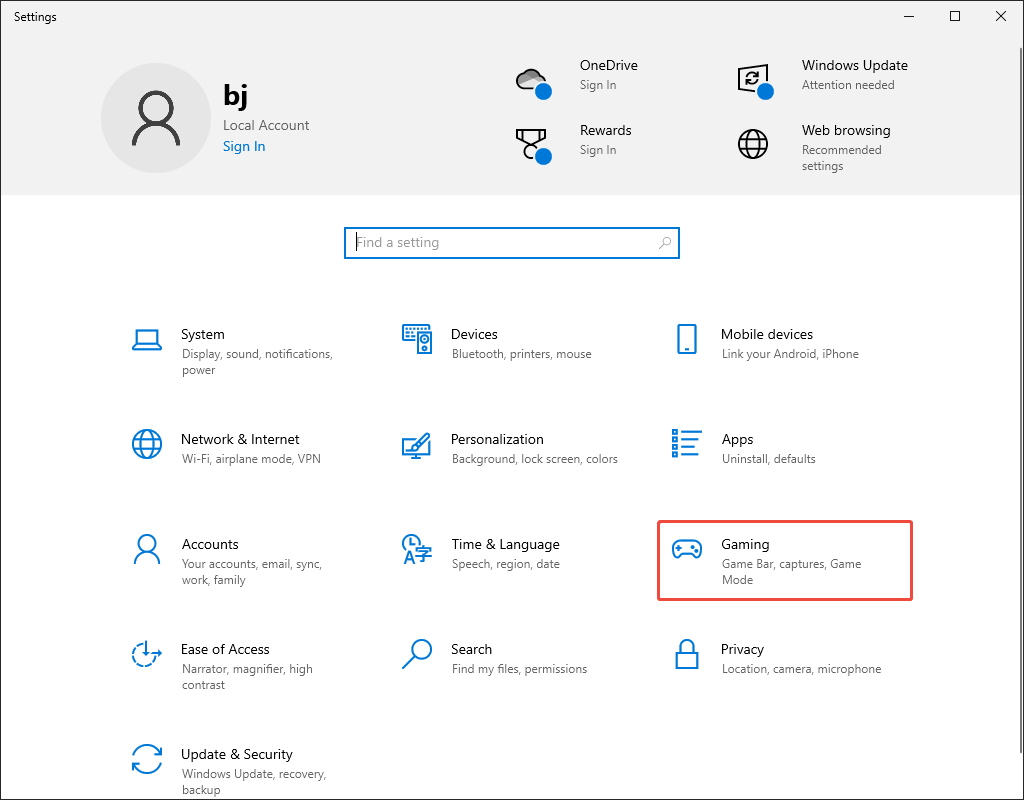
Step 1. Go to the Gaming section of the Settings window.
Press the Windows + I keys to enter the Settings window. There, choose the Gaming option.
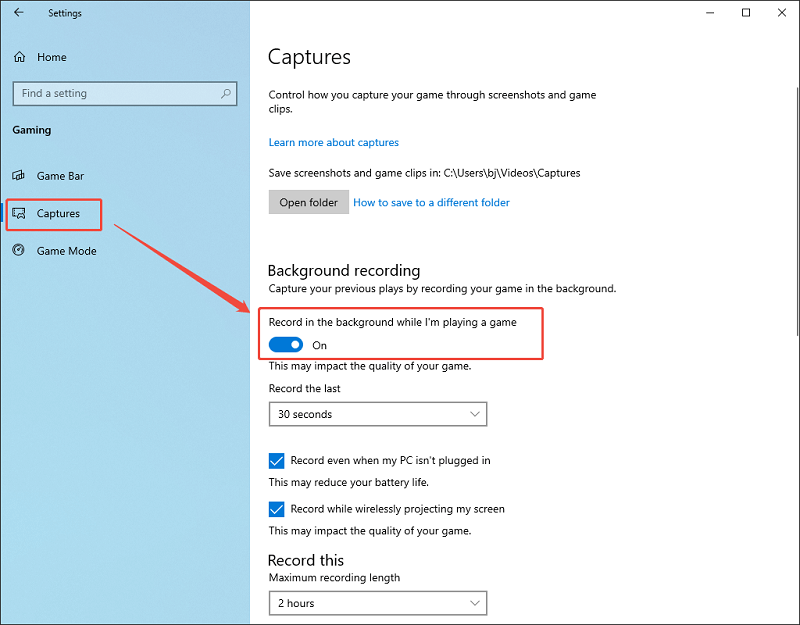
Step 2. Go to the Capture section and check the background running permission.
Navigate to the Capture section. There, turn on the Record in the background while I'm playing a game option.
Next, check whether the method is effective by using the Xbox Game Bar to capture the screen.
Method 2. Check If the Interface Can be Recorded
Follow the guidance below to check if the interface can be recorded by the Xbox Game Bar.
Step 1. Activate the Xbox Game Bar.
Press the Windows + G keys to activate the Xbox Game Bar.
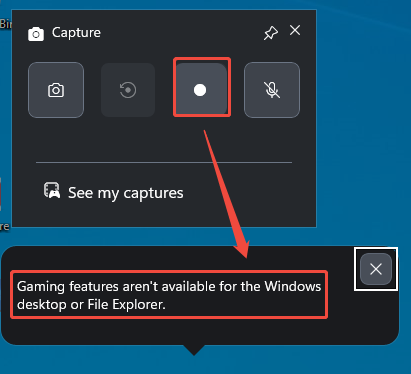
Step 2. Check the recording function.
Go to the Capture section. There, click on the Record button to see whether the recording process starts. If you see the pop-up notification that Game features aren’t available for the Windows Desktop or File Explorer, it means that you can’t capture the interface with the Xbox Game Bar.
If you have encountered the situation above, try the other methods below to fix the Xbox Game Bar start recording greyed out.
Method 3. Check the Storage Space
If the problem that the Xbox Game Bar start recording greyed out happens due to a limited storage space, you need to free up the storage space.
Option 1. Extend the Partition
If the partition on which your screen recordings are stored has limited space, you can try to extend the partition. In essence, the partition extension allows for adding adjacent unallocated space. This way, more space can be used for storing the Xbox Game Bar recordings.
Option 2. Use Space Analyzer
Using a space analyzer also enables you to get more storage space. A space analyzer aims to walk you through the storage usage by scanning the hard drive. Meanwhile, it will recognize the large files, helping you quickly find out the unnecessary files that can be deleted. With the instructions from a space analyzer, you can free up the storage space more efficiently.
Method 4. Check the App Permission for Xbox Game Bar
If there is no permission for the Xbox Game Bar, you will see the Xbox Game Bar screen recording greyed out. As such, follow the guidance below.
Step 1. Enter the Settings window.
Press the Windows + I keys to enter the Settings window.
Step 2. Turn on the permissions.
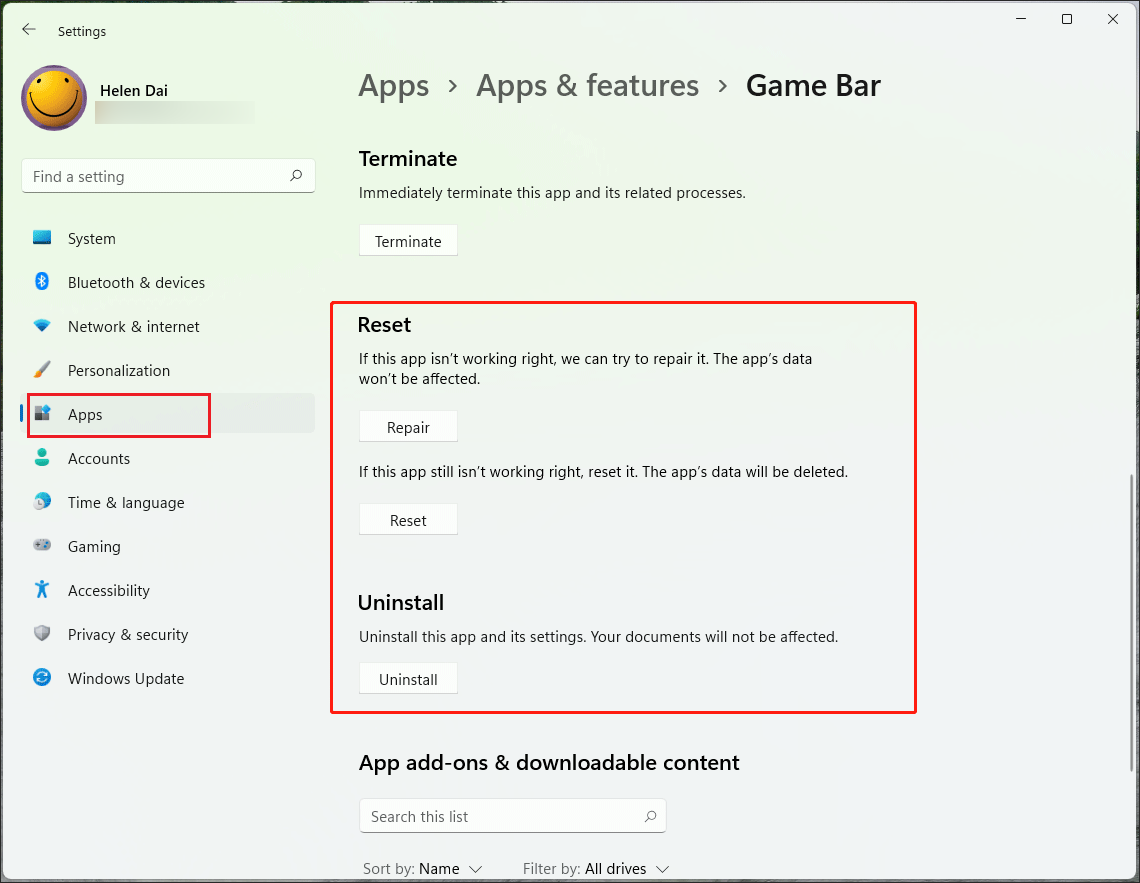
After choosing the Apps option, click on Apps & features and choose Game Bar to enter the next page. Scroll down to the App permissions section. There, turn on the permission for the microphone and camera.
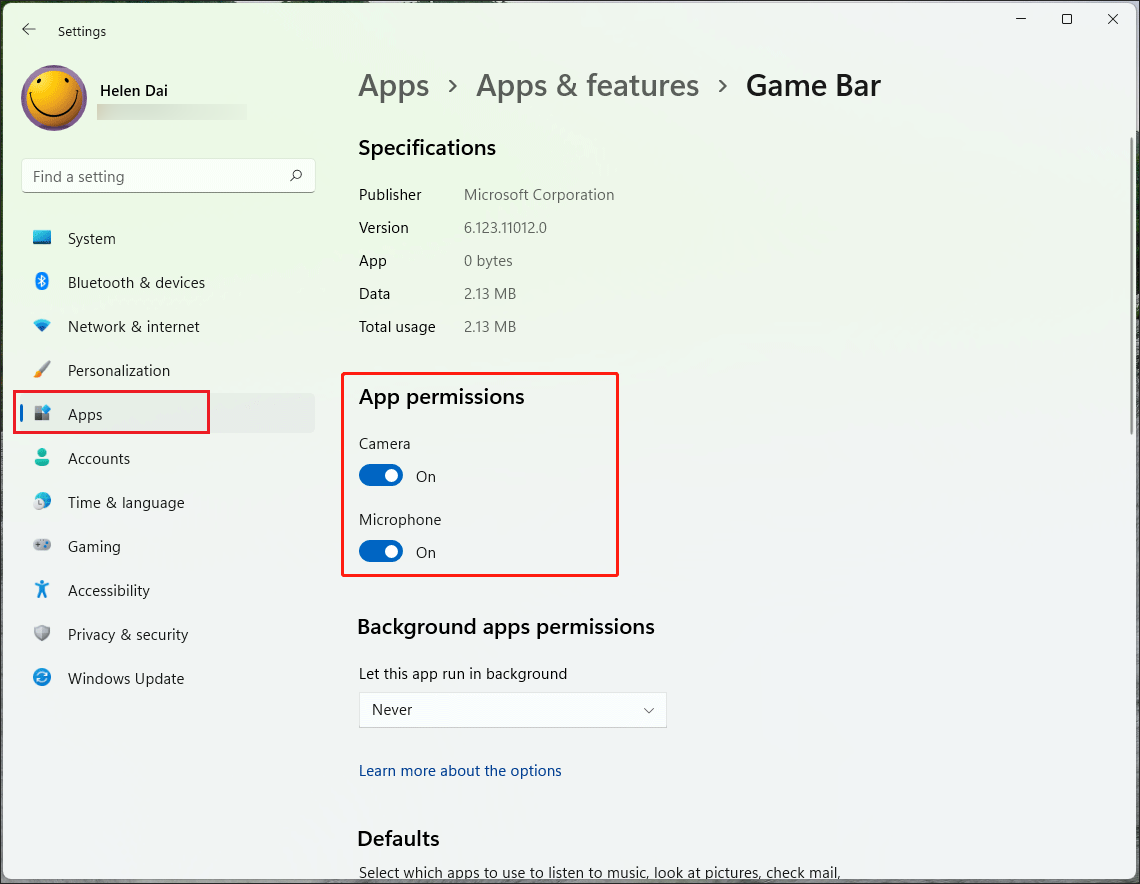
After toggling on the permissions, check whether the recording feature is usable.
Method 5. Configure the Settings of Audio Devices
Follow the guidance below to configure the audio settings and ensure a smooth recording process.
Step 1. Open the Xbox Game Bar.
Run the Xbox Game Bar by pressing the Windows + G keys.
Step 2. Go to the Settings panel of Xbox Game Bar.
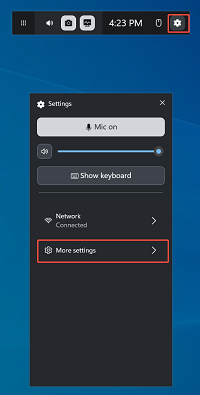
Click on the top Settings icon to enter the Settings panel. There, click on the More settings option.
Step 3. Configure the audio recording settings.
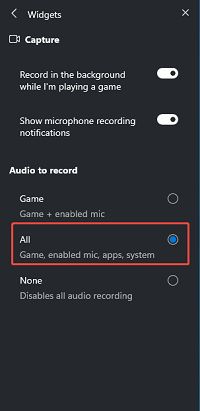
Choose the Widget option to enter the next panel.

Scroll down to the Audio to record section. There, check the All option.
With the above-detailed steps, you are more likely to fix the Xbox Game Bar recording greyed out.
Method 6. Update Graphics Driver
If an outdated graphics driver causes the Xbox Game Bar recording not to work, follow the tutorial below to update the graphics driver.
Step 1. Enter the Device Manager window.
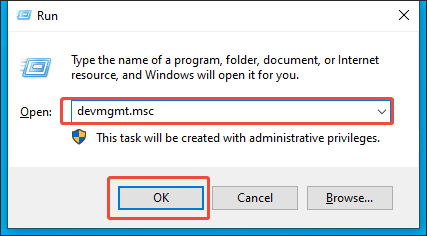
Activate the Run window by pressing the Windows + R keys. Then, after typing devmgmt.msc, press the Enter key or click on the OK button to access the Device Manager interface.
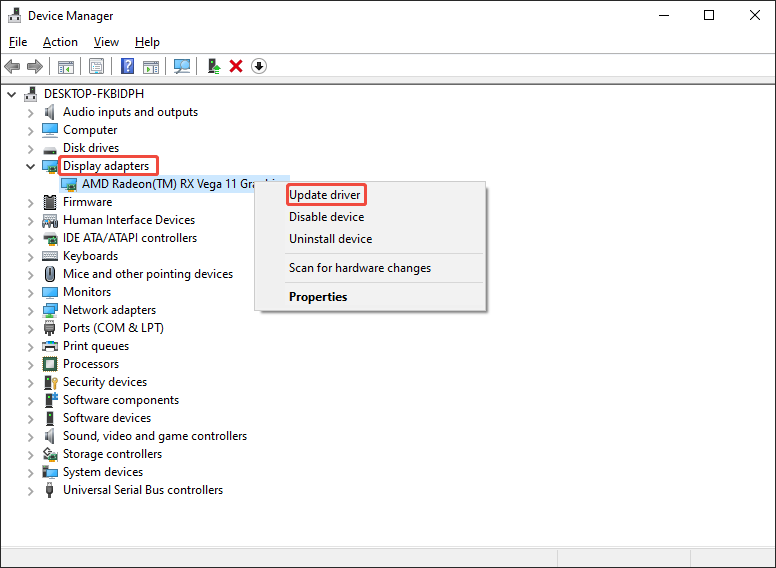
Step 2. Access the driver update page.
After expanding the Display adapters option, right-click on the graphics card. In the pop-up option menu, select Update driver.
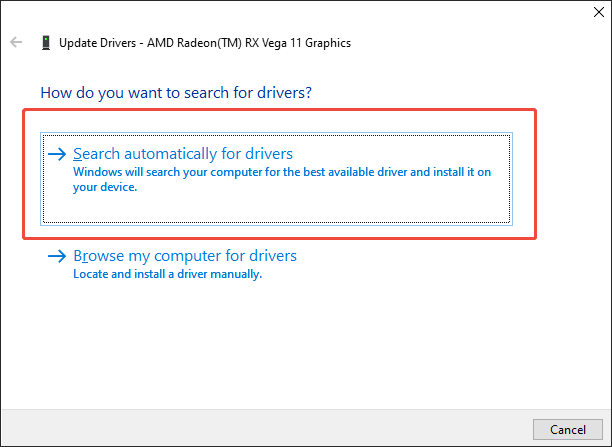
Step 3. Begin the update process.
Start the update process by clicking on Search automatically for drivers. Then, follow the on-screen prompts to finish the update.
If these steps are not effective, please try other methods below.
Method 7. Enable GameDVR
Below are the detailed steps to enable the GameDVR function.
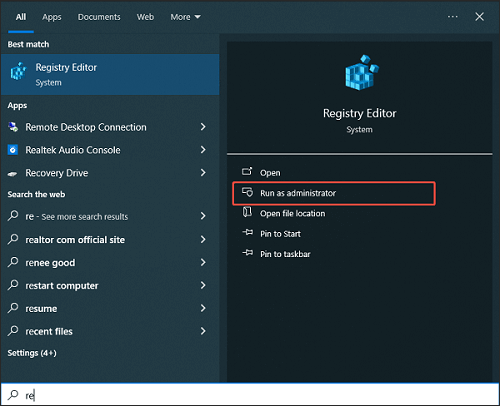
Step 1. Open the Registry Editor app.
Type Registry Editor into the search bar on your PC. Then, locate this program and click on Run as an administrator.
Step 2. Go to the GameDVR section.
Follow the path: Computer\HKEY_CURRENT_USER\Software\Microsoft\Windows\CurrentVersion\GameDVR to access the GameDVR section.
Step 3. Enable GameDVR.
Double-click on the AppCaptureEnabled file to access the pop-up. There, change the value data to 1 and click on the OK button to save the change.
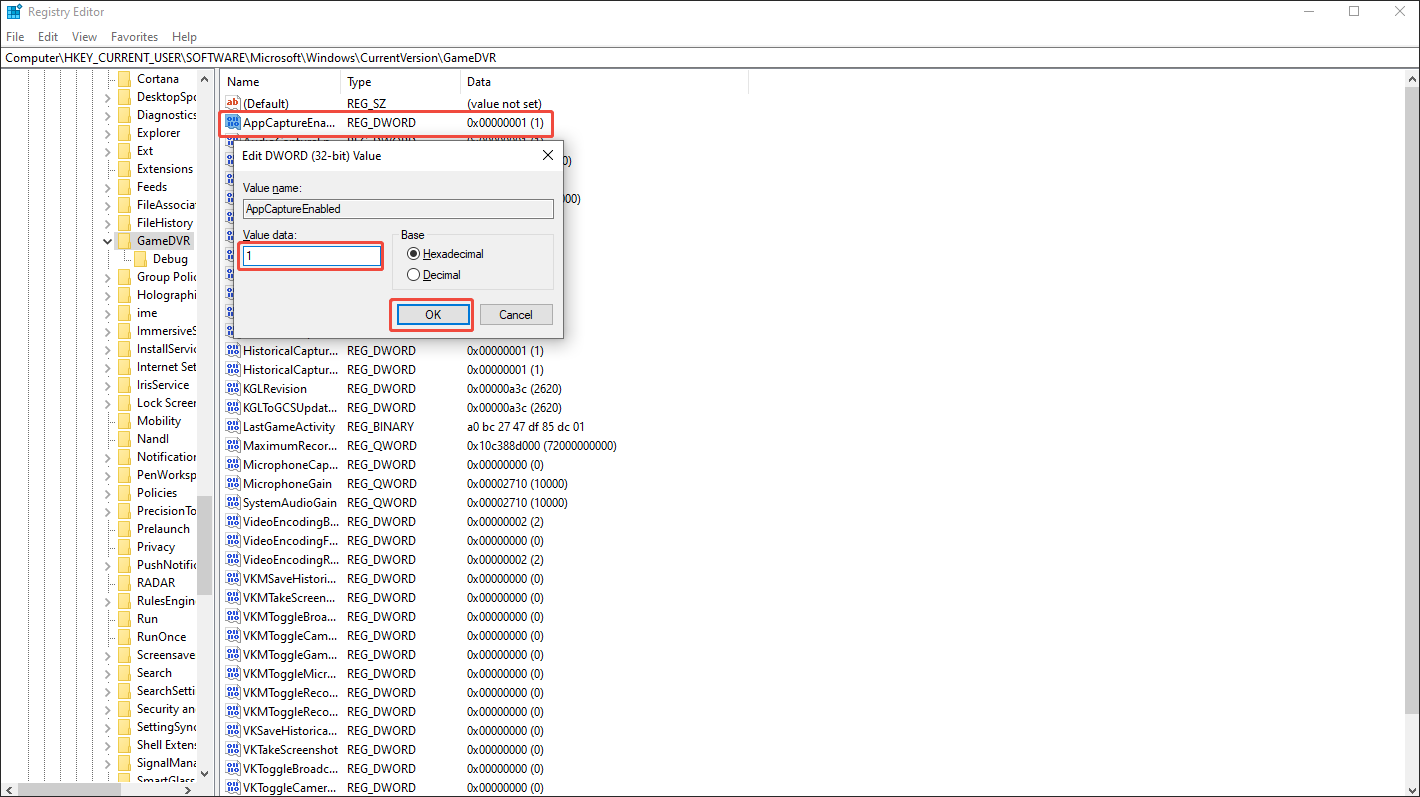
If there isn’t a file named AppCaptureEnabled, right-click on the blank area. Next, create a new file by choosing DWORD (32-bit) Value under the New section.
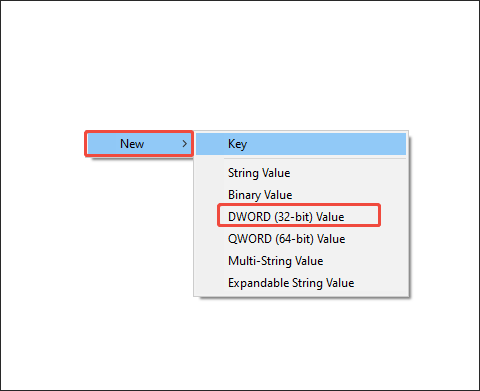
Then, after double-clicking on the created file, specify the value name as AppCapturedEnabled and set the value data as 1. Finally, confirm the customization by clicking on the OK button.
With the GameDVR function enabled, it is possible for you to handle the Xbox Game Bar recording greyed out.
Method 8. Reset/Repair/Reinstall Xbox Game Bar
If the methods above are all ineffective, follow the instructions below to reset, repair, or reinstall the Xbox Game Bar in the Windows Settings.
Step 1. Enter the Settings window.
Press the Windows + I keys to enter the Settings window.
Step 2. Begin the reset/repair/reinstall process.
After choosing the Apps option, click on Apps & features and choose Game Bar to enter the next page. Scroll down to the Reset and Uninstall section. There, click on the Repair, Reset, or Uninstall button based on your needs to begin the process.
When the process ends, check whether the recording function of the Xbox Game Bar is available.
Method 9. Use an Xbox Game Bar Alternative
If the methods above are all ineffective, you can try an Xbox Game Bar alternative to accomplish the recording tasks. Considering that some of you may not know how to select a robust screen recorder, I highly recommend MiniTool Screen Recorder here.
What Is MiniTool Screen Recorder
MiniTool Screen Recorder is a one-stop video recording tool for webcam recording, screen recording, and screen annotation. Meanwhile, it enables you to capture the system and microphone sounds simultaneously or separately. Plus, MiniTool Screen Recorder, which is completely free, offers you a watermark-free recording experience without time limits.
All the recordings by MiniTool Screen Recorder are saved in the MP4 format, which facilitates your video sharing or editing on various platforms. Besides, MiniTool Screen Recorder, which features an intuitive interface, is easy to use for entry-level users.
How to Record the Screen with MiniTool Screen Recorder
Below is a step-by-step guide on how to capture the screen using MiniTool Screen Recorder.
Step 1. Download and install MiniTool Screen Recorder.
MiniTool Screen RecorderClick to Download100%Clean & Safe
Download MiniTool Screen Recorder by clicking on the download button above. Then, follow the on-screen prompts to install this Xbox Game Bar alternative on your PC.
Step 2. Manage the audio recording and choose the recording area.
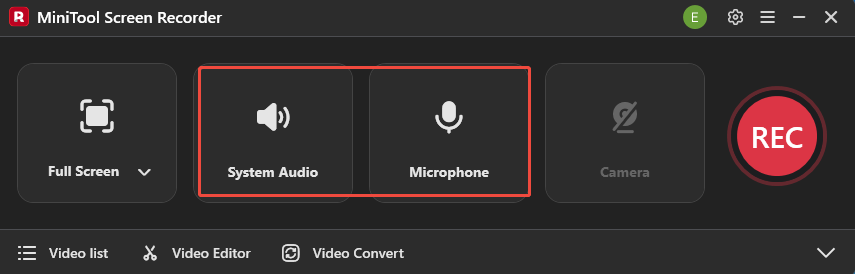
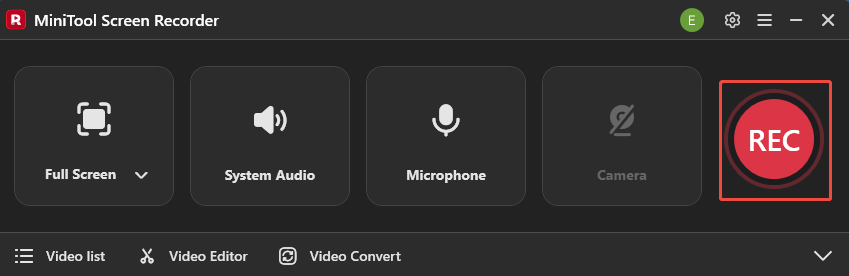
After launching MiniTool Screen Recorder, click on the System Audio icon and the Microphone icon to turn on/off the system and microphone sounds. By default, MiniTool Screen Recorder will capture the whole screen. If you want to customize the recording area, press the Alt + R keys.
Step 3. Enable the webcam recording and configure other recording settings.
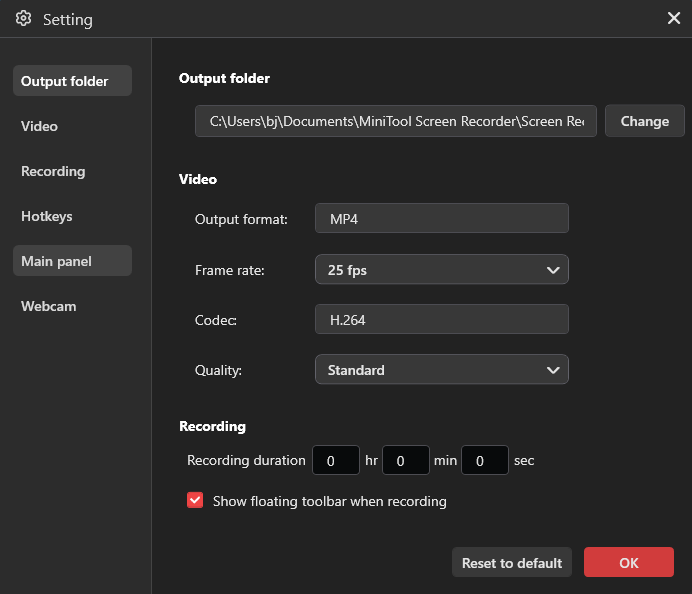
Click on the Camera icon to activate the webcam recording function. To specify other recording settings, click on the upper-right Settings icon to access the Settings window.

In the pop-up window, you can choose a saving path for the recording file. Meanwhile, different recording frame rates, such as 15fps, 20fps, 25fps, 30fps, and 50fps, can be chosen. In addition, you are free to set the recording quality to High, Original, or Standard. Finally, click on the OK button to confirm the changes.
Step 4. Begin/end recording and check the recorded video.
Start the recording process by clicking on the REC button. After a 3-second countdown, begin the computer activity that you want to record. When the recording process ends, stop it by pressing the F6 key.
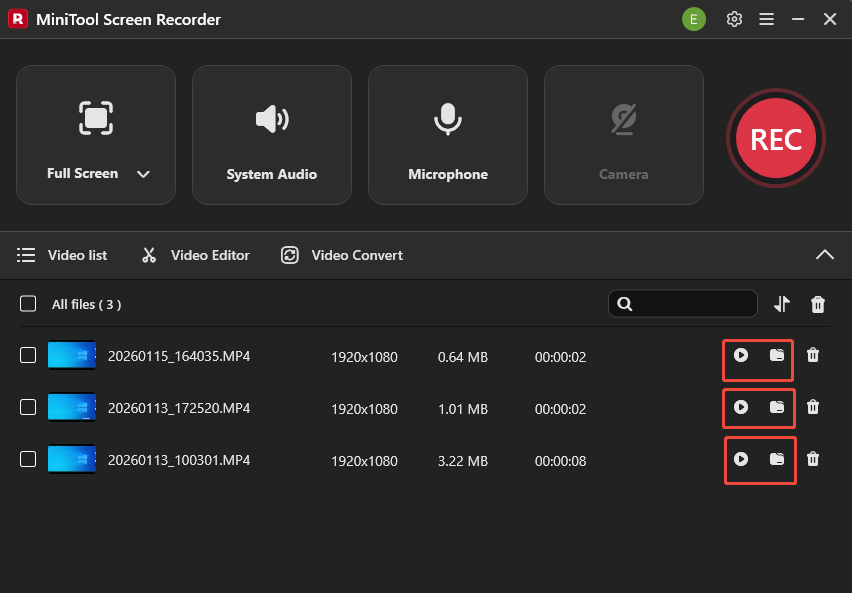
To view the recorded video, click on the Play icon. If you want to locate it, click on the Folder icon.
As you can see, MiniTool Screen Recorder is an easy-to-use Xbox Game Bar alternative.
Bonus: How to Edit the Xbox Game Bar Recording
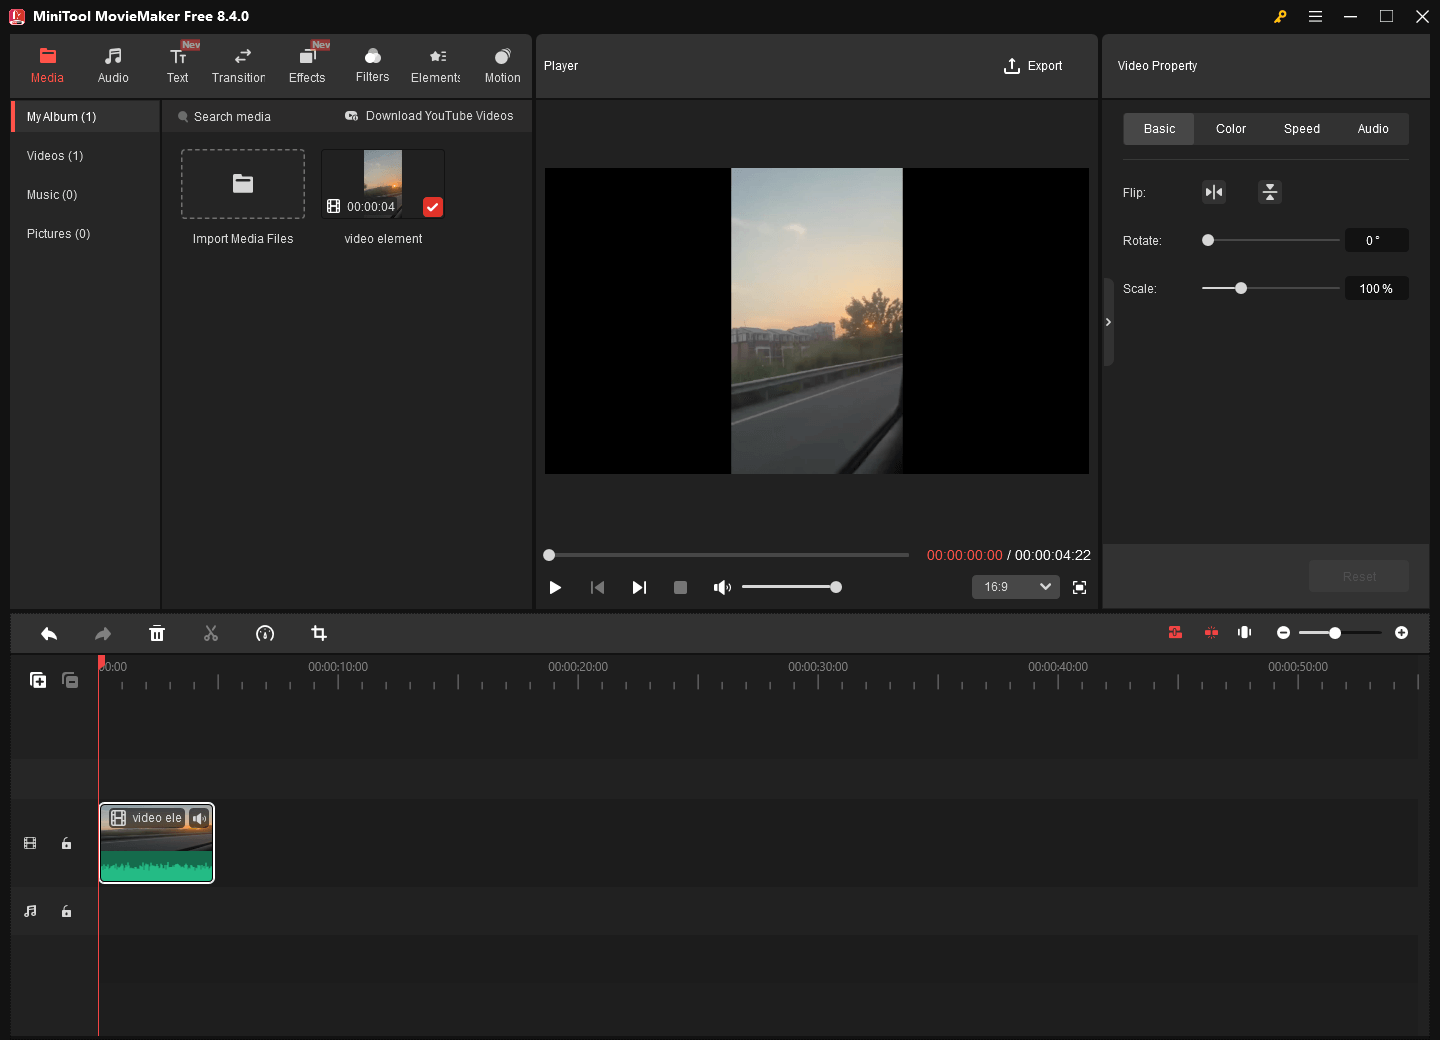
Do you want to edit the screen recording? If yes, MiniTool MovieMaker can be an ideal option for you. It provides you with a wide range of editing functions, allowing you to crop, reverse, flip, rotate, or speed up the recording.
MovieMaker also enables you to add various elements to your screen recording, such as motions, transitions, effects, filters, and more. Moreover, it can save your screen recordings in multiple formats, including MP4, MKV, MOV, WMV, WEBM, MP3, GIF, and so on.
MiniTool MovieMakerClick to Download100%Clean & Safe
Closing Words
Various factors may lead to Xbox Game Bar recording greyed out, including a lack of app permission, limited storage space, disabled GameDVR, and so on. This article has summarized 9 feasible methods to solve that problem. If the Xbox Game Bar recording is still unavailable, try MiniTool Screen Recorder, which is a top-grade Xbox Game Bar alternative.
If you encounter any issues while using MiniTool Screen Recorder or MiniTool MovieMaker, please contact us by sending an email to support@minitool.com for assistance. Also, you can directly share your problems with me on X. I will help you as quickly as possible.