Steam is a globally renowned digital game distribution platform with millions of players. How to record on Steam? This article provides three efficient recording methods, including using Steam's built-in recording tool, MiniTool Screen Recorder, and Icecream Screen Recorder. Additionally, you'll learn how to optimize your recorded content.
Steam is one of the world's most popular video game distribution platforms, where players log in daily to play games, share gaming experiences, or chat with friends. When players want to capture memorable moments spent with friends or share exciting gameplay clips, screen recording becomes an essential tool. This guide will detail how to screen record on Steam without lag easily.
It is incredibly simple to record on Steam. You can use Steam's built-in recording tool or opt for more powerful third-party screen recorders. Below is our detailed guide for both recording methods.
Method 1: Use the Steam Built-in Recorder
Steam provides users with a convenient screen recording feature available free of charge to all users. It supports two recording modes: Record in Background and Record Manually.
When users record in the background, the system automatically captures gameplay after the game launches, with recording duration not exceeding the user's preset limit. In Record Manually mode, users can independently choose the recording start time according to their needs. Below are the operation methods for both recording modes:
#1 Record in Background
Here is a step-by-step guide for recording in the background.
Step 1: Enable the Record in Background Mode
1. Open the Steam client on your computer and click on the Steam option in the upper-left corner.
2. Then, select the Settings option in the drop-down menu.
3. In the new interface, move to the Game Recording section and select the Record in Background recording mode.
Step 2: Choose the Game to Play
Then, you can select the game you want to play.
Step 3: Start and End Recording
1. You just need to launch the game, and the recording will start automatically.
2. To end the recording process, simply end the game.
#2 Record Manually
The recording instructions for manual recording are as follows:
Step 1: Enable the Record Manually Mode
In the Game Recording section, click on the Record Manually next to the Record in Background option.
Step 2: Launch a Game
Select a game you want to play and launch it.
Step 3: Start and End Recording
1. To start the recording process, simply press the Ctrl + F11 key on your keyboard.
2. When you want to end the recording process, press the Ctrl + F11 key again.
As mentioned above, Steam's built-in recording feature is limited to capturing gameplay footage, with a maximum recording duration of two hours. Therefore, if you need to record additional content such as real-time chat or live streams, using third-party screen recorders is the optimal solution.
Method 2: Use Third-Party Recorders
We've carefully selected two professional third-party screen recorders for you. Not only do they enable zero-latency game capture, but they also allow users to record a wider variety of content.
#1 MiniTool Screen Recorder
For recording videos without time restrictions, MiniTool Screen Recorder, a screen recorder for Steam, is a great choice. It supports preset recording durations with no time restrictions. Beyond capturing gameplay, MiniTool Screen Recorder smoothly records online meetings, video calls, webinars, live streams, and more. Users can also enable webcam recording as needed.
Additionally, MiniTool Screen Recorder supports simultaneous or separate recording of the microphone and system audio. Its annotation tools are particularly outstanding, meeting users' needs to highlight key information during screen recording. Now, follow the guide below to record Steam videos or games using MiniTool Screen Recorder.
Step 1: Get MiniTool Screen Recorder
Click on the button below to download MiniTool Screen Recorder. Then, follow the prompts to install it on your PC.
MiniTool Screen RecorderClick to Download100%Clean & Safe
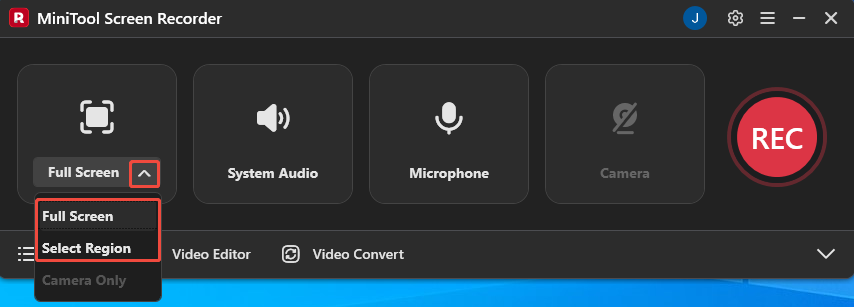
Step 2: Choose the Recording Area
1. Launch MiniTool Screen Recorder on your PC.
2. Expand the drop-down menu of the Full Screen option.
3. Then, select the Full Screen option to record the entire screen; or, select the Select Region option to record the specific area.
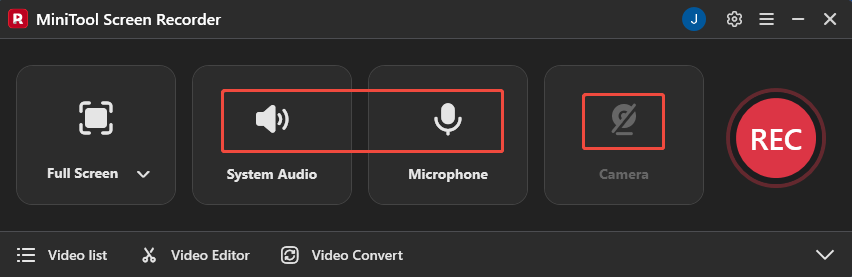
Step 3: Control the Audio and Camera Recording
1. Click on the System Audio icon or the Microphone icon to determine whether to record the audio from the system or the microphone.
2. To enable the webcam recording feature, click on the Camera icon on the right.
Step 4: Start and End Recording
1. Prepare the Steam content you want to record.
2. When you want to start the recording process, click on the REC button on the right side of the main interface or press the F6 key.
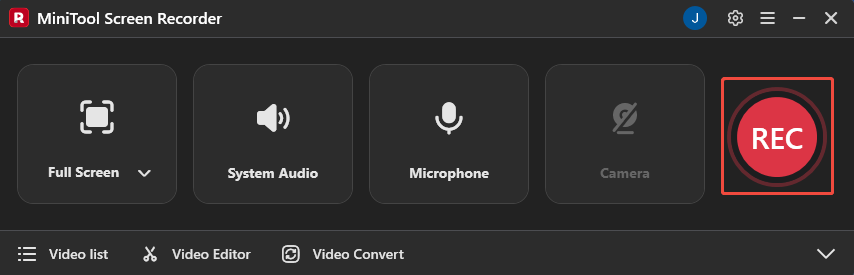
3. To end the recording process, press the F6 key again.
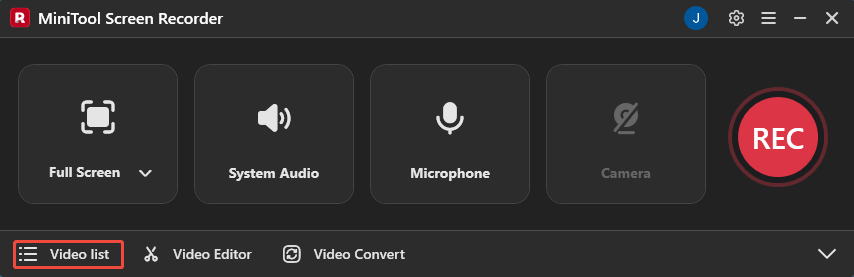
4. Then, you can check the recorded video under the Video list module.

#2 Icecream Screen Recorder
Icecream Screen Recorder is another excellent choice. Not only can it easily capture static screenshots, but it also records all types of video content displayed on the screen. It similarly allows users to choose between recording the entire screen or a specific area based on their needs. Additionally, all recorded content is output in WebM format.
Below is a step-by-step guide for recording Steam content using Icecream Screen Recorder.
Step 1: Download and Install Icecream Screen Recorder
Go to the Icecream Screen Recorder official website to download and install it on your PC.
Step 2: Choose the Recording Area
1. Launch Icecream Screen Recorder.
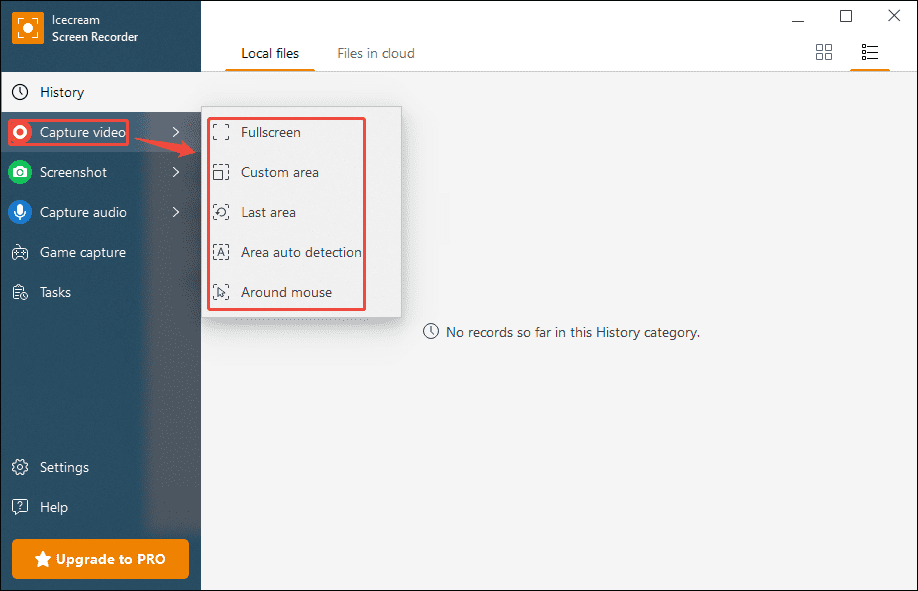
2. Hover your mouse over the Capture video option, then select the recording area option from the new menu bar that appears.
Step 3: Set the Audio Recording
Click the Microphone or System Audio icon in the recording panel to choose whether to record audio from the system or the microphone.

Step 4: Start and End Recording
1. Prepare the Steam content you want to record.
2. Click on the Rec button on the left in the recording panel to start the recording process.
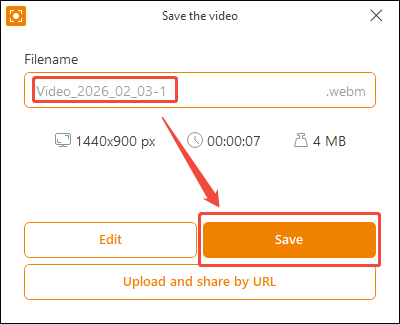
3. To end the recording process, press the F8 key. Then you can enter a name for the recorded video in the pop-up window and click on Save to output it.
Both MiniTool Screen Recorder and Icecream Screen Recorder can meet users' needs for recording various types of Steam content. However, the free version of Icecream Screen Recorder imposes a 5-minute recording time limit. Therefore, if you have a limited budget, we recommend choosing MiniTool Screen Recorder, which offers unlimited recording time for free.
Bonus: How to Polish Your Recordings
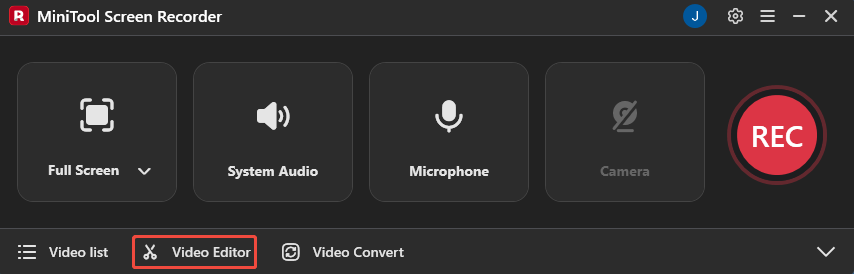
If you want to further enhance your recordings, click the Video Editor option at the bottom of the MiniTool Screen Recorder main interface to get the professional video editor.
Or, you can also directly click the button below to get this video editing tool.
MiniTool MovieMakerClick to Download100%Clean & Safe
This video editing tool enables users to trim, cut, reverse, and rotate videos. It also allows adding transitions, effects, filters, text, and other elements as needed. Users can further enhance video expressiveness by incorporating personalized music from its built-in audio library, making their creations more visually appealing.

Final Words
How to record on Steam? If you simply want to record gameplay on Steam, you can use Steam's built-in screen capture tool. However, to capture more Steam content, you'll need third-party screen recorders like MiniTool Screen Recorder and Icecream Screen Recorder, as introduced in this article.
Additionally, to further enhance your recordings, don't forget to use the recommended video editor. If you encounter any issues while using MiniTool Screen Recorder or MiniTool MovieMaker, you can reach out for assistance by emailing us via support@minitool.com or sending a message on X.