This article will explain why we need a screen recorder no time limit and how to choose a good one. What’s more, it shares how to use 2 excellent screen recorders, which include MiniTool Screen Recorder and Free Online Screen Recorder.
Why Need a Recorder with No Time Limit
Before looking for a screen recorder no time limit, let’s learn the advantages where you might need to record videos without a time limit.
Boost Work Efficiency
In workplace workflows, unlimited screen recordings are sometimes a routine part of work. Employees may need to record team meetings, product demonstrations, internal tutorials, online training courses, and more. These tasks often last a long time. If the recording tool stops after a few minutes, it disrupts the workflow and wastes resources.
However, unlimited screen recorders allow you to record the whole process at once and improve work efficiency. The recordings also make it much more convenient to review them later, share them with team members, and clarify responsibilities during projects.
Additionally, long screen recordings allow employees to focus on their work and reduce unnecessary stress caused by considering the limited recording time.
Save Learning Materials and Facilitate Review
Screen recording is one of the most common methods learners use to store valuable learning materials. Lengthy tutorials, lectures, demonstrations, and online courses can easily exceed standard recording time limits.
Furthermore, learners may encounter concepts they don’t immediately understand during class, but they can’t dwell on those concepts the whole class. Therefore, learners must mark these puzzles and address them later.
Using a screen recorder no time limit that allows unlimited screen recording helps save the entire course without missing any key explanations. Afterward, you can replay difficult sections to learn them repeatedly at your own pace.
Help Capture Life Highlights
Apart from recording for work or study. Many people use a screen recorder to save important personal moments, such as online virtual ceremonies and celebrations, family gatherings, live events, or special programs, which are often long in duration.
A screen recorder with no time limit can help preserve these moments completely. This ensures that valuable moments are remembered and passed down. People won’t have the regret of missing out on these wonderful moments.
Enrich Content Creation
For content creators, recording screen no time limit is crucial to record gameplay, commentary, or the content creation process. These recording sessions often take a long time. Unlimited screen recorders give creators the freedom to capture all contents and gather as much material as possible, which is easier to decide what to keep during editing.
In addition, longer recording times also provide a complete record of the creator’s product evaluation process, increasing transparency. Reliable contents can increase audience trust in content creators and expand their influence.
How to Choose an Enhanced Recorder
Having no recording time limit is only one aspect of a good screen recorder. The following 5 aspects should also be considered when choosing a recorder.
#1 Recording Stability
Stability is a fundamental performance characteristic of any excellent screen recorder. A reliable recording tool should be able to run stably for extended periods without stuttering or crashing.
Smooth recording requires a stable frame rate, clear resolution, and good audio and video synchronization. Maintaining the stability of these elements during recording, the recorded video will perform better.
#2 Recording Type Options
Different tasks need different recording models. A good screen recorder should support full screen recording, selected region recording, and specified window recording with no time limit. This flexibility helps you focus on the most important parts of the recording and helps viewers to easily grasp the key content.
#3 Audio Recording Support
High-quality audio is as important as video quality. When choosing a screen recorder no time limit, ensure the recording tool can record system audio, microphone input, or both simultaneously. This is crucial for recording tutorials, meetings, and commentary content.
#4 Webcam Recording Support
Webcam recording can create a PiP (Picture-in-Picture) effect to enrich the recorded content and attract viewer interest. Furthermore, in live streams or educational sessions, webcam recording can effectively enhance viewer engagement.
#5 Customizable Settings
For long-duration video recordings, users can choose screen recording tools with customizable advanced settings, such as fine-tuning the frame rate, adding annotations, changing the storage location, and adjusting video quality, making it easier for users to obtain satisfactory screen recordings.
Preparations Before Recording a Long Screen Video
There are some preparatory steps to take before recording to ensure a smooth recording process.
1. Close Unnecessary Applications
Running too many applications at the same time may cause recording to lag. Therefore, closing programs that are not used before recording helps free up system resources and improve recording stability.
2. Check Available Storage Space
Long recording sessions will generate large files, which need a large amount of computer storage space. Therefore, before starting recording, check that you have enough storage space to avoid interruption, or you may suffer significant recording loss.
3. Rehearse the Recording Process
Before the actual recording, you can rehearse the recording process. Prepare the content to be recorded and familiarize the recorder with all the options and functions of the recorder, making it a powerful auxiliary during recording. This will allow you to record with ease during the actual recording session.
4. Choose Proper Settings
Before recording, setting certain parameters will also affect the recorded video. You can adjust whether to record system audio and microphone sound before recording. Parameters such as resolution, frame rate, and video quality can also be fine-tuned. Additionally, you can plan whether to turn on your webcam and whiteboard and determine their locations.
2 Recommended Recorders with No Time Limit
How to screen record no time limit? Here are 2 useful recorders that I’ve tried for my long meetings.
1. MiniTool Screen Recorder
MiniTool Screen Recorder allows you to record your screen for an unlimited duration while maintaining smooth performance. It is suitable for recording long meetings, online courses, tutorials, and live streams.
MiniTool Screen Recorder offers both full-screen recording and selected region recording models. In addition, it allows you to control whether system audio and microphone recording are enabled.
Furthermore, MiniTool Screen Recorder allows you to adjust the recording hotkeys and pre-recording duration before recording. Its interface layout is very user-friendly. Even if you’ve never used a screen recording application before, you can easily start recording.
Pros:
- Supports webcam recording.
- Allows taking annotations in real-time with brushes, shapes, highlighters, and white board.
- Enables fine-tuning the frame rate among 15 fps, 20 fps, 25 fps, 30 fps, and 50 fps.
- Allows changing the quality of the recorded video from original, standard, and high models.
- Supports recording the mouse movements.
- Supports recording up to 4K resolution video.
- No watermarks or ads.
- Free and user-friendly.
Cons:
- Only supports recording on Windows systems.
Below is a simple step-by-step guide on how to record unlimited videos using MiniTool Screen Recorder.
Step 1. Download and Install MiniTool Screen Recorder
Click on the download button below to download MiniTool Screen Recorder. Then, set it up by following the installation steps displayed on the screen.
MiniTool Screen RecorderClick to Download100%Clean & Safe
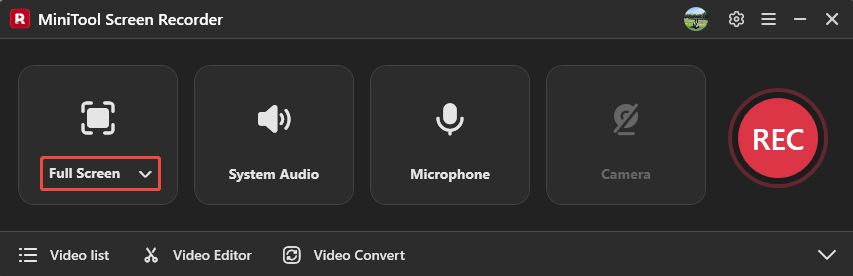
Step 2. Choose a Recording Pattern
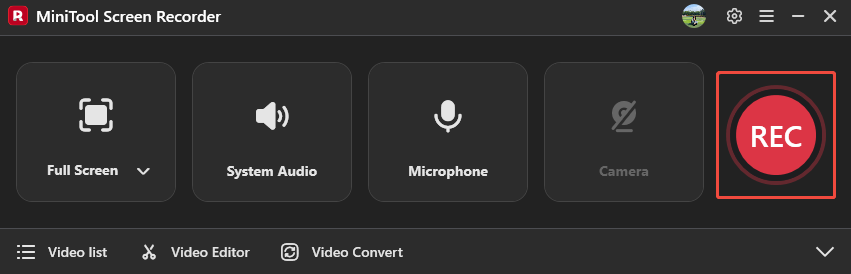
Launch MiniTool Screen Recorder and log in to it. Expand the first option on the main interface to choose a recording type. Here, I select Full Screen.
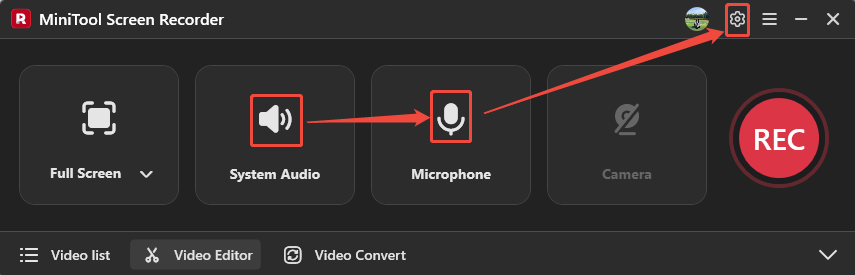
Step 2. Control Audio and Complete Settings
Click on the System Audio icon and the Microphone icon to decide whether to enable the computer sound and voiceover. Then, click the Gear icon on the upper-right to open the Setting window.
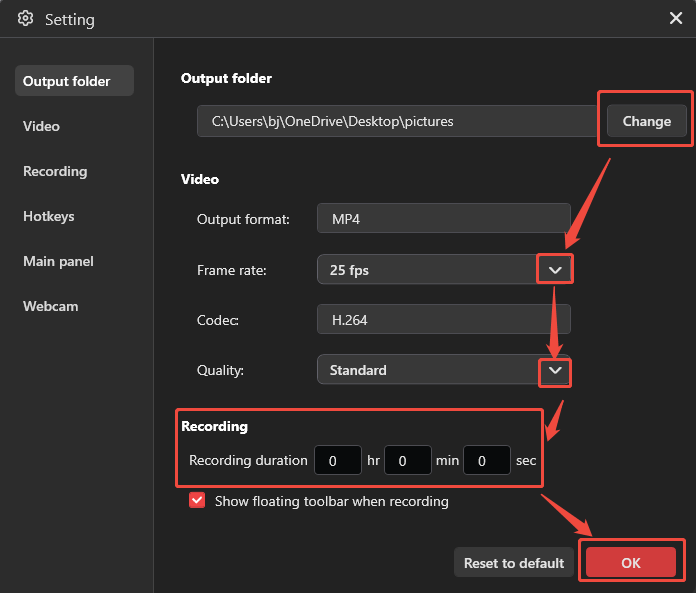
In the Setting window, click on the Change button to choose a storage location. Also, you can expand the Frame rate option and the Quality option to adjust the frame rate and recorded video quality. What’s more, to work more efficiently, you can also enter a specific time in the Recording section to preset a recording duration. Later, click on the OK button to save these changes.
Step 3. Start the Recording
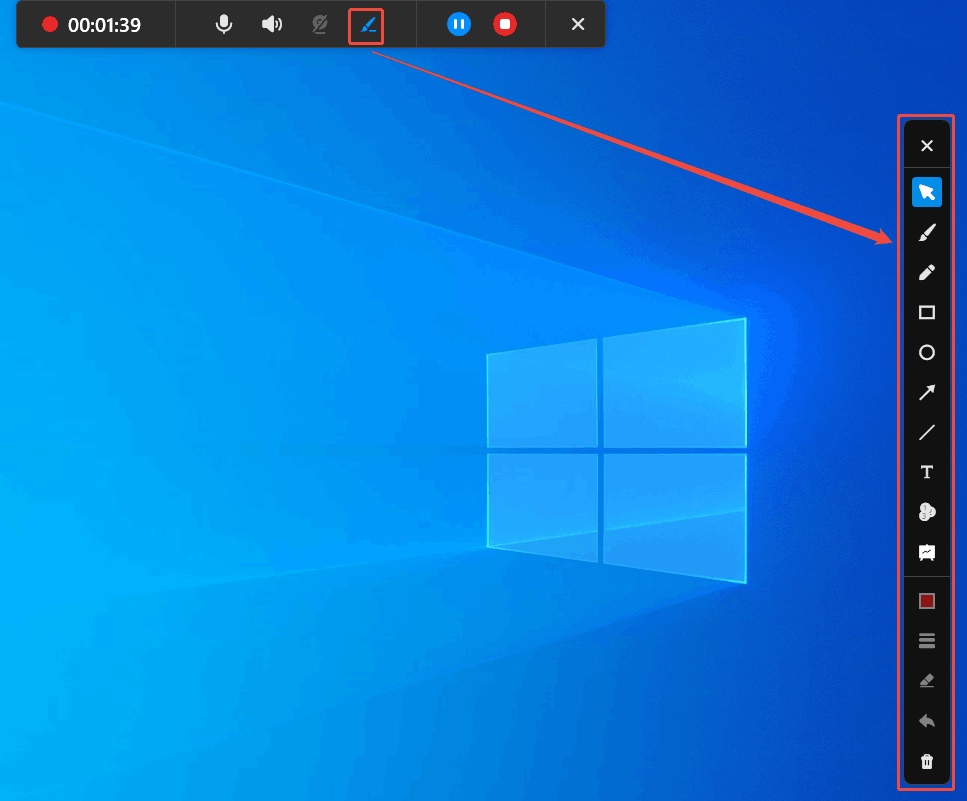
After completing the preparations, click the REC button to start recording and present the meetings or courses you want to capture. To pause or resume this recording, press the F9 key. If you want to end the recording, press F6 to stop it.
When you record the screen, click on the Bush option on the floating toolbar to open the annotation column. Here, you can add real-time annotations in various formats, including pen, highlighter, shape, text, numbering, and whiteboard.
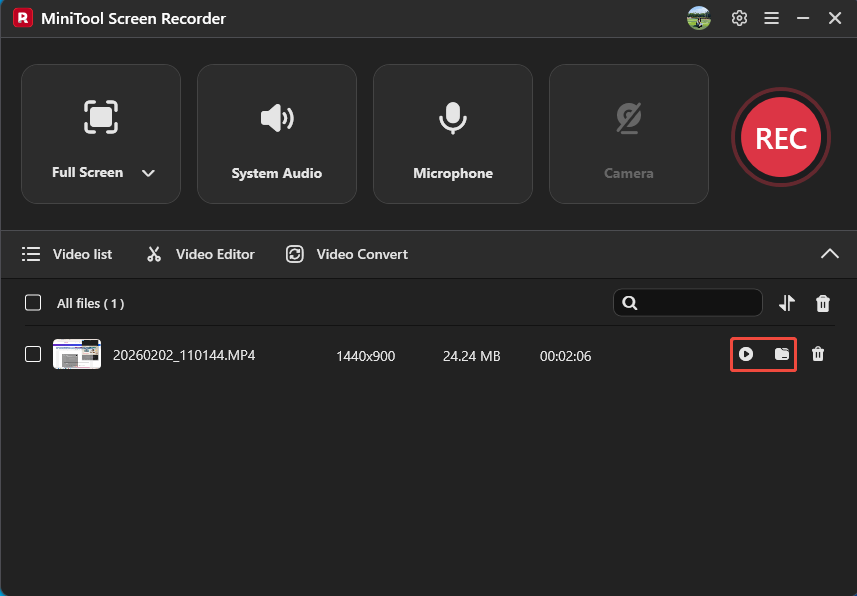
Step 4. Check and Locate the Recorded Video
Once the recording finishes, the recorded video will land on the Video list tab. Here, click on the Play icon or the Folder icon to view or locate it on your computer.
Follow the steps above to record screen no time limit with MiniTool Screen Recorder without any bundles.
2. Free Online Screen Recorder
For users who don’t want to install software, Free Online Screen Recorder is a can’t-miss option. It supports direct operation in multiple browsers, such as Firefox and Google Chrome. Free Online Screen Recorder is also well-compatible with Windows, macOS, and Android systems.
Pros:
- Compatible with multiple web browsers.
- Supports recording webcam.
- Allows capturing computer audio and voiceover.
- Supports editing and sharing the recorded video online.
Cons:
- Requires a smooth network.
Here’s how to capture screen no time limit with Free Online Screen Recorder.
Step 1. Navigate to Free Online Screen Recorder’s Webpage
Copy this URL: https://screen-recorder.com/ and paste it into a browser’s address bar to open Free Online Screen Recorder’s webpage.
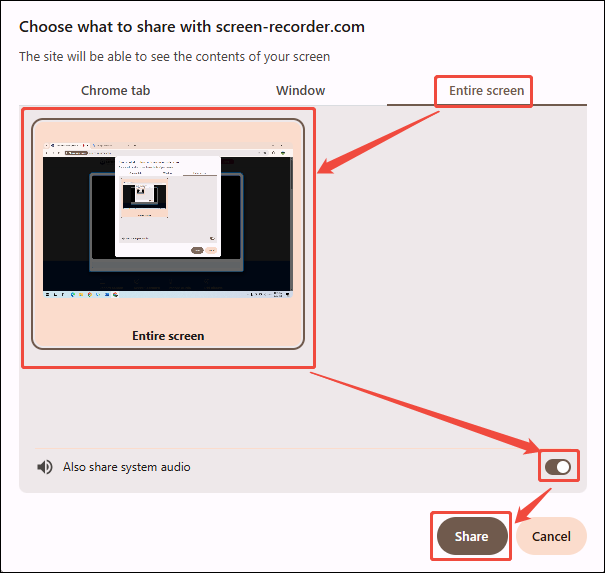
Step 2. Select Recording Type
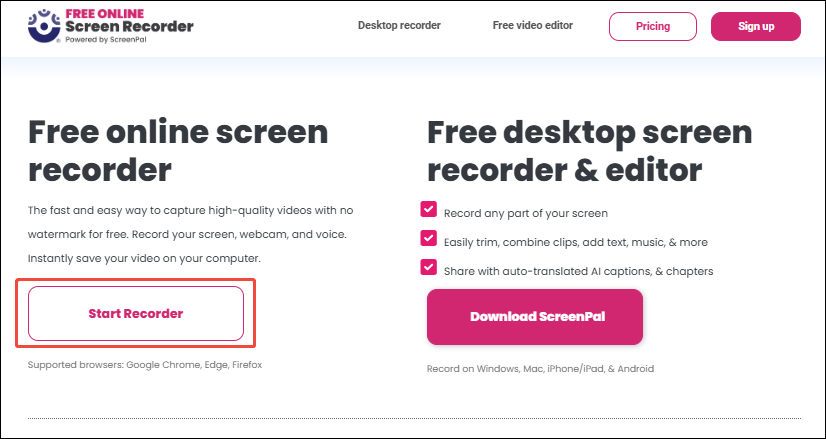
On the Free Online Screen Recorder’s main page, click on the Start Recorder option to open a window that offers different recording types.
In this window, switch to the Entire screen tab. Under this tab, click on the Entire option and enable the Also share system audio button. Click on the Share button to open the screen recording page.
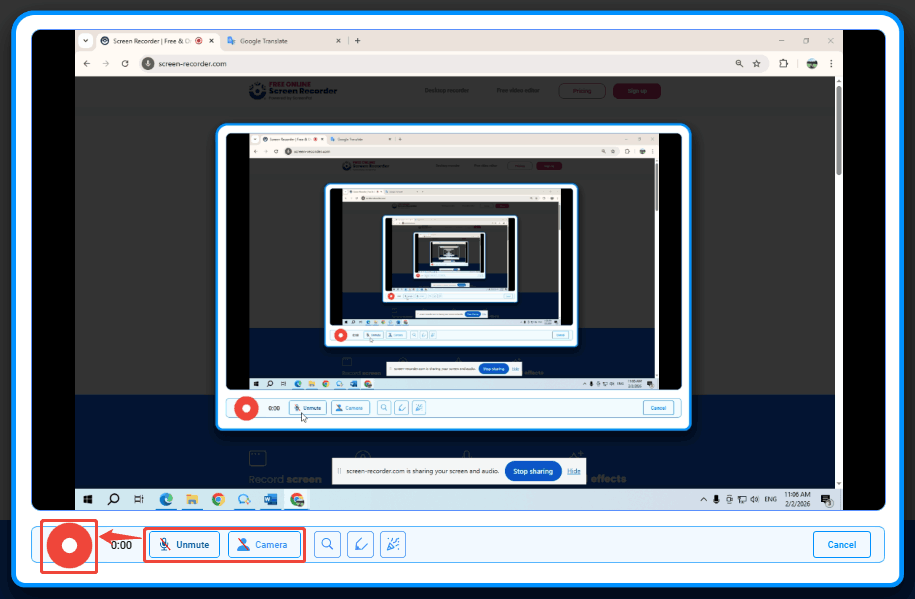
Step 3. Begin the Recording Process
Click on the Microphone icon and the Camera icon to confirm whether to record the voiceover and webcam. Then, open the content you need to record and click on the Record button to begin the recording process.
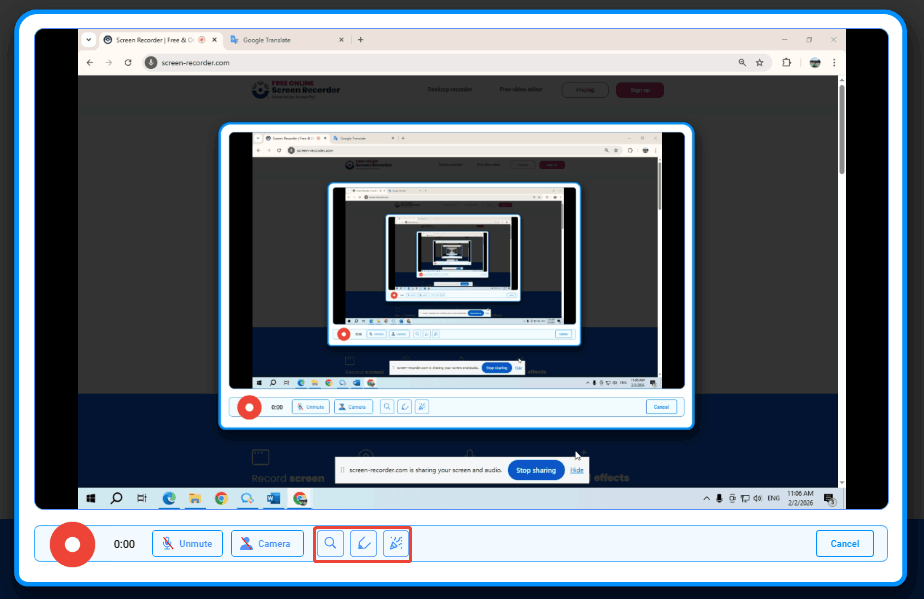
During the recording, you can click on the Magnifying glass icon to enlarge the content you want to highlight, catching viewers’ attention. Plus, click on the Brush icon or the Clear icon to add or get rid of annotations.
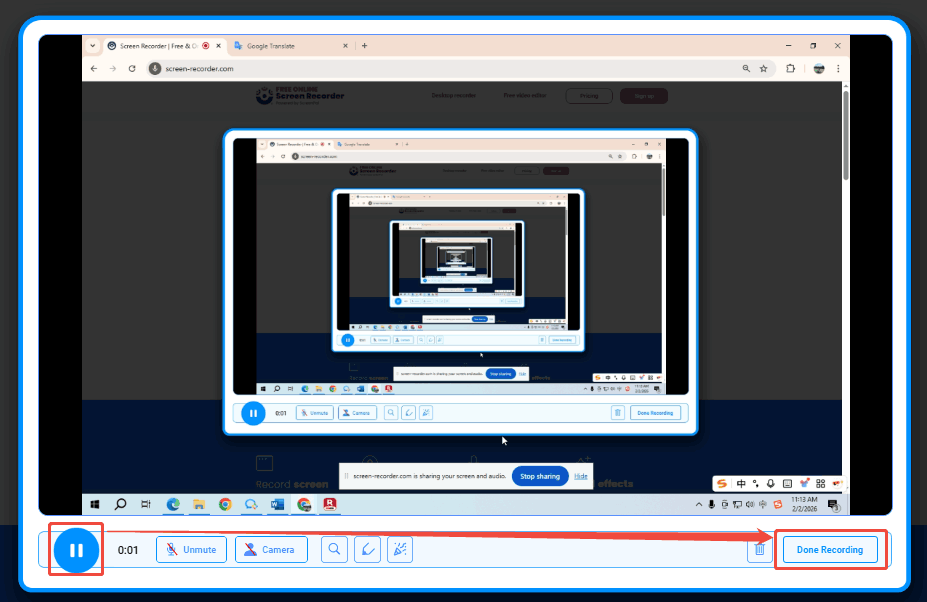
Step 4. Stop the Screen Recording
If you want to pause or resume this recording, click on the Pause/Resume button. To end this recording, click on the Done Recording option in the right corner to stop it.
Free Online Screen Recorder is an online recorder that enables you to use it smoothly in various browsers. However, if you need to record a very long recording, Free Online Screen Recorder’s performance may be limited by browser and system resources.
Final Thoughts
A reliable screen recorder with no time limit can greatly improve your work, study, and content creation efficiency. This article shares how to choose a screen recorder, what to prepare before recording, and how to record your screen using 2 excellent recorders, including MiniTool Screen Recorder and Free Online Screen Recorder.
If you would like to obtain more information about MiniTool Screen Recorder, you can contact us via email at support@minitool.com. You can also send me a message directly through X. I will reply to you as soon as I see it.