This article lists specific scenarios for Fraps not working, including recording duration limits, desktop recording issues, audio recording issues, etc. Meanwhile, it provides 16 practical solutions for each of these issues, such as using an alternative video recorder: MiniTool Screen Recorder, updating the software, restarting the computer, disabling desktop composition, and more.
What Is Fraps
Gamers who began playing PC games around the turn of the millennium are undoubtedly familiar with Fraps, a tool that first emerged in the late 1990s. It was the only tool I knew of when I first started creating gaming videos.
Fraps offers three primary functions: screen recording, screenshot capture, and the display of in-game frame rates. The tool features a very simple interface; typically, I only needed to use hotkeys to activate the specific functions I required.
However, Fraps hasn’t been updated since 2013. As Windows and various games have continued to evolve, the software has gradually developed a series of issues that have impacted my gaming experience. In the following sections, I’ll outline the common problems I’ve encountered and share the solutions that have worked for me.
Fixes for Fraps Stops Recording After 29 Seconds
This is a situation that virtually every player encounters when they first start using Fraps. Strictly speaking, it isn't actually a software glitch. I figured out the reason the first time I recorded a video: I was using the free version, which limits recording length to 30 seconds. Below are the specific solutions.
#1. Purchase the Full Version of Fraps
The most direct way to resolve this issue is to purchase the full version of Fraps. After I purchased it and logged in, the recording time limit disappeared.
#2. Use an Alternative Screen Recording Tool
Of course, some users may be reluctant to pay for the full version of Fraps; in such cases, they can try using software that hat has no recording time limit. MiniTool Screen Recorder is a free Fraps alternative tool I frequently use that fits this requirement perfectly.
Meanwhile, MiniTool Screen Recorder offers flexible recording options, including full-screen recording, as well as the ability to capture specific regions or windows. I can also record the system audio and microphone audio separately or simultaneously with this screen recorder.
Furthermore, I frequently utilize MiniTool Screen Recorder's webcam recording feature to capture gaming reaction videos. Moreover, its annotation tools prove particularly useful when I am recording gaming tutorials. The following are the steps for performing a screen recording using MiniTool Screen Recorder.
Step 1: Download and Install MiniTool Screen Recorder
Download MiniTool Screen Recorder by clicking the button below. Then, follow the prompts to install it on the PC.
MiniTool Screen RecorderClick to Download100%Clean & Safe
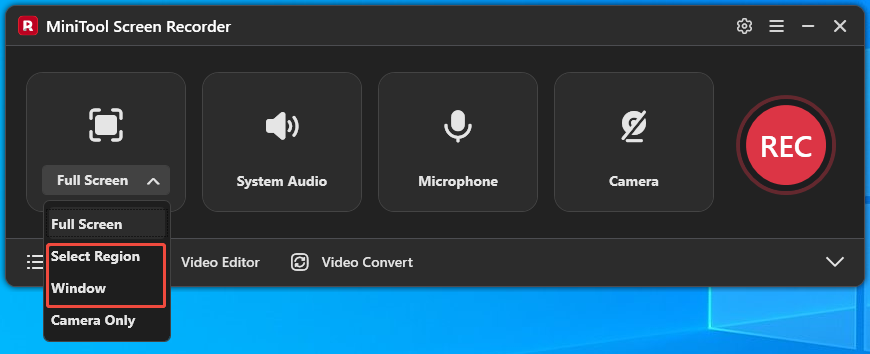
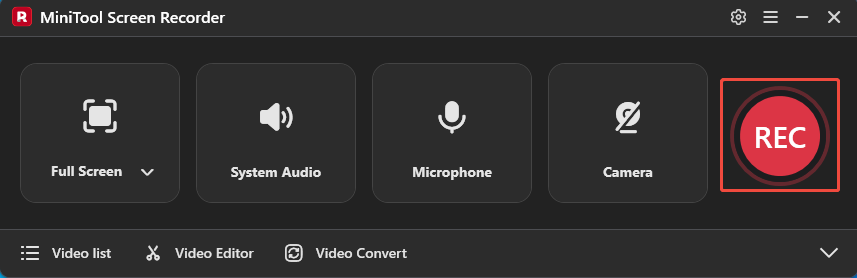
Step 2: Choose the Recording Area
1. Launch MiniTool Screen Recorder.
2. MiniTool Screen Recorder defaults to full-screen recording.
3. To capture a specific area or a particular window, expand the drop-down menu next to the Full Screen option. Then, choose the Select Region option or the Window option.
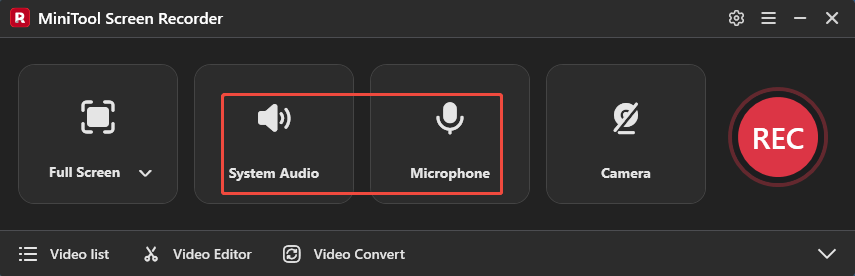
Step 3: Manage the Audio Recording
System and microphone audio recording functions are enabled by default. To turn off either of them, click the System Audio icon and the Microphone icon, respectively.
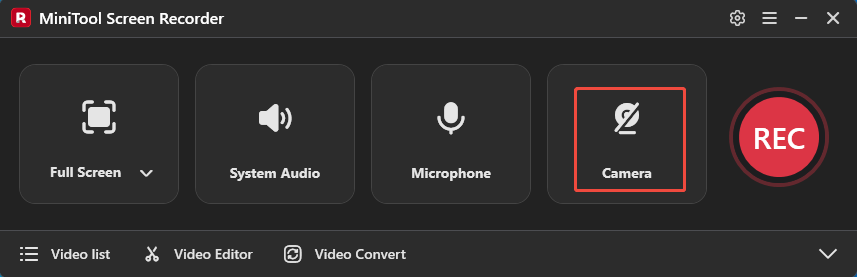
Step 4: Control the Camera Recording
To record the screen with webcam footage, click the Camera icon to enable the webcam recording feature.
Step 5: Start and End Recording
1. To start the recording process, click the REC button or press the F6 key.
2. After a 3-second countdown, open the target game or window.
3. To end the recording process, press the F6 key again.
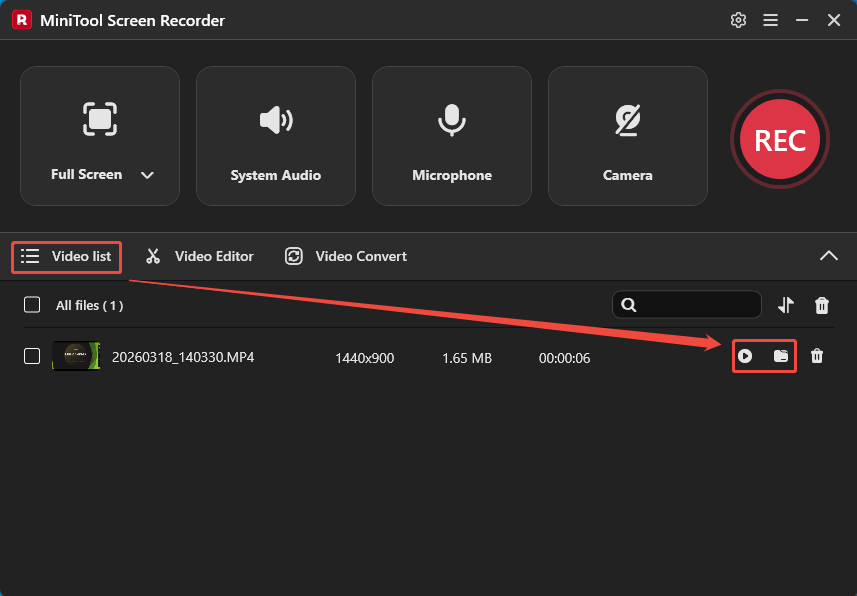
Step 6: Check the Recorded Content
When the recording ends, MiniTool Screen Recorder will automatically switch to the Video list section. Then, click the Play icon to check it. Or, click the Folder icon to access it on the computer.
Fixes for Fraps Only Recording Black Screen
In recent years, I’ve frequently encountered issues where Fraps records a black screen. After investigating, I found that this problem is primarily caused by the following reasons:
- Lack of support from media players.
- Incompatibility with Windows 10/11.
Eventually, I solved the problem by trying the following methods.
#1. Use a Compatible Player
Recorded videos may sometimes result in a black screen during playback due to format incompatibility. I tried switching media players, specifically VLC Media Player and Windows Media Player, and was able to successfully play the videos recorded with Fraps.
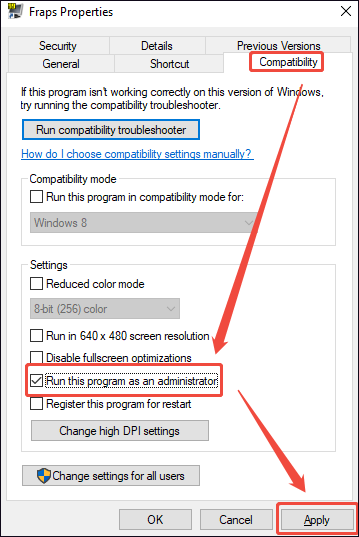
#2. Run Fraps in Administrator Mode
Fraps was originally designed for Windows 7, so it is now difficult to make it compatible with the latest operating systems. Therefore, running Fraps in administrator mode ensures that it can properly access modern hardware and system files. The procedure is very simple:
Step 1: Open the Properties of Fraps
Right-click the Fraps shortcut, then click the Properties option.
Step 2: Set Fraps Run in Administer Mode
1. Switch to the Compatibility section and check the Run this program as an administrator option.
2. Then, click the Apply option to save the setting.
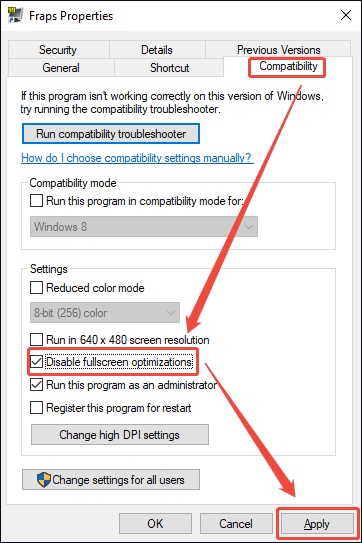
#3. Disable Desktop Composition
I also tried disabling desktop composition, which proved to be another effective way to resolve the black screen issue. The latest versions of Windows use GPU technology to optimize desktop operations, rendering them as smooth animations. Fraps has difficulty working with this technology, which can easily lead to black screens during recording.
Step 1: Open the Properties of Fraps
Step 2: Enable Desktop Composition
1. In the Fraps Properties interface, move to the Compatibility section.
2. Check the Disable fullscreen optimizations option. Then, click on Apply to save the change.
If the methods above still do not resolve the black screen issue when recording with Fraps, try the following three methods:
- Reinstall Fraps.
- Use an alternative Windows screen recorder, such as MiniTool Screen Recorder.
- Contact Fraps support for assistance.
Fixes for Fraps Desktop Recording Not Working
Due to a work requirement, I needed to record my desktop, but when I started recording in Fraps, nothing happened. After some troubleshooting, I discovered that Fraps was incompatible with the Desktop Windows Manager, which prevented it from hooking into the desktop screen. I then searched online for solutions and found the following methods to be effective:
#1. Enable Monitor Aero Desktop of Fraps
By default, Fraps only records full-screen games that interact directly with the graphics card. Enabling the Monitor Aero Desktop feature ensures that Fraps successfully hooks into the Desktop Windows Manager, allowing it to record the desktop properly. The specific steps to enable this feature are as follows:
Step 1: Open Fraps
Launch Fraps on the computer.
Step 2: Enable Monitor Aero Desktop
Under the General tab, check the Monitor Aero Desktop option to enable it.
#2. Change Windows Theme
After enabling the Monitor Aero Desktop feature, I learned that it requires the Aero theme to function properly. As such, I switched the Windows theme to Aero to ensure that the desktop recording feature would work as intended.
It’s worth noting that the Aero theme is typically available in older versions of Windows. If you don’t have access to it, try downloading it from GitHub. However, since I didn’t want to waste time, I chose to use MiniTool Screen Recorder to record my desktop.
MiniTool Screen RecorderClick to Download100%Clean & Safe
Fixes for Fraps Stop Recording
Of all the issues I’ve encountered, Fraps suddenly stopping recording is the most frustrating. It always prevents me from fully enjoying the game. After searching online and experimenting on my own, I found that the following methods can solve Fraps not working for stopping recording.
#1 Change the Recording Hotkey
One of the reasons was the recording hotkey I had set up. I had originally configured Fraps to stop recording with the F8 key, but I forgot that a game action also required pressing F8. Every time I pressed that key, Fraps would automatically stop recording. To prevent the recording from being interrupted again, I changed the stop key to Ctrl + F9.
#2. Check Disk Space
Unlike most video recorders today, Fraps saves videos to disk in real time without compression. Hence, if there is insufficient disk space, new data cannot be written, causing Fraps to stop recording. To resolve this issue, free up disk space or purchase an external hard drive.
#3. Disable the 4GB Splitting Feature
If the 4GB file splitting feature is enabled, Fraps will automatically split the file when it reaches 4GB during recording. This causes a brief pause in the recording process. If the hard drive is slow, leading to the automatic splitting process taking too long, Fraps will terminate the recording to prevent a system crash. Ultimately, I disabled this feature in Fraps using the following method:
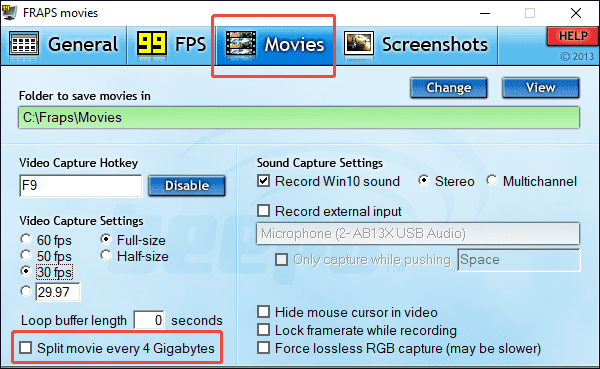
Step 1: Launch Fraps
Step 2: Disable the 4GB Splitting Feature
1. Switch to the Movies tab.
2. Disable the 4GB splitting feature by unchecking the Split movie every 4 Gigabytes option.
#4. Reduce the Recording Frame Rate
Setting the recording frame rate too high places a heavy load on the system, which can cause the recording to pause. Moreover, since Fraps uses uncompressed recording, the higher the frame rate, the larger the file size, which can also cause the recording to pause.
Fixes for Fraps Not Recording Sound
For a while, I noticed that my screen recordings either had no sound at all or only included either voice or game audio. Later, I realized that I hadn’t checked the audio recording settings before recording. To ensure that my screen recordings have sound, I always perform the following two checks before recording. Here are the detailed steps.
#1. Check Fraps’ Audio Recording Settings
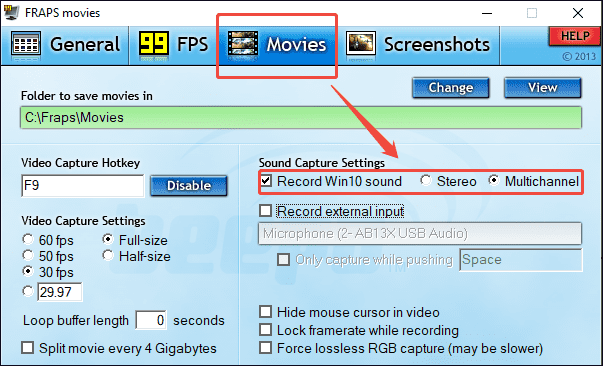
Step 1: Launch Fraps
Step 2: Enable the System Audio Recording Feature
1. Move to the Movies tab.
2. To record the system audio, check the Record Win10 sound option. Then, choose between Stereo and Multichannel audio output.
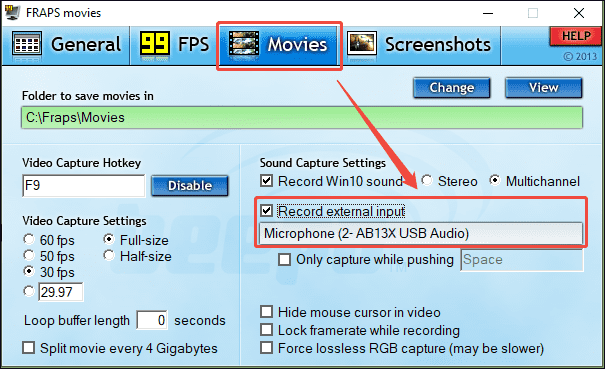
Step 3: Enable the Microphone Audio Recording Feature
Check the Record external input option and ensure the correct microphone device is chosen in the box.
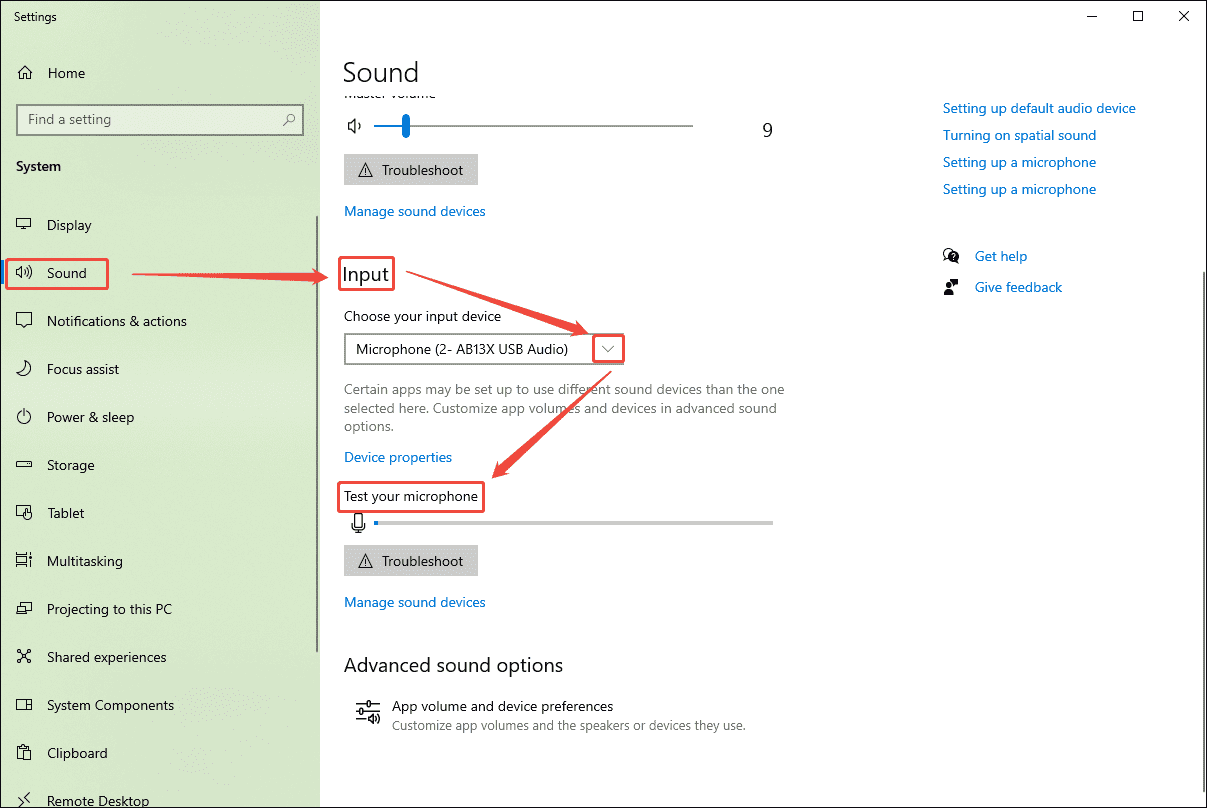
#2. Check the Window Sound Settings
The first time I enabled Fraps' audio recording feature, there was no voice during the screen recording. I later realized this was because Windows hadn't configured the correct default audio device, so I followed these steps to check Windows' audio input device.
Step 1: Open Windows Sound Settings Interface
1. Right-click the Speakers icon on the right side of the taskbar at the bottom of the screen.
2. Then, choose the Open Sound settings option.
Step 2: Check the Audio Input Device
1. Scroll down the screen to the Input section.
2. Expand the drop-down menu under the Choose your input device section to select the target microphone device.
3. Finally, test the microphone under the Test your microphone section to see if the device is connected properly.
Fixes for Fraps Not Showing FPS
The Fraps frame counter is one of the features I use most often when recording my screen. It allows me to monitor the game’s performance and ensure it doesn’t crash at critical moments. The following methods effectively solve this problem:
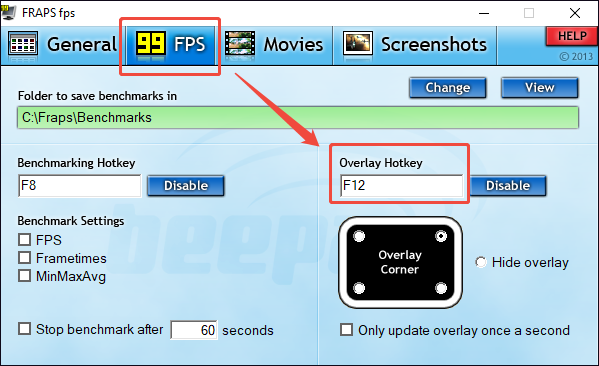
#1. Check the Overlay Hotkey
The default hotkey for displaying the frame rate in Fraps is F12. If this key is already in use, the frame rate may not be displayed. As such, try opening Fraps to change the hotkey.
Step 1: Launch Fraps
Step 2: Change the Overlay Hotkey
Switch to the 99 FPS tab and change the shortcut key in the box under the Overlay Hotkey section.
#2 Use DirectX 11
Using DirectX 12 in the game will prevent Fraps from displaying the frame rate. Therefore, if possible, please switch from DirectX 12 to DirectX 11 in the game settings.
#3 Close Other Overlays
If the Steam Overlay or Discord Overlay is enabled while using Fraps, this will also affect the frame rate display. The simplest solution is to disable both of these features.
If the above methods do not resolve the issue, try the following approaches:
- Uninstall and reinstall Fraps.
- Open Fraps Monitor Aero Desktop.
- Run Fraps as an administrator.
Although Fraps has had some issues in recent years, I’ve still been able to enjoy a smooth recording experience after applying the troubleshooting tips mentioned above. Please choose the method that best suits the specific situation to resolve any issues you may encounter.
To Wrap Things Up
This article provides 16 specific solutions for Fraps not working, such as using alternative tools like MiniTool Screen Recorder, running Fraps as an administrator, and adjusting Fraps settings, etc. I hope these solutions will help you enjoy screen recording again. If you run into any issues when trying out MiniTool Screen Recorder, send an email to support@minitool.com.