Google Slides is a presentation platform that allows users to create, edit, and collaborate on slides in real time, similar to Microsoft PowerPoint. It is part of the Google Drive suite, alongside tools like Google Sheets and Google Meet.
Recording both slides and yourself on Google Slides can make your presentation more professional and engaging for formal tasks. This post explains how to record yourself on Google Slides using three ways.
How to Record Yourself on Google Slides
When I want to record a presentation on Google Slides, the first question that comes to my mind is whether it includes a built-in recording feature. The answer is yes, but this feature is only available to users with a Google Workspace work or school account. This means users with personal accounts must rely on third-party screen recording tools to capture their presentations with webcam footage.
Additionally, I noticed that I can only use the Google Slides recording feature in Google Chrome and Microsoft Edge. However, after recording, I’m still able to view, share, and delete the recordings from any browser.
Therefore, to help all users record themselves on Google Slides, this post introduces three practical methods, including the built-in recorder and alternative tools such as MiniTool Screen Recorder and Microsoft Clipchamp.
Method 1: Use the Built-in Recorder
The built-in recording feature in Google Slides allows me to record presentations with audio and video directly in Chrome or Edge. It also displays a camera bubble on the slides to show the presenter, with adjustable size and shape. Moreover, this platform includes a speaker notes feature for monitoring notes, timing, and upcoming slides, helping ensure a smooth, well-paced presentation.
In addition, I found several things to note while using this feature. Each recording is limited to 30 minutes, and recordings are not included in the Revision History. If the Google Drive storage quota is exceeded, it’s impossible to create new recordings. Furthermore, I must have edit access to the presentation to start a recording.
Based on my experience, here is how to record yourself on Google Slides using its built-in recorder.
Step 1: Access Google Slides
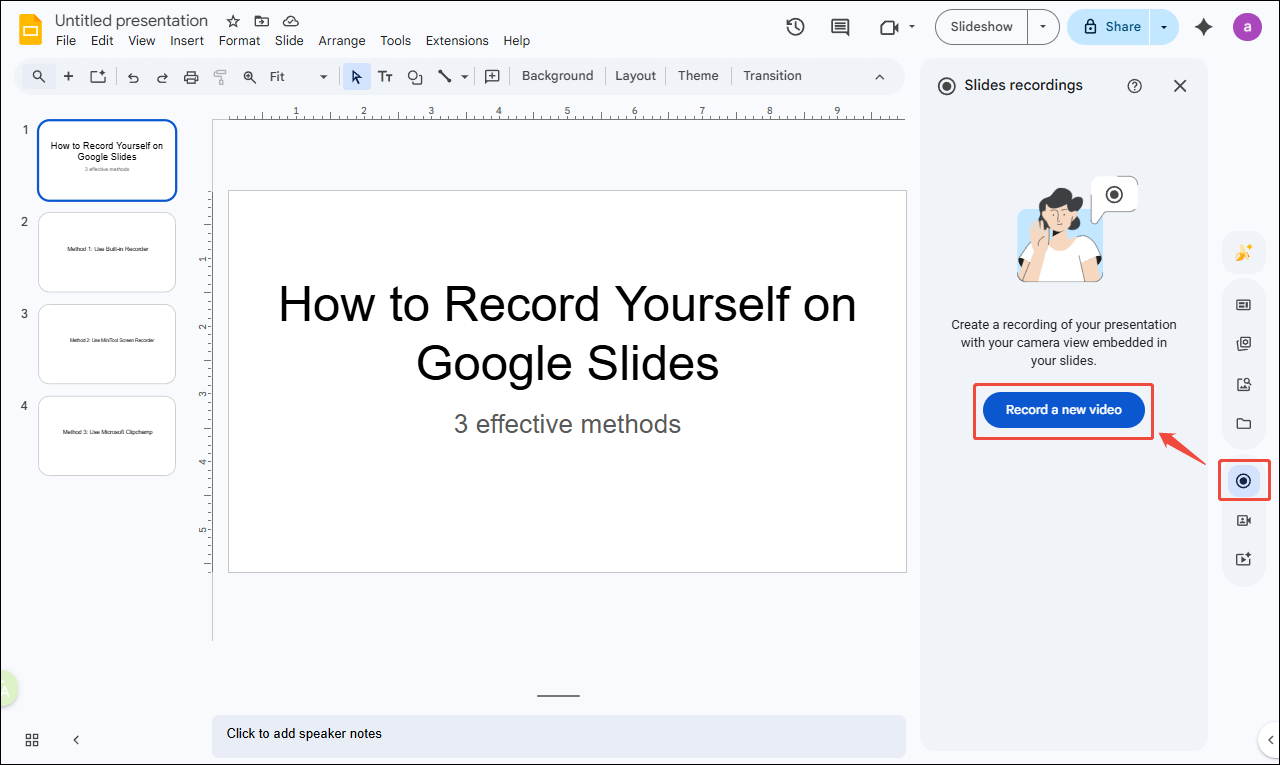
Open Google Slides in Google Chrome or Edge. Go to the desired slides. Click the View and create recorded slideshows option in the right toolbar. Then, click Record a new video in the Slides recordings panel.
Step 2: Configure Camera and Microphone
When recording a video on Google Slides for the first time, pop-ups may appear asking for permission to access the microphone and camera in Google Chrome or Edge. Click Allow while visiting the site or Allow this time to grant access.
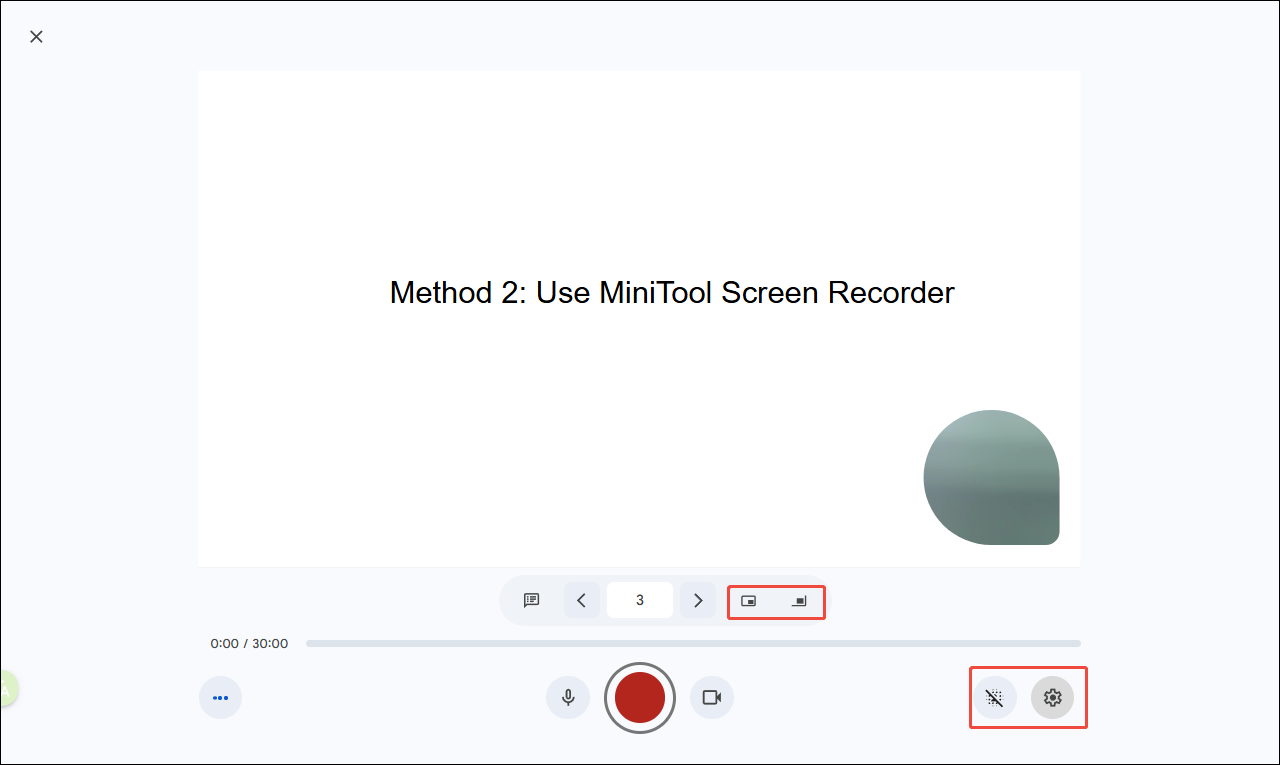
Next, preview the camera view and adjust it as needed. This platform allows me to adjust the position and size of the camera footage by clicking the Change PIP position and Change PIP size icons. It also includes a camera blur option to reduce background distractions. A different microphone or camera can also be selected if multiple devices are available.
Step 3: Start Recording
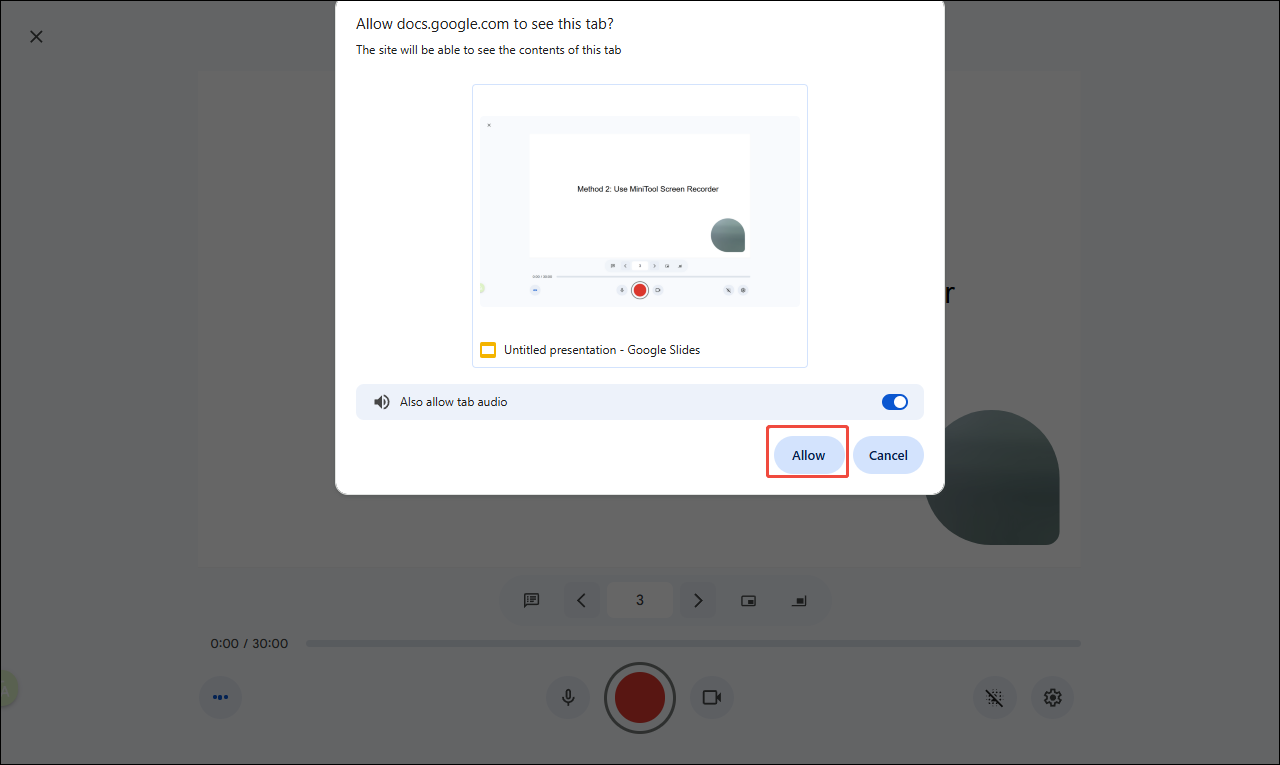
Once everything is set up, click the Start recording icon. Enable the Also allow tab audio option and click Allow in the pop-up window. After a 3-second countdown, the recording will start automatically, and begin the presentation simultaneously.
Step 4: Stop and Find the Recording
To take a break, click Pause recording and click Resume recording to continue. To start over, pause and click Re-record. To save the recording, pause and click Save to Drive.
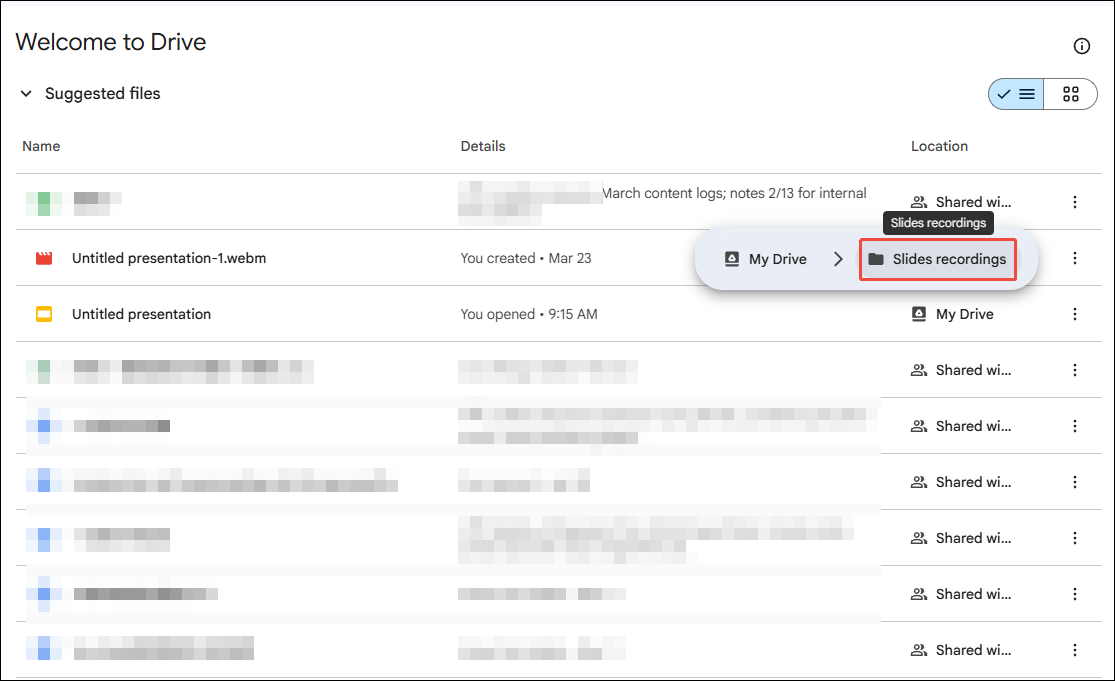
To find the recording in Google Slides, open the presentation where it was recorded, then click the View and create recorded slideshows option in the right toolbar. The recordings will appear in the list. To locate the recording in Google Drive, open My Drive and find the folder named Slides recordings. The most recent file will appear at the top. Users can preview, download, or share the recording as a WebM file.
I believe you no longer need to worry about how to record a presentation on Google Slides with faces using the platform’s built-in feature. Overall, it’s a quick and convenient solution for recording presentations. However, I will not have access to this feature if I don’t have an eligible account. In that case, I can switch to alternative tools such as MiniTool Screen Recorder and Microsoft Clipchamp.
Method 2: Use MiniTool Screen Recorder
As a lightweight yet professional Windows screen recording tool suitable for all users, MiniTool Screen Recorder allows me to record not only Google Slides presentations, but also live streams, gameplays, online meetings, and more.
MiniTool Screen RecorderClick to Download100%Clean & Safe
To record yourself giving a presentation on Google Slides, MiniTool Screen Recorder delivers reliable performance. It supports recording both screen and camera footage to create an overlay effect. As a powerful webcam recorder, it enables users to customize the camera settings such as brightness, color, position, shape, size, and more.
Additionally, MiniTool Screen Recorder offers flexible recording options. I can record the full screen, a selected region, or a specific window, along with camera footage. System sound and microphone audio can be recorded simultaneously or separately. The software also allows me to adjust the frame rate, video quality, and preset the recording duration.
What’s more, MiniTool Screen Recorder also features built-in screen annotation tools, including drawings, pens, shapes, arrows, step numbers, and whiteboards, making it easier to highlight key points or add real-time notes during recording.
MiniTool Screen Recorder also supports recording without time limit or watermarks. It saves recording in MP4 format for easier editing and sharing. From my perspective, it is an excellent alternative for you to record yourself giving a presentation on Google Slides.
How to record a presentation on Google Slides with face using MiniTool Screen Recorder? Follow the steps below.
Step 1: Download and Install
Click the download button below to download and install MiniTool Screen Recorder on your PC. Then, double-click the shortcut to launch it.
MiniTool Screen RecorderClick to Download100%Clean & Safe
Step 2: Choose the Recording Area
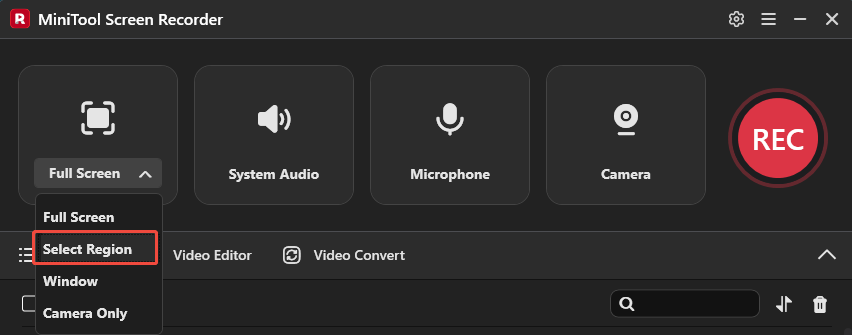
Open the target slide deck in Google Slides. By default, MiniTool Screen Recorder records the full screen. To record yourself talking on Google Slides without distractions, expand the drop-down menu next to the Full Screen option and choose the Select Region option. Then, drag the cursor to specify the recording area.
Step 3: Check the Dual Audio
System sound and microphone audio are recorded with the screen by default. Make sure both options are enabled.
Step 4: Open and Adjust the Webcam Recording
To record a video of yourself on Google Slides, click the Camera icon on the right of the interface to enable the webcam.
To improve the quality of the webcam footage, click the Settings icon in the upper-right corner and switch to the Webcam tab. Click Setting to adjust parameters such as brightness, contrast, hue, and saturation, then click OK to save the changes.
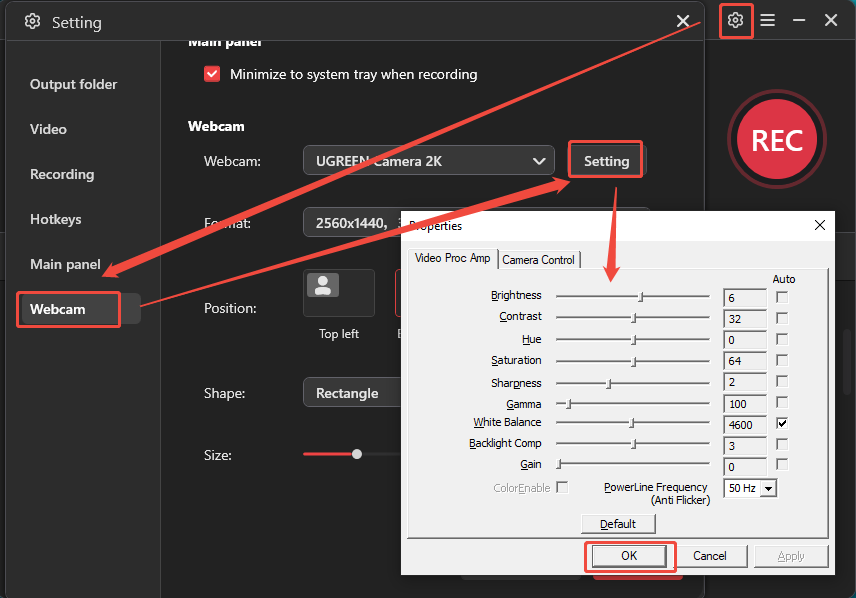
I can also customize the webcam format, including frame rate and resolution. In addition, the webcam overlay can be adjusted in terms of position, shape, and size based on my preferences. Click OK to save the adjustments.
Step 5: Start Recording
Click REC on the right side of the main interface or press the default F6 key. After a 3-second countdown, the recording will begin automatically, and start the presentation. To avoid mistakes and ensure a smooth recording, press F9 to pause and resume.
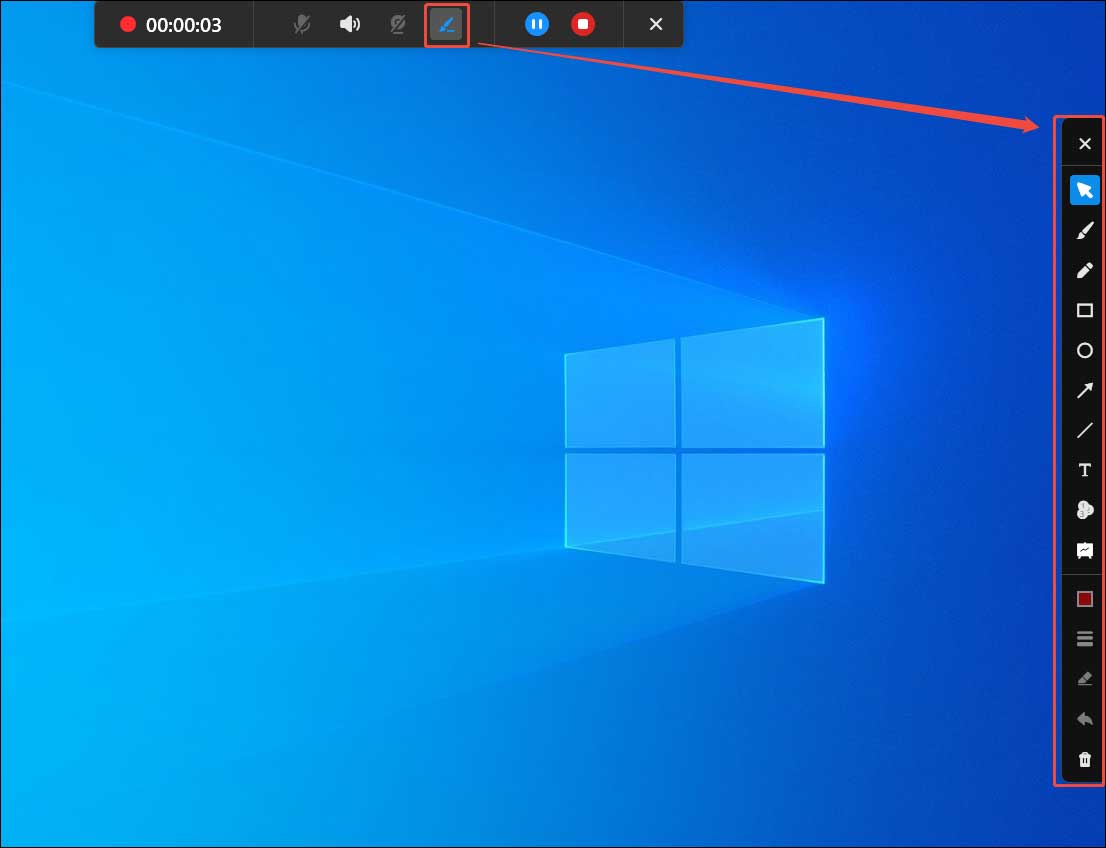
To mark key points on the presentation, click the Pen icon in the floating bar. Select the desired tool and make real-time notes during recording.
Step 6: Stop and Check Recording
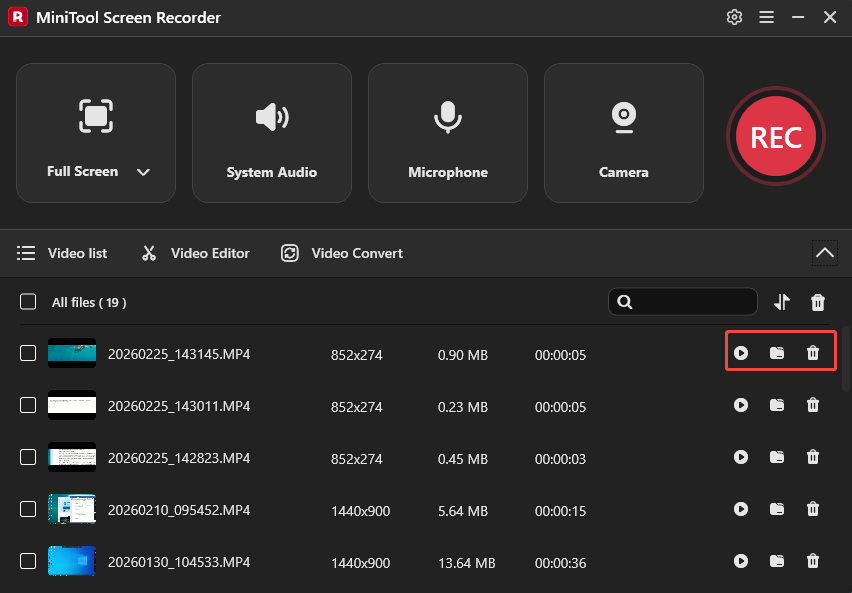
When the presentation is finished, press the default F6 key again to end the recording. And the latest video will appear at the top of the Video list module in the interface. Click the Play icon to preview the recording. To locate or delete it, click the Folder or Delete icon.
Step 7: Edit the Recording (Optional)
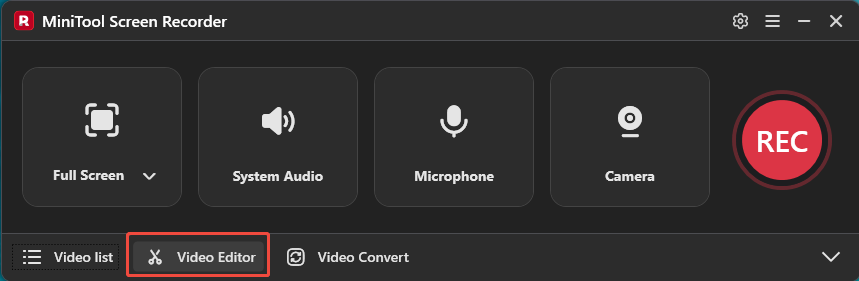
Whether recording an online lesson or a tutorial video, further editing can significantly improve the overall quality and professionalism. MiniTool Screen Recorder provides easy access to its companion video editing tool, MiniTool MovieMaker. Click the Video Editor option next to the video list to download or launch it on the computer.
MiniTool MovieMaker supports various video formats, including MP4 and WebM, allowing me to edit recordings created with Google Slides or MiniTool Screen Recorder.
Method 3: Use Microsoft Clipchamp
Microsoft Clipchamp is a built-in screen recorder on Windows 11 worth considering. It offers both a desktop version from the Microsoft Store and a web-based version for quick use.
To record yourself taking on Google Slides, Clipchamp supports capturing both the screen and webcam, along with system sound and microphone audio. It also features a teleprompter that displays scripts on the screen during recording, which is especially useful for presentations.
In addition to screen recording, Clipchamp functions as a video editor, allowing users to crop, trim, and enhance their recordings. However, it does not support recording a custom region, so presentations need to be played in full-screen mode. It also limits recording sessions to 30 minutes.
Here is how to record yourself on Google Slides using Microsoft Clipchamp.
Step 1: Open Microsoft Clipchamp
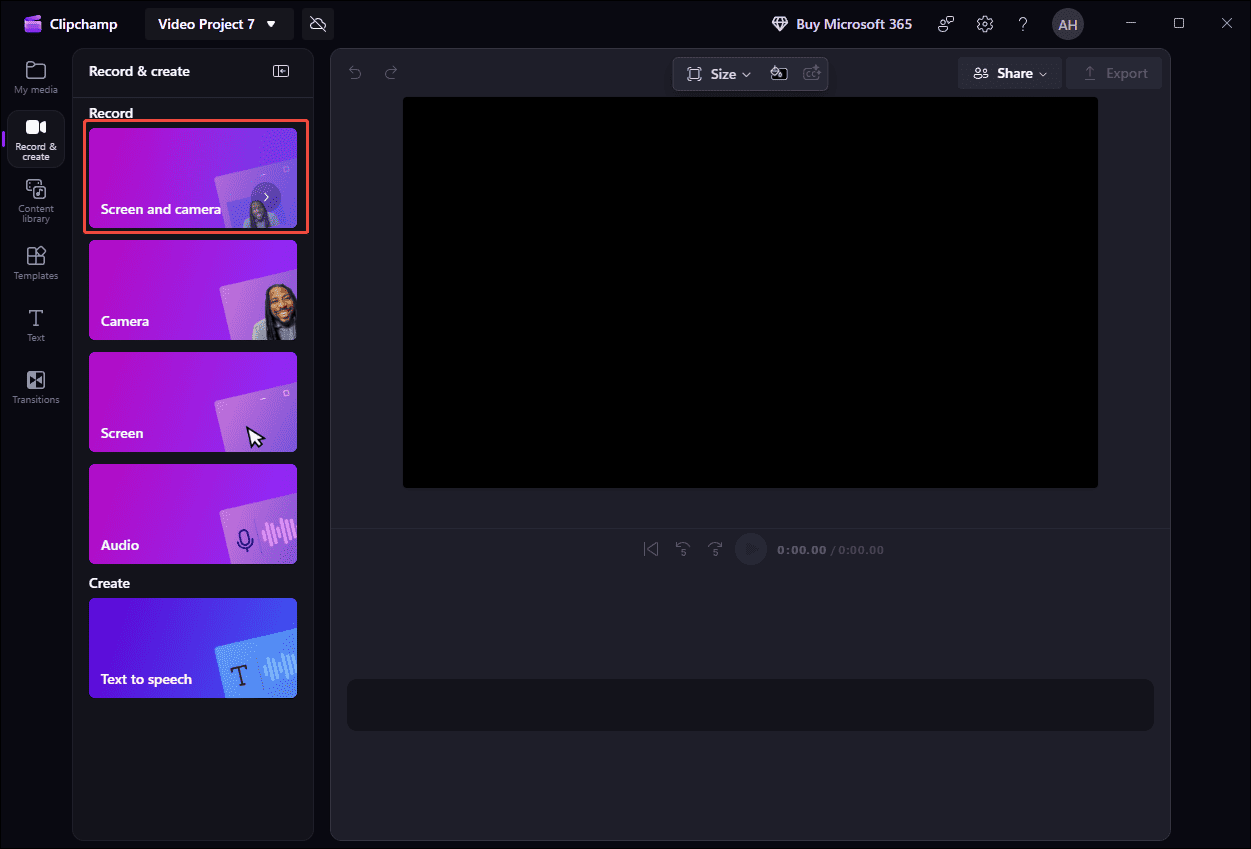
Launch Microsoft Clipchamp and click Create a new video to enter its main interface. Next, click Record & create and select Screen and camera.
Step 2: Check Camera and Audio
A new Screen recording window will appear, and check the camera footage and adjust the angle for the best result. The audio recording feature is enabled by default. To add a script, click Script and type your notes.
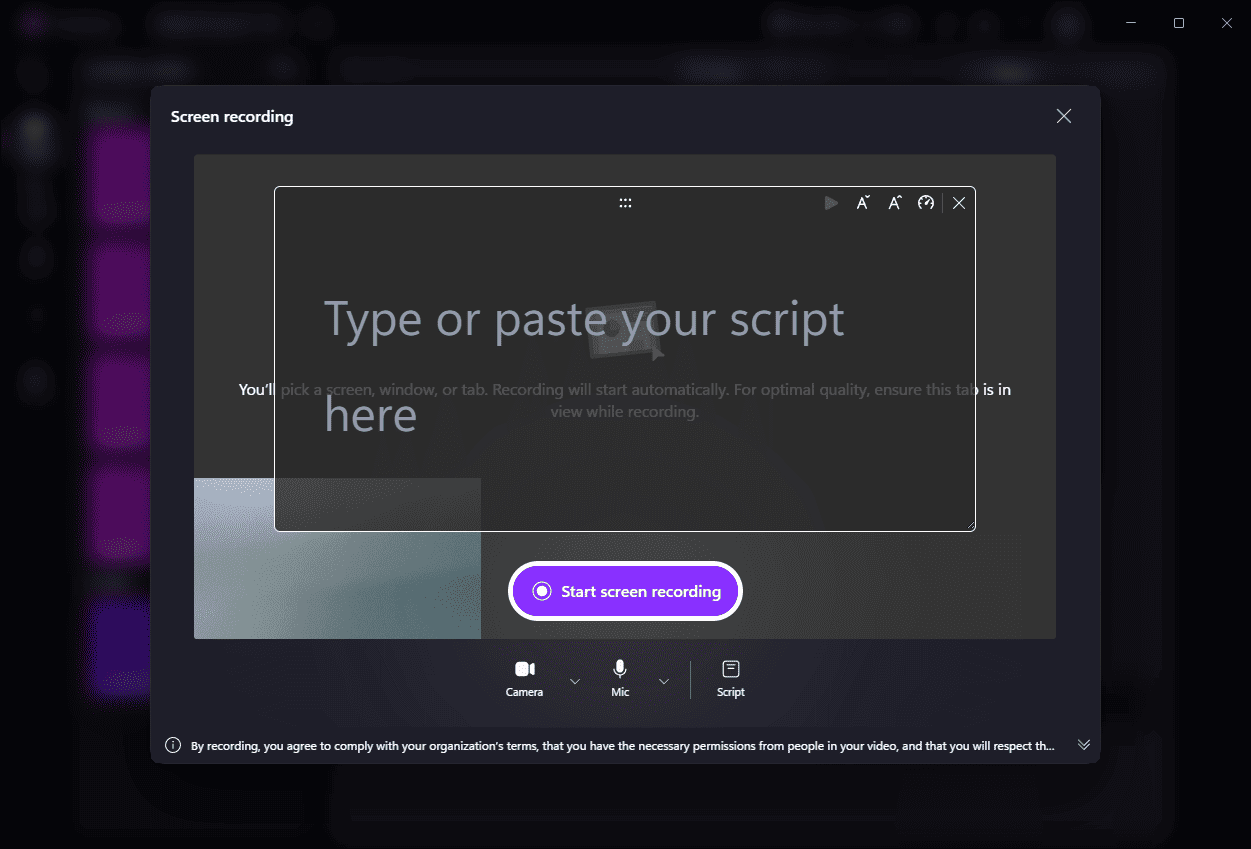
Step 3: Start and End Recording
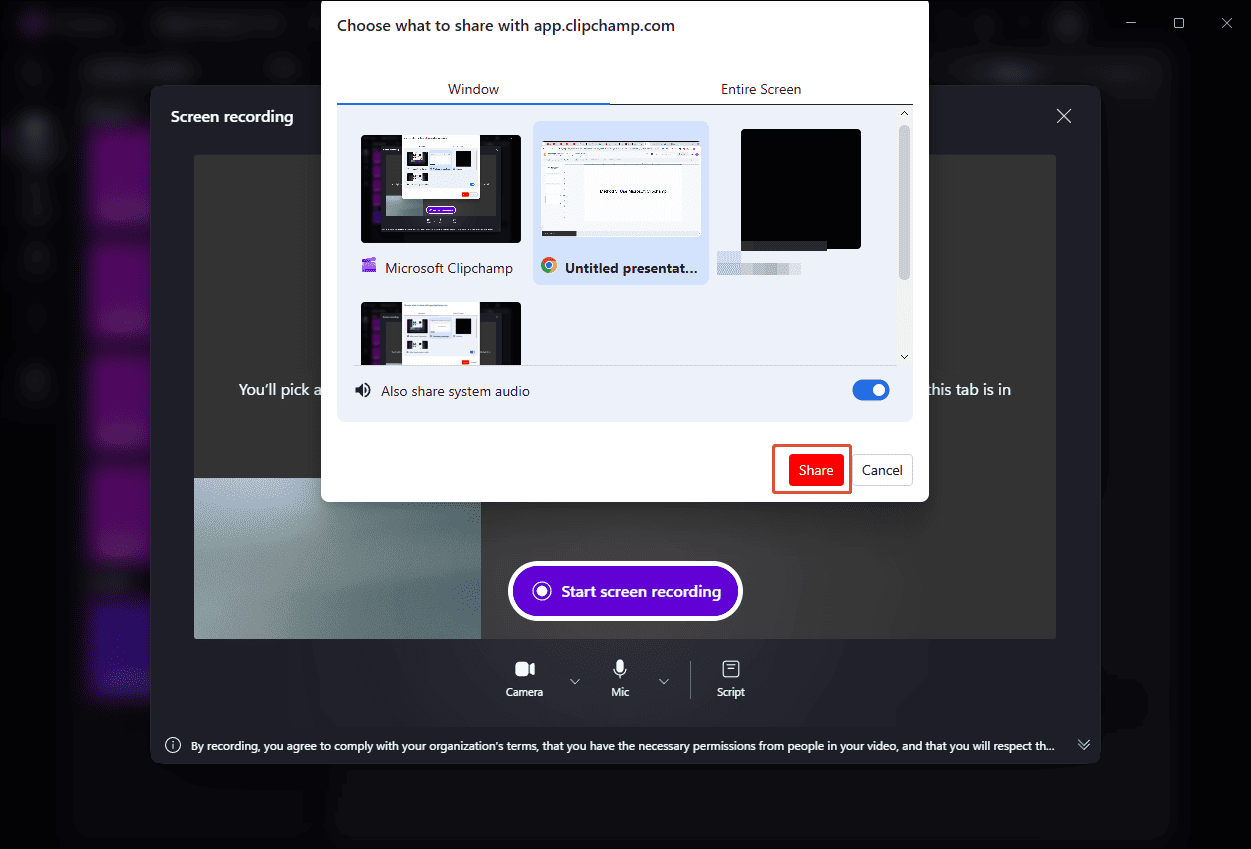
Open the target slide deck in Google Slides. Then, click the Start screen recording button and select the Chrome window. Enable the Also share system audio option. Next, click the Share option, and the software will start recording after a 3-second countdown. Then, click Slideshow in Google Slides to present it in full-screen mode.
After the presentation, click the Stop and review icon to end the recording. Then, select Save and edit to edit the recording within the application.
Now, a clear understanding of how to record a presentation on Google Slides with face using Microsoft Clipchamp has been established. However, during my testing, I found that both the camera position and shape can only be adjusted after the recording has started, which can be inconvenient when trying to set up the layout in advance.
Tips for Recording Google Slides Presentations
To record a video of yourself on Google Slides perfectly and professionally, it is not enough to choose the powerful tool. It’s also necessary to make preparations before recording to improve the final result. The following section compiles a list of practical tips.
Check the Slides and Equipment
Make sure the content in the slides is clear, concise, and free of errors. Use the speaker notes in Google Slides or the teleprompter in Microsoft Clipchamp to guide the presentation without overcrowding the slides.
What’s more, check the microphone, camera, and network connection to ensure they are working properly. It’s also a good idea to close unnecessary applications to avoid distractions or performance issues during recording.
Rehearse Before Recording
Practicing once or twice before recording can help you maintain a natural pace and reduce mistakes. Speak clearly, maintain eye contact with the camera, and use a steady tone.
Choose a Quiet Environment
Choose a quiet space with minimal background noise and good lighting, so the face is clearly visible in the camera bubble. A clean and uncluttered background can also make the presentation look more professional.
Conclusion
This post explains how to record yourself on Google Slides using three practical methods. For users with a Google Workspace work or school account, the built-in recorder offers a quick and convenient way to record presentations. For those using a personal Google account, alternative tools such as MiniTool Screen Recorder and Microsoft Clipchamp are also powerful enough to create professional-quality recordings.
If you have any suggestions or encounter any problems when using MiniTool Screen Recorder and MiniTool MovieMaker, please don’t hesitate to contact us via support@minitool.com. Also, you can directly share your problems with me on X. I will help you as quickly as possible