Is there the best screen recorder for Windows 11? Of course! This article shares with 2 excellent screen recorders, including the Windows 11 built-in Snipping Tool and a third-party application: MiniTool Screen Recorder.
3 Screen Recording Types on Windows 11
Before choosing a recorder, it’s important to learn the different screen recording models available on Windows 11.
1. Full Screen Recording
Full-screen recording captures everything displayed across the entire monitor. It’s ideal for recording gameplay, tutorials, and scenarios with multiple windows displayed simultaneously. It doesn’t need to frame a recording area, simplifying the screen recording process. Furthermore, the full-screen model provides a clear view, ensuring viewers don’t miss any information.
Correspondingly, the disadvantage of full-screen recording is that it may record some unnecessary content, such as notification messages or application icons. Additionally, full-screen recordings typically produce larger file sizes, consuming more storage space.
2. Selected Area Recording
Region recording involves manually selecting a rectangular area on the screen for recording. It’s suitable for recording specific sections of software or web pages, small video clips, and operational parts of tutorials. The advantage of selected area recording is that it only records the desired area, helping to keep the audience focused. Also, compared to full-screen recording, it selects a smaller area, resulting in a smaller file size.
3. Specific Windows Recording
Specific window recording only captures the content of a single window on the screen. It is well-suited for recording browser and application windows. Specific window recording allows you to automatically follow the window without repeatedly switching between screen content. However, it is less flexible and not suitable for scenarios requiring recording across multiple windows.
Why Record Screen on Windows 11
People record their screens for a variety of reasons. Here are 3 common reasons you may care about.
1. For Recording Meaningful Videos
People often record their highlight moments on screen, such as saving important exam results, video chats with friends far away, or capturing an important online event. Screen recording allows them to preserve meaningful content.
2. For Capturing Gameplay
Gamers often use screen recording to share gameplay, exciting moments, and interactions. Recording game-related content on Windows 11 can serve as replay material, evidence in game disputes, and a way to share their gaming experiences and delicate game skills.
3. For Saving Online Tutorials
People also usually use screen recorders to record important webinars. Sometimes, webinars may contain video or document content that is inconvenient to share. Recording this content allows for saving it for future reference.
How to Screen Record on Windows 11
The above covers some basic information about screen recording. Next, let’s try 2 best screen recorder for Windows 11.
1. Use the Snipping Tool
Windows 11 includes Microsoft’s built-in screenshot tool: Snipping Tool. It’s a native, free, and ad-free tool. This tool can not only capture screenshots but also record video, facilitating efficient workflows. Snipping Tool also supports flexible selection of the recording area. However, it only allows recordings up to 30 minutes at a time, which may not meet the needs of recording longer videos.
Below is how to record screen on Windows 11 using the built-in Snipping Tool.
Step 1. Launch Snipping Tool
Press the Windows logo + Shift + S to open the Snipping Tool.
Step 2. Frame the Recording Area
Click on the Video Record icon to frame the region you want.
Step 3. Control the Audio
Click on the Microphone icon and the System Audio icon to choose whether to record dual audio or only capture one of them.
Step 4. Start/stop the Recording
Click the Start button to start the recording. Then, open the content you want to record on the screen. When you want to stop this screen recording, click on the Stop Recording icon to finish.
Step 5. Store this Recorded Video
After ending the recording, the recorded video will appear in the Snipping Tool. Press Ctrl + S to store it.
Using Snipping Tool in Windows 11 avoids downloading a new application, which helps record video instantly and saves computer storage.
2. MiniTool Screen Recorder
If the built-in screen recording settings don’t meet your needs, you can try a professional third-party screen recorder for more advanced settings and higher recording quality. MiniTool Screen Recorder is the best screen recorder for Windows 11, which is designed for users who demand quality and powerful features.
MiniTool Screen Recorder allows you to record the entire screen, a specific area, or a specific window. Its user-friendly interface makes it easy for even beginners to get started. Furthermore, MiniTool Screen Recorder is highly flexible, supporting the recording of system audio, microphone voice, or both simultaneously. In addition, there is no recording time limit.
What’s more, MiniTool Screen Recorder also allows you to add a real-time screen annotation during recording. It also supports recording webcam, creating a picture-in-picture effect with screen recording.
Let’s explore how to screen record for Windows 11 using MiniTool Screen Recorder.
Step 1. Get MiniTool Screen Recorder
Click on the download button below to download and install MiniTool Screen Recorder. Then, run and log in to it.
MiniTool Screen RecorderClick to Download100%Clean & Safe
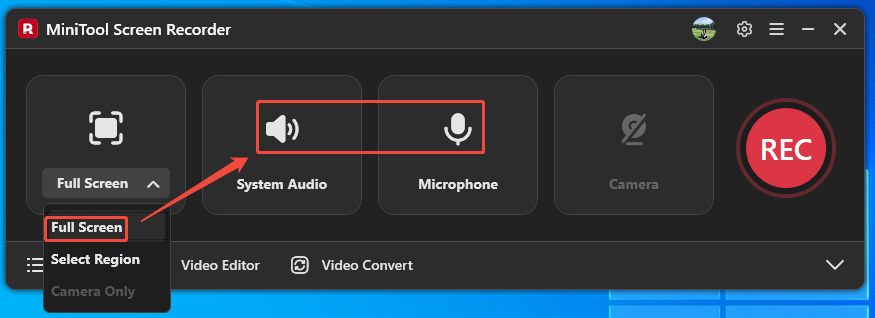
Step 2. Choose the Recording Region and Control Audio
Expand the screen recording type and choose the Full Screen option. Then, click on the System Audio icon and the Microphone icon to decide whether to record the computer sound and voiceover.
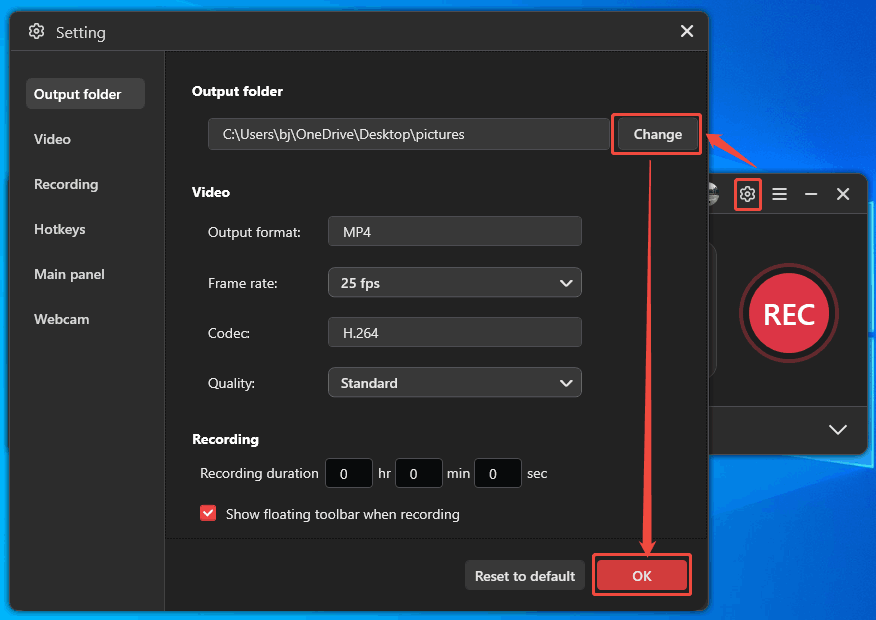
Step 3. Select a Storage Location
Click on the Gear icon to trigger the Setting window. There, click on the Change button to select a saving path. Then, click on the OK button to save the change.
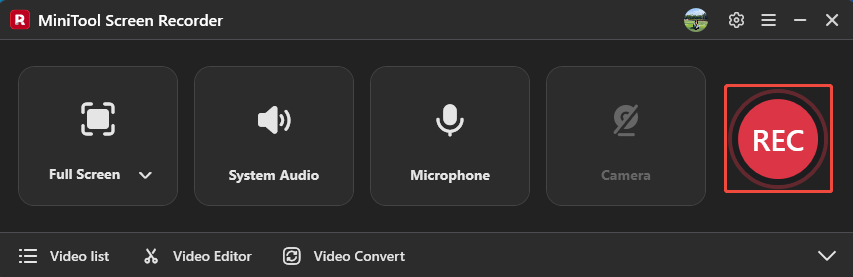
Step 4. Begin the Recording Process
Click on the REC button to begin the recording after a 3-second countdown. Then, open the window or website you want to capture. To stop the screen recording, press the F6 key.
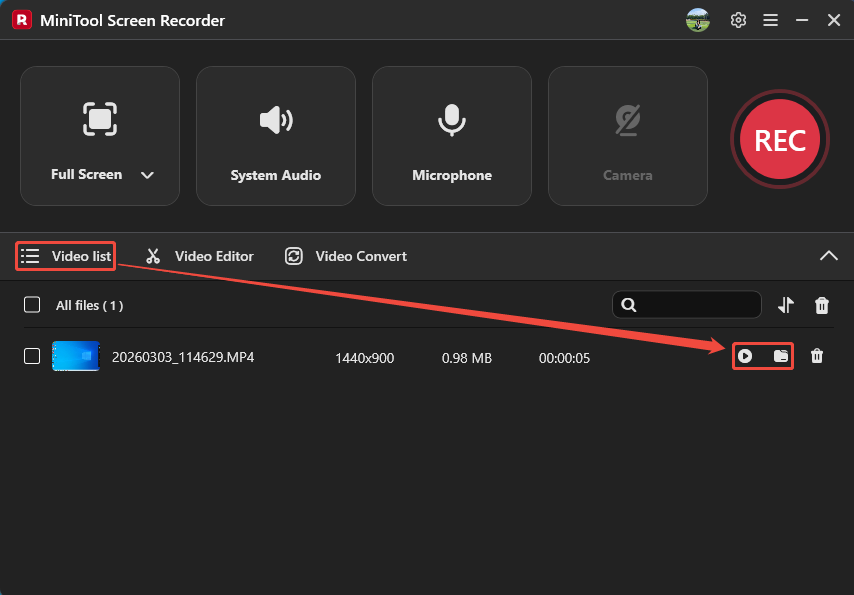
Step 5. Check and Locate the Recorded Video
Once the recording finishes, the recorded video will land in the Video list tab. There, click on the Play icon or the Folder icon to check or locate it.
Using MiniTool Screen Recorder to screen record for Windows 11, you can get recordings without watermarks.
Final Words
This article shows 2 screen recording types and explains why screen recording for Windows 11, including the built-in Snipping Tool and a professional desktop recorder: MiniTool Screen Recorder.
If you want to learn more about MiniTool Screen Recorder. Please feel free to contact us via MiniTool’s official email at support@minitool.com. Also, a more convenient way is to send me a message on X. I will reply to you as soon as possible.