Recording a seminar can be simple with the right recorder and preparations. How to record a webinar? This article shares 4 surprising screen recorders: the built-in recorders of Google Meet and Zoom, MiniTool Screen Recorder, and Xbox Game Bar. It also provides suggestions for subsequent steps after recording.
Why Record a Webinar
Many people regularly record webinars for later review or sharing. Here are 5 reasons people will consider.
#1 Save Live Webinars
Webinars are conducted in real-time and can’t be replayed once they end. Recording webinars preserves the presentations, interactions, Q&A sessions, and other details. This is an invaluable asset for businesses, organizations, and participants. Recorded webinars can also be saved as key evidence. In case of emergencies or copyright infringement issues, the well-preserved webinar content can serve as crucial evidence.
#2 Reuse Webinar Content
Webinar recordings are reusable content. They can be edited into short videos, course compilations, or marketing promotional videos to gain the maximum value. One recording may lead to multiple innovations and generate more derivative products, which transform the short-term value of a webinar into long-term value.
#3 Serve as Reference Materials
Webinar recordings provide teams with insights for preparing future webinars, optimizing presentation flow, and innovating presentation content. Hosts can also review the recordings to learn how to control and present in meetings, improve their presentation style, refine their explanations, or debrief on issues.
Preparations Needed Before a Webinar Recording
It is important to have thorough preparation before starting the recording. Here are 6 things to consider before recording.
Confirm Attendees and Invitation Information
As the host of a webinar, it’s vital to confirm the participants, the number of attendees, and other details. Late arrivals or connection issues may disrupt the flow and affect recording quality. It’s also essential to ensure all participants receive accurate invitations and access links. Confirming these details in advance enhances the meeting experience for participants, ensures a smoother meeting, and maximizes the effectiveness of the recording.
Choose the Right Meeting Platform
Different webinar platforms have varying recording permissions and functions. After deciding how to record the webinar and confirming the participants, you also need to confirm whether the platform supports built-in recording. It's also advisable to prepare a third-party professional screen recorder as a backup if the built-in one doesn’t work.
Adjust the Recording Parameters
Screen settings directly affect the quality of the recorded video, such as screen resolution, frame rate, and audio source. Before starting your webinar, adjust your screen settings to avoid recording stutters due to high resolution or frame rate.
How do you record a webinar? Read the next section to learn about the meeting built-in screen recorders and third-party professional screen recorders.
How to Record a Google Meet Webinar
Google Meet supports recording a webinar smoothly. It allows you to record webcam and dual audio. Moreover, Google Meet enables you to record a full-screen, interactive, and real-time caption. However, as an initiator, you need a paid Google Workspace subscription to record Google meetings. If you are an invited participant and wish to record a webinar, you must apply for recording permission from the conference organizer.
Below is how to record a webinar with Google Meet.
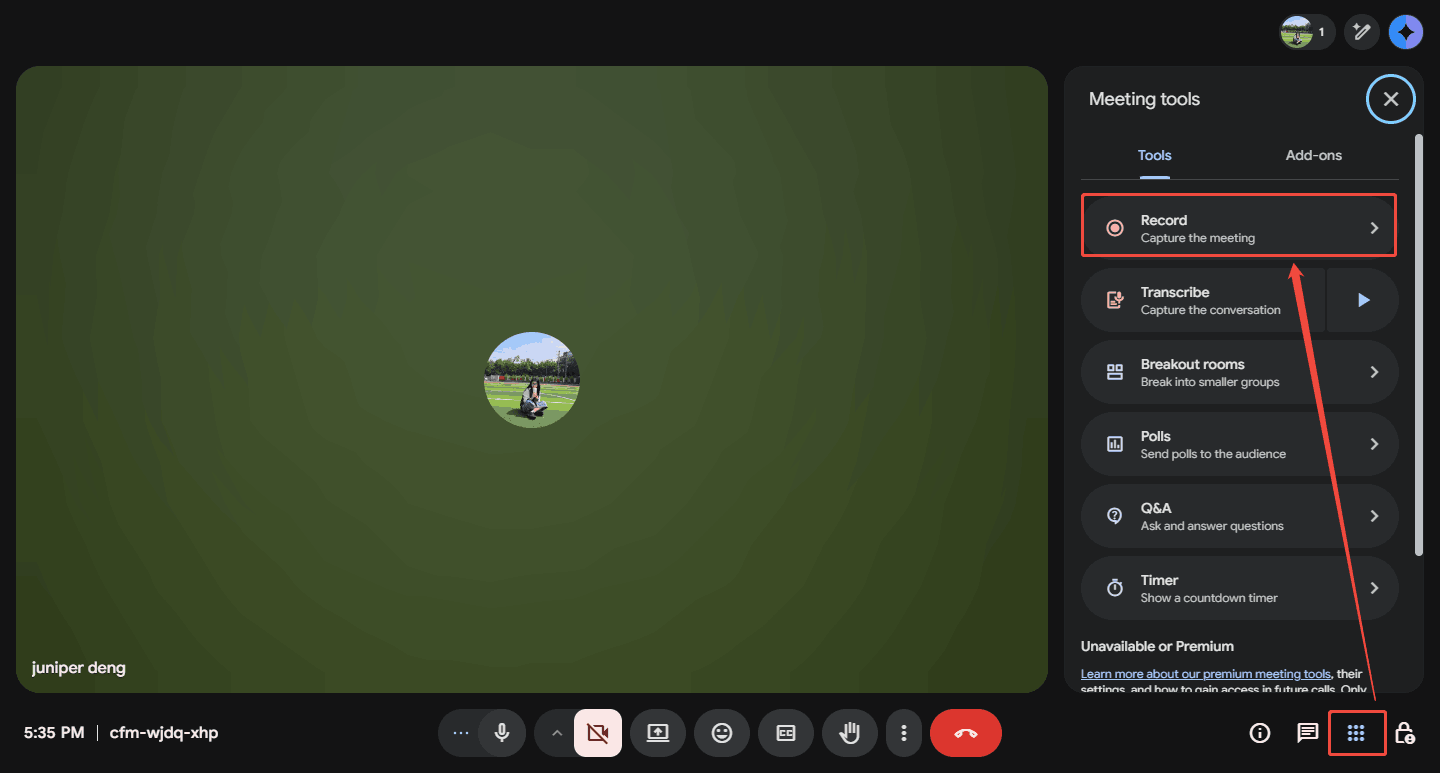
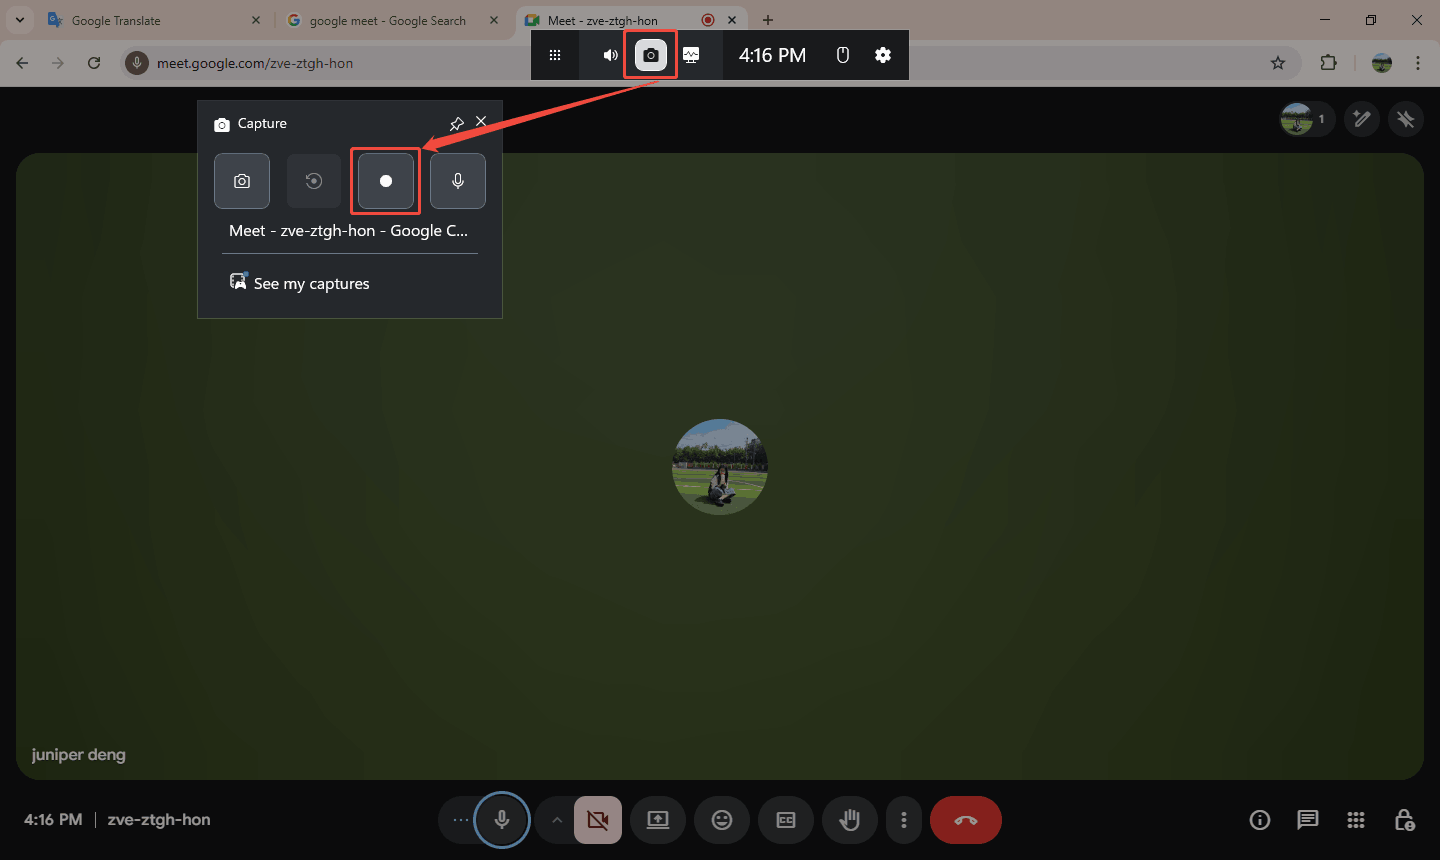
Step 1. Open Google Meet
Run the Google Meet in Chrome and log in to your Google account. Next, expand the Meeting tools option in the bottom-right corner of the page. Then, choose the Record option to switch to the Recording page.
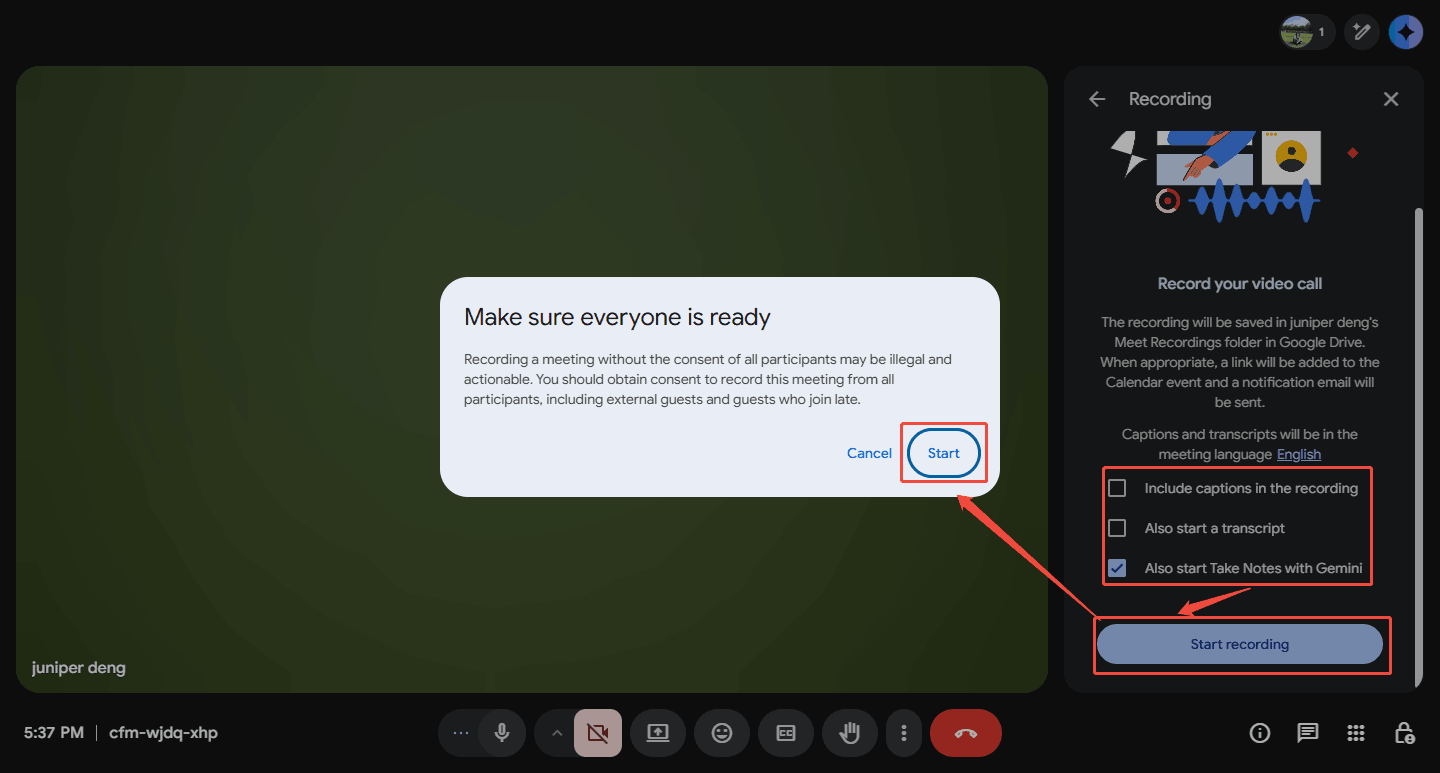
Step 2. Begin the Recording
In the Recording page, check or uncheck captions, transcripts, and Gemini notes. Then, click on the Start recording option and the Start button to begin the recording. At this time, you can start your webinar.
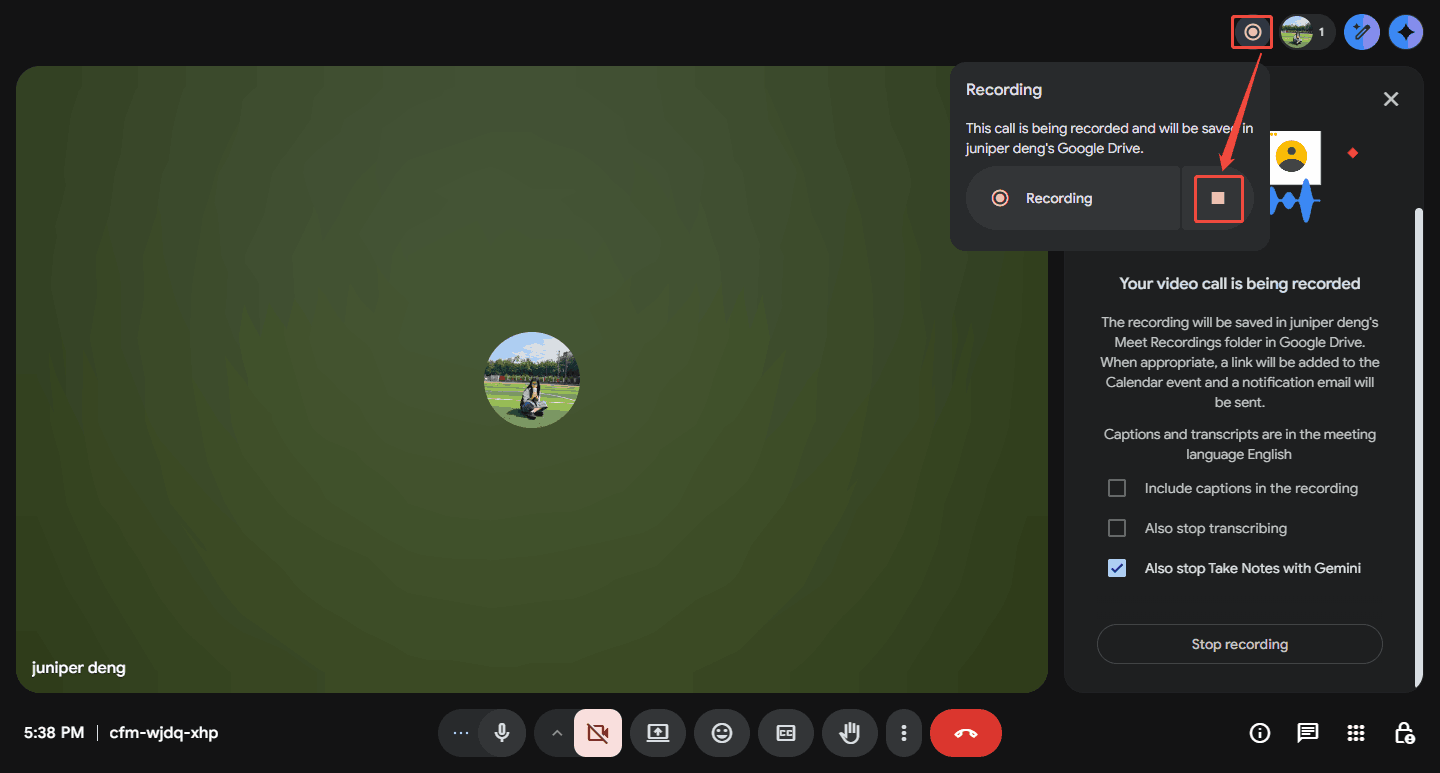
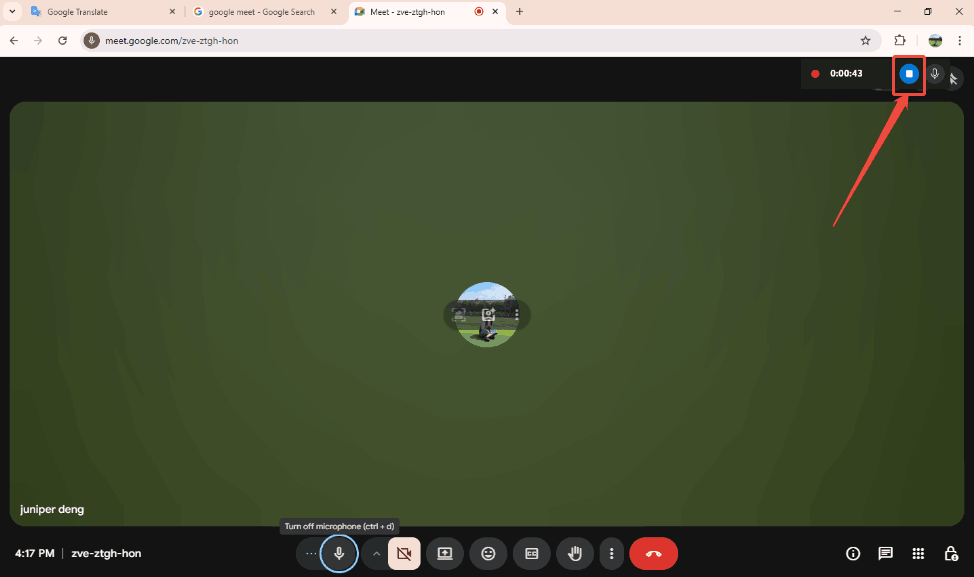
Step 3. Stop the Recording
To end this recording, hover your mouse over the Recording icon and click on the Stop recording button. Then, click on the Stop button in the Stop recording pop-up window to confirm that you need to end it. Finally, find the recorded video in your Google Drive.
The steps above are on how to record your webinar screen using the built-in recorder in Google Meet. Notably, it has a recording time limit of up to 8 hours.
How to Record a Zoom Webinar
Zoom is a comprehensive office platform. Its meeting feature includes a built-in recorder that can record meeting content while holding a webinar. What’s more, Zoom launches a free meeting plan to help you save on office expenses. Additionally, it has its own desktop application and browser-based access.
Here, I will show how to record a webinar using the Zoom website version.
Step 1. Open Your Zoom Meeting
Copy this URL: https://www.zoom.com/en/products/virtual-meetings/ and paste it in your browser address bar to enter the Zoom Meet page. Then, log in to your account and choose the Basic option to open the main interface of Zoom.
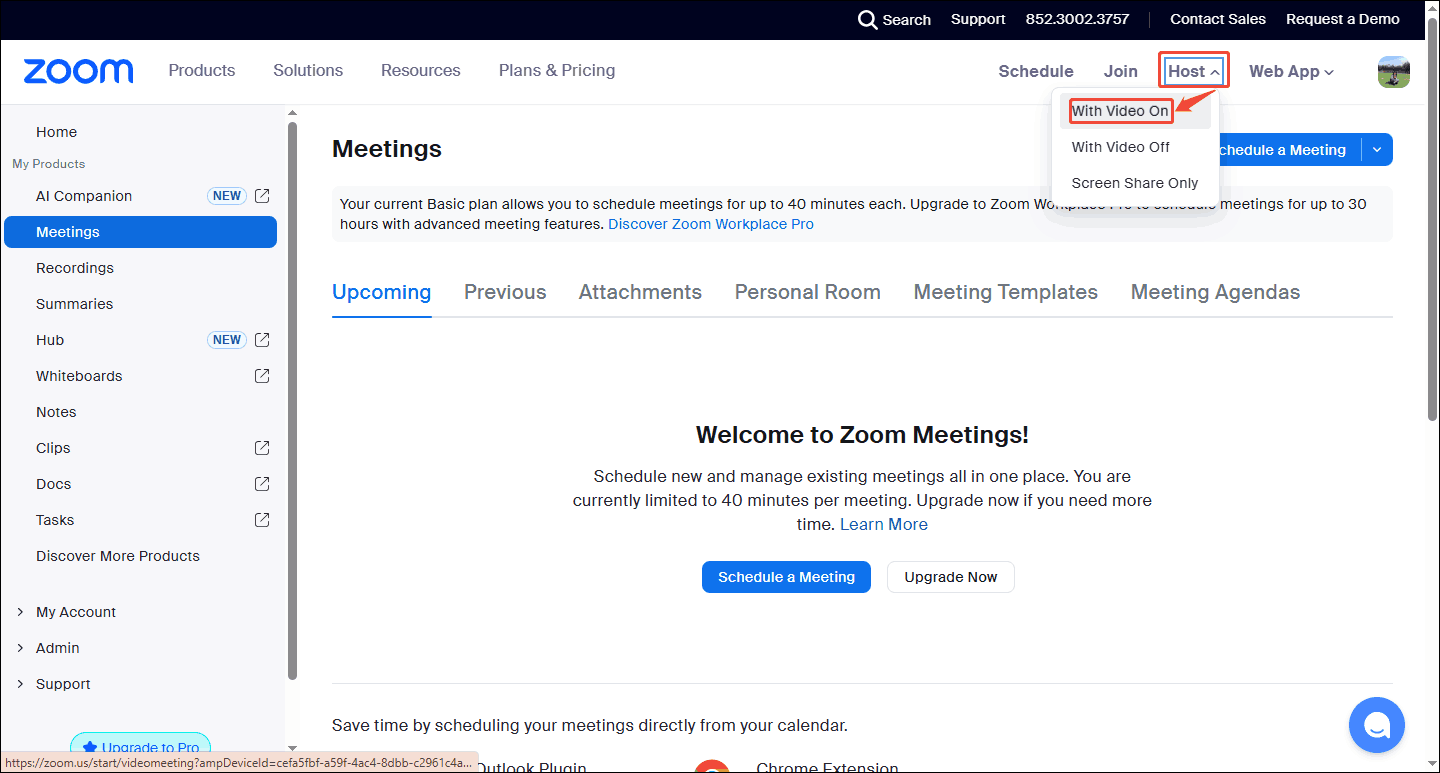
Step 2. Host a Meeting
In the Zoom main panel, expand the Host option to choose the With Video on option to open a pop-up window.
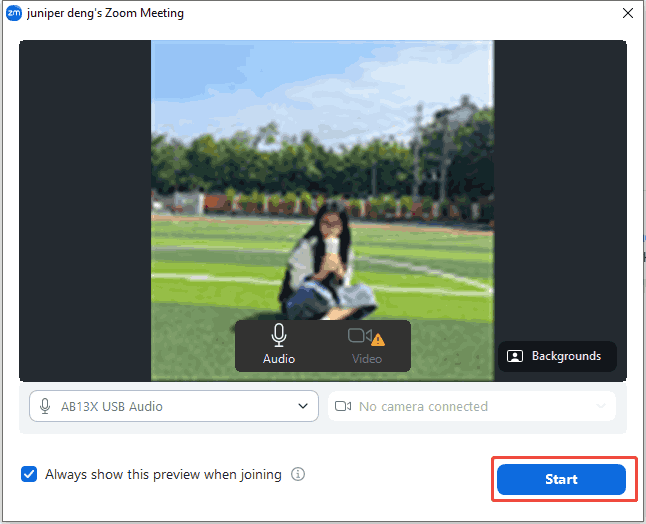
In the pop-up window, click on the Start button to start your meeting.
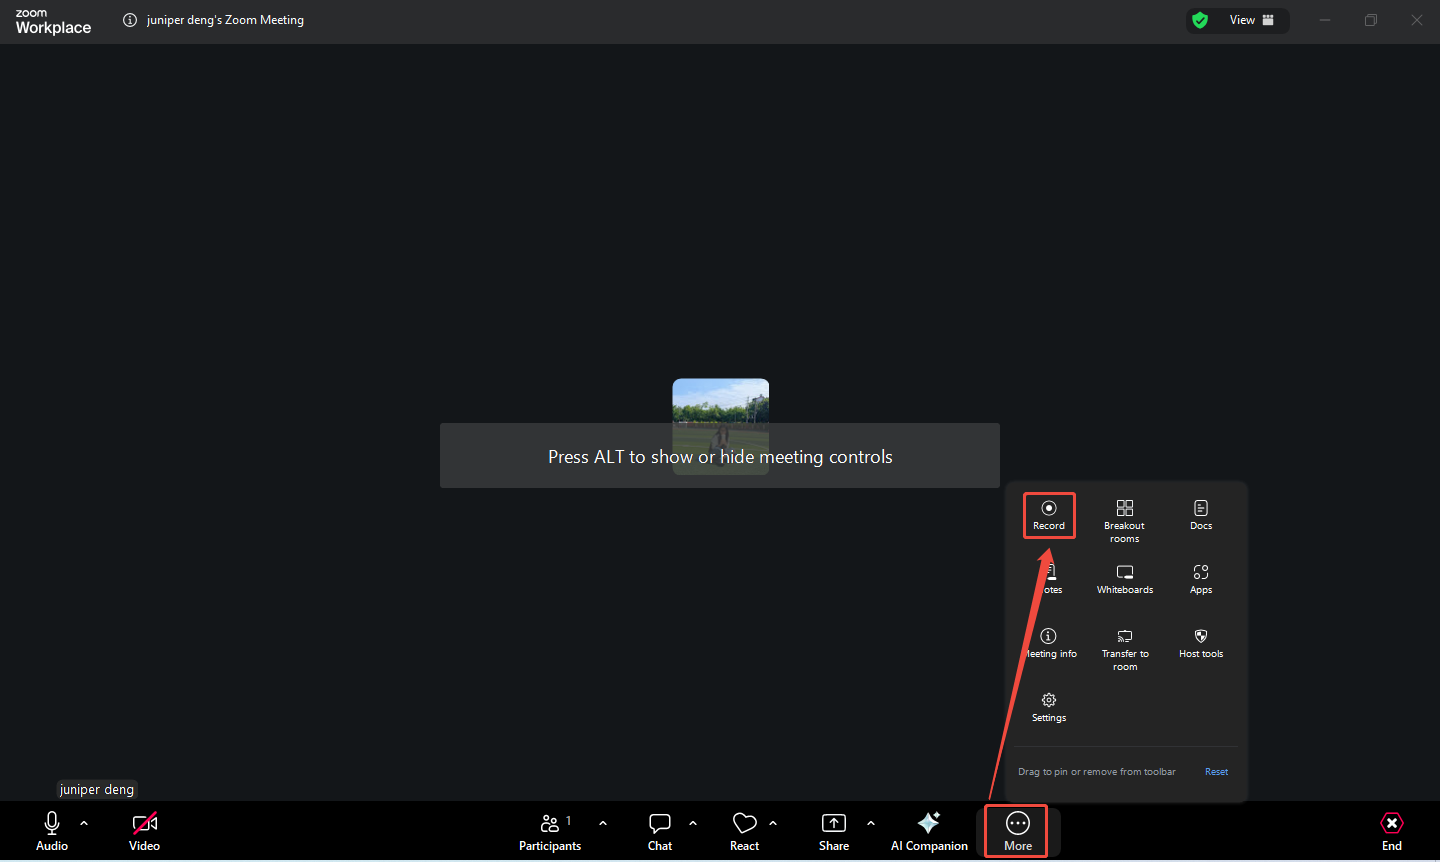
Step 3. Start Recording
Click on the More option in the tool column at the bottom of the meeting to expand the menu. There, choose the Record option to start recording.
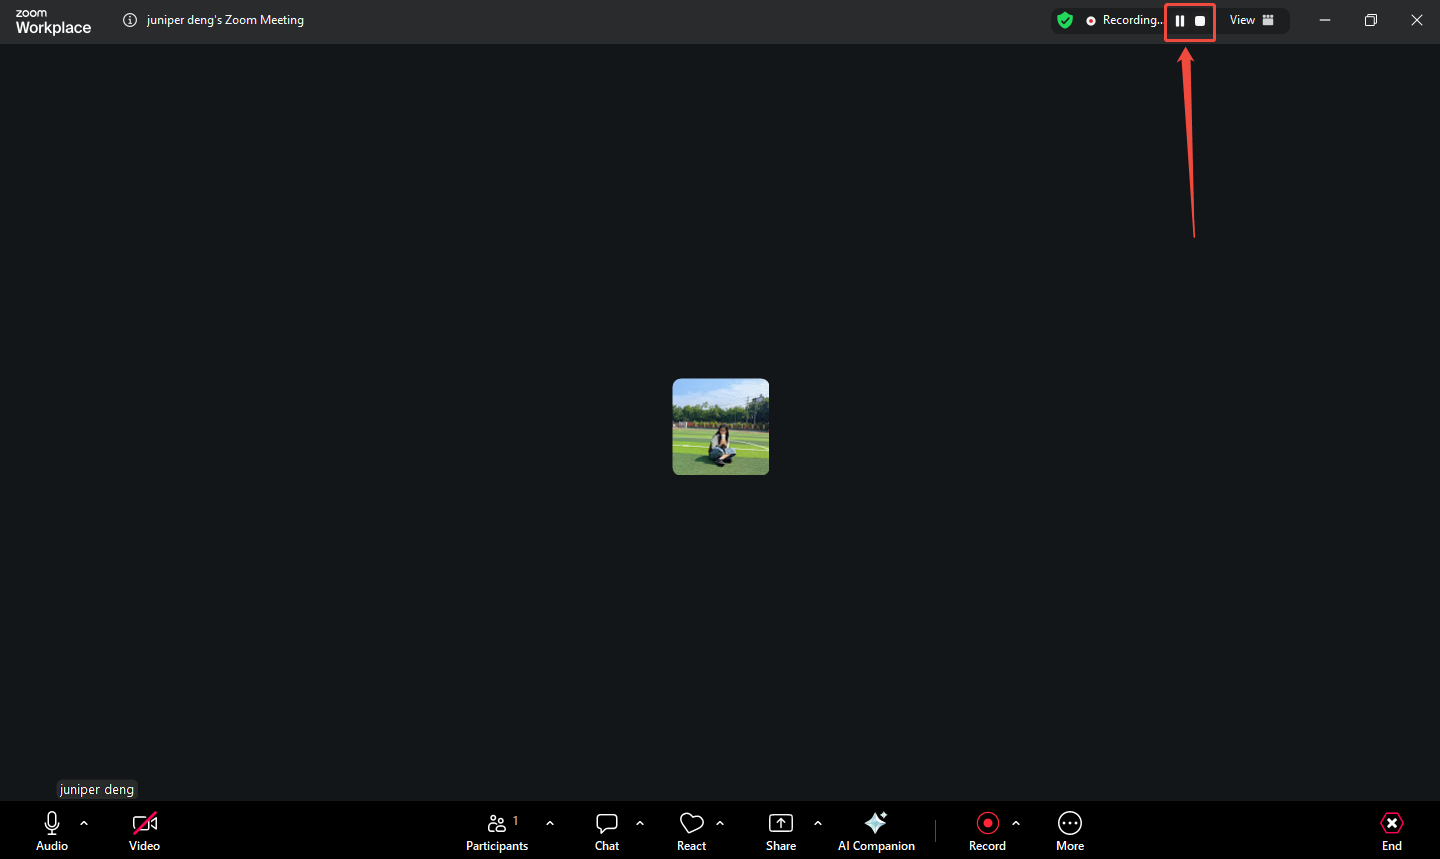
Once you want to pause/resume this recording, just click on the Pause icon. If you want to end it, click on the Stop icon. Then, when you end your meeting, this recorded video will be automatically saved as an MP4 file. This browser will locate the save destination on your computer.
Zoom Meeting offers you a free and easy webinar recording experience.
How to Record a Webinar with MiniTool Screen Recorder
If you need a more professional recorder to capture a webinar, choose MiniTool Screen Recorder. It supports recording video without a time limit. MiniTool Screen Recorder doesn’t have any ads, bundles, or watermarks. In addition, it also allows you to record a full screen or a selected screen.
MiniTool Screen Recorder supports recording webcam and customizing the size, position, and shape of webcam overlay. Apart from this, it also enables you to add real time annotations while recording. MiniTool Screen Recorder distinguishes between system sound and microphone audio recording, allowing you to choose to record either one or both.
Below is a tutorial on how to record a webinar with MiniTool Screen Recorder instantly and easily.
Step 1. Download and Install MiniTool Screen Recorder
Get MiniTool Screen Recorder by clicking the download button below. Then, follow the on-screen instructions to install and launch it.
MiniTool Screen RecorderClick to Download100%Clean & Safe
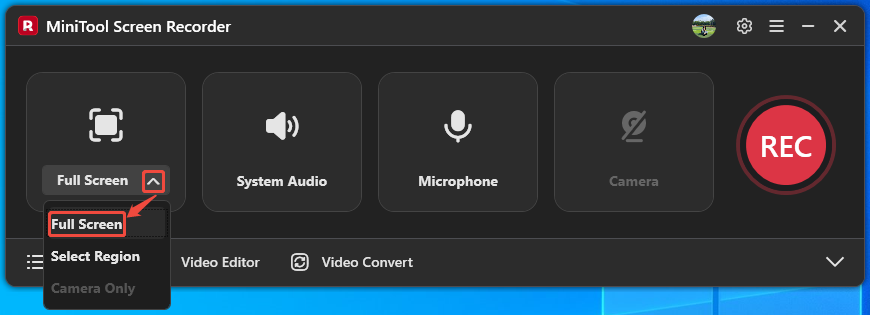
Step 2. Choose a Recording Type
After running MiniTool Screen Recorder, click on the Sign in option to access your account. Then, expand the first option to select a recording pattern as needed. I choose Full Screen.
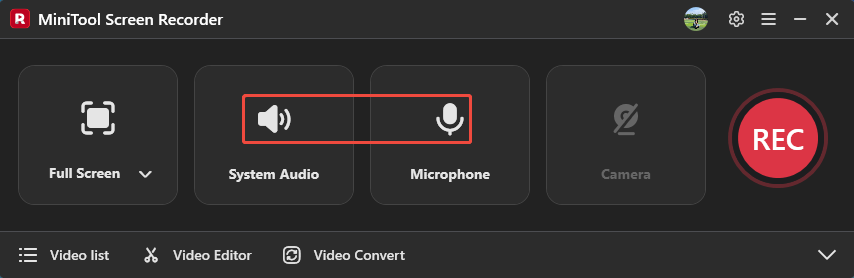
Step 3. Manage Dual Audio
Click on the System Audio icon and the Microphone icon to decide whether to record internal computer sound and voiceover.
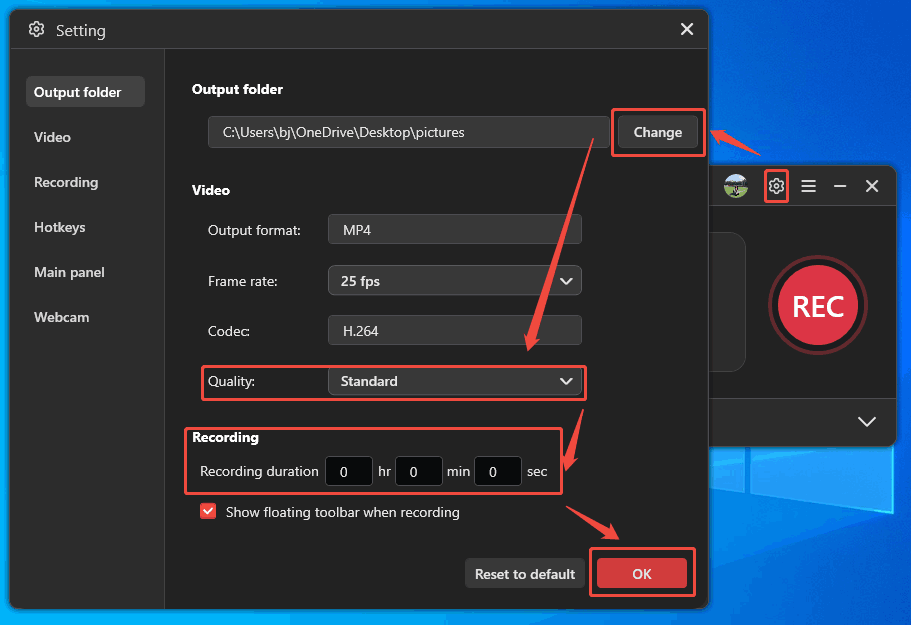
Step 4. Complete Settings Before Recording
Click on the Settings icon on the upper-right of the interface to open the Setting window. There, click on the Change button to specify a storage location. You can expand the Quality option to pick a proper recorded video quality. Or you can enter a time in the Recording section to preset a recording duration. Then, click on the OK button to save these changes.
Step 5. Start Recording
When a series of settings finishes, click on the REC button to start the recording process after a 3-second countdown. Then, you can start your webinar on the screen. If you want to pause or resume this recording, press the F9 key. To stop the current recording, press the F6 key.

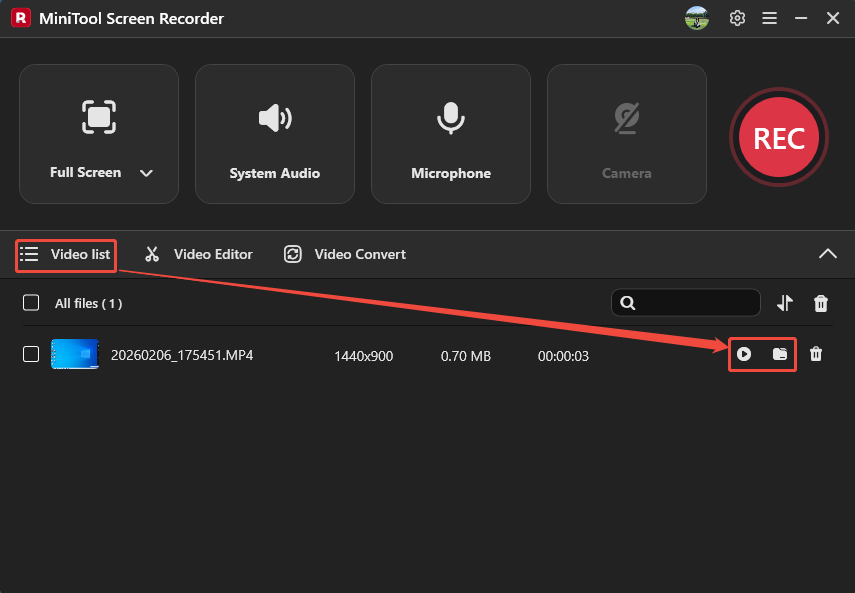
Step 6. Review the Recorded Video
Once the recording ends, the recorded video will land on the Video list tab. Here, click on the Play icon to check the recorded video. Or click on the Folder icon to access it on your computer.
MiniTool Screen Recorder helps you record high-quality webinars at up to 4K resolution. It also empowers you to adjust the frame rate freely.
How to Record a Webinar with Xbox Game Bar
Xbox Game Bar is a Windows-built-in recording tool. It allows you to record a webinar without downloading or install extra application. Xbox Game Bar also enables you to record system audio and your microphone voice. In addition, it provides a computer performance monitor panel. You can check your computer’s performance before recording to avoid problems such as lag or black screen recording.
Next, I'll record a webinar on Google Meet as an example. Let’s try to record a webinar using the Xbox Game Bar with a quick guide.
Step 1. Launch Xbox Game Bar
Press Win + G to open the Xbox Game Bar.
Step 2. Begin/Stop the Recording
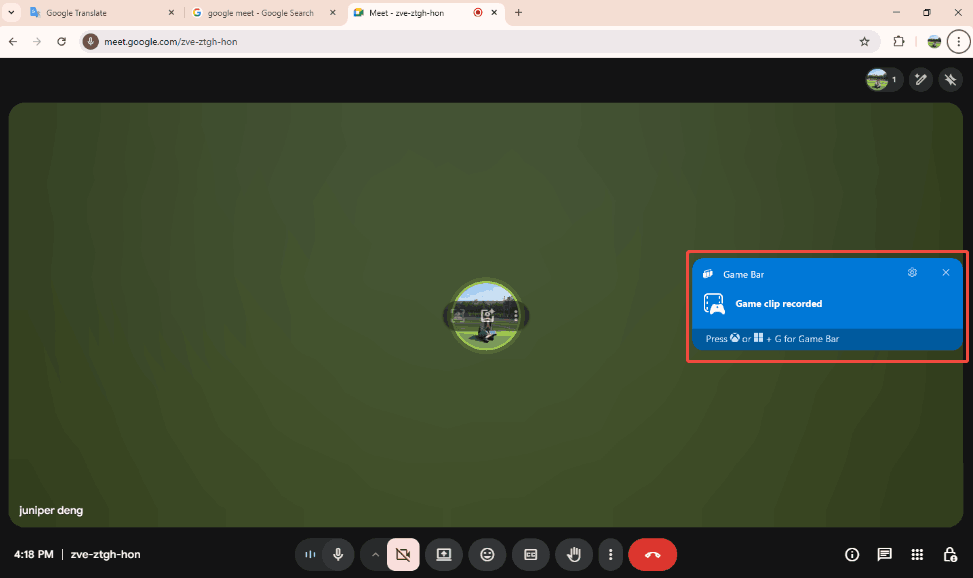
After you running Xbox Game Bar, here’s a toolbar. Click on the Capture icon to trigger the Capture window. In this window, click on the Start recording option to begin the recording. Then, open your webinar page.
When you want to end this recording, click on the Stop recording button.
Step 4. Check the Recorded Webinar
After ending this recording, a shear board will pop up. Then, click on it to trigger the Gallery window.
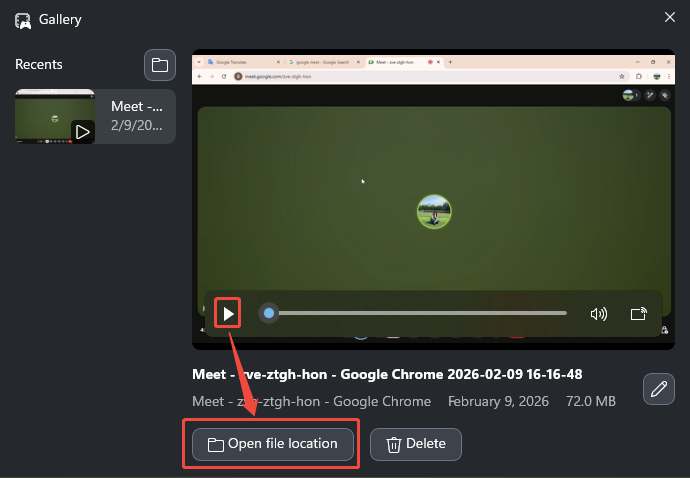
Step 5. Check the Recorded Video
In the Gallery window, click on the Play icon to check this recorded video. Also, you can click on the Open file location option to locate it.
Xbox Game Bar is a practical webinar recorder. However, it only allows you to record videos for 4 hours. Therefore, before choosing the Xbox Game Bar, you need to arrange the webinar’s recording time.
Next Steps After Recording the Webinar
What should you do after ending the recording? Here are 3 essential steps you should know.
1. Check If the Screen Recording Is Complete
After recording, make sure you have saved the video and note where you saved it on your PC. Then, play the video in its entirety to confirm that the webinar recording is complete, without interruptions, omissions, or audio problems. Identifying problems early will help you decide whether you need to re-record or edit, minimizing loss.
2. Check for Any Infringing Content
Some webinars contain copyrighted material or information that is not for commercial use. You need to carefully review the recorded content to ensure it can be shared legally and compliantly. If necessary, remove or blur sensitive content before distribution.
3. Add/Delete and Edit Content
You can also cut out unnecessary pauses, add titles, or delete irrelevant parts. Basic editing can improve the quality and professionalism of your seminar recording. Editing can also enhance the viewing experience.
Bottom Line
This article shares how to record a webinar with the 2 recorders that come with Google Meet and Zoom. It also shows 2 third-party recording tools, including MiniTool Screen Recorder and Xbox Game Bar. Both the built-in recorders and Xbox Game Bar have a recording time limit. Therefore, I highly recommend the third-party screen recorder: MiniTool Screen Recorder. It is free and has no limit on recording time.
If you have any questions or suggestions about MiniTool Screen Recorder, please contact us via email at support@minitool.com. Or you can send me a message directly on X. I’m willing to reply to you.