Where does VLC save recordings? By default, they are saved to your system’s Videos folder. In this article, you will see how to capture your screen with VLC and how MiniTool Screen Recorder can do it faster and easier.
What Is VLC?
VLC, also known as VLC Media Player, is a free and open-source multimedia player. Its most prominent feature is its strong compatibility. It can be used on a variety of systems, including Windows, macOS, Linux, Android, and iOS. Furthermore, it supports a wide range of formats, including MP4, MKV, MOV, AAC, MP3, OGG, and more. You can also use VLC to convert formats.
Can VLC record screen? The answer is absolutely yes. VLC is not just a media player but also a screen recorder. It also allows adjustment of the recording frame rate and output format.
Where Does VLC Save Recordings?
VLC Media Player saves videos to the default “Videos” folder on your computer. If your computer is running Windows 10 or 11, you can find the VLC screen recording files with the following steps:
Step 1: Open File Explorer
Click the yellow folder icon on the taskbar or simply press Windows + E to open File Explorer.
Step 2: Find Videos Folder
In the File Explorer window, click the Local Disk (C:) option on the left column, and select the Users folder on the right. Then, double-click the folder with the same name as your username (user’s home directory). You will find the Videos folder.
Step 3: Check Your Recorded Video
All the videos recorded by VLC Media Player will be saved in the Videos folder.
Without changing the VLC record location, the above steps can ensure that Windows 10 or 11 users can successfully find videos recorded by VLC.
Where does VLC save recordings on Mac? Your recorded videos are saved in the “Movies” folder by default. You can click the Finder icon in your Dock, choose the Movies folder on the left-hand sidebar under your favorites, and find the recorded videos in this folder.
How to Record with VLC?
In this section, I will show you how to choose the save folder for VLC recordings and how to record with VLC Media Player.
How to Change the Default Save Folder
As mentioned, VLC recordings land in the system’s Videos folder. If you want to change the VLC record location, simply follow these steps:
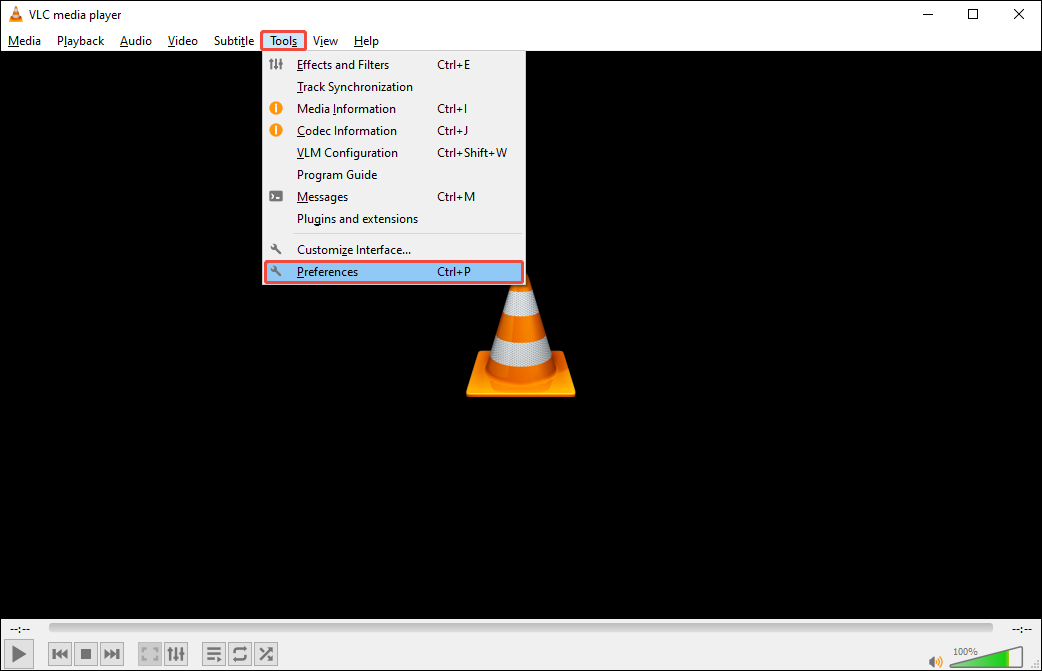
Step 1: Go to VLC Media Player Preferences
Launch VLC Media Player, choose the Tools tab in the menu bar, and select Preferences.
Step 2: Set Storage Location
In the Simple Preferences window, make sure you are in simple settings mode and choose the Input / Codecs tab. Then, click the Browse button in the Record directory or filename section.
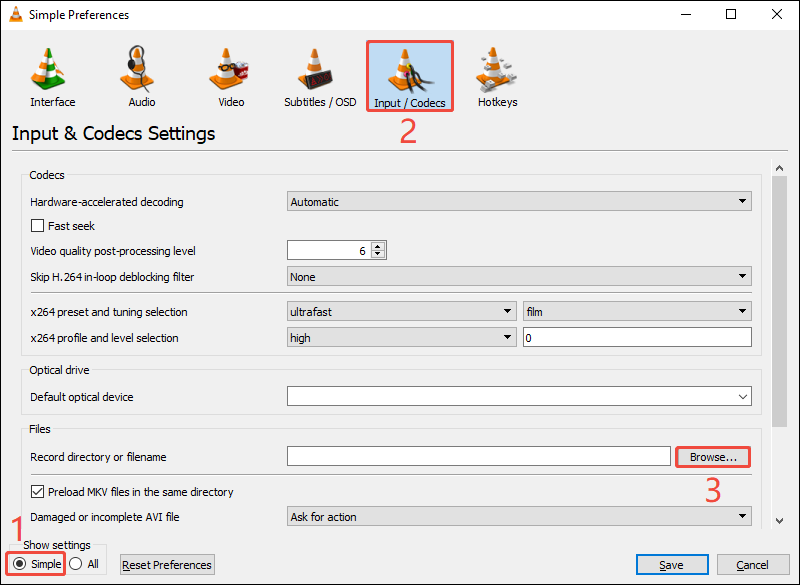
In the pop-up window, choose a folder you want, and click on Select Folder. Then, you will go back to the Simple Preferences window, click the bottom-right Save button to save your changes.
The methods above can easily change VLC’s default save path. Now, follow the steps below to learn how to record video and audio using this application.
How to Record a Video with VLC
Can VLC record screen? Yes! With VLC Media Player, you can easily record screens, videos, browsers, games, and more. There are also no recording time limits. Here’s how to do it:
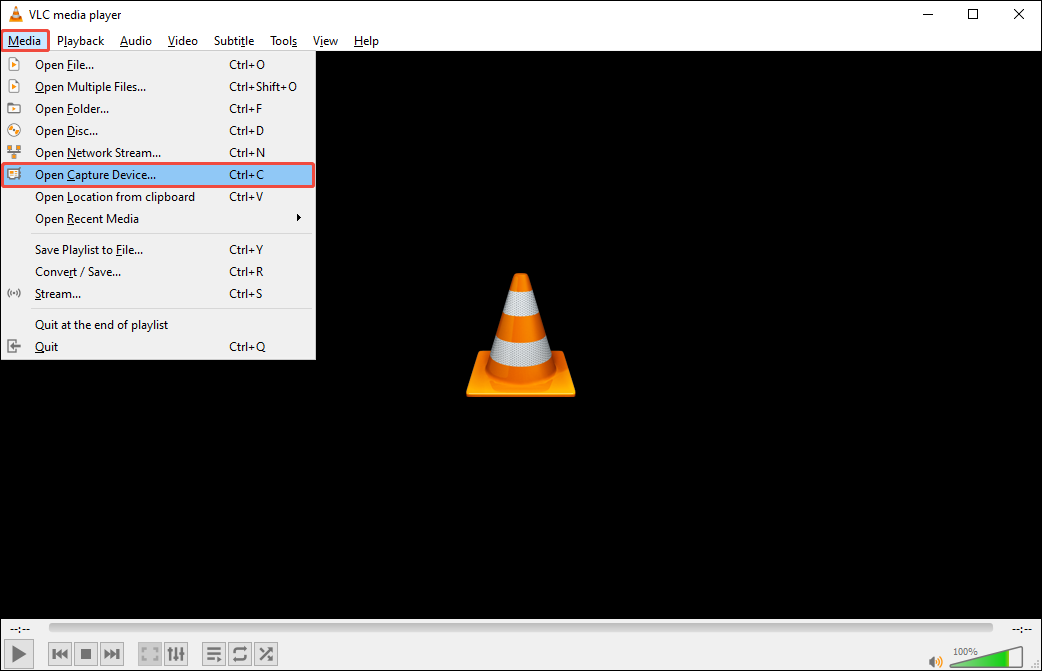
Step 1: Open Capture Device
Click the Media tab on the menu bar and select Open Capture Device.
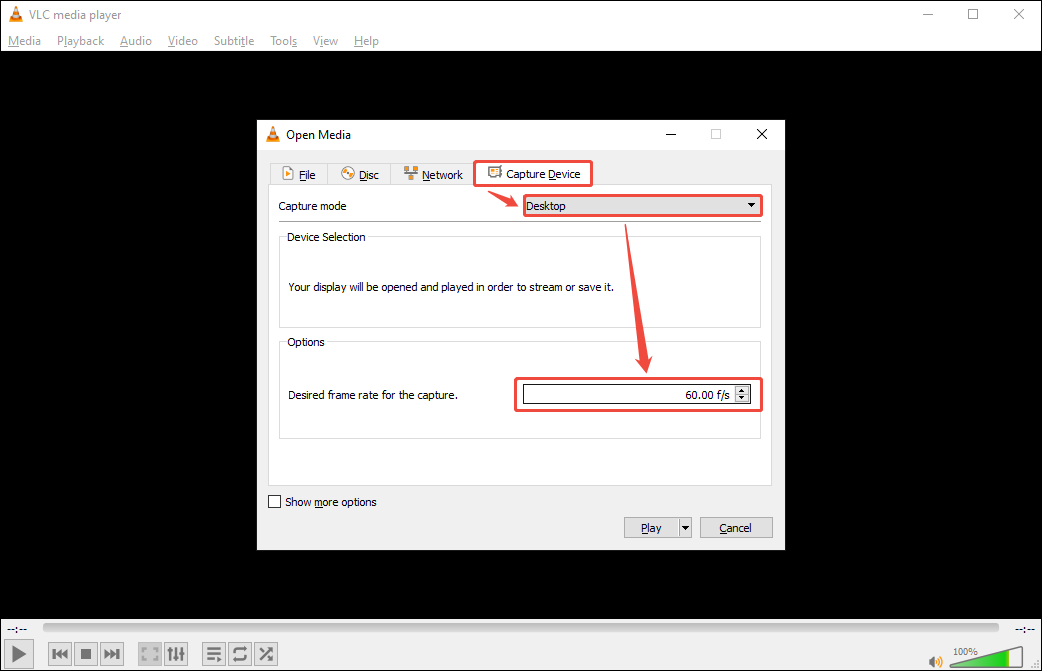
Step 2: Set Capture Mode
In the Open Media window, choose the Capture Device tab, expand the Capture mode option, and select Desktop.
Step 3: Enter the Frame Rate
In the Desired frame rate for capture area, type the frame rate you want in the blank text box.
Step 4: Choose Video Encoder
Click the small triangle icon next to Play and then select the Convert option from the drop-down menu.

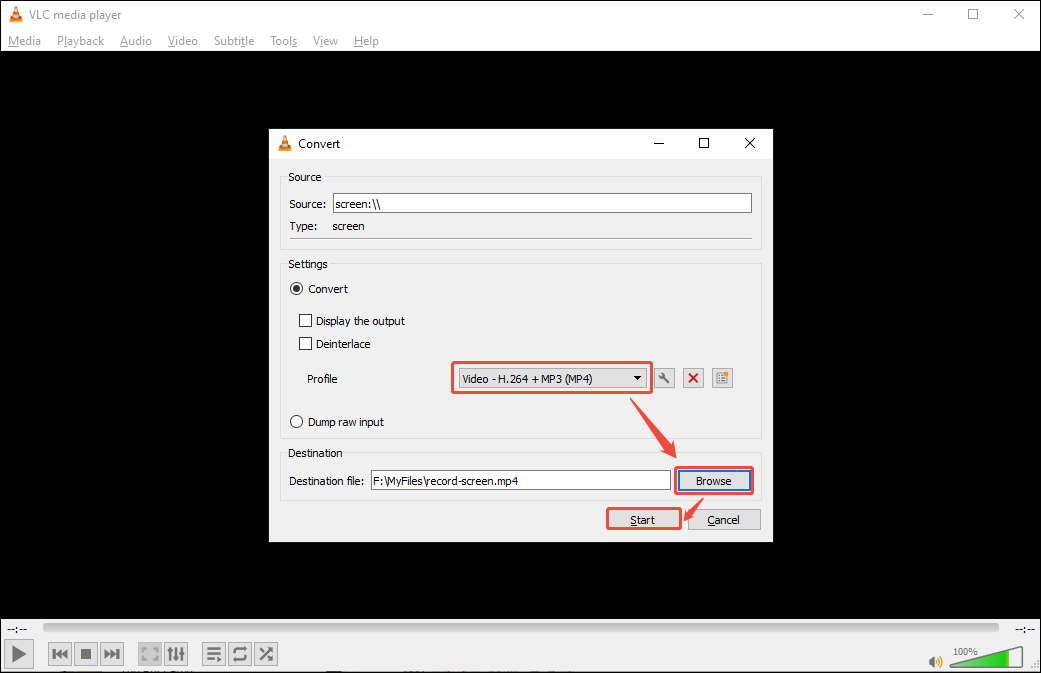
Step 5: Set Output Format and Save Location
In the Profile section, choose Video - H.264 + MP3 (MP4). Then, click Browse to select the save folder.
Step 6: Start Recording
Click Start to start recording your screen.
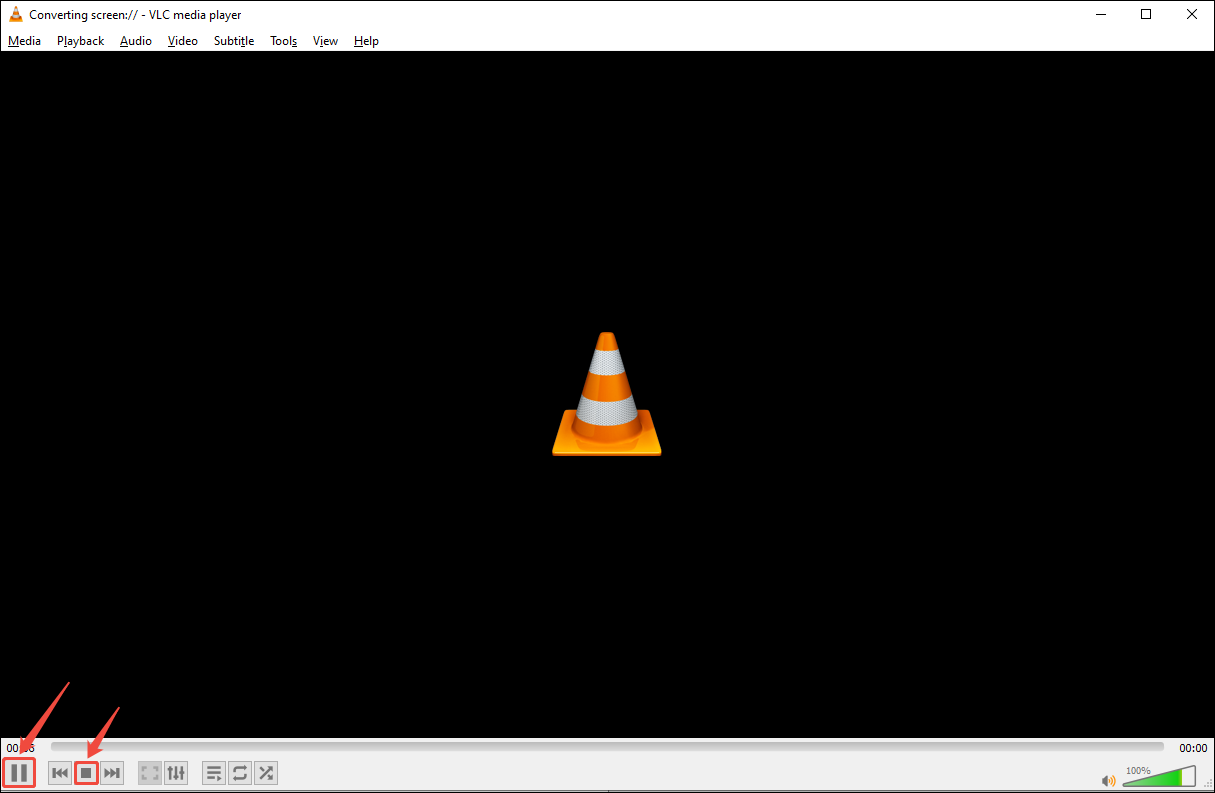
Step 7: Pause/Resume/Stop Recording
To pause recording, open the recording window and click the Pause the playback button in the bottom left corner. Click the play button to resume recording. To end recording, simply click the stop icon.
How to Record Audio with VLC
VLC Media Player also supports recording system audio and microphone sounds. Follow the steps below to record audio using this application:
Step 1: Open Capture Device
Click the Media tab on the menu bar and choose Open Capture Device.
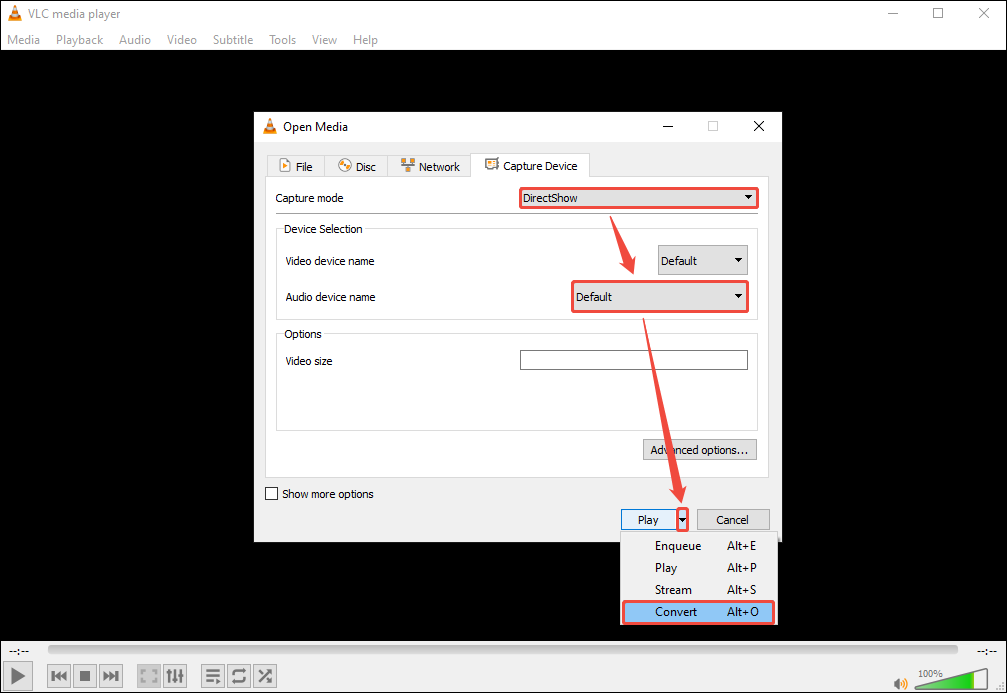
Step 2: Configure Capture Devices Settings
In the pop-up window, expand the Capture mode option and select DirectShow. Then, select the speaker or microphone for the Audio device name. After that, click the down arrow beside the Play option and choose Convert.
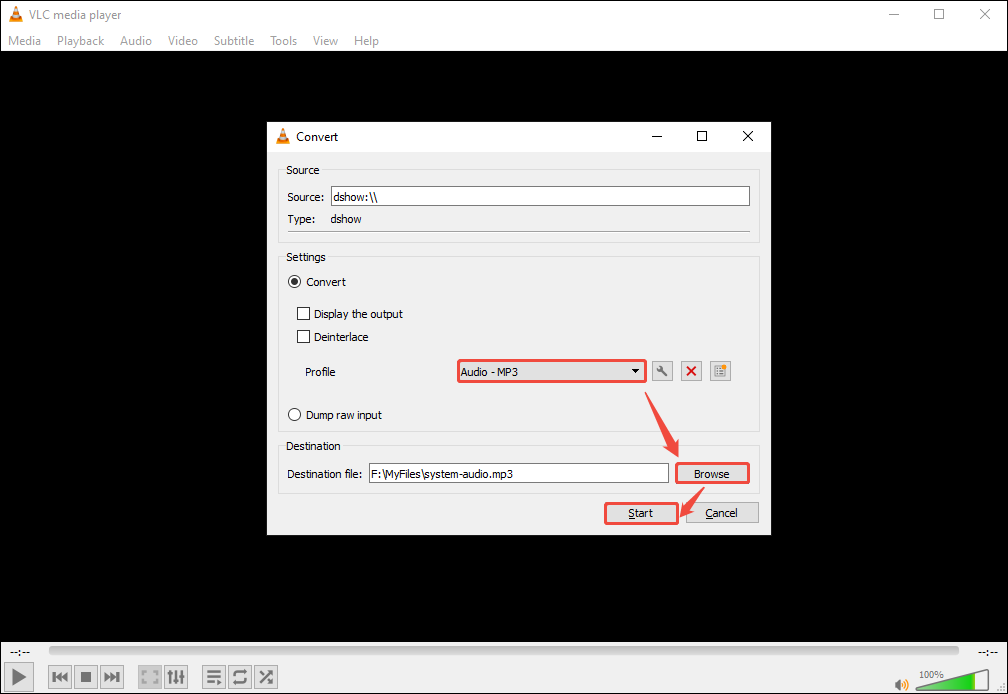
Step 3: Set Profile and Destination
Select an MP3 preset, then enter a file name and pick where to save it by clicking Browse.
Step 4: Start Recording
Once everything is configured, click Start to begin recording.
Step 5: Stop Recording
Click the stop icon to end the recording, then open the saved MP3 to review it.
Now, you know how to record with VLC. In practice, you may encounter various problems, such as being unable to record video, the recorded video having no sound, or the record button not working. Below, I will provide solutions to these problems.
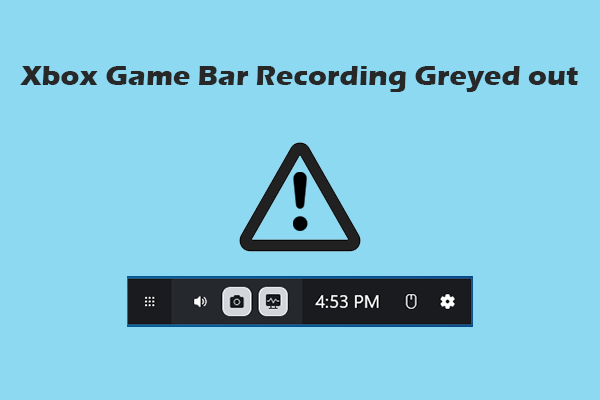
How to Fix VLC Record Not Working?
VLC’s built-in recorder lets you capture on-screen action and system audio with just a few steps. However, sometimes you might encounter VLC record not working. Here are some common situations and their solutions.
1. VLC Cannot Record Video
VLC failing to record video is a relatively common problem. You can try the following methods.
Solution 1: Restart or Update VLC
If your VLC player is unable to record videos, consider that the software version may be outdated. You can check if VLC has been updated to the latest version:
- Tap the Help tab in the menu bar.
- Choose Check for Updates.
If updates are available, a notification window will pop up. When it says “You have the latest version of VLC,” just restart VLC or your computer and try recording again.
Solution 2: Disable Video Acceleration
With hardware acceleration enabled, VLC player may only save MP3 audio files. This is likely the reason if your VLC player only records audio and not video. The following steps can disable hardware acceleration:
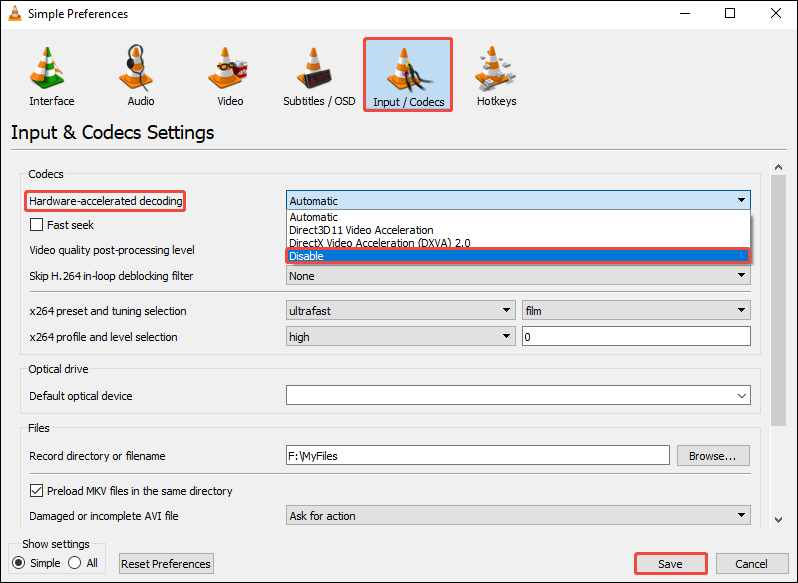
Step 1: Go to Preferences
Click the Tools tab in the menu bar and select Preferences.
Step 2: Disable the Hardware Acceleration
In the Simple Preferences window, choose the Input / Codecs tab. Then, select Disable from the Hardware-accelerated decoding list, and click Save.
2. VLC Video Recording Stuttering
If your recorded video experiences stuttering, you can resolve this by modifying the video encoder:
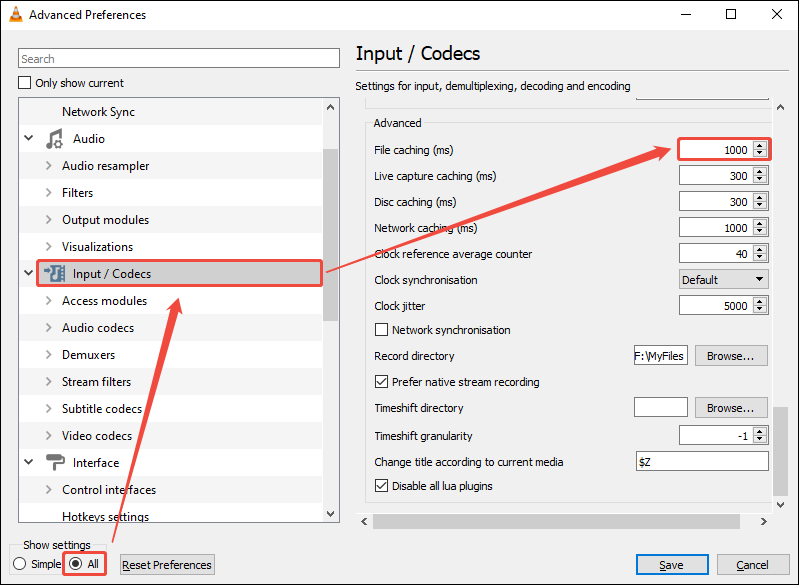
Step 1: Go to the Input/Codecs Tab
Click Tools in the top menu bar and select Preferences. Then, switch to the Input / Codecs tab and select All in the bottom-left Show settings section.
Step 2: Adjust Caching Settings
Choose the Input / Codecs option in the left panel and find the File caching (ms) option on the right-hand side. Then, you can change the file caching as needed.
3. VLC Cannot Record Audio
If a VLC recording turns out to be mute, the sound card has likely crashed or is being used by another program on your computer. In this case, you can try restarting the sound card.
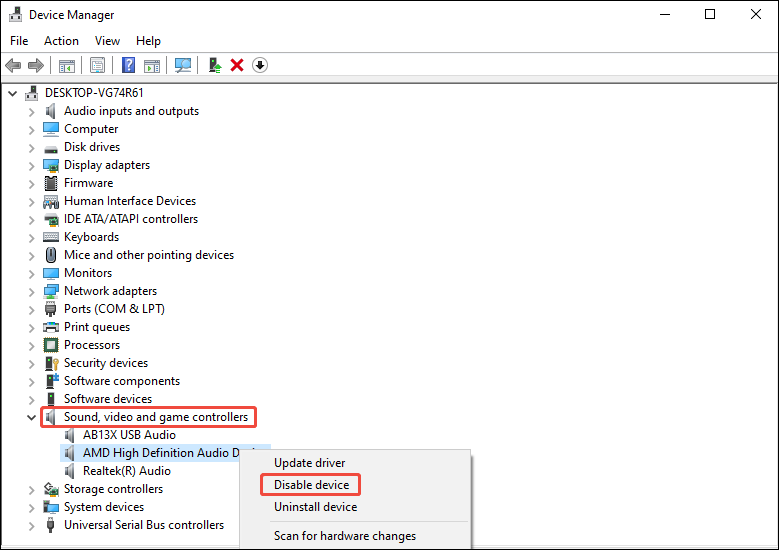
Step 1: Open Device Manager
Right-click on the Start icon and select Device Manager.
Step 2: Restart the Sound Card
In the Device Manager panel, expand the Sound, video and game controllers option, right-click the sound card, and select Disable device. Then, right-click it again and choose Enable device.
4. The VLC Recording Button Is Not Working
If you find that the recording button in VLC is not working, it might be because the Windows Defender settings conflict with VLC’s recording settings. Disabling Windows Defender may resolve the issue. Here are the steps:
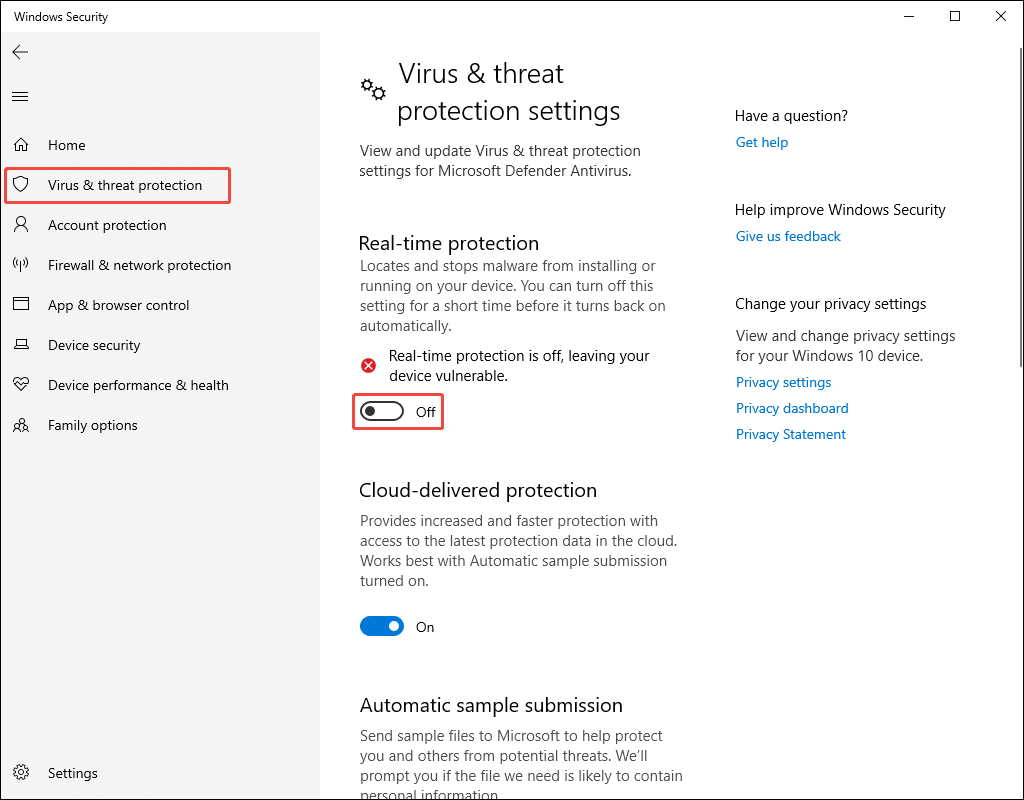
Step 1: Open System Settings
Press Win + I to open the Settings window and choose Update & Security.
Step 2: Turn off Protection
Choose Windows Security on the left menu and click Virus & threat protection. Next, choose Manage settings under the Virus & threat protection tab. Then, turn off the Real-time protection option.
While VLC can be used for screen recording, it’s not a dedicated screen recording tool. It is relatively difficult to use. Plus, sometimes VLC record not working. Therefore, using a simpler and more convenient screen recorder is the better choice.
Best VLC Alternative for Screen Recording
How can you quickly and easily record watermark-free videos? Try MiniTool Screen Recorder, a free screen recorder that even beginners can quickly get started with.
What Is MiniTool Screen Recorder
MiniTool Screen Recorder is a professional screen recording tool. It allows you to record full screen or a specified region. You can also choose whether to record system audio or microphone audio.
MiniTool Screen Recorder not only supports screen recording, but also webcam recording and screen annotation features. It allows you to choose to record the webcam separately or record it together with the screen. Also, you can add text, graphics, arrows, and highlights during screen recording for explanatory purposes.
MiniTool Screen Recorder is completely free, has no recording time limit, and does not add watermarks to the recorded videos.
How to Capture Screen with MiniTool Screen Recorder
Below is a step-by-step guide on how to record your screen using MiniTool Screen Recorder.
Step 1. Install MiniTool Screen Recorder on Your PC
You can click the button below to get the latest version of MiniTool Screen Recorder. After that, run this application.
MiniTool Screen RecorderClick to Download100%Clean & Safe
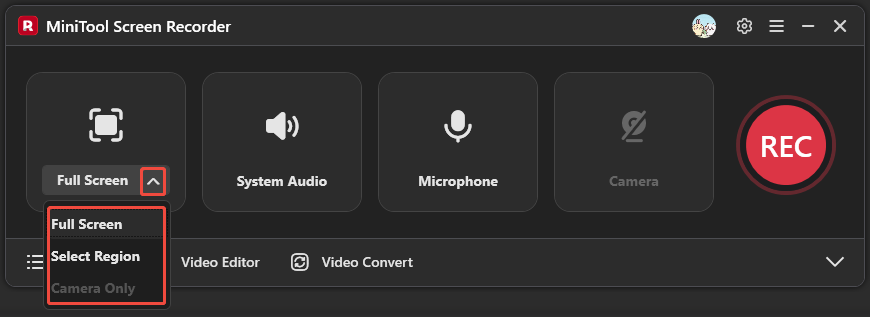
Step 2. Select Recording Area
MiniTool Screen Recorder records the entire screen by default. If you want to record a specific area or only record the webcam, click the small triangle icon next to Full Screen and select the corresponding option.
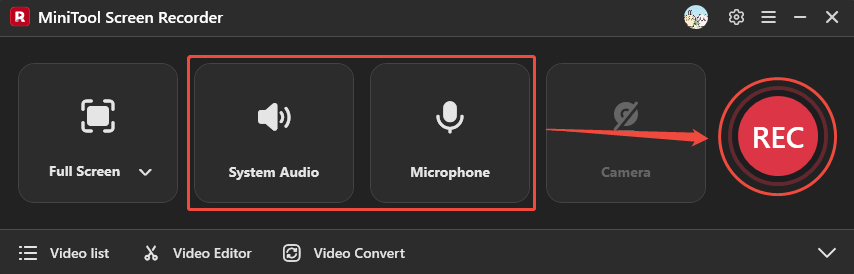
Step 3: Choose Recording Audio
Click on the System Audio option and the Microphone option to pick which sounds you want in the clip.
Step 4. Start and End Recording
Click the REC button. The main software interface will then disappear automatically. After a 3-second countdown, screen recording will begin. Press F6 to stop recording when finished.
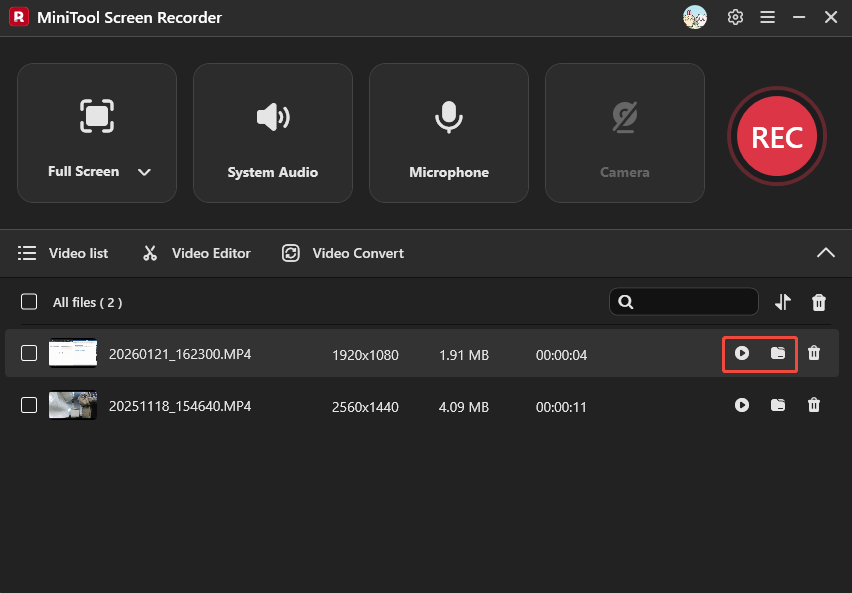
Step 5: Play and Locate the Recorded Video
In the video list, find the video you just recorded. Click on the play icon to watch it or click on the folder icon to navigate to the save location.
The above are the simple steps to record your screen using MiniTool Screen Recorder. You can also adjust settings such as the file save destination, frame rate, video quality, and webcam layout position by clicking the settings button in the upper-right corner of the interface before recording.
Record crisp videos with no watermarks in seconds using MiniTool Screen Recorder.Click to Tweet
VLC Media Player vs MiniTool Screen Recorder
After using VLC and MiniTool multiple times, I noticed some differences between them in screen recording.
1. Operation
When using VLC for screen recording, you need to open various menus and windows. Furthermore, you have to manually click the stop button with your mouse to end the recording. The final “click to close” screen will remain in the recorded footage, and you’ll have to manually cut that part out later.
MiniTool Screen Recorder, on the other hand, allows you to quickly record your screen in just a few steps. Even if you need to adjust the frame rate, save path, etc., you can simply set these in the settings. Moreover, MiniTool Screen Recorder supports keyboard shortcuts to start, stop, or pause recording, which is very convenient.
2. Recording Functionality
VLC was not specifically developed for screen recording. Although it can capture the screen, it cannot select a specific recording area, record the webcam, or add screen annotations. MiniTool Screen Recorder supports all of these features.
3. Stability
VLC’s performance is affected by many factors. Recording videos with VLC may result in lag, choppy footage, or even a black screen. In contrast, MiniTool Screen Recorder offers more stable performance.
To Wrap Up
Where does VLC save recordings? It stores screen recordings in your system’s Videos folder by default, but you can pick any location you like. This article guides you on how to record with VLC and solve common problems. Considering the limitations of VLC’s screen recording features, this article also recommends MiniTool Screen Recorder, a simpler and faster screen recorder.
If you have any problems when using MiniTool Screen Recorder, please send an email to support@minitool.com to ask for help.