This post shows you how to screen record on Windows using various programs, including built-in tools such as Xbox Game Bar and Snipping Tool, free third-party screen recording software programs like MiniTool Screen Recorder and OBS Studio, and recording features in the GPU-related software.
In today's digital world, knowing how to record your computer screen is an essential skill, whether you need to create a software tutorial, record a webinar for later review, or capture gameplay highlights.
That’s why I crafted this comprehensive post to show you how to screen record on Windows computers using various methods, covering the system's native tools, powerful third-party applications, and your GPU's built-in software.
Why Need to Screen Record on Windows
Screen recording offers an efficient method for communication across different fields. In daily work, taking a screen recording is a quick way to create step-by-step software guides or showcase a product’s new features.
Screen recording is also widely used in education – teachers pre-record lessons and students record online lectures. For content creators, it’s also a fantastic way to make tutorials or share the greatest game moments on YouTube.
In a word, screen recording is a more effective way to deliver messages than text-only descriptions and images, thus efficiently saving time, enhancing understanding, and improving productivity.
Preparation Tips Before Recording Your Screen
Before exploring various Windows screen recorders, let’s focus on essential preparation tips to ensure high-quality videos in the end.
#1 Plan Your Content
Before you start a recording with complex steps, for instance, you need to create a software demo or take a screen recording to solve your PC-related issues, outline your steps, or write a script to familiarize yourself with the process.
#2 Clean Up Your Desktop
To create a clear, high-quality screen recording, you should also clean up your desktop beforehand to avoid distractions in the recording. For example, close unnecessary windows or apps, organize your taskbar, and disable notifications to keep the recording area clean and tidy.
#3 Check Audio
Additionally, decide if you need audio for the recording, system sound, microphone narrations, or both. If none are required, make sure the audio settings are turned off. If you desire to include computer audio in your recording, check the speaker volume and mute other audio sources. Likewise, test your microphone and record in a quiet environment.
#4 Close Demanding Programs
When you capture gameplay or other high-quality videos on a PC, you’re advised to exit demanding applications to enjoy a smooth recording experience.
#5 Practice More Times
Furthermore, you can do several test recordings to get accustomed to the procedure, thus avoiding uncertain clicks during recording, especially in a long and complex tutorial. This also helps check your recording settings.
After understanding useful tips for ensuring good recordings, let’s see how to screen record on Windows with audio.
How to Screen Record on Windows with Native Tools
Screen recording is an extremely useful skill across many fields. To cater to a variety of user needs, Windows offers several built-in screen recording tools. This section walks through how to use every native screen recorder in Windows.
Method 1: Use Xbox Game Bar
When it comes to the native Windows screen recorder, we have to mention the Xbox Game Bar. It’s primarily designed to record gameplay and application windows, capture screenshots, monitor system performance, etc.
Here’s how to screen record on Windows 10 and 11 with Xbox Game Bar.
Step 1: Configure Recording Settings
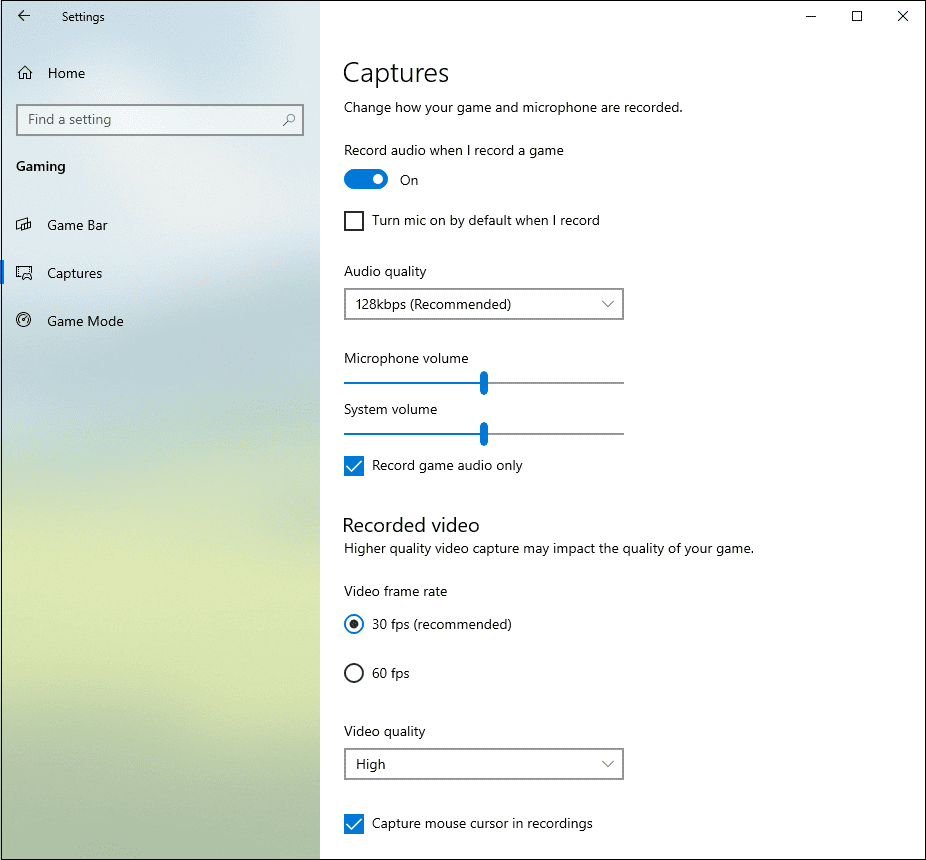
Press Windows + I to open Settings, and click Gaming. Then, select Captures to make changes:
- Choose a maximum recording length: 30 minutes, 1 hour, 2 hours, or 4 hours.
- Decide whether to record audio when screen recording or record game audio only.
- Select audio bitrate, volume, video frame rate for recording, video quality, and other settings.
Step 2: Choose What to Record
Open the application or game before enabling the recording.
Step 3: Open the Application
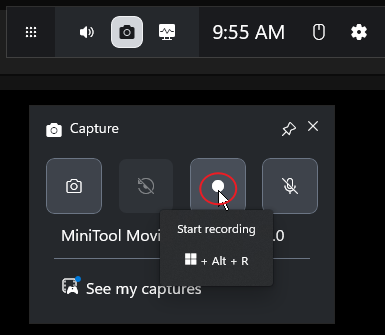
Press Windows + G to open the Xbox Game Bar immediately or search for it directly in the Start menu search box. Then, the Game Bar will appear at the top of your screen.
Step 4: Start Recording
Click the Capture option (a Camera icon) to access the video controls, and the Game Bar will automatically detect and choose your recording area. In the Capture window, microphone audio is disabled by default. Click the Microphone icon to enable the audio recording, and plug your microphone in to record your voice.
Next, click the Start recording option to start capturing the video.
Step 5: Stop Recording
To end the recording, click the Stop Recording option in the Capture Status window. By default, videos recorded by Game Bar are saved in the Captures folder with your PC’s Videos library.
What makes the Game Bar a good screen recorder for Windows?
- Built-in and free to use.
- Quick access and simple interface.
- Record the last 30 seconds of gameplay without interrupting the current session.
Limitations of Game Bar:
- Cannot capture the desktop and File Explorer.
- Sometimes it can cause problems for users, like a sudden crash.
Method 2: Use Snipping Tool
If you are running Windows 11, you can access another native screen-capturing program – Snipping Tool. It also comes installed on Windows 10, but it cannot record the screen on a Windows 10 PC.
How to record screen on Windows 11 using the Snipping Tool? Here are the steps.
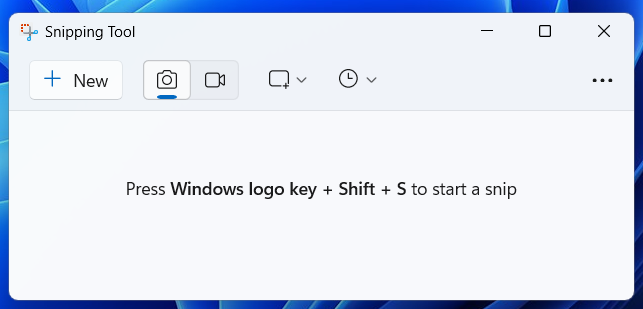
Step 1: Open the Snipping Tool
Select the Start button, enter “snipping tool”, then click Snipping Tool from the results. Alternatively, press Windows + Shift + S to run the application.
Step 2: Prepare Your Recording
Click the + New option and click the Record option (the second icon) at the top of your screen. Then, drag your mouse to select the recording area. By default, the microphone audio is turned off, and the system audio is turned on. To record your voice, make sure the Microphone icon is not muted.
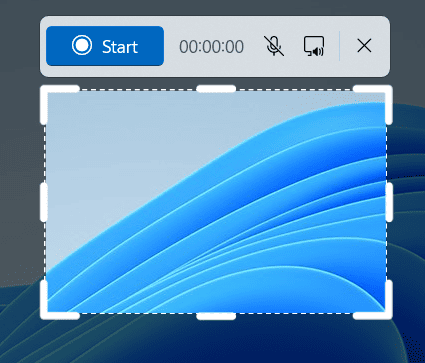
Step 3: Start and Stop Recording
Click the Start button, and the recording begins after a 3-second countdown. To finish, click the Stop recording button. Then, your recording will appear in the Snipping Tool window.
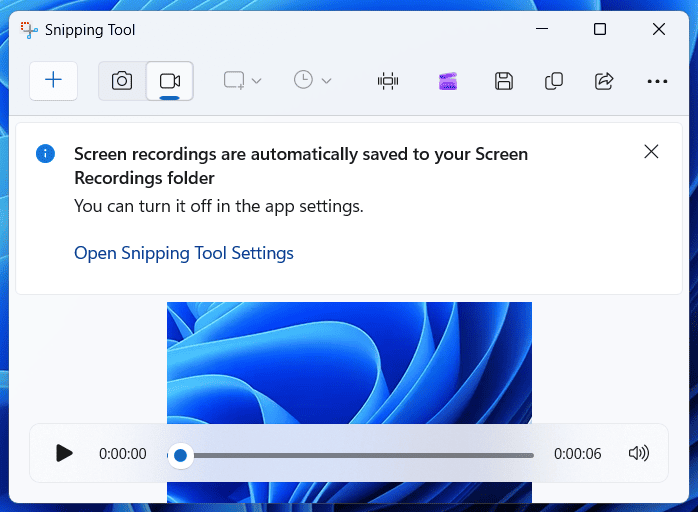
You can play the video to review. If you need to trim the recording, click the Video Trim icon on the left of the Microsoft Clipchamp icon. Then, click the Save as option to save your recording to your desired location.
Additionally, you can click the More option (three dots) and choose Create GIF to save your recording as a GIF. If you’re using Snipping Tool version 11.2505.21.0 or later, you can see the Export GIF option in the top toolbar.
Advantages of Snipping Tool:
- Free and no need to download.
- Simple to use and user-friendly.
- Export screen recordings as GIFs.
Disadvantages of Snipping Tool:
- Lack of advanced editing features.
- Cannot schedule a recording.
- No webcam overlay.
Method 3: Use PowerPoint
As an essential part of Microsoft products, PowerPoint is also equipped with a screen recording feature, enabling users to create presentations with embedded video demonstrations, tutorials, and narrations. Therefore, PowerPoint is on the list of Windows screen recorders. Here’s how to screen record on Windows 10 with the application.
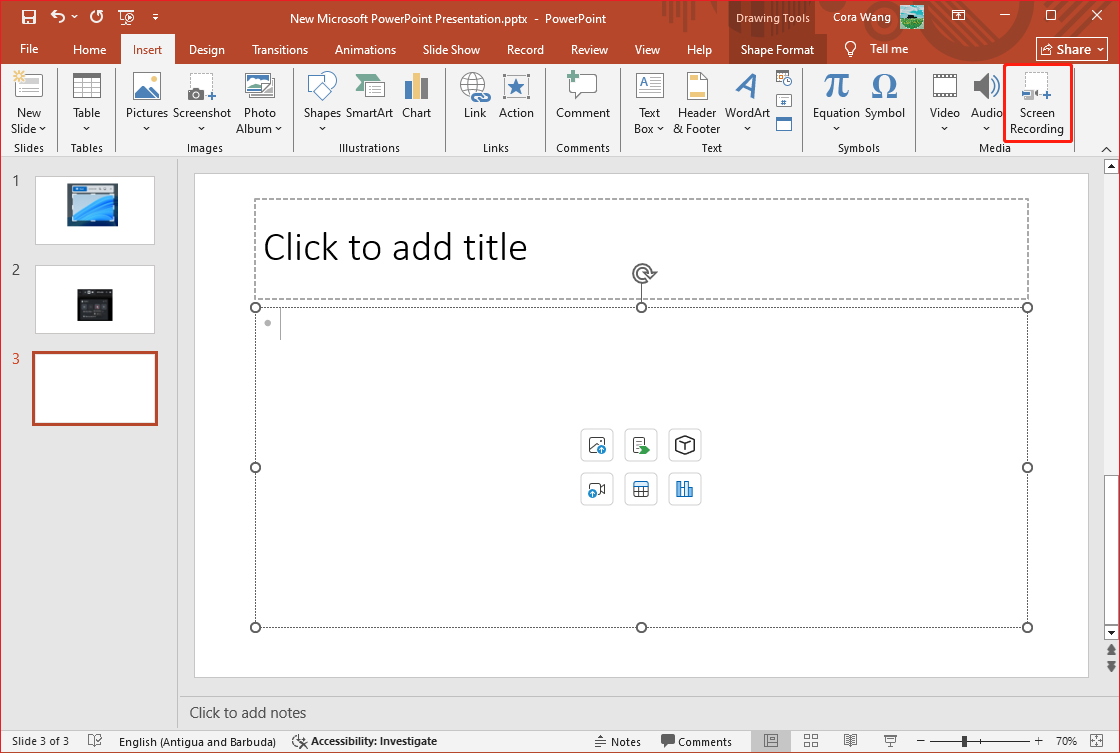
Step 1: Open Your Presentation
Open your PowerPoint presentation and go to the slide where you want to insert the recording.
Step 2: Prepare for Recording
Click Insert at the top and then select Screen Recording from the ribbon.
Then, the Control Dock appears at the top of your screen. Choose Select Area and drag to select the area of the screen you want to record, or press Windows + Shift + F to record the full screen.
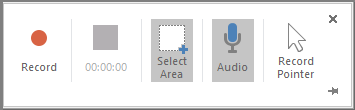
By default, PowerPoint automatically records audio and mouse pointers. You can deselect Audio and Record Pointer to disable them.
Step 3: Start and End the Recording
Select Record to start the recording, and press Windows + Shift + Q or click Stop when you're done. Then, the video will be added to the slide. To save your screen recording as a separate file, right-click the video and choose Save Media as.
Furthermore, PowerPoint offers several tools for editing your screen recording, like trimming and cropping. For detailed steps, please refer to this post: How to Edit PowerPoint Video Recording: 2 Methods.
What makes PowerPoint’s screen recorder stand out?
- Embed the recording into your slide instantly.
- Easy to use and available for all PowerPoint users.
Shortcomings of the screen recorder in PowerPoint:
- Limited editing tools.
- Lack of customization when saving videos.
Method 4: Use Microsoft Clipchamp
Microsoft offers various built-in tools to meet diverse user needs. For screen recording, you can also find another solution in Microsoft Clipchamp, a free video editor built into Windows 11. This application can also be installed on Windows 10 through the Microsoft Store.
So, how to record screen on Windows 11 and 10 using Microsoft Clipchamp? Here’s the guide.
Step 1: Run the Application
Launch Microsoft Clipchamp from the Start menu. Once activated, sign in with your Microsoft account and click the Create a new video option at the top.
Step 2: Access the Windows Screen Recorder
On the main interface, click the Record & create option from the left sidebar. Then, choose Screen and camera to capture your PC screen and webcam simultaneously, or select Screen to record your desktop only.
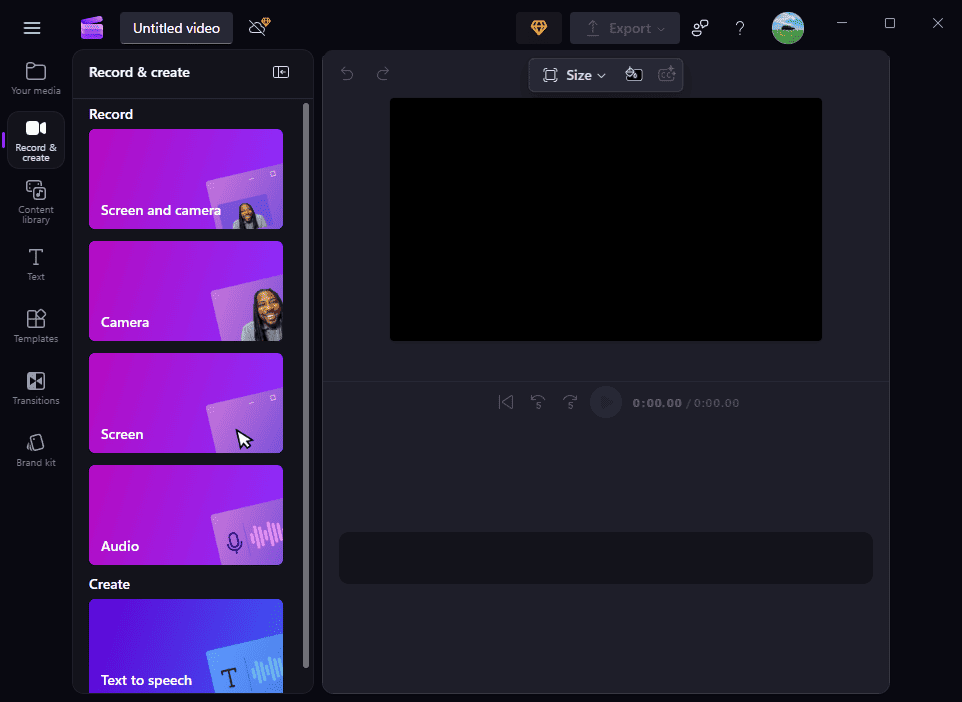
Step 3: Configure Recording Settings
After clicking the Screen option, a pop-up window opens. Choose your microphone and click the red Record option at the bottom. Next, select a specific window or the entire screen to record. To record system audio, enable the Also share system audio setting.
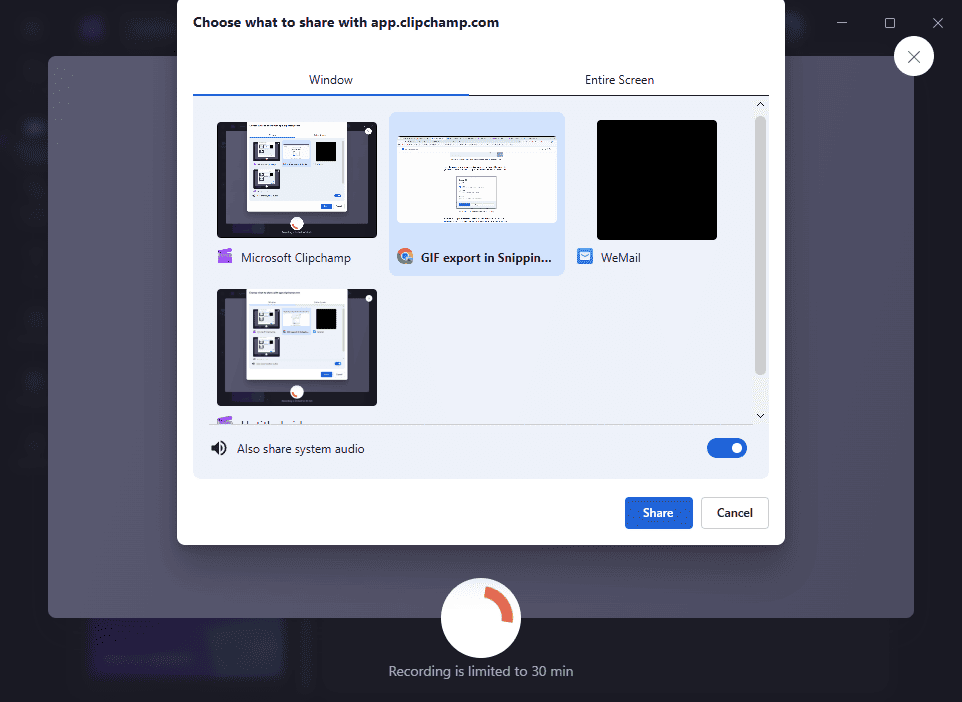
Step 4: Start and Stop the Recording
Click Share to begin the recording. To finish, click the Stop sharing option at the bottom of your screen.

Step 5: Save and Edit the Video
Then your video will immediately open in Microsoft Clipchamp. You can select Save and edit to edit the video inside the editor. Finally, click Export to save your recording.
What makes Microsoft Clipchamp a good screen recording tool?
- Pre-installed on Windows 11 without extra downloads.
- Record screen, webcam, or both simultaneously.
- Edit the recording inside the video editor.
Restrictions of the Microsoft Clipchamp screen recorder:
- A 30-minute limit on individual screen and webcam recordings.
- No live annotation tools during recording.
- No recording schedule.
The four native Windows screen recorders are easy to use and can satisfy most simple recording tasks. All of them are free and don’t leave watermarks on the final results.
However, each of them has different weaknesses, such as the Xbox Game Bar’s inability to record the desktop, the Snipping Tool’s lack of picture-in-picture recording, PowerPoint’s screen recorder with no scheduled recording and drawing tools, and Microsoft Clipchamp’s 30-minute recording limits.
Therefore, it’s necessary to switch to advanced third-party screen recording software to compensate for the shortcomings of Windows built-in tools.
How to Screen Record on Windows with Third-Party Applications
This section includes two free, feature-rich alternatives to Windows' native screen recording tools: MiniTool Screen Recorder and OBS Studio. Use them to take professional-looking videos.
Option 1. MiniTool Screen Recorder
As the name suggests, MiniTool Screen Recorder is a dedicated screen recording application. It’s designed to be a powerful yet easy solution for Windows users of all levels to capture their screen activity and create high-quality videos.
Whether you’re a beginner looking for simple screen recording software or a content creator seeking a reliable tool for creating tutorials, MiniTool Screen Recorder has you covered.
What distinguishes MiniTool Screen Recorder from Windows' native screen recorders? Here are the main reasons.
#1 Record Anything on Your Screen
It’s capable of recording the entire desktop, selected areas, and any application window, along with system audio and your microphone. It can also record your webcam only or capture the screen and webcam simultaneously.
#2 Custom Webcam Recording Settings
When you capture your computer screen with a webcam, you can select the camera’s resolution and frame rate, its position on your desktop, its shape (rectangle or circle), and its size. By personalizing these settings, you can record picture-in-picture videos with ease.
#3 Extensive Annotation & Drawing Tools
Compared with the native Windows screen recording tools, MiniTool Screen Recorder’s another significant feature lies in its annotation and drawing tools. You can effortlessly enhance your recording by drawing, adding text, arrows, step numbers, rectangles, ellipses, whiteboards, etc. These settings can make your recording clearer, more engaging, and easier to follow, especially when creating tutorials and presentations.
#4 Scheduled Screen Recording
MiniTool Screen Recorder allows you to set the recording duration, making it a perfect choice for capturing sports events and other specific tasks.
#5 Customize Recording Frame Rates & Hotkeys
Additionally, MiniTool Screen Recorder lets you record at different frame rates: 15, 20, 25, 30, and 50FPS, which affects the video file size and smoothness of the final video. Apart from that, this application enables you to change recording hotkeys to your preference.
#6 Free & No Time Limit & No Watermark
Best of all, MiniTool Screen Recorder is a free screen recording application without time limits and annoying watermarks. You can use it to capture your screen as long as you need, and you’ll get a clean video in the end.
#7 User-Friendly Interface
Featuring an intuitive interface, MiniTool Screen Recorder is easy to use and suitable for users at different levels. With simple setup settings, everyone can start a recording in just a few clicks.
A Quick Tutorial on MiniTool Screen Recorder
Here’s how to screen record on Windows with MiniTool Screen Recorder.
Step 1: Install the Application
Click the download option below to download and install the free screen recorder on your computer.
MiniTool Screen RecorderClick to Download100%Clean & Safe
Step 2: Choose Recording Area
Once the program is activated, a ribbon will appear at the top of your screen, and the main interface below it.
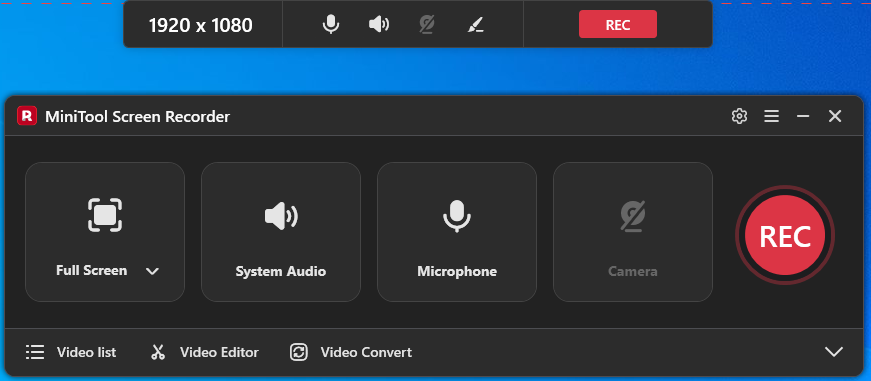
By default, MiniTool Screen Recorder captures the whole screen. If you want to record part of the screen or a window, click the arrow next to the Full Screen option, choose Select Region, and drag to select your desired recording area.
Step 3: Check Audio
The system audio and your microphone will be recorded with the screen by default. To disable them, click System Audio and Microphone.
Step 4: Make Other Adjustments
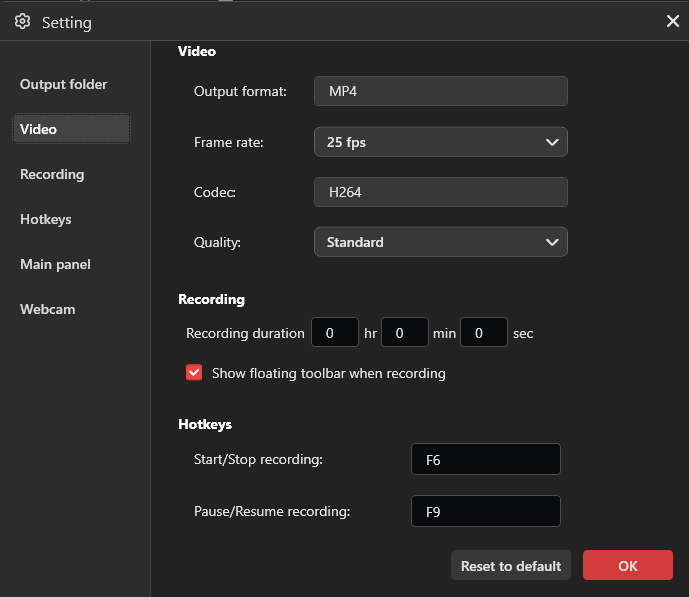
Click the Gear icon in the upper-right corner to open Settings. Then, you can modify the output folder, video quality, frame rate, and other recording settings. Finally, click OK to save changes.
Step 5: Record Your Screen
Click the red REC button, and the recording will start after a 3-second countdown. If you need to draw on the screen or add notes while recording, click the Pen icon on the floating toolbar below the recording area to enable the annotation toolbar.
Next, you can add text, shapes, step numbers, arrows, and more to customize the recording.
Step 6: Stop the Recording
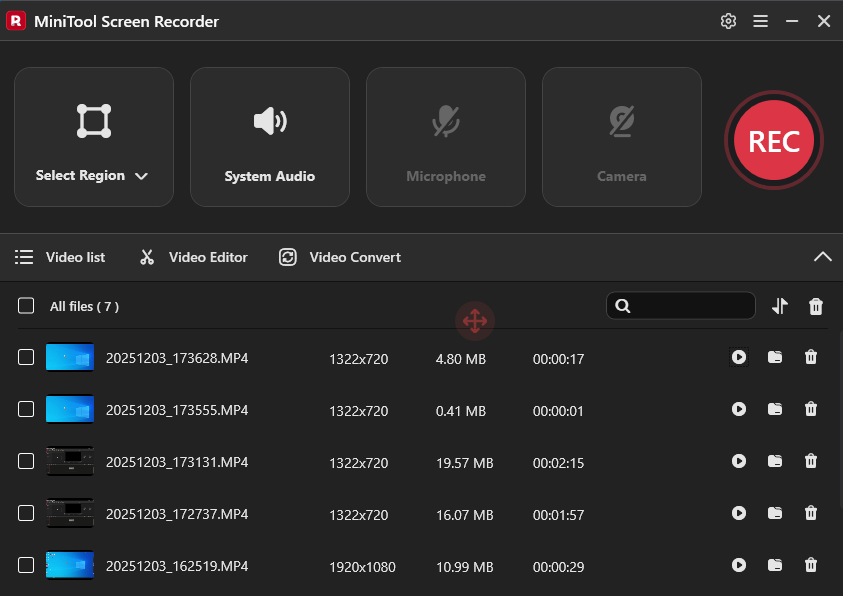
To end your recording, click the red Stop option on the ribbon or press F6. Your video will appear on the Video list tab. Then, you can play, delete, or locate the video.
When I record a quick software tutorial with MiniTool Screen Recorder, its annotation tools are amazing. However, this program lacks more control over the final recording. For instance, it does not support customizing video bitrate or codec.
Option 2. OBS Studio
When it comes to free yet robust screen recording software for Windows, OBS Studio must be on the list. It’s a free, open-source, cross-platform, and powerful application for screen recording and live streaming.
Let’s quickly review the core strengths of the OBS screen recorder.
#1 Comprehensive Recording Capabilities
As a professional-grade screen recorder, OBS captures everything on your screen, such as the desktop, gameplay, specific application windows, webcams, microphone, system audio, capture cards, live web content, and more. It also supports adding background images to recordings. Whatever you need to record, OBS provides a dedicated source.
OBS also allows you to create complex scenes with multiple sources and switch between them seamlessly.
#2 Advanced Audio Control
OBS can capture audio from multiple inputs and also supports recording up to 6 separate audio tracks in a video file (MP4 or MKV) for easier editing in post-production. Besides, it provides essential filters to ensure high-quality audio, such as noise suppression to clean noise, a compressor to balance levels, and gain to increase the volume of the entire recording source.
#3 Highly Customizable Settings
OBS provides various settings to control recordings, such as resolution, frame rate, video/audio encoders, audio sample rate, etc. This allows you to easily control the file size and quality of the final video. Besides, OBS can save recordings in different formats, including MP4, MOV, FLV, MKV, and TS. It’s worth mentioning that OBS can also utilize the AV1 encoder to save recordings.
#4 Crystal Clear Quality
OBS supports high-resolution and frame rate (up to 60FPS) recording and can save recordings up to 1080P, ensuring high-quality or near-lossless output.
OBS Studio Screen Recording Beginner Tutorial
How to screen record on Windows with audio using OBS Studio? Here’s the guide.
Step 1: Get the Windows Screen Recorder
Head to the official website (https://obsproject.com/download) to download the application. Then, complete the installation.
Step 2: Use the Setup Wizard for Recording
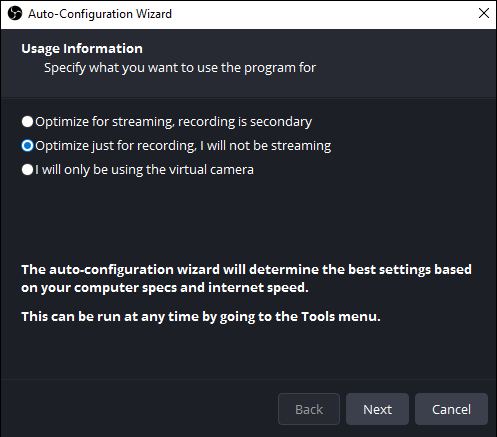
The first time you open OBS Studio, you’ll see a pop-up window called the Auto-Configuration Wizard, asking you to specify your goal using the program. For screen recording, select the Optimize just for recording, I will not be streaming option. You can change this later.
Click Next to proceed. Complete the other video settings and click Apply Settings to enter the main interface.
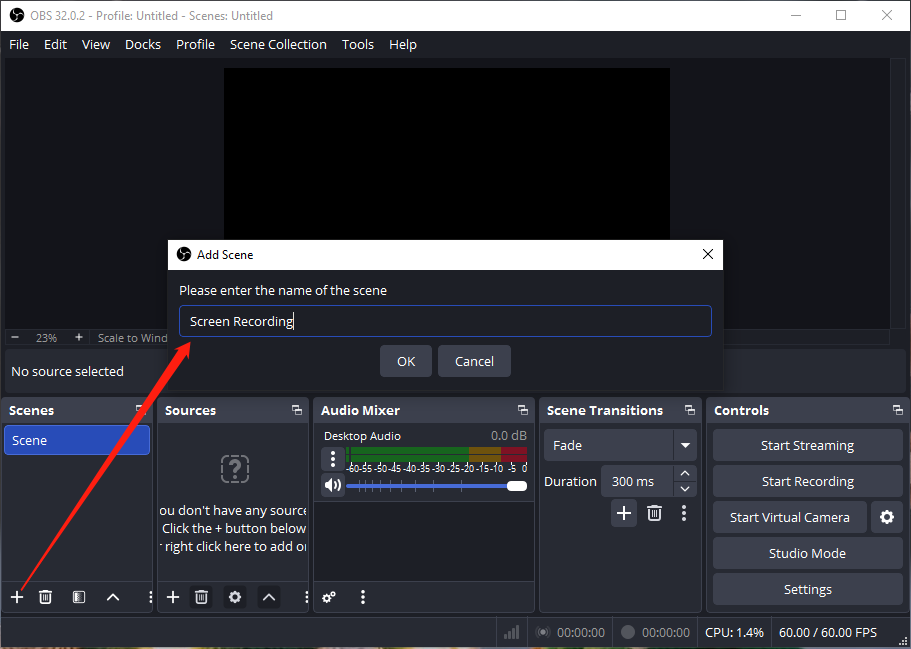
Step 3: Create a Scene
To capture your screen, you’ll first need to create a scene by right-clicking the Add Scene option (the + icon) at the bottom of the Scenes box. Then enter the scene name and click OK.
Step 4: Choose What to Capture
Click the Add Source option (the + icon) in the Sources box, and choose Display Capture to grab the entire screen.
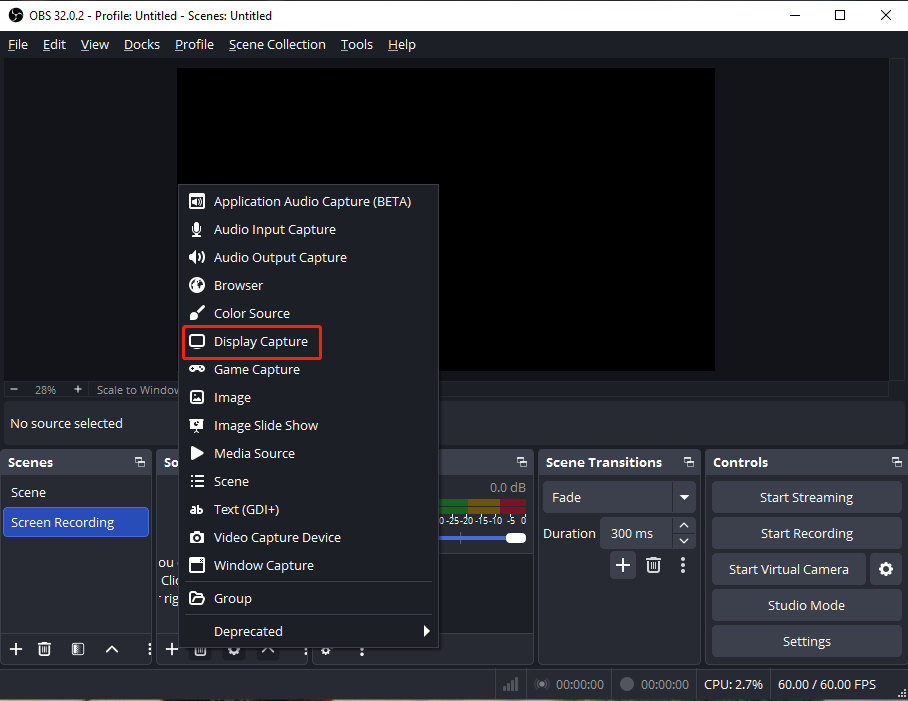
Then, click OK. Next, choose the target display to record if you have more than one monitor. By default, OBS records your cursor. You can also unselect the Capture Cursor to disable cursor recording. Click OK to confirm.
Step 5: Add Your Microphone
To record your voice during the recording, click the Add Source option again, choose Audio Input Capture, type a name for the audio source, click OK, select your microphone, and click OK. Then, you can drag the sliders to change the volume of your microphone and system audio.
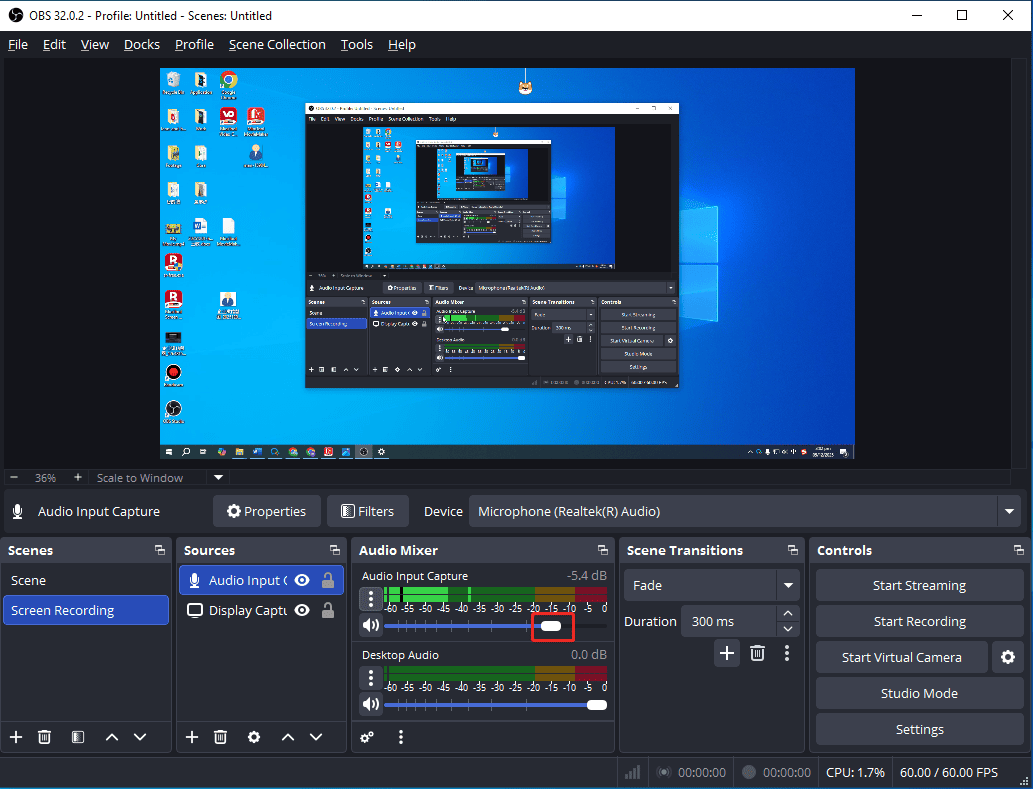
You can also click the More option (the three vertical dots) on the left side of the audio waveform and choose Filters to select an audio filter.
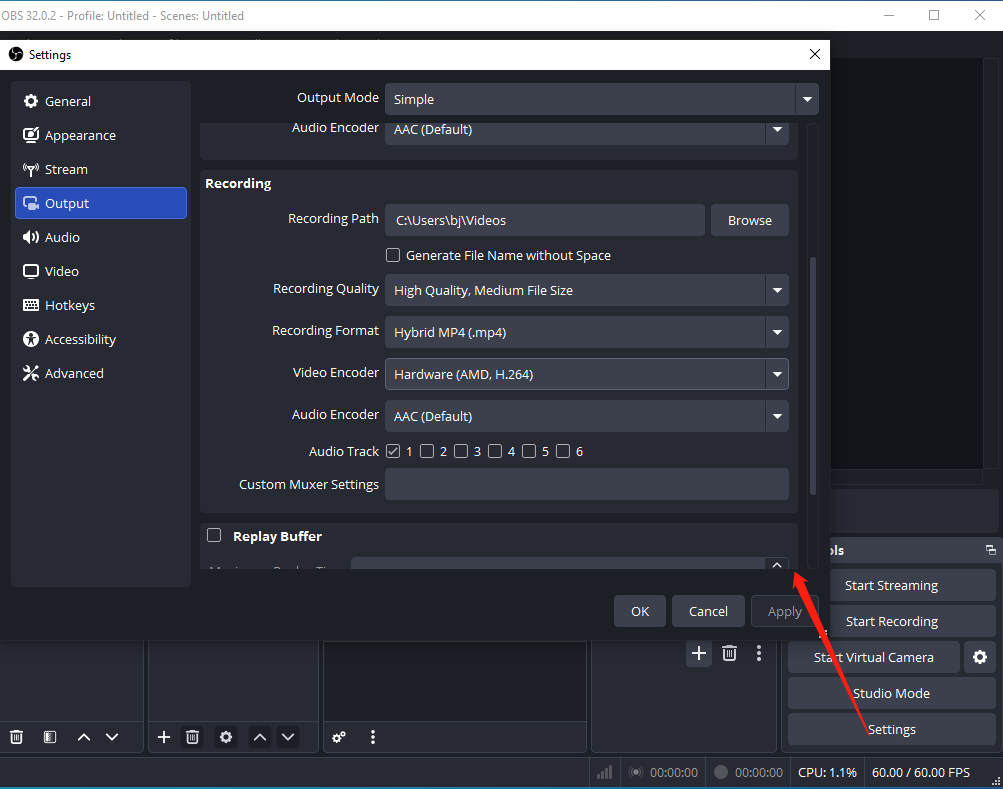
Step 6: Adjust Recording Settings
Click Settings in the bottom right corner, then select Output from the left sidebar in the Settings window, and go to the Recording section. Then, you can alter the save location, recording quality, output format, video encoder, and audio encoder. Finally, click OK to save changes.
Go to the Video tab to confirm the output resolution for saving the final video. Just set it to the same resolution as your computer screen for the best result. You can also choose a frame rate, 30 FPS for most tutorials and 60 FPS for gameplay or fast movements. Go to Audio to set the sample rate, channel, and the target audio device.
Next, go to Hotkeys to set the hotkeys for starting, pausing, resuming, and stopping recordings, because OBS doesn’t provide default hotkeys for these actions.
Finally, click Apply and OK to save your settings.
Step 7: Start and Stop Recording
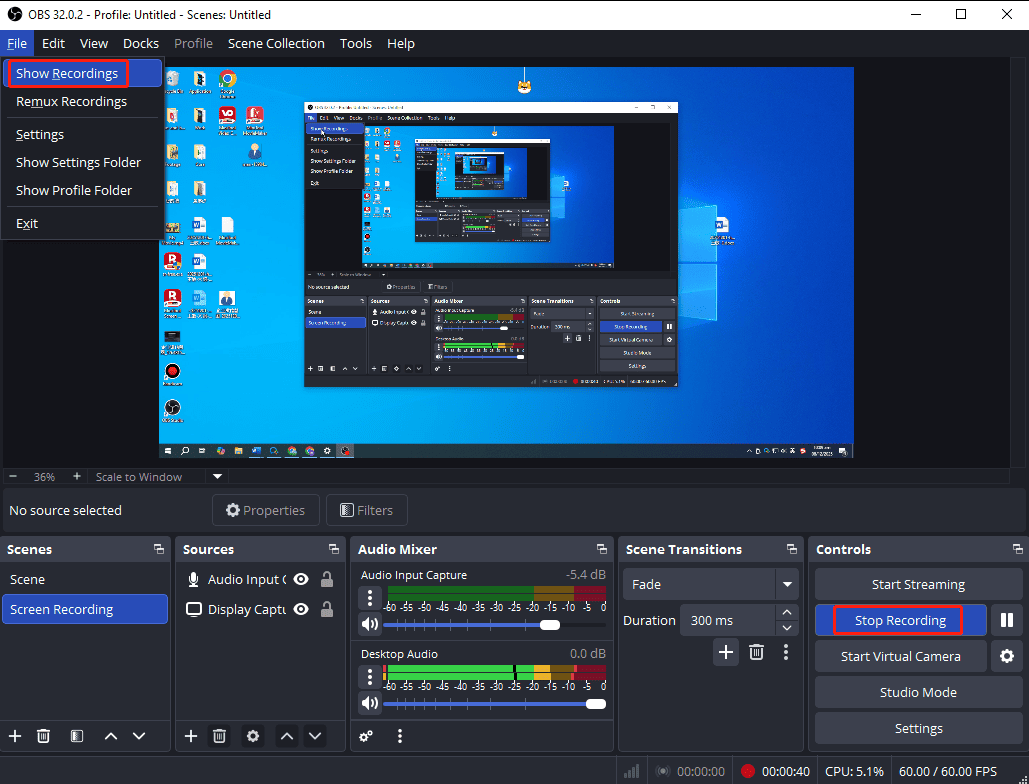
Click Start Recording at the bottom and minimize the OBS window to record your desktop. To end the recording, press your hotkey or click Stop Recording at the OBS interface. Finally, click File and select Show Recordings to locate your video.
When I record my desktop with OBS, a minor drawback that frustrated me is that the software doesn't automatically minimize its window after clicking the Start Recording button. As a result, I have to manually minimize the OBS window every time.
To avoid this, I configured custom recording hotkeys within OBS. Every time I enable the recording, I’ll first minimize the OBS window manually, then press the shortcut. Since OBS doesn’t offer a 3-second countdown timer, it’s important to minimize the window before pressing the hotkey. The recording begins immediately upon pressing the shortcut.
What’s more, the interface of OBS Studio is a little bit complex because it’s designed for complete control for recordings. OBS may not be an ideal choice for beginners who want a simple screen recorder with an intuitive interface.
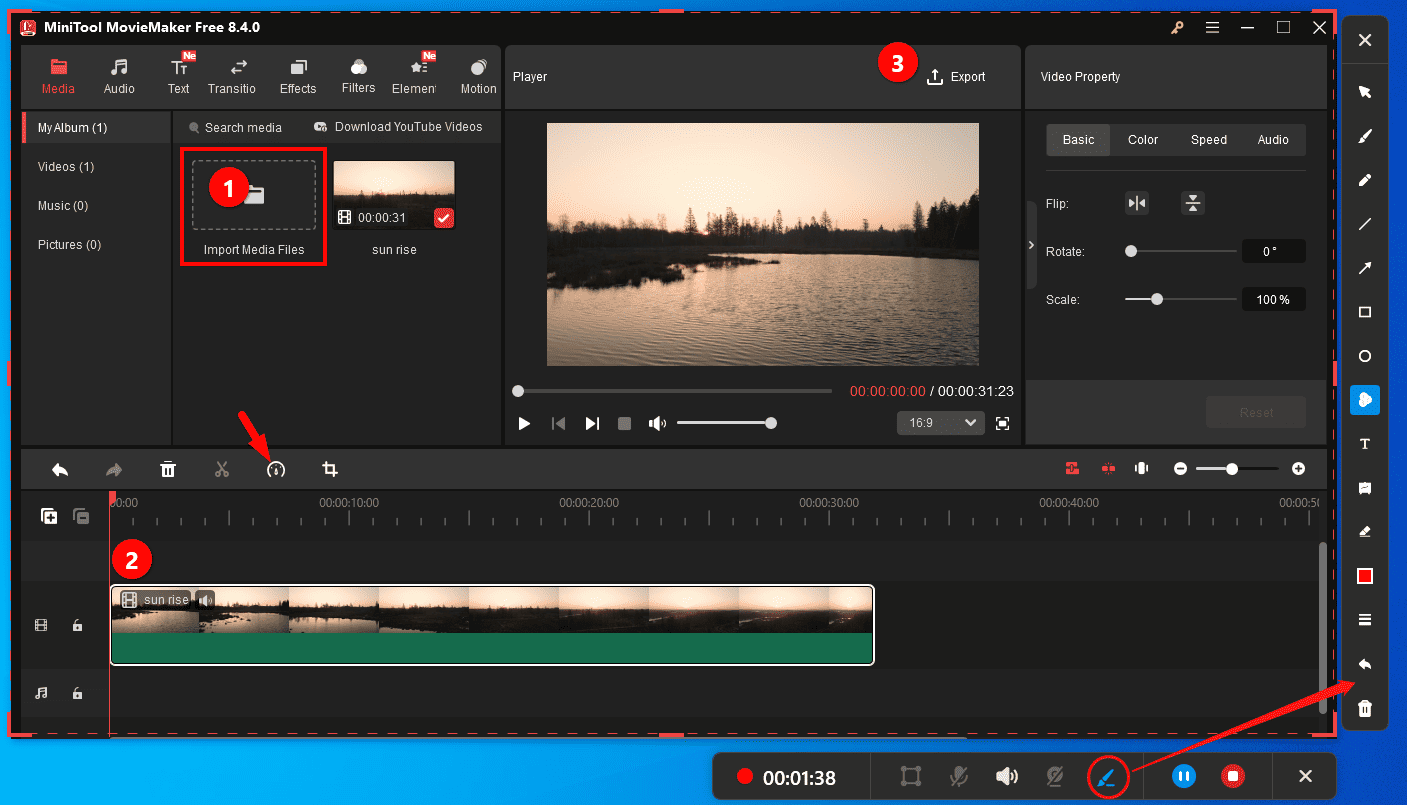
MiniTool MovieMakerClick to Download100%Clean & Safe
How to Screen Record on Windows with the GPU's Built-in Software
In addition to the convenient screen recorders built into Windows and robust third-party programs, there is another quick way to record your screen – the built-in screen recording software or feature provided by major GPU manufacturers. These tools are designed primarily for capturing gameplay.
1. NVIDIA App
If you have been using NVIDIA GeForce graphics cards and enjoy playing games, you may be familiar with GeForce Experience. It was a free companion application designed for gamers to optimize game settings, automatically update GPU drivers, and capture gameplay through ShadowPlay.
Now, GeForce Experience has been integrated into the all-in-one NVIDIA App, which also replaces the older NVIDIA Control Panel, to provide a streamlined control center for users with NVIDIA GPUs in their PCs and laptops.
The new NVIDIA App supports up to 8K resolution desktop recording, making it a great choice for NVIDIA GPU owners to record high-quality gameplay footage, create how-to videos, and more to simplify tasks. Besides, users with RTX 40-series GPUs can record in the AV1 codec to save disk space.
Here’s how to record screen on Windows 11/10 using the NVIDIA APP.
Step 1: Launch the NVIDIA APP
If you haven’t installed the app, go to the official website to download it. Then, install the app on your computer. Next, click the Start menu and search for “NVIDIA” to open the application.
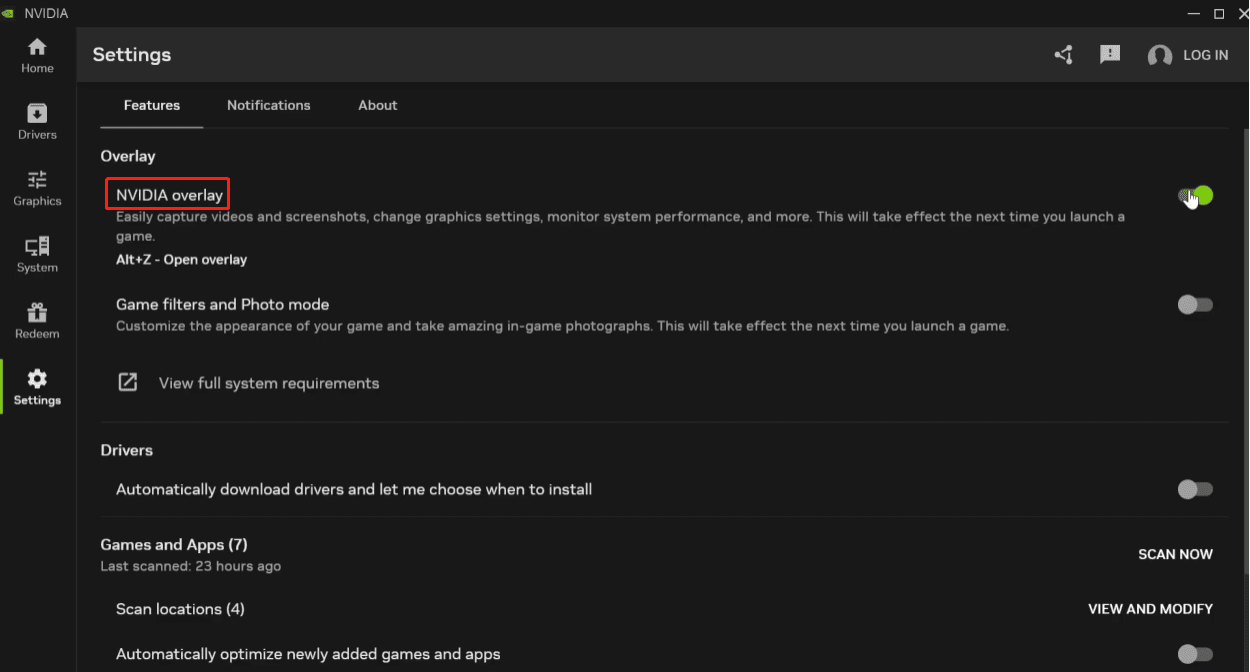
Step 2: Enable the NVIDIA Overlay
Select Settings on the left sidebar, then head to the Features section on the right side, and make sure NVIDIA overlay is enabled.
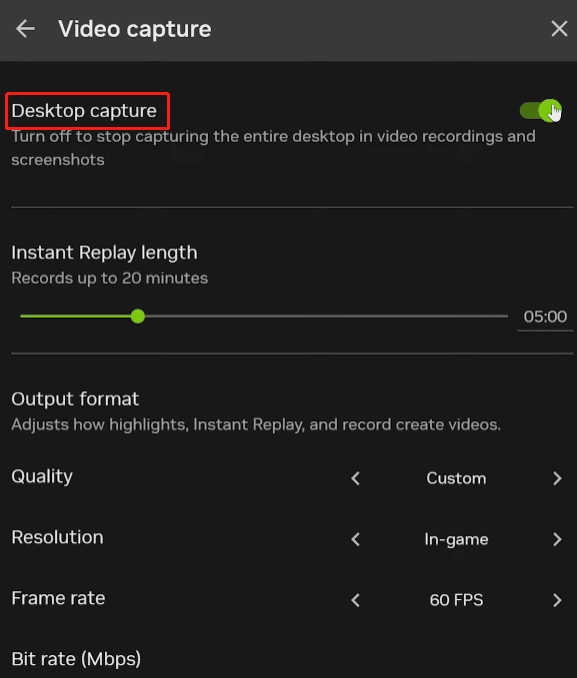
Step 3: Turn On Desktop Capture
Press Alt + Z to open the overlay. On the left side, click Instant Replay, then turn off Instant Replay, and click Configure video capture. In the Video Capture menu, turn on Desktop capture to record the entire desktop in the recordings.
Step 4: Adjust Recording Settings
In the Output format section, you can set the video quality, resolution, frame rate, and bitrate. To record your desktop, set the resolution to your screen’s native resolution for the best results. For instance, set the resolution to 4K, frame rate to 60 FPS, and bit rate to 50 Mbps or higher; or set the resolution to 1080P, frame rate to 30 FPS, and bit rate to 30 Mbps.
Step 5: Change Audio Settings
Click the Back option twice and click the Gear icon to open Settings. Click Audio, then you can change the volume of the system audio and microphone.
Step 6: Record Your Screen
Once configured, you can press Alt + F9 to start recording. Press the two keys again to stop recording.
Strengths and Weaknesses of the Screen Recorder in the NVIDIA App
| What We Like | Multiple recording settings to control the recording quality. Record at up to 8K with minimal impact to PC performance. Support high frame rates, like 120FPS recording. Instant access and ease of use. |
| What We Don’t Like | Cannot record a specific part of the desktop. Occasional issues like corrupt recordings and startup failure. |
2. AMD Software: Adrenalin Edition
As NVIDIA’s primary competitor, AMD also offers a recording feature built into AMD Software: Adrenalin Edition, which works with the following graphics processors to capture desktop and gameplay content.
- Radeon™ RX Vega Series
- Radeon™ RX 500 Series
- Radeon™ RX 400 Series
- Radeon™ Pro Duo
- AMD Radeon™ R9 Fury, R9 300, R7 300 Series
- AMD Radeon™ R9 200, R7 200, R5 300, R5 240 Series
- AMD Radeon™ HD 8500 – HD 8900 Series
- AMD Radeon™ HD 7700 – HD 7900 Series
Here's how to screen record on Windows with audio using the AMD Software.
Step 1: Run the Application
Click the Start button, type AMD Software, and launch AMD Software: Adrenalin Edition.
Step 2: Configure Recording Settings
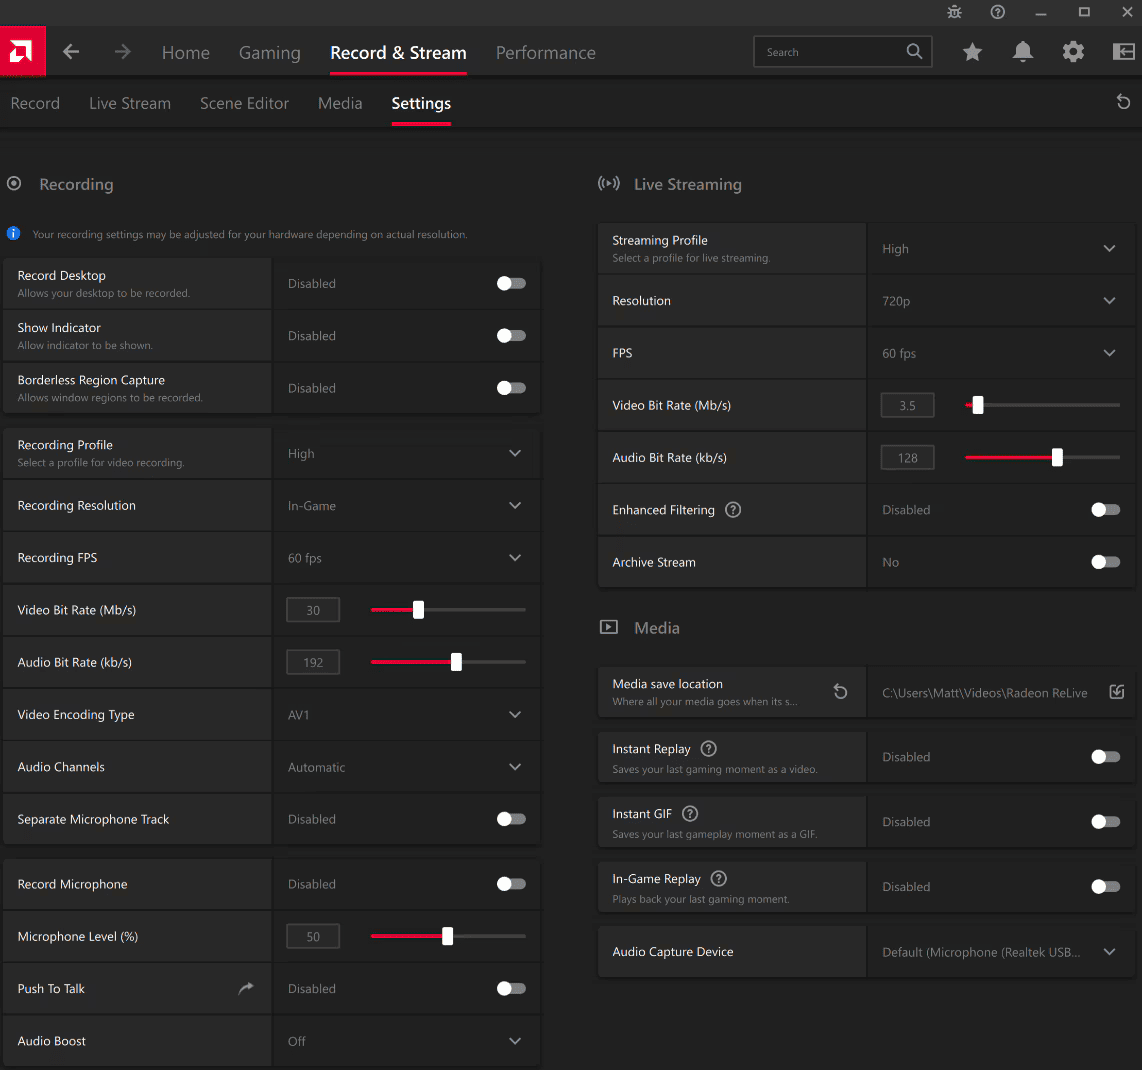
Go to the Record and Stream tab at the top and select Record from the submenu.
1. Choose what to record
Select Fullscreen to record the whole desktop, click Region to capture a selected application or part of the screen, or expand the Active Window dropdown list to choose a monitor to record.
2. Adjust the microphone volume
Drag the slider next to Microphone Level to adjust its volume.
3. Advanced settings
Go to Settings and scroll down to the Recording section for more controls over the recording, such as resolutions, profile for recorded footage, frame rate, video bitrate, audio bitrate, video encoding types, and more.
Step 3: Record Screen
Go back to the Record tab and click the Start Recording button.
Step 4: Stop Recording
Press Ctrl + Shift + E to turn off the recording. Then, go to the default folder location <drive>:\Users\<username>\Videos\Radeon ReLive to view your recording. You can also change the save path in Settings.
Pros and Cons of the Screen Recording Feature in AMD Software
| What We Like | One-stop solution for recording the full or a specific screen and gameplay footage. Support up to 4K UHD recording, depending on the GPU. Minimal frame rate drops in game recordings. The latest AV1 encoding technology is available. A wide variety of recording settings. |
| What We Don’t Like | No countdown timer. Cannot record VR and copyrighted content. |
3. Intel Graphics Command Center/Intel Arc Control
The screen recording feature was initially supported on the Intel Graphics Command Center (IGCC). Then, it has been added to Intel Arc Control, which is available to those using GPUs included with the Intel® Core™ 11th generation or newer processors or Intel® Arc™ discrete GPU.
People using an Intel® Core™ 10th generation or older processor can download the IGCC beta version from the Microsoft Store to record the screen.
Then, in November 2024, the Intel Graphics Software was released, along with more features than IGCC and Intel Arc Control. However, the latest version of Intel Graphics Software doesn’t provide screen recording.
Then, I’ll show you how to record screen on Windows 11 using the IGCC beta version with an Intel® Core™ i7-8550U CPU.
Step 1: Get the Beta Version of Intel Graphics Command Center
Go to the Microsoft Store to download and install the IGCC beta version. Then, launch the application on your PC.
Step 2: Enable the Screen Capture Feature
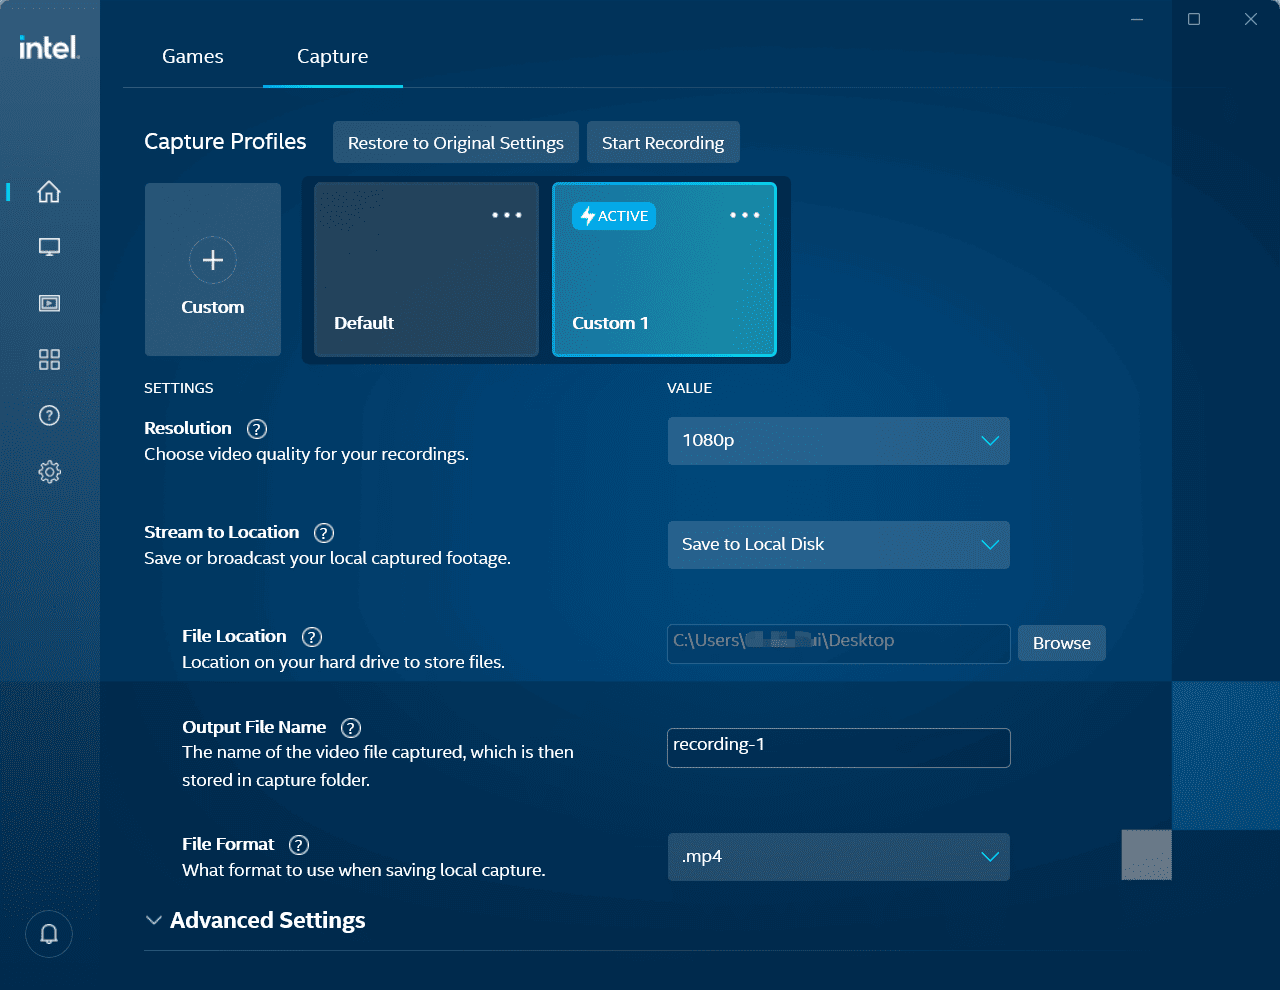
After the IGCC beta version opens, switch from the Games tab to Capture.
Step 3: Configure a Capture Profile
If you’re not satisfied with the default recording profile, you can change the settings or click Custom to create a new profile. Then, configure your preferences, including the video quality (720P or 1080P), file location, and file name.
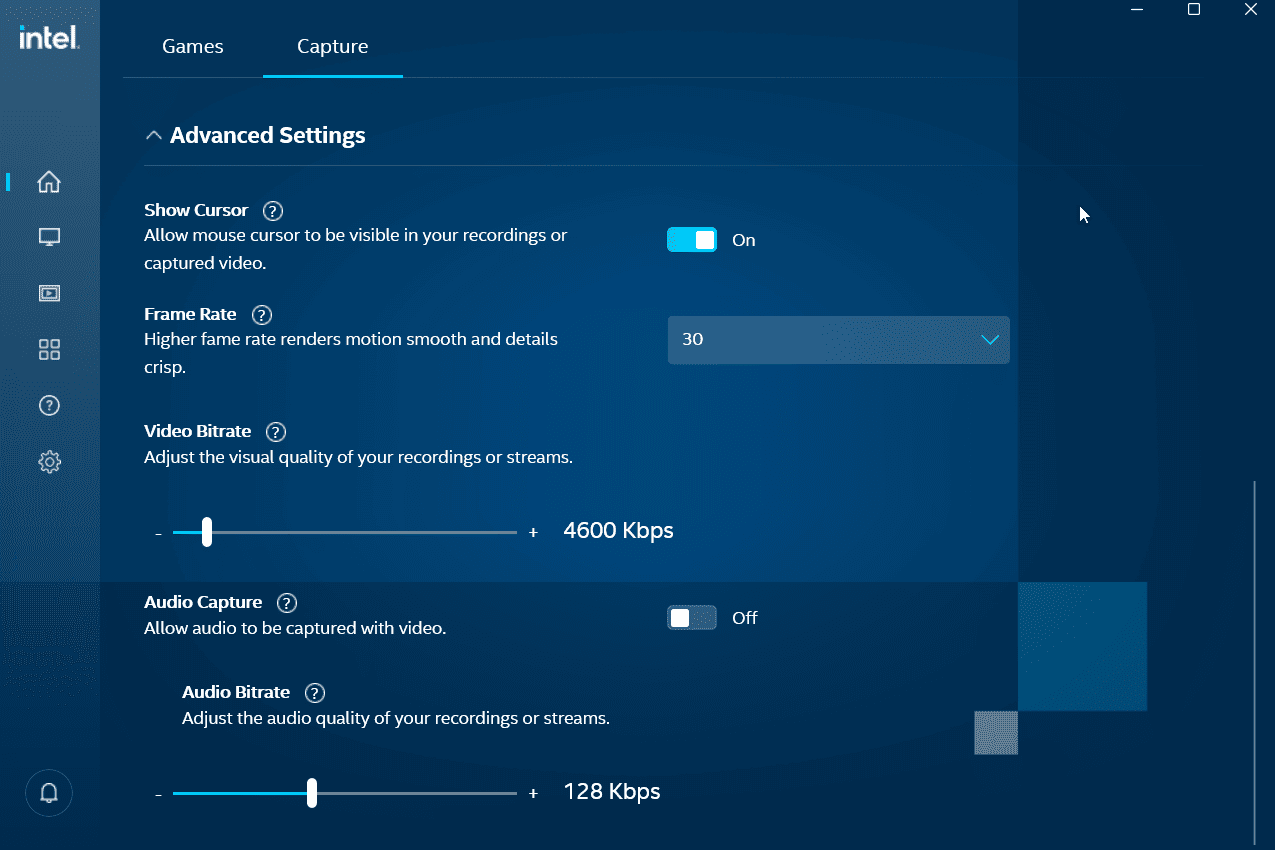
Then, click Advanced Settings for more controls over the recording. Decide whether to show the mouse cursor in the recording, choose a recording frame rate of 30 or 60 FPS, change the video bitrate, and decide if to capture system audio with the recording.
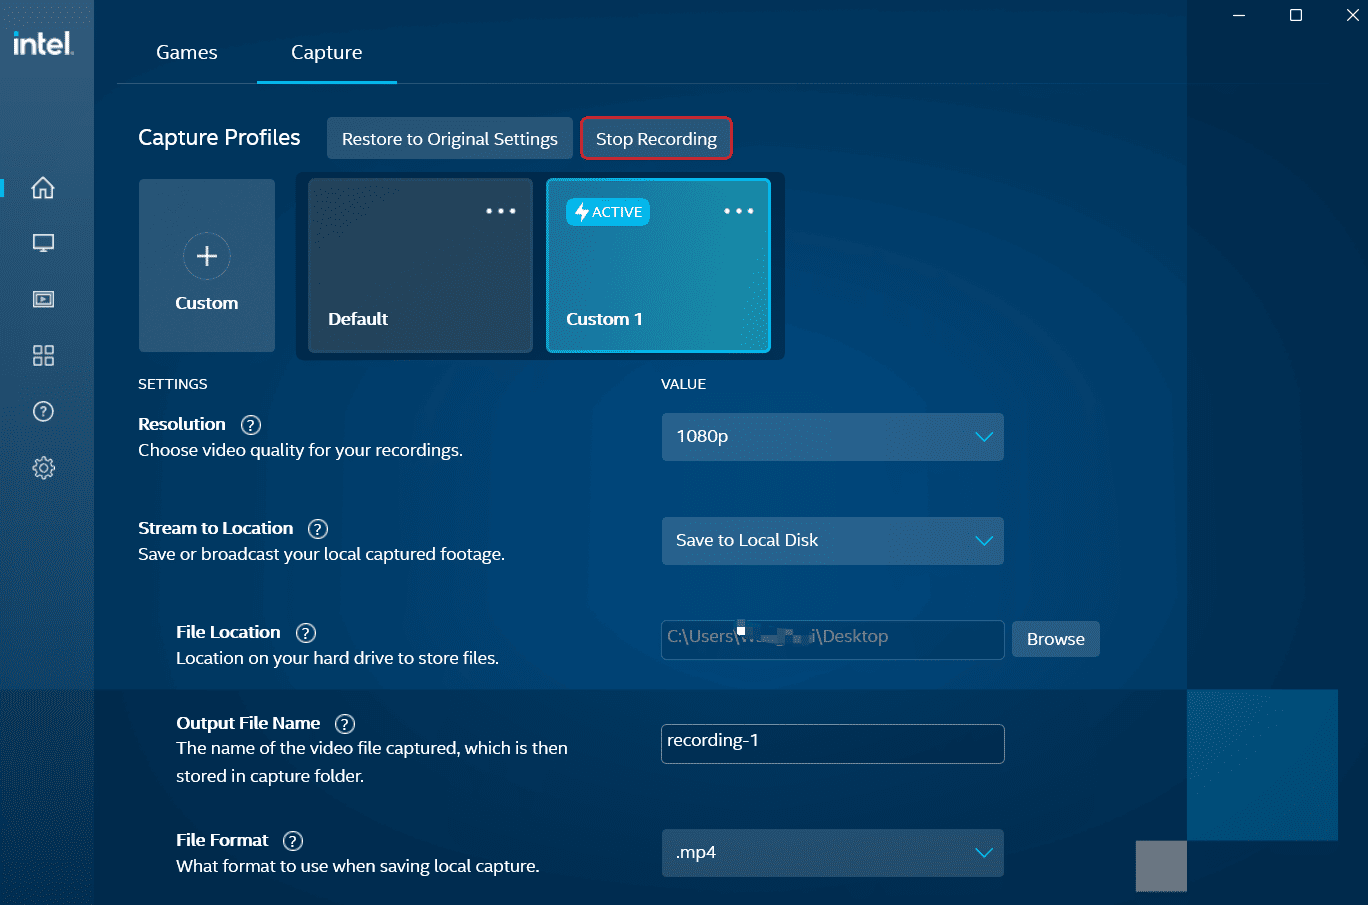
Step 4: Start and Stop Recording
Click Start Recording at the top to start capturing the entire desktop. To end the recording, return to the IGCC beta version, click Stop Recording at the top.
Pros and Cons of the Screen Recording Feature in IGCC (Beta)
| What We Like | Quick screen recording with simple setups. Essential settings to control the quality of the final video. Support 60FPS screen recording. |
| What We Don’t Like | Screen recording is no longer available in the standard IGCC version. Cannot record the microphone audio. Limited to full-screen recording. |
When to Use the Right Windows Screen Recorder
Until now, this post has introduced nine screen recorders for Windows users. Then, you may wonder which one is best for you. Actually, there’s no single “best” screen recorder. Select the right application depending on your goal.
When to Use Xbox Game Bar
Choose Xbox Game Bar to capture gameplay clips, capture application windows for convenience, or record the last 30 seconds of your game without any setup.
When to Use Snipping Tool
Select the Snipping Tool to take short screen recordings or create simple tutorials for personal notes, and there’s no need for advanced editing.
When to Use PowerPoint
Use PowerPoint’s screen recorder when you need a quick clip to embed directly into a presentation or make short videos without needing advanced features.
When to Use Microsoft Clipchamp
Microsoft Clipchamp can be a great choice when you want to take recordings and edit them in one place. However, if you want to capture videos longer than 30 minutes, it’s not an ideal choice.
When to Use Third-Party Screen Recorders
When you need to create professional, high-quality tutorials to post on YouTube or for a better experience, using free third-party screen recorders is a wise choice.
Suppose you desire annotation tools to enhance recordings, add a webcam overlay to your screen with simple setups, or you’re an entry-level user. In that case, MiniTool Screen Recorder is a reliable choice.
While OBS Studio has a learning curve, its power and versatility make it a top choice for advanced content creators and game enthusiasts who need a free, powerful recording tool without limits.
When to Use a GPU's Built-in Screen Recorder
Generally speaking, if you want to leverage your hardware or seek efficient and high-quality gameplay footage, consider your graphics card-related recording tool.
The NVIDIA App can be the first choice for NVIDIA users who need to create simple tutorials or capture gameplay with high quality and want a simple recording process.
If you use AMD Radeon graphics processors and pursue low system usage while screen recording, then AMD Software: Adrenalin Edition is a reliable solution.
People using 11th Gen (or later) Intel Core processors can try Intel Arc Control for a quick desktop recording. However, if you are using 10th Gen (or older) Intel Core processors, you need to manually download the IGCC (Beta) from the Microsoft Store for a quick recording.
Troubleshooting Common Screen Recording Issues on Windows
Although I always hope you enjoy a smooth recording experience, some issues may occasionally occur. Therefore, this section complies with common screen recording issues on Windows and provides corresponding fixes.
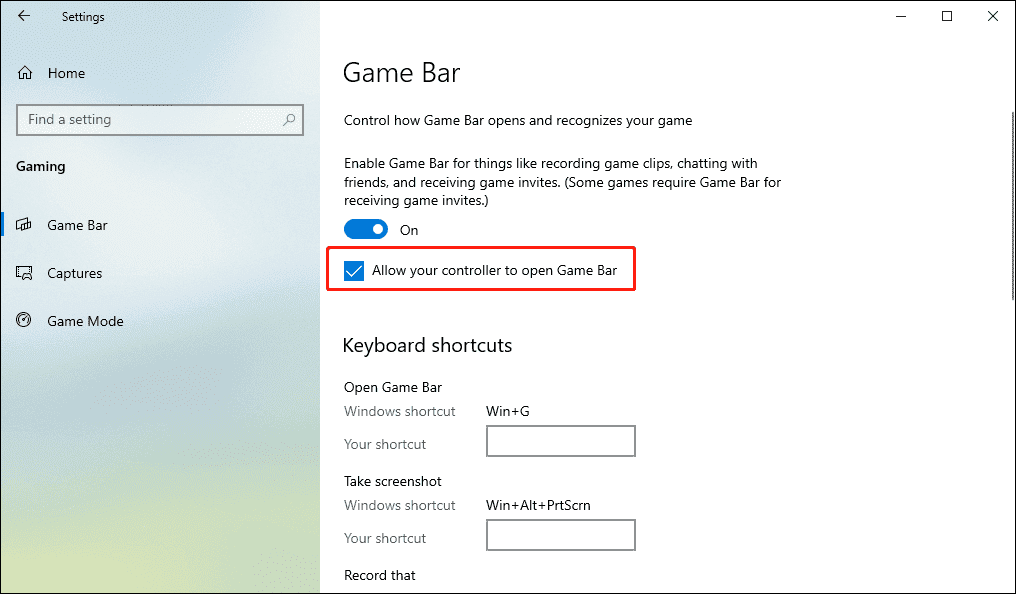
1. Game Bar Won't Open
Press Win + I to open Settings and select Gaming. Then, ensure that Game Bar is enabled and the option “Allow your controller to open Game Bar” is selected. Also, restart your computer and try again.
Also read: Is Windows 11 Xbox Game Bar Not Working? Try to Fix It
2. No Audio
This can be caused by a disabled microphone, muted system audio, or an incorrect audio device selected. Before starting a recording, check your system audio, make sure your microphone is well plugged in, and both are turned on in your recording application. Besides, don’t forget to check the volume.
To record audio with Game Bar, go to Settings > Gaming > Captures, and enable these settings: Record audio when I record a game and Turn Mic on by default when I record. Select Record game audio only to capture only game audio with Game Bar.
3. Black Screen
A black screen when recording usually means your software (like OBS or Game Bar) cannot record what’s happening on your desktop. When you encounter this issue, you can attempt to restart your computer or application, update graphics drivers, or adjust recording settings.
4. Recording Is Lagging
Screen recording lag usually happens because of insufficient hardware or recording at high resolution and frame rate on a low-end PC. To fix this issue, try exiting background programs, optimizing game settings, or lowering the recording resolution, frame rate, or bitrate.
Conclusion
After checking out this post, I believe you will no longer wonder how to screen record on Windows. This post comprehensively covers all the available screen recording tools built into Windows 10/11, applications provided by the three main GPU manufacturers, and reliable third-party solutions. It also simply lists the main scenarios of when to use these recording programs. It’s your turn now. Choose one method and start recording.
Finally, if you have questions when using MiniTool Screen Recorder, please feel free to contact us at support@minitool.com for help.