As a blogger who reviews digital products, I frequently need to test online tools in my browser and create corresponding tutorial videos. This process requires screen recording software, but I often encountered issues such as black screens, poor quality, or failure to capture audio.
Consequently, I set out to find a more reliable method for browser-based recording and ultimately selected the two tools I consider the most suitable.

How Do I Record a Browser Session
After researching and testing numerous video captures, I ultimately settled on Microsoft Clipchamp and MiniTool Screen Recorder for recording browser activity. They share similar operational workflows, primarily consisting of the following steps:
- Open the screen recording software.
- Choose the recording area.
- Control the audio recording settings.
- Select the target browser.
- Start capturing the browser screen.
- End the recording process.
- Check the recorded browser video.
To clearly present the respective advantages and usage methods of these two tools, I have summarized the information below in more detail. Before this, I also created a comparison table to facilitate a quick overview.
| Microsoft Clipchamp | MiniTool Screen Recorder | |
| Ease of Use | Yes | Yes |
| Recording Mode | Full-screen, window, and webcam footage | Full screen, specific area, windows, second monitor, and webcam |
| Audio Recording Capability | System audio and microphone | System audio and microphone |
| Output Format | MP4 | MP4 |
| Extra Features | Video editing feature | Built-in annotation tools |
Method 1: Use Microsoft Clipchamp
I started by trying out a few Windows built-in recording tools. Ultimately, I found Microsoft Clipchamp to be the best fit for recording the browser interface, as it comes pre-installed on Windows and also offers a web-based version.
Another reason for my choice is that it integrates editing capabilities directly into the workflow, allowing me to edit and produce the final video immediately after recording. Consequently, although Clipchamp has a 30-minute recording limit, it is more than sufficient for basic browser screen recording tasks. The method on how to record browser using Clipchamp is very simple:
1. Launch Microsoft Clipchamp on the PC. Then, click on Try it within the Record yourself section to enter the Record & create interface.
2. Choose the Screen recording mode. Then, click the Start screen recording option and make sure the microphone audio recording feature is enabled in the new interface.
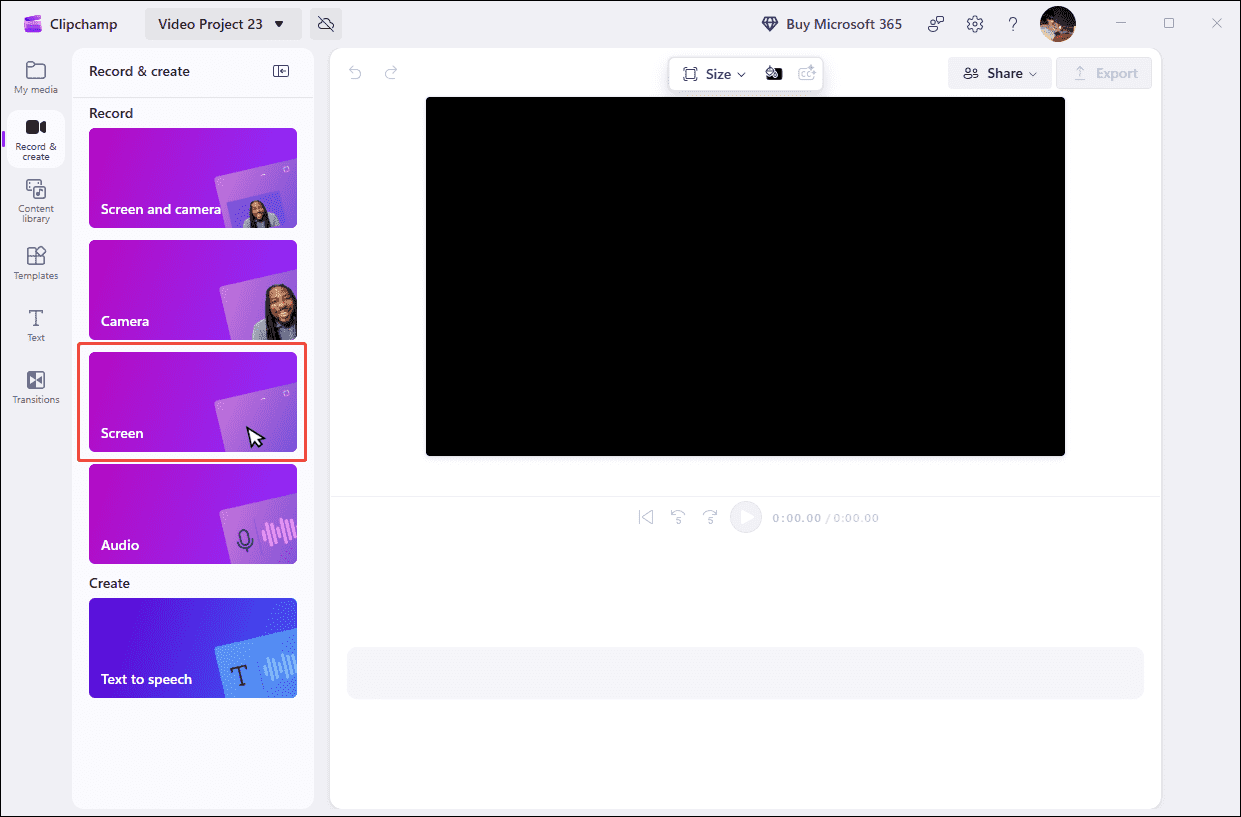
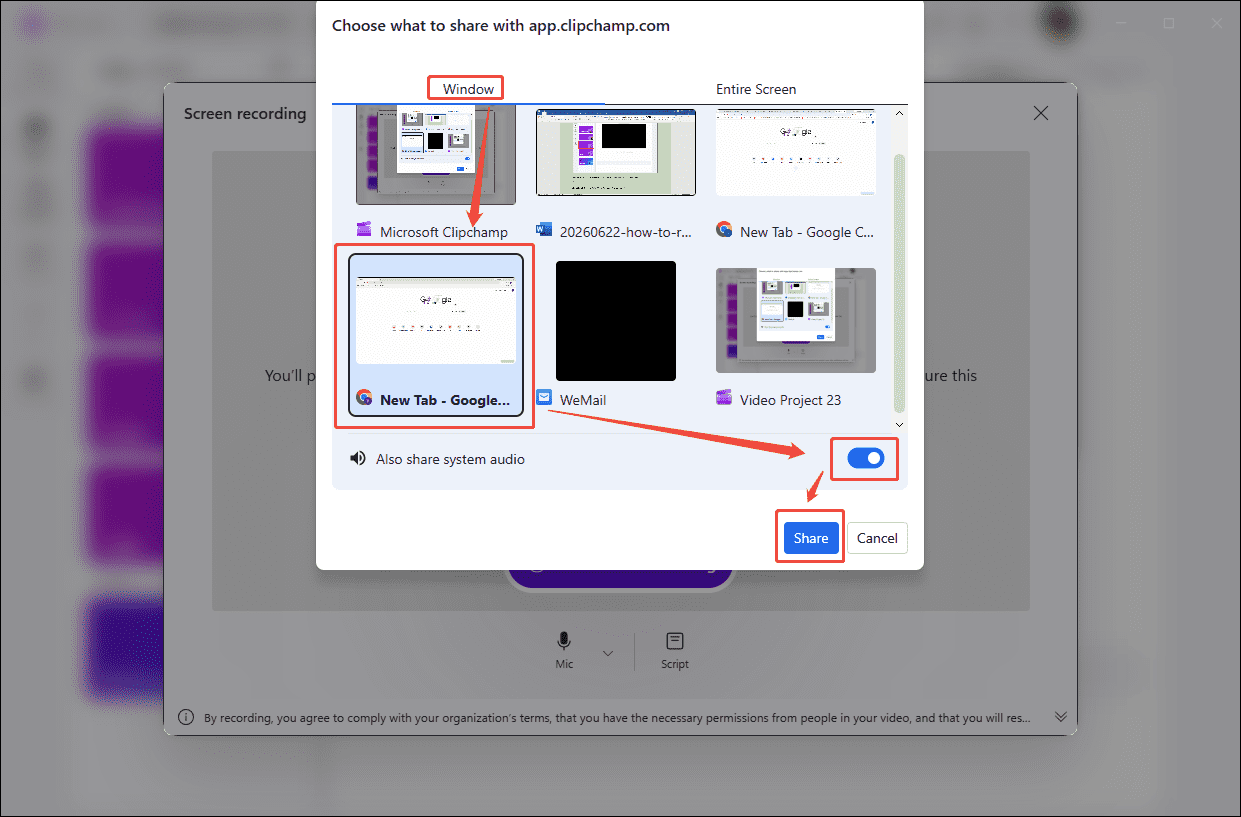
3. In the new pop-up window, switch to the Window section and select the target browser. Then, check the Also share system audio option. Finally, click the Share option to start recording.
4. To end the recording process, click the Stop sharing option. Then click the Save and edit option to enter the editing interface.
5. When the editing process ends, click the Export option in the upper-right corner of the editing interface.
However, it is worth noting that certain premium features of Clipchamp, such as filters and background music requiring a premium subscription, as well as 4K video export, are available only in the paid version.
Method 2: Use MiniTool Screen Recorder
MiniTool Screen Recorder is a comprehensive recording tool that I discovered strikes an excellent balance between feature versatility and ease of use. In addition to window recording, it supports capturing multiple displays, full screen, specific regions, and webcam footage.
This tool also allows for independent control over system audio and microphone recording. Furthermore, the application includes built-in annotation tools, making it ideal for creating detailed instructional videos and operational demonstrations. Here is a detailed guide on how to record browser screen with MiniTool Screen Recorder.
1. Download and install MiniTool Screen Recorder on the PC. Then, launch it.
MiniTool Screen RecorderClick to Download100%Clean & Safe
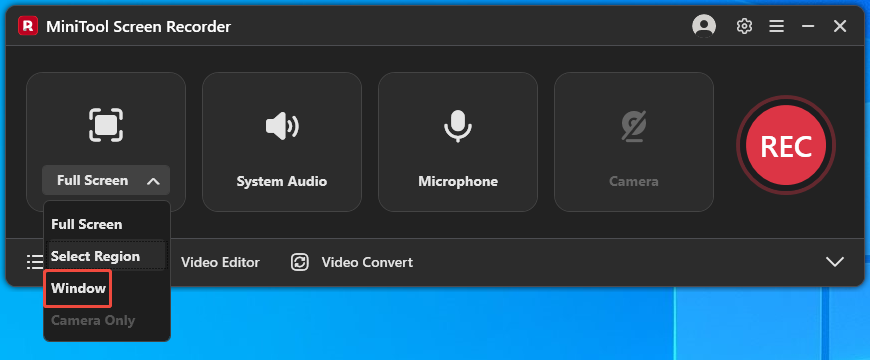
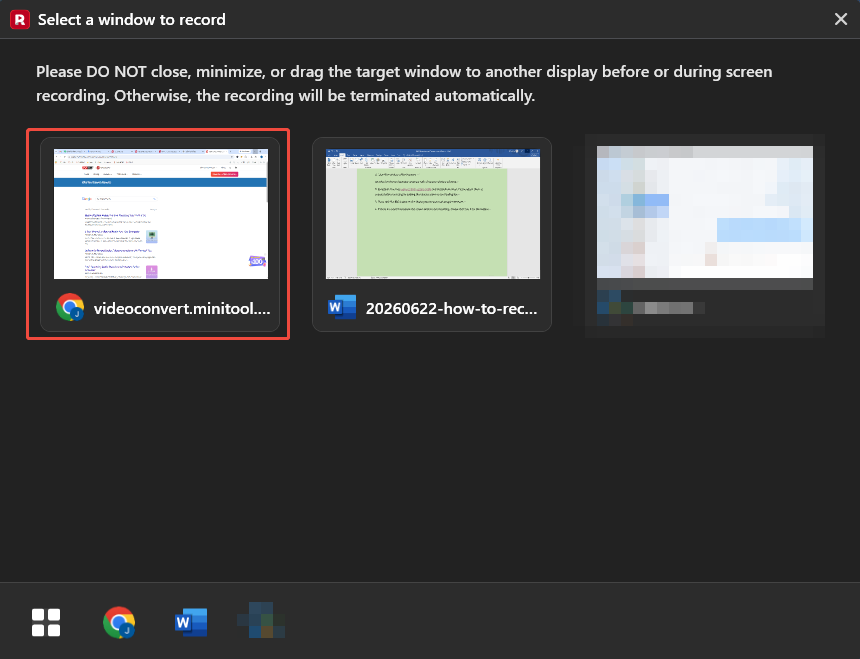
2. Expand the Full Screen option, then choose the Window option.
3. Select the window of the browser.
4. By default, this tool captures both system audio and microphone input. Please adjust them as needed before recording by clicking the relevant icons on the floating bar.
5. Then, click the REC button on the floating bar or press the F6 key to start capturing the browser.
6. If there is a need to annotate the screen while screen recording, choose the tools from the toolbar.
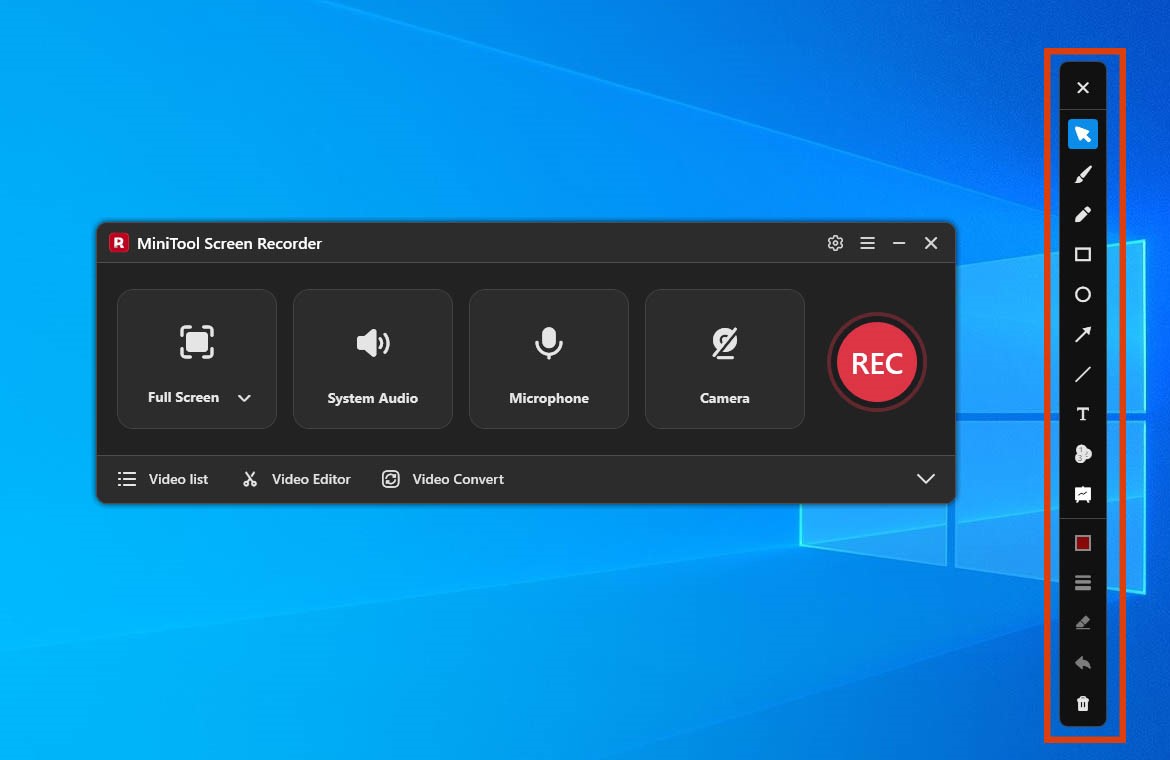
7. To end the recording process, press the F6 key. Then, the tool will switch to the Video list section, where the user can check the video by clicking the Folder icon.
Although the two tools discussed here were selected based on my specific video creation needs, testing has shown that they are fully capable of handling a wide range of browser recording tasks, from recording online meetings, virtual classes, and videos from platforms like YouTube to capturing footage for official error reports.
Useful Browser Recording Tips
In addition to choosing the right screen recording tool, I’ve found that fine-tuning certain recording details can also improve the quality of the recording to some extent. For example, consider the points I’ve listed below:
#1 How to Protect the Privacy While Browser Recording
While recording, it is easy to accidentally capture private web pages or personal information displayed in the browser. To prevent this, I usually close other tabs and hide the bookmarks bar. If I need to further conceal details like my profile picture, I usually turn on the Chrome Incognito mode.
Additionally, to avoid having sudden notifications obscure the content I am recording, I typically enable the operating system's focus mode. Instructions on how to do this are provided below.
1. Press the Windows + A keys to open the interface of Manage notifications.
2. Then, click the moon icon to enable Alarm Only mode.
#2 How to Capture the Browser Audio Only
When trying to record browser window, I often find that audio from other applications gets captured as well. In such cases, the usual solution is to either re-record the footage or use video editing software capable of separating audio tracks. To prevent this from happening again, I typically mute the audio from other applications before I start recording.
1. Right-click the Volume icon in the taskbar. Then, from the expanded options, select the Open Volume mixer option.
2. In the Volume Mixer interface, click the Volume icons for System Sounds and any other unrelated applications to mute their audio.

#3 How to Reduce Background Noise While Recording
Background noise in the microphone audio is another significant factor affecting the quality of recorded videos. When recording audio, the microphone may pick up various ambient sounds, resulting in a cluttered or noisy audio track. To address this, I often record in a relatively quiet room and turn off any noise-generating equipment. Alternatively, if possible, I use a headset microphone.
Of course, beyond these factors, tweaking other settings, such as adjusting the recording resolution and frame rate, or using hardware acceleration, can also improve the quality of the recorded browser video.
Common Problems & Fixes for Browser Recording
Of course, I have encountered some tricky situations while capturing the browser interface on numerous occasions. Below, I have summarized some common issues and their corresponding solutions.
#1 Recorded Video Shows a Black Screen
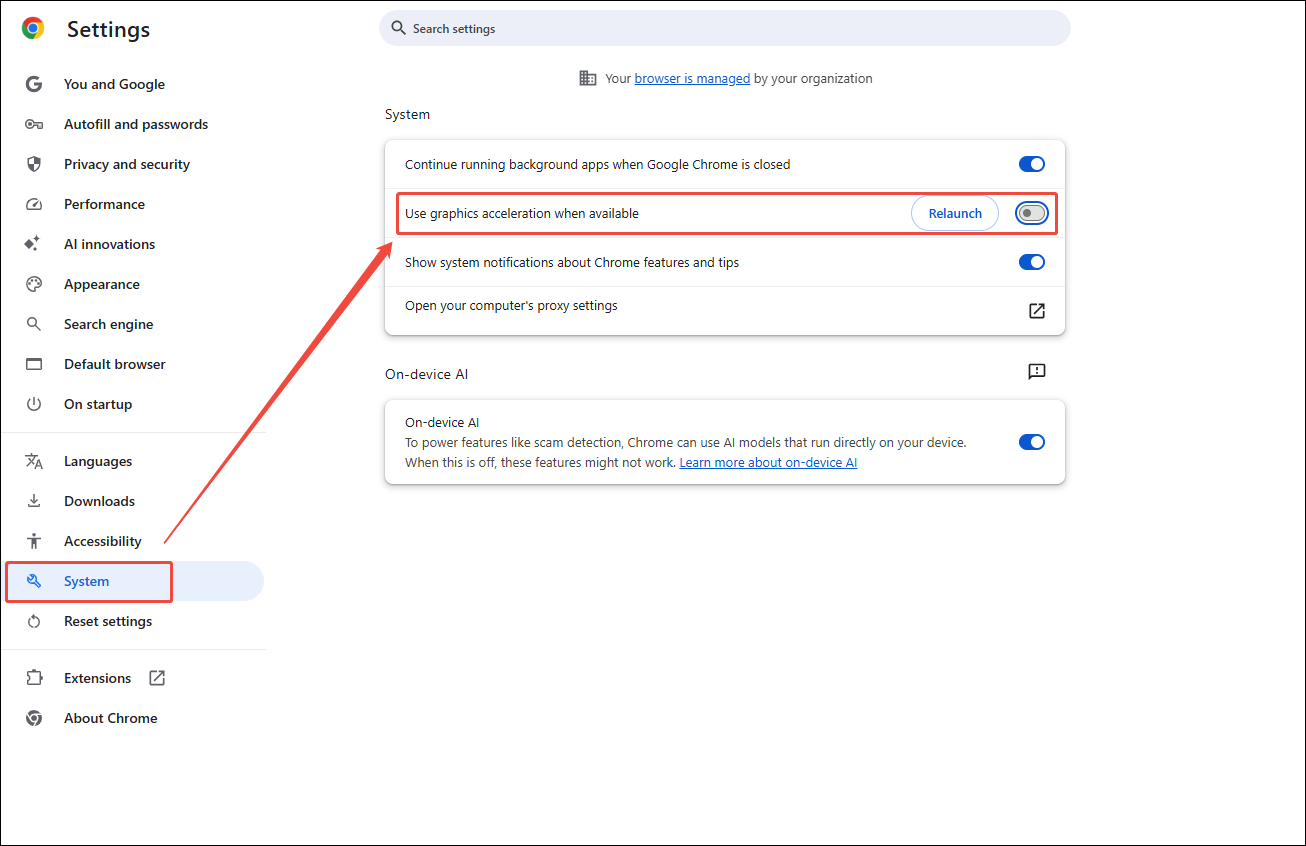
The first issue is that the recorded browser screen appears completely black; this is usually caused by graphics acceleration being enabled. The most direct solution is to disable this option in the browser. This post uses the Chrome browser to demonstrate the specific steps.
1. In the Chrome main interface, click the More option in the top-right corner.
2. Then, choose the Settings option within the expanded interface.
3. Switch to the System section in the new interface, then turn the Use graphics acceleration when available option off.
#2 No Audio in Recording
Generally speaking, a lack of sound in recorded videos is caused by incorrect system settings rather than an issue with the software itself. Therefore, it is necessary to verify that the correct audio device is selected in the Windows system settings before recording. Additionally, check to ensure that browser audio has not been disabled.
#3 Browser Recording Process Automatically Stops
This is a fairly common issue, usually caused by software malfunctions, excessive CPU usage, or insufficient storage. In such cases, I typically restart the software and close unnecessary applications to prevent excessive CPU and memory consumption. Finally, I check whether there is enough available disk storage, clearing space as needed depending on the situation.
In short, common issues encountered when recording with browsers can be avoided by taking the right steps beforehand; only with thorough preparation can a smooth recording experience be made.
Final Words
This article explains how to record browser screen using Microsoft Clipchamp and MiniTool Screen Recorder. It also offers tips for browser recording and solutions to common issues, ensuring a smooth recording experience.
If there are any questions about MiniTool Screen Recorder or MiniTool MovieMaker, please contact the support team at support@minitool.com.