Recording videos from a website allows you to watch and review content offline at your convenience. This post introduces four easy and quick methods to capture video from websites, including using a third-party screen recorder like MiniTool Screen Recorder, Windows built-in recorders such as Xbox Game Bar and Microsoft Clipchamp, and a browser extension like Loom.
There are many situations where recording video from websites is necessary. Whether you want to watch videos offline, save online meetings, or record courses for later review, using a reliable and effective tool to capture video from websites can be very helpful.
Although browsers such as Google Chrome do not offer a built-in screen recording feature, there are several third-party extensions and software tools that enable you to record a video from a website. This post demonstrates four effective and reliable methods for capturing video from websites.
How to Capture Video from Websites Using a Third-Party Recorder
When recording videos from websites, third-party screen recorders are often recommended due to their rich feature sets and greater flexibility. This section introduces one of the best screen recorder software tools, MiniTool Screen Recorder, along with detailed steps.
Overview of MiniTool Screen Recorder
MiniTool Screen Recorder is an easy-to-use screen recorder tool designed for Windows users of all levels. Featuring a clean and intuitive interface, it allows you to capture a wide range of on-screen activities with ease, including gameplay, live streams, video calls, and website videos. Below are some key features that make it effective for recording videos from websites.
Custom Screen Capture
MiniTool Screen Recorder supports flexible screen capture options. You can choose to record the full screen or select a custom region for precise recording, making it easy to capture a browser window or a specific video area. In addition, it supports webcam recording, allowing you to create a picture-in-picture overlay while recording.
Flexible Audio Control
Moreover, MiniTool Screen Recorder offers precise control over audio capture settings. You can choose to record system sound and microphone input either simultaneously or independently, ensuring website videos are captured with clear and synchronized audio.
Customizable Recording Settings
In addition, MiniTool Screen Recorder records at up to 4K resolution and saves recordings in MP4 format without time limits or watermarks, making it convenient to edit and share recorded website videos. You can also adjust the frame rate to 30 fps or 50 fps to ensure smooth playback and clear visuals when capturing videos from websites.
What’s more, this application enables you to change recording hotkeys based on your preference.
Additional Features
Beyond the essential functions for recording videos from websites, MiniTool Screen Recorder also offers several practical features for screen capture. For example, its real-time screen annotation tools allow you to use a pen tool to draw, add text, arrows, step numbers, rectangles, and whiteboards during recording, which can be helpful when highlighting key content in website videos.
In addition, MiniTool Screen Recorder provides recording duration settings. You can preset the recording time in advance, and the recording will automatically stop once the preset time is reached.
With these comprehensive features, MiniTool Screen Recorder offers a reliable solution for capturing video from websites.
How to Record a Video from a Website Using MiniTool Screen Recorder
Here are detailed steps for capturing a video from a website with MiniTool Screen Recorder.
Step 1: Download and Install
Click the button below to download the free screen recorder. Then, follow the on-screen instructions to install it on your computer.
MiniTool Screen RecorderClick to Download100%Clean & Safe
Step 2: Select the Recording Area
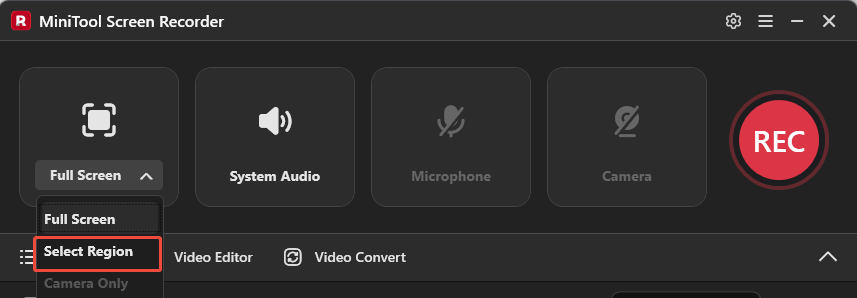
Launch MiniTool Screen Recorder to enter the main interface. Next, open the website video you want to capture. You can keep the default Full Screen recording mode if the video is played in full screen.
If you prefer to record a video in a specific area of the screen without unnecessary distractions, click the Arrow icon next to the Full Screen option and choose Select Region. Then, you can drag the red dashed border to customize your recording area.
Step 3: Control the Audio Recording
The system audio and microphone input audio are recorded with your screen by default. You can click the Microphone option to turn it off for better audio quality in the recorded video.
Step 4: Make Other Adjustments
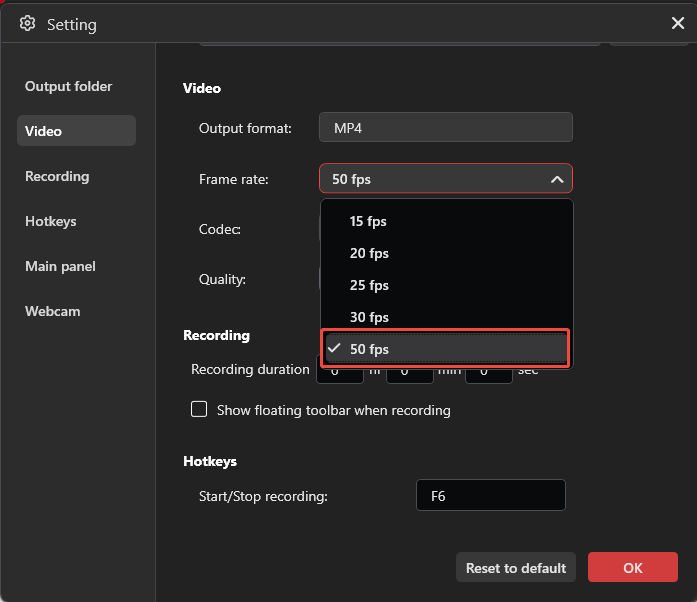
For additional settings, click the Gear icon in the upper-right corner of the interface. You can change the output folder and preset the recording duration. Click the Frame rate option and select 50 fps to make the recorded video from the website smoother than the default 30 fps. MiniTool Screen Recorder also offers three video quality options, including standard, high, and original. Select the preferred one and click OK to save all the adjustments.
Step 5: Start and Customize the Recording
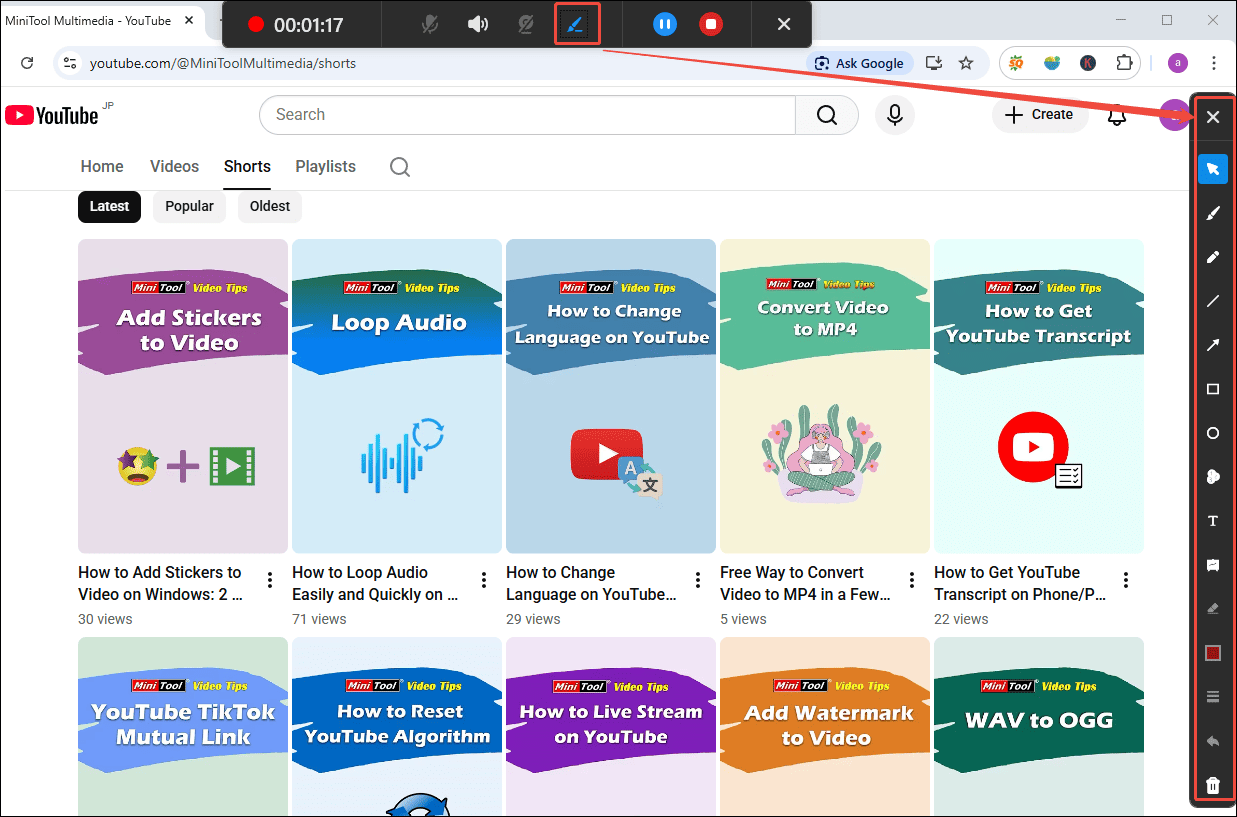
Click the REC button on the right side of the main interface to start recording. Alternatively, you can press the default key F6 on the keyboard. It will capture the video from the website after a 3-second countdown. Press F9 to pause and resume the recording.
To add annotations during recording, make sure you are logged in to your account. Then click the Pen icon on the floating toolbar to open the annotation panel on the right side of the screen. Then, select the desired tools to highlight key areas while recording the video.
Step 6: End and Check the Recording
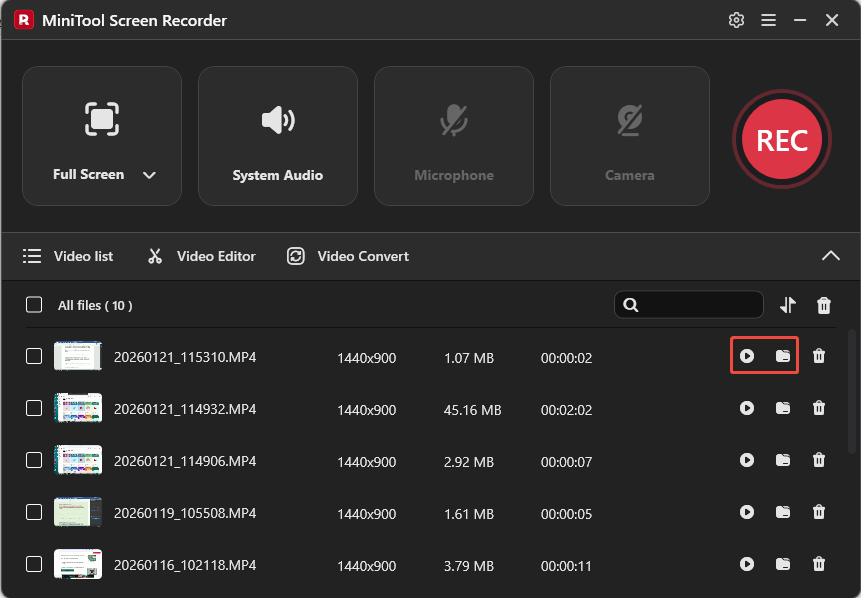
Press the default F6 again to end the recording. Then, the recorded video will appear at the top of the video list module. Here, you can click the Play icon or the Folder icon to check or locate it on your computer.
As you can see, recording a video from a website with MiniTool Screen Recorder is a straightforward process. Simply follow the steps above to capture your desired video efficiently.
How to Capture Video from Websites Using Built-in Windows Recorders
Using built-in Windows recorders is another practical way to capture video from websites. With the pre-installed software, you can eliminate the need for additional downloads and save storage space. This section demonstrates how to capture video from websites using Xbox Game Bar and Microsoft Clipchamp.
Let’s take a closer look at each of them one by one.
Method 1: Use Xbox Game Bar
Xbox Game Bar is designed for taking screenshots and recording application windows, especially game clips. It also offers features such as performance monitoring and Xbox social integration.
In terms of capturing video from a website, Xbox Game Bar allows you to capture both system audio and microphone input, with adjustable volume levels. To ensure smooth playback, you can customize the video frame rate and video quality before recording.
However, it does not provide flexible screen selection options, as the recording area is automatically detected and set by the system.
If you don’t mind that drawback, you can follow the steps below to record a video from a website using Xbox Game Bar.
Step 1: Activate and Customize Xbox Game Bar
Press the Windows key on your keyboard and click Settings. Select Gaming and turn on the option to allow your controller to open Game Bar.
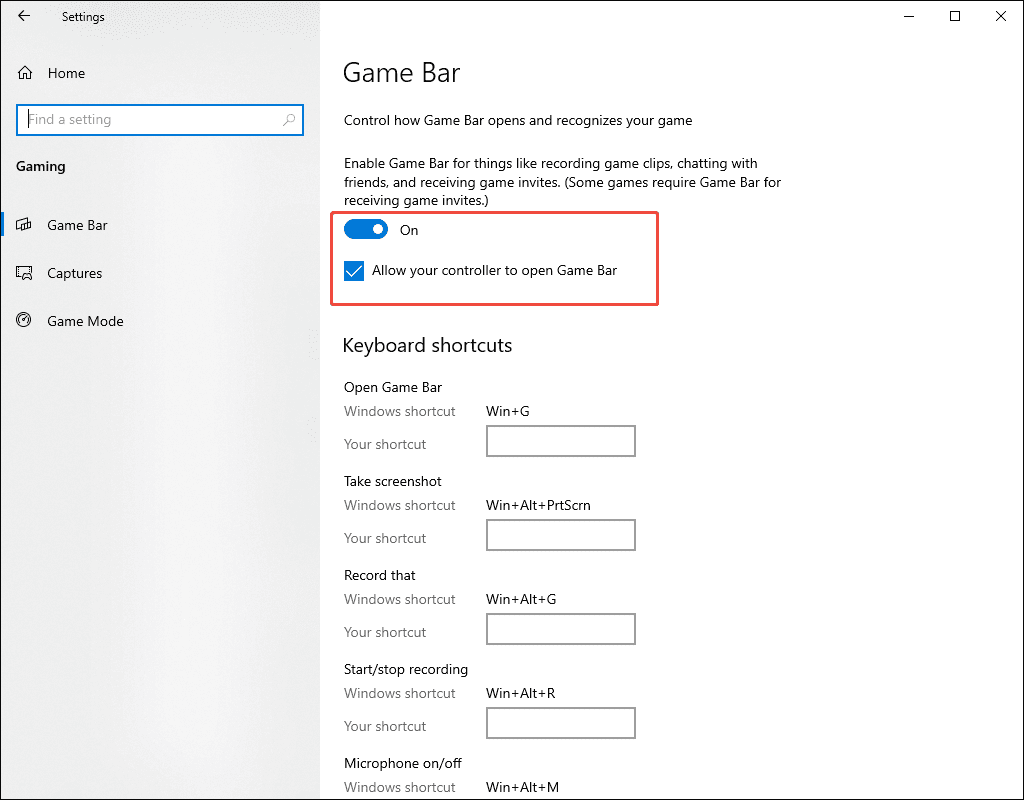
You can also click Capture below Game Bar to customize the recording settings. Set Audio quality to recommended 128kbps, video frame rate to 60fps, and video quality to High for a smoother, higher-quality result.
Step 2: Control Recording Audio
Navigate to the website and open the video you would like to capture. Next, press the Windows and G keys to open Xbox Game Bar. Click the Capture option to enter the video controls, and the Game Bar will automatically detect and choose your recording area.
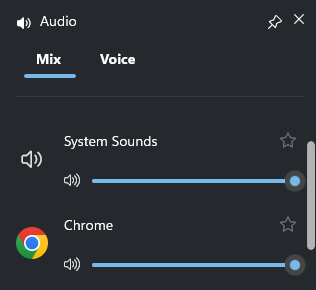
Next, click the Audio icon to customize the audio controls. The microphone is disabled by default. Click the Microphone icon to enable the microphone recording if you want to add real-time commentary to your recorded video. You can also move the volume sliders to adjust the system volume and individual application volumes.
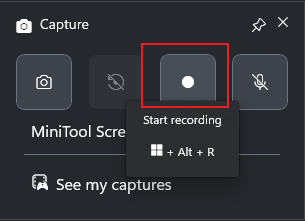
Step 3: Start and End Recording
Click Start recording in the capture panel to begin recording. Click the Stop Recording icon to end recording. Later, you can click on See my captures to locate your recorder video.
Method 2: Use Microsoft Clipchamp
Microsoft Clipchamp is another pre-installed software for Windows 11. As an all-in-one video recorder, it enables you to record the screen and webcam. It also offers flexible control over system audio and microphone input. Moreover, it includes a built-in teleprompter tool, enabling you to type or paste your script on your screen while recording for better performance.
What makes Microsoft Clipchamp stand out is that it can directly edit the recorded video, as it also serves as a video editor. However, Microsoft Clipchamp also lacks custom region selection for screen recording, limiting you to capturing a specific window or the entire screen. Additionally, screen and webcam recordings are limited to a maximum duration of 30 minutes.
How to capture video from websites using Microsoft Clipchamp? Follow the steps below.
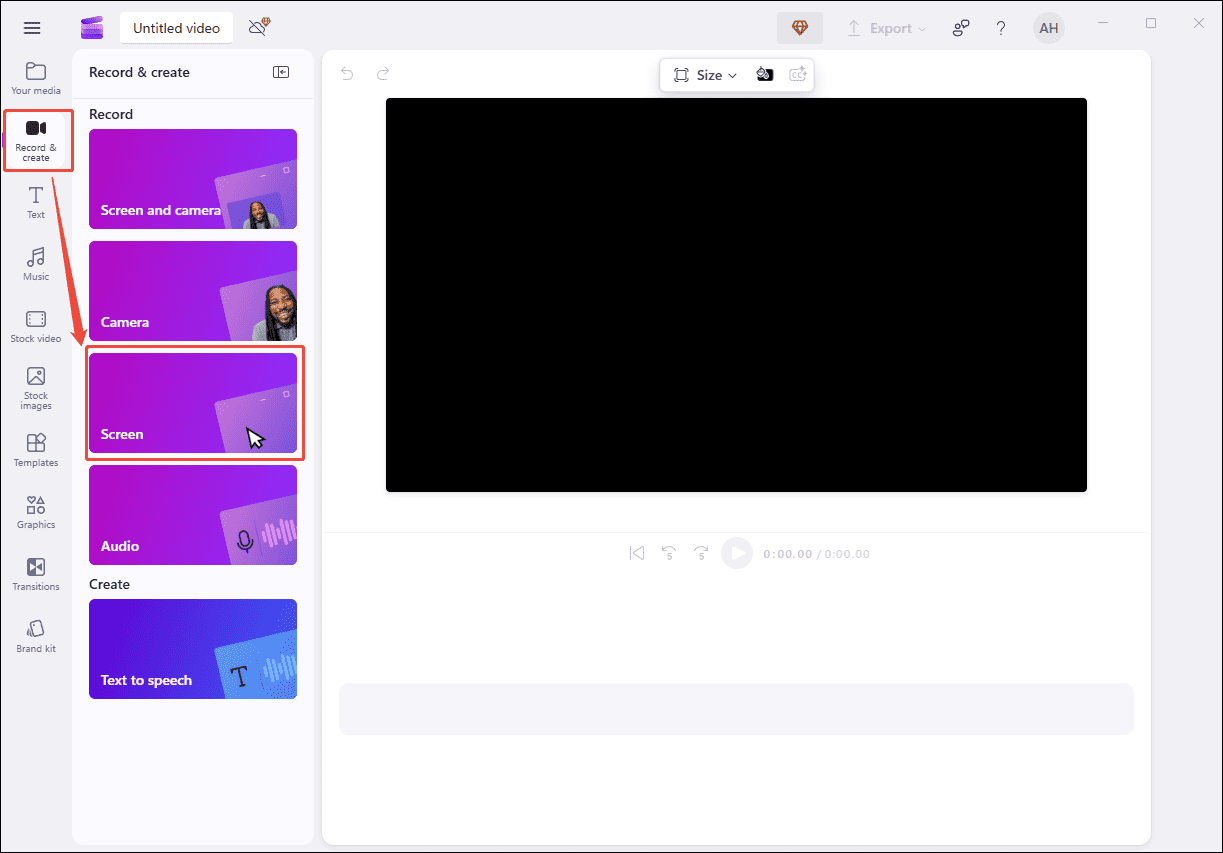
Step 1: Access Microsoft Clipchamp’s Screen Recorder
Open Microsoft Clipchamp and click Record & create. Next, select Screen and customize the microphone and script settings as needed. Then, go to the website containing the video you want to capture.
Step 2: Start and End Recording
Click Start screen recording and select the website window. Keep the default system audio turned on. Next, click Share to begin recording after a 3-second countdown. Click Review to stop and preview the recording. If you are satisfied with it, click Save and Edit to make further edits.

How to Capture Video from Websites Online
The online screen recorder can be your go-to choice thanks to its robust compatibility. You can use them on all kinds of websites through different web browsers. This section takes Loom, a browser extension, as an example.
Overview of Loom Browser Extension
Loom is a screen recorder that can be used on Chrome, Edge, Windows, and Mac. It allows you to capture your screen, selected tab, and webcam with just a couple of clicks. It includes camera background images and blur options to protect your private information. After stopping recording, videos are automatically saved in the Loom Library, and you can obtain an instant, shareable link to send to others.
How to Record a Video from a Website Using Loom
Step 1: Add Loom to Chrome
Go to the Chrome Web Store and search for Loom to install it in your browser.
Step 2: Start and Stop Recording
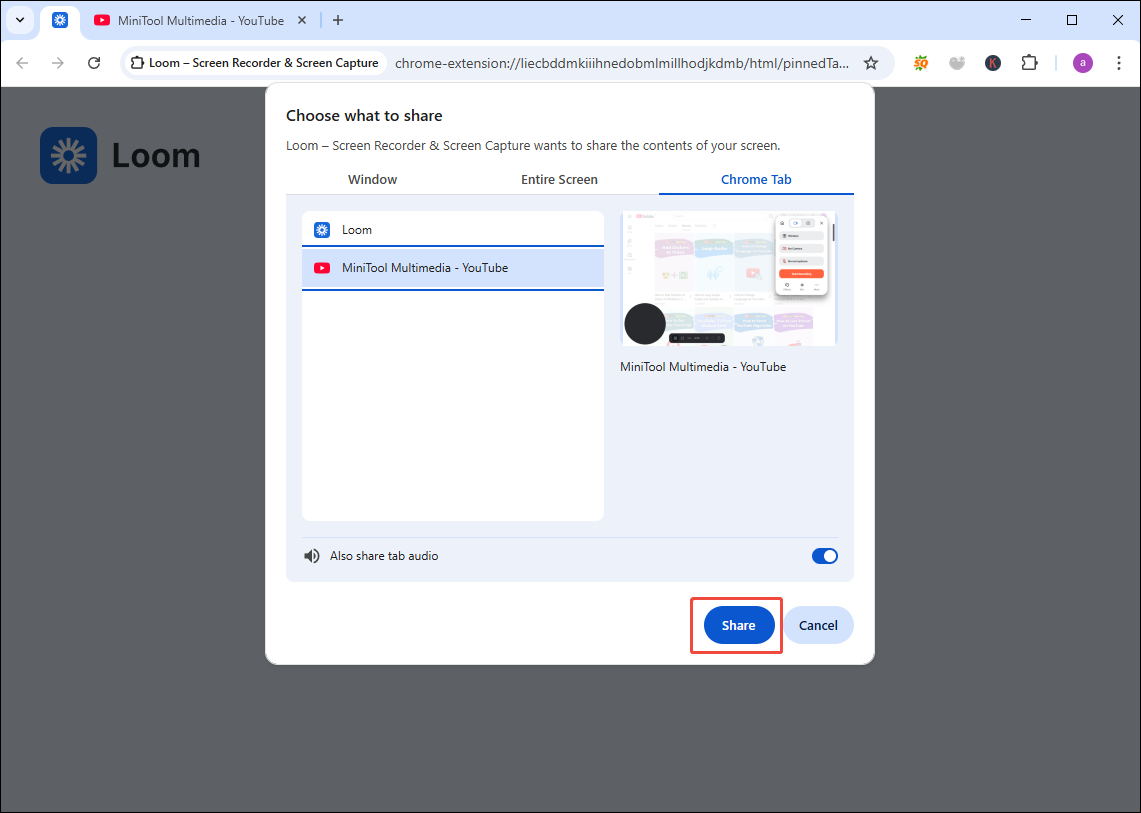
Open the video you want to capture on the website. Next, click the Loom icon in the extension bar to enter the main interface. Then, customize the camera and microphone settings. Click Start Recording in the right panel to choose the video Chrome tab and click Share. After a 3-second countdown, the recording starts automatically. When it is over, click the Finish icon to end recording.
Bonus: How to Edit the Recorded Website Video
Once a video is recorded on your computer, you may need a video editor to remove unwanted parts, crop borders, adjust audio volume, or make other refinements. MiniTool MovieMaker is a highly recommended editing tool, as its versatility can meet a wide range of editing needs.
MiniTool MovieMaker enables you to crop, trim, and rotate videos with ease. Beyond basic editing, it also provides advanced features such as creating picture-in-picture effects. With a rich collection of effects, transitions, text templates, and filters, you can effortlessly enhance your video content. Moreover, it allows you to export videos in up to 4K resolution without a watermark at no cost.
MiniTool MovieMakerClick to Download100%Clean & Safe
Conclusion
This post has shown you how to capture video from websites on Windows using four reliable methods. With these easy-to-use screen recorders, you can record your desired videos from websites in just a few clicks. However, whether you are saving educational content or sharing entertaining videos with friends, always remember to respect copyright laws and terms of use to avoid violations.
Choose the screen recorder that best suits your needs and expectations. Follow the steps above, and give it a try. Hope this post is helpful to you!
If you have any questions or suggestions about MiniTool Screen Recorder and MiniTool MovieMaker, please don’t hesitate to email us at support@minitool.com.