How to record a presentation on Teams? Meeting organizers, by virtue of their recording permissions, can utilize Teams' built-in recording feature. Users without the relevant permissions need to rely on a third-party video capture tool, such as MiniTool Screen Recorder.
What Is Microsoft Teams
Microsoft Teams is a cloud-based team communication and collaboration platform launched by Microsoft in 2016, and it is directly integrated into the Microsoft 365 suite. The platform is feature-rich, enabling users to engage in a wide range of activities such as online chat, video conferencing, file collaboration, storage, and more.
Users can access select features for free or purchase a business plan to unlock the platform's full capabilities. Furthermore, Teams includes various built-in tools to facilitate video conferencing, such as the convenient screen recording feature. The reason I mention this feature is that I frequently use it to record audio, screen activity, and shared sessions during the meeting.
Can I record a presentation on Teams? The answer is yes. However, recording is not possible if the user is not the meeting organizer, has not been granted recording permissions, or is on the free version. Nevertheless, I have found that this can still be accomplished by using third-party screen recording tools.

How to Record a Presentation on Teams
As previously mentioned, users can record a presentation in Teams using either its built-in recording feature or a third-party recording tool. Next, I will outline the specific steps for both of these methods in detail.
Method 1: Use the Teams' Built-in Recording Feature
Our team has purchased the Teams Business plan, and I have personally served as the meeting organizer on numerous occasions to record presentations. The following is a workflow I have compiled based on my own experience:
Step 1: Go to Teams
Go to the Teams website or launch the application on the PC. Then, log in to the account.
Step 2: Start or Join a New Meeting
1. Switch to the Meet section.
2. Then, click the Create a meeting link option to start a new meeting. Or, click the Join with a meeting ID option to join a new meeting.

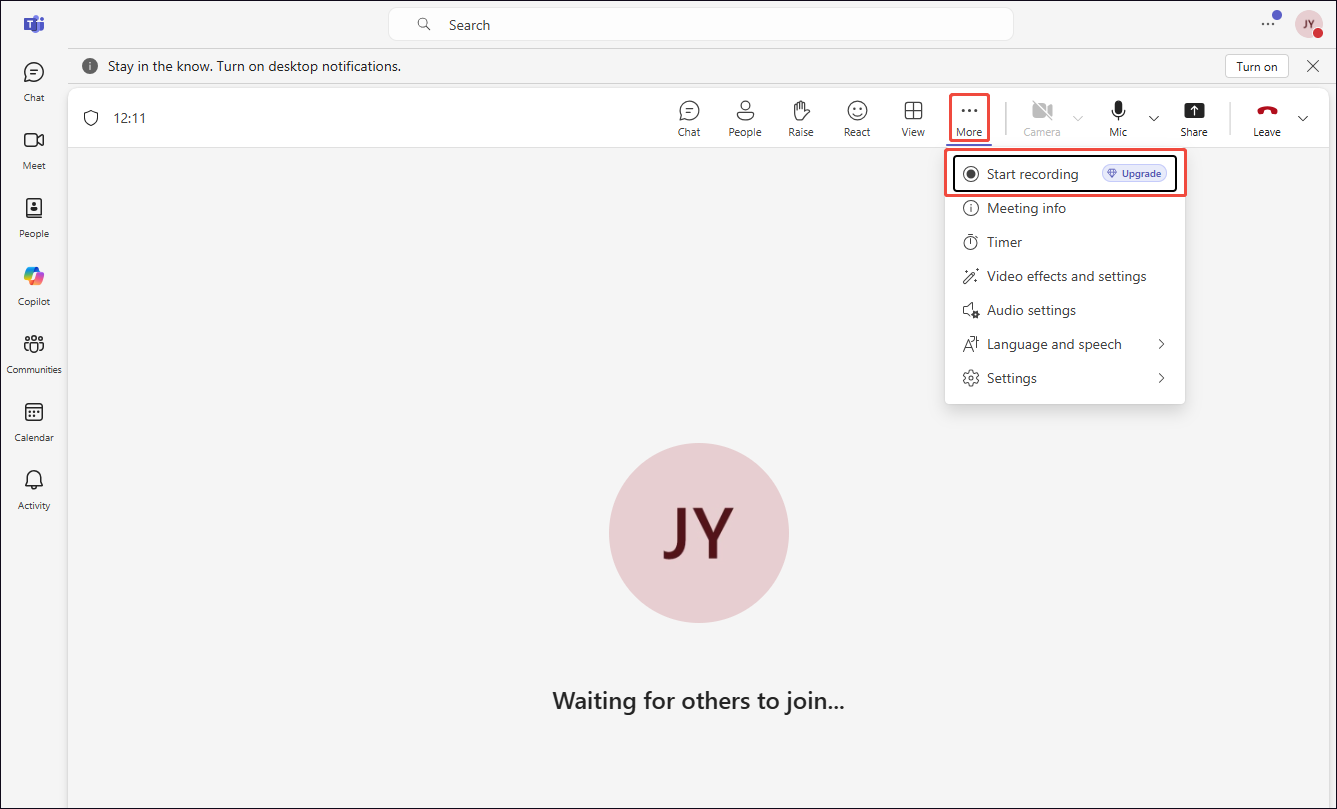
Step 3: Start Recording
To start the recording process, click the More option and choose the Start recording option.
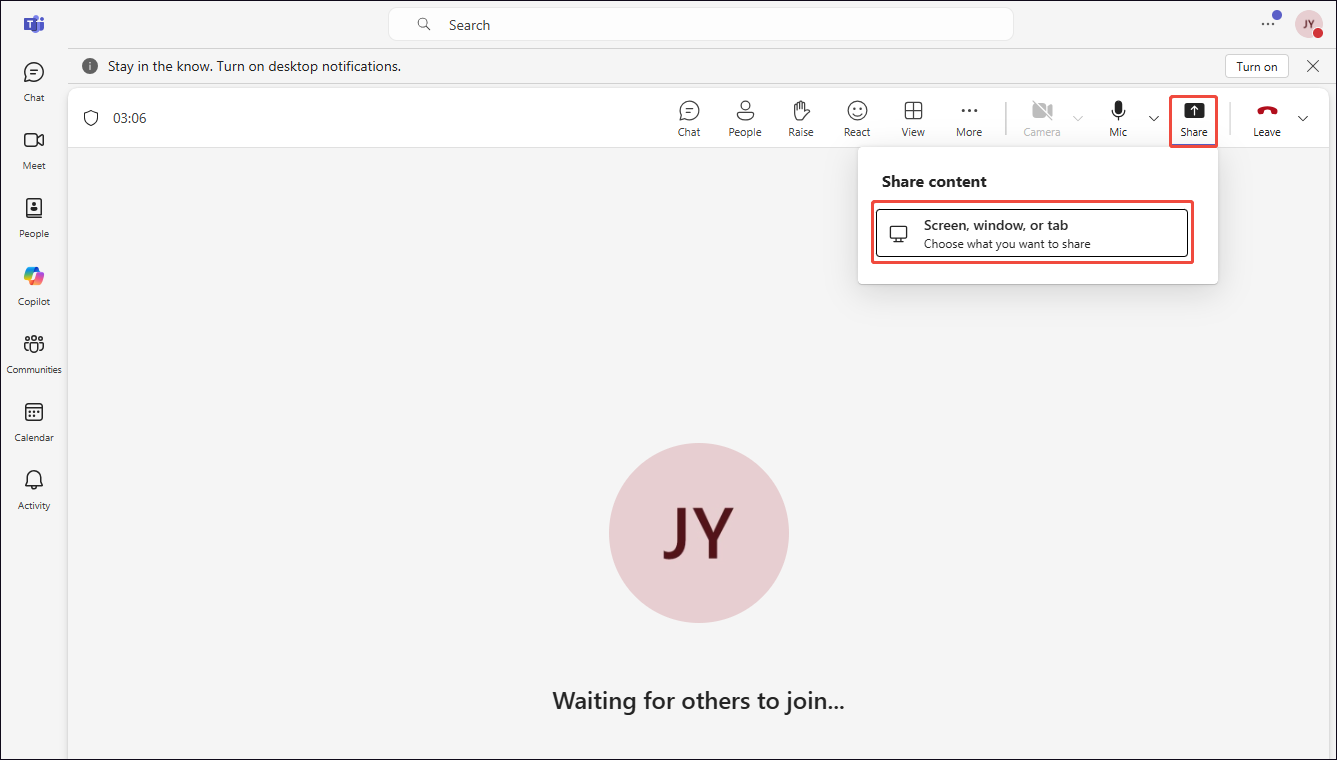
Step 4: Share the Presentation
1. Click the Share option and choose the Screen, window, or tab option.
2. In the new window that appears, select the target presentation that will be used during the meeting.
3. Subsequently, I will automatically enter the presentation interface; within this interface, a small black box will appear in the bottom-right corner, indicating that Teams is recording.
Step 5: End Recording
1. Click the black box to return to the Teams meeting interface.
2. Then, click the More option again, and choose the Stop recording option to end recording.
Step 6: Check the Recorded Video
Teams recordings are stored either in the channel's Recordings folder or in OneDrive, depending on the type of meeting. Therefore, users must navigate to the appropriate location to access these files.
Teams offers an easy-to-use recording feature. However, during the actual recording process, I discovered that it is currently unable to record a specific area. Furthermore, users of the free version or those who have not been granted recording permissions are unable to use this feature. Given these limitations, I decided to use a third-party recording tool to capture my presentation content.
![How to Record a Teams Meeting Easily [2 Proven Methods]](https://images.minitool.com/recorder.minitool.com/images/uploads/2026/04/how-to-record-a-teams-meeting-thumbnail.jpg)
Method 2: Use MiniTool Screen Recorder
In the course of my professional duties and daily life, I frequently rely on MiniTool Screen Recorder, a professional video capture software, to fulfill my recording needs. As it turns out, it performs just as excellently as always when recording presentations on Teams.
My preference for MiniTool Screen Recorder is largely due to the flexible recording options it offers. In terms of recording area, I can capture the entire screen, a specific window, or a custom region. As for the content, this tool captures not only all on-screen activity but also simultaneously records both system audio and microphone audio; it even supports recording webcam footage.
Furthermore, the most standout feature of MiniTool Screen Recorder is its convenient annotation tools. These tools prove particularly invaluable when recording software demonstrations or instructional videos.
MiniTool Screen Recorder also offers me a wealth of customization options: I can adjust video frame rates and quality, modify webcam configurations, configure recording shortcuts, and more. Here is a step-by-step guide on how to record a presentation on Teams with MiniTool Screen Recorder.
Step 1: Get MiniTool Screen Recorder
MiniTool Screen RecorderClick to Download100%Clean & Safe
Click the button above to download MiniTool Screen Recorder. Then, follow the prompts to install it on the PC.
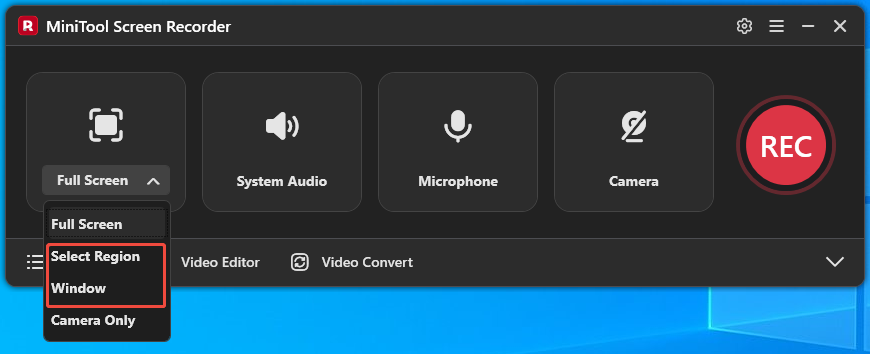
Step 2: Choose the Recording Area
1. Launch MiniTool Screen Recorder.
2. By default, MiniTool Screen Recorder records full-screen.
3. To capture a specific area or a window, expand the dropdown menu next to the Full Screen option.
4. Then, choose the Select Region option or the Window option.
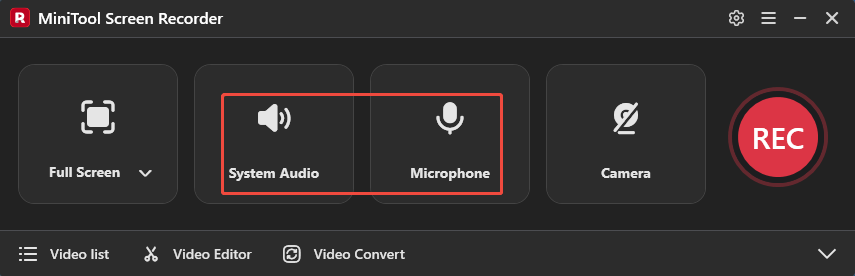
Step 3: Control the Audio
1. MiniTool Screen Recorder’s system audio and microphone audio recording functionalities are enabled by default.
2. To turn them off, click the System Audio icon and the Microphone icon, respectively.
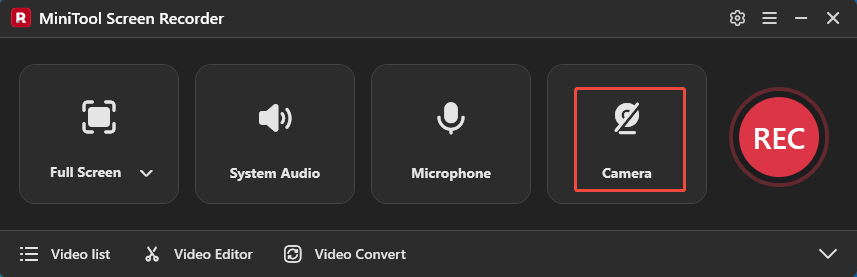
Step 4: Manage the Webcam Recording
To record a Teams presentation with my face, I always click the Camera icon to enable webcam recording.
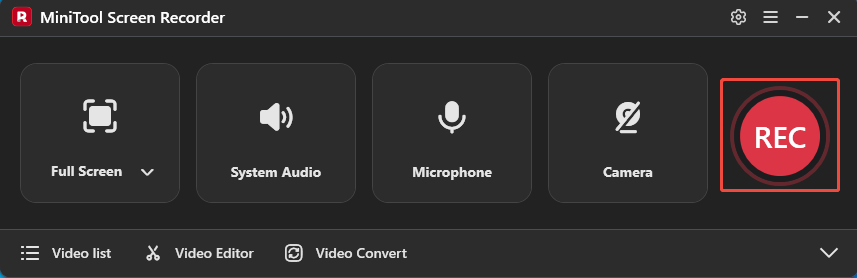
Step 5: Start and End Recording
1. To begin the recording process, click the REC button or press the F6 key directly.
2. After a 3-second countdown, go to Teams and start a new meeting, ensuring the presentation is ready.
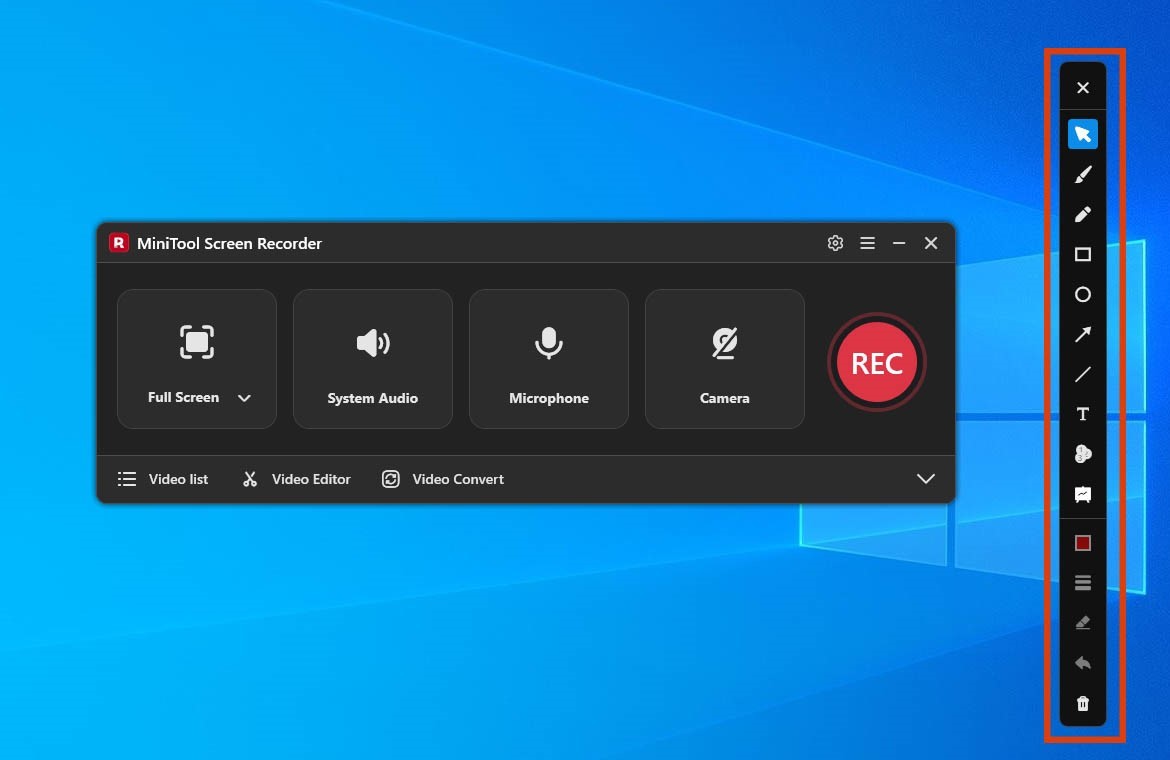
3. I often need to circle key points in the presentation, so I always use the tools located in the annotation bar on the right side of the screen.
4. To end the recording process, press the F6 key again.
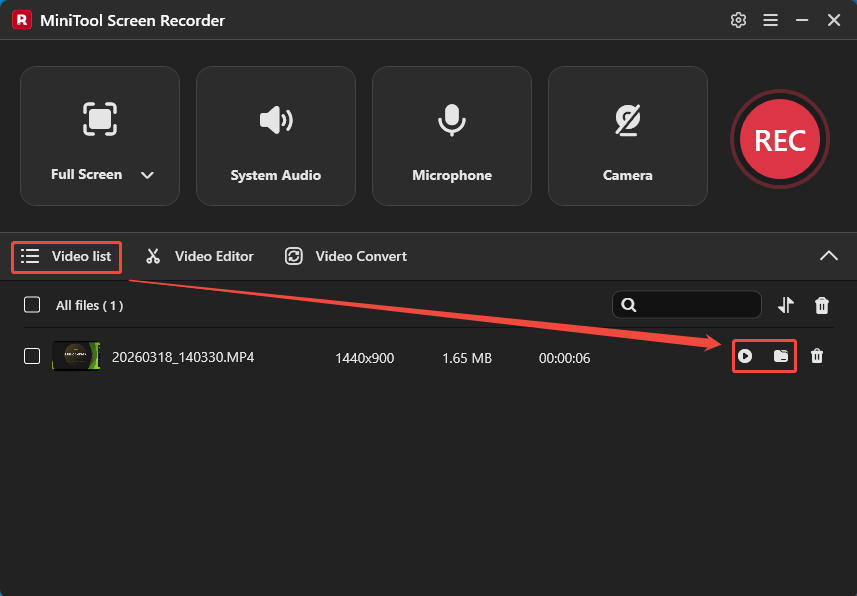
Step 6: Check the Recorder Video
1. When the recording process ends, MiniTool Screen Recorder will automatically switch to the Video list module, where the recorded video is listed.
2. Then, click the Play icon to check the recorded video and click the Folder icon to locate it on the PC.
MiniTool MovieMakerClick to Download100%Clean & Safe
Conclusion
This article introduces how to record a presentation on Teams with 2 practical methods. Users who have purchased a Teams Business plan and possess recording permissions can directly utilize its convenient built-in recording feature. For users who do not meet these criteria, MiniTool Screen Recorder offers powerful recording capabilities to help you effortlessly record presentations.
If you run into any issues when trying out MiniTool Screen Recorder or MiniTool MovieMaker, send an email to support@minitool.com.