

As a seasoned user who frequently records gameplay, I used to rely on capture cards to ensure a smooth recording process. However, after trying out a screen recorder, I discovered that these programs could deliver recording quality comparable to that of capture cards.
I subsequently realized that the two operate on different principles and are thus suited to different use cases; the following section provides a detailed analysis of this.
What Are Capture Cards and Screen Recorders
Although both capture cards and screen recorders can be used for recording, there is a fundamental difference in how they capture video signals. This distinction directly influences the choices we make for specific recording tasks; therefore, understanding their working principles is crucial for improving recording efficiency.
What Is a Capture Card
A capture card acts as a bridge connecting an external video signal source to a computer. As a piece of hardware, it receives video signals from an external source, such as a game console, and transmits them to the computer, enabling the user to livestream or record the footage.
So, how does a capture card work? The process typically involves the following steps:
- Signal capture: External devices (such as game consoles and DSLR cameras) output video signals via HDMI interfaces. The capture card then collects these external signal sources.
- Signal conversion: After acquiring signals from an external source, the capture card first converts them into data that the computer can process.
- Signal transmission: The converted video signal is transmitted via the capture card's USB interface to the corresponding recording or live streaming software on the computer. This enables the software to record or live stream the external video signal source.
What Is a Screen Recorder
A screen recorder is a tool used to capture computer screen content and save it as a video. There is a wide variety of such software, ranging from built-in tools for Windows and macOS (such as Xbox Game Bar and QuickTime Player) to third-party applications developed by companies and web-based recording tools.
How does a screen recorder work? Unlike capture cards, screen recording software operates in a much simpler way.
- Computer display output: Before recording begins, the graphics card renders the image and displays it on the computer screen.
- Capture on-screen visuals: Once the recording tool is launched, it captures the images displayed on the screen and uses a video encoder to compress and process them into a suitable video format, such as MP4, MOV, or MKV.
- Save the video file: After capturing the screen content, the screen recording software generates a video file and saves it to the default folder on the computer.
Capture Card vs Screen Recorder: Deep Comparison
We have previously provided a brief overview of the differences in operating principles between capture cards and recording software. In addition, they differ in many other respects. The table below lists these differences to facilitate a quick comparison.
| Comparison Aspect | Capture Card | Screen Recorder |
| Recording Method | Captures external video sources | Captures computer display |
| Audio Recording | Device audio capture | System audio and microphone input |
| Performance Impact | Lower PC workload | Uses CPU/GPU resources |
| Video Quality | High quality | Depends on system performance |
| Legacy | Depends on input method | Low legacy |
| Device Compatibility | External devices | PC screen and apps |
| Learning Curve | Requires hardware configuration | Easy to use |
| Price and Value | Higher cost | More affordable |
#1 Recording Method
As previously mentioned, the primary difference between a capture card and recording software lies in the recording method: the former receives video signals from an external device via an HDMI connection and transmits them to the computer for recording, whereas the latter directly captures the content displayed on the computer screen using the software itself.
#2 Audio Recording
It is well known that screen recorders typically capture system audio and microphone input simultaneously, whereas capture cards record only audio from connected external devices. This means that if computer audio needs to be captured simultaneously, the setup process becomes slightly more complex.
This is because recording microphone audio can interfere with the connection between the HDMI source and the computer, preventing the capture card from functioning correctly. In this scenario, the best approach is to use a mixer to combine multiple audio sources into a single signal before sending it to the computer for recording.
#3 Performance Impact
In most cases, using a capture card for recording has less impact on computer performance than using screen recording software. Capture cards are capable of independently receiving and converting external video signals.
Furthermore, since image rendering relies primarily on the external device itself rather than the computer's hardware, capture cards place a lighter load on the CPU and GPU, allowing the computer to maintain better overall performance.
When using screen recording software to capture content, the computer hardware must not only render the visuals but also simultaneously handle the capture task; this places a heavier load on the CPU and GPU, resulting in a decline in computer performance.
#4 Video Quality and Legacy
Video Quality
The quality of recorded video generally depends on resolution, frame rate, and bitrate. Since capture cards directly receive and process the video signal source, they preserve more video data, resulting in clearer image quality. Although screen recording software also supports high resolutions and frame rates, issues such as stuttering may occur if the computer's GPU lacks sufficient performance.
In addition, high-quality capture cards utilize advanced output formats, such as NV12 and YUY2, to minimize the loss of image detail caused by compression. In contrast, a screen recorder is constrained by computer hardware and applies heavier compression to the source footage, resulting in lower video quality and reduced visual fidelity.
Legacy
Provided that the resolution and frame rate are configured correctly, videos generated by recording software generally do not suffer from stuttering.
However, the impact of a capture card on video latency depends on the output method used: if capture preview mode is employed, some latency occurs as the external device's video signal is transmitted to the computer; conversely, using the HDMI loop-through function allows the video signal to be transmitted directly to the computer, thereby eliminating latency.
#5 Device Compatibility
Understanding the compatibility between capture cards and recording software helps in selecting the right configuration for different recording scenarios. Since they operate differently, the devices they support also vary. The table below clearly lists the devices compatible with capture cards and recording software, respectively.
| Capture Card | Screen Recorder |
| Game consoles: Switch, PS4/5, Xbox Series X, Xbox One | Windows/Mac computer desktop |
| DSLR / Mirrorless camera | PC game |
| Mobile device | Application window |
| Another computer | Website browser |
| TV set-top box | PC live streams |
| Retro game console (with HDMI) | Online meetings |
Generally, a capture card is the preferred choice for recording video signals from external devices, whereas screen recording software should be considered for capturing the content of the computer screen itself.
#6 Learning Curve
In my view, recording software is generally easy to pick up. However, feature-rich programs like OBS Studio have a relatively steep learning curve due to their complex interfaces.
Capture cards, however, come with a learning curve regarding the hardware itself. Before mastering their operation, it is necessary to first learn how to connect them to the computer using an HDMI cable; any error during this process can result in a blank screen.
#7 Price and Value
Price
Clearly, screen recorder holds a distinct price advantage, as capture cards are hardware devices that must be purchased to be used. There is a wide variety of recording tools available, ranging from free to paid options.
In contrast, capture cards vary significantly in price, spanning from around $20 for entry-level models to over $200 for mid-to-high-end versions. Users typically select a suitable capture card based on their specific recording requirements.
Best Value for
In terms of price differences, recording software is better suited for users who frequently record various on-screen activities on their computers. Capture cards, on the other hand, are better suited for console gamers and professional streamers on platforms like YouTube and Twitch.
Clearly, there are significant differences between capture cards and screen recorders in terms of recording methods, performance, device compatibility, ease of use, price, etc. However, this variety also enables users to more easily select the recording solution that best suits their specific needs.
How to Record with/Without a Capture Card
To clearly illustrate the differences in recording methods between capture cards and screen recorders, I have also summarized the operational steps for each.
#1 Record External Devices with a Capture Card
In fact, the operating principle mentioned above essentially describes the process by which a capture card records from an external device. The following is a more detailed breakdown of the procedure.
Fast Track Steps:
- Connect the capture card.
- Connect the capture card to the external device.
- Set up recording software.
- Configure recording settings.
- Start and end recording.
Taking PS5 as an example, the following section demonstrates the detailed steps for recording its content with a capture card.
1. Connect the capture card HDMI IN port to the PS5 HDMI OUT port with an HDMI cable.
2. Use a USB cable to connect the capture card HDMI IN port to the computer.
3. Once the connection is successfully established, open the corresponding recording software.
4. Then, launch the game on PS5.
5. In the recording software, determine the recording mode and set the audio recording settings.
6. Finally, start and end the recording process.
#2 Record PC Screen Without a Capture Card
Recording a computer screen is even simpler; it only requires choosing the best capture software for PC. MiniTool Screen Recorder is a free recording tool I frequently use. It offers multiple recording options, including full-screen activity capture, webcam recording, and audio recording. Additionally, its annotation tools make it an excellent choice for creating tutorial videos.
Fast Track Steps:
- Install MiniTool Screen Recorder and launch it.
- Manage the recording settings.
- Choose the recording mode.
- Configure the audio and webcam recording features.
- Start recording and annotate the screen if needed.
- End the recording process.
- Check and edit the recorded video.
MiniTool Screen RecorderClick to Download100%Clean & Safe
1. Click the button above to download and install it on the PC. Then, launch it.
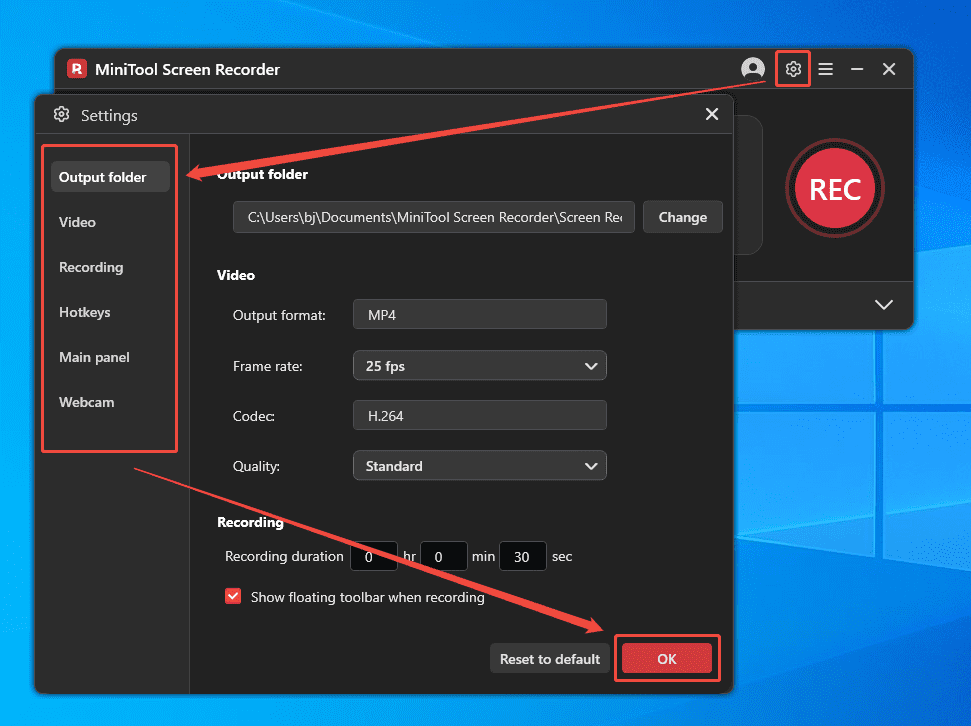
2. Click the Settings icon and configure the recording settings in the relevant sections, such as the video quality, frame rate, recording time, hotkeys, webcam size, and many more. Then, click OK to save the changes.
3. The default mode of this recording tool is to capture the entire screen, while the recording area can be adjusted from the expanded Full Screen section to record a specific window, region, or another display.
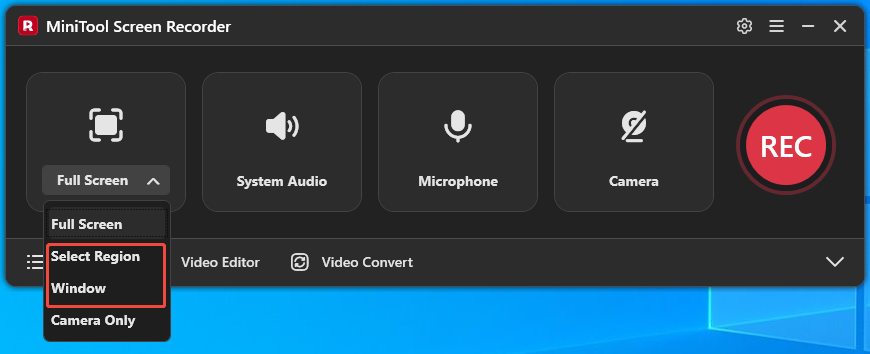
4. The system audio and microphone recording features are enabled by default. To disable them, simply click the System Audio and Microphone icon, respectively.
5. This tool's webcam recording feature is disabled by default. So, if there is a need to capture the screen with the camera, click the Camera icon on the right.
6. Click the REC button in the main interface or the floating bar to begin recording. When the 3-second countdown ends, move to the interface that needs to be captured.
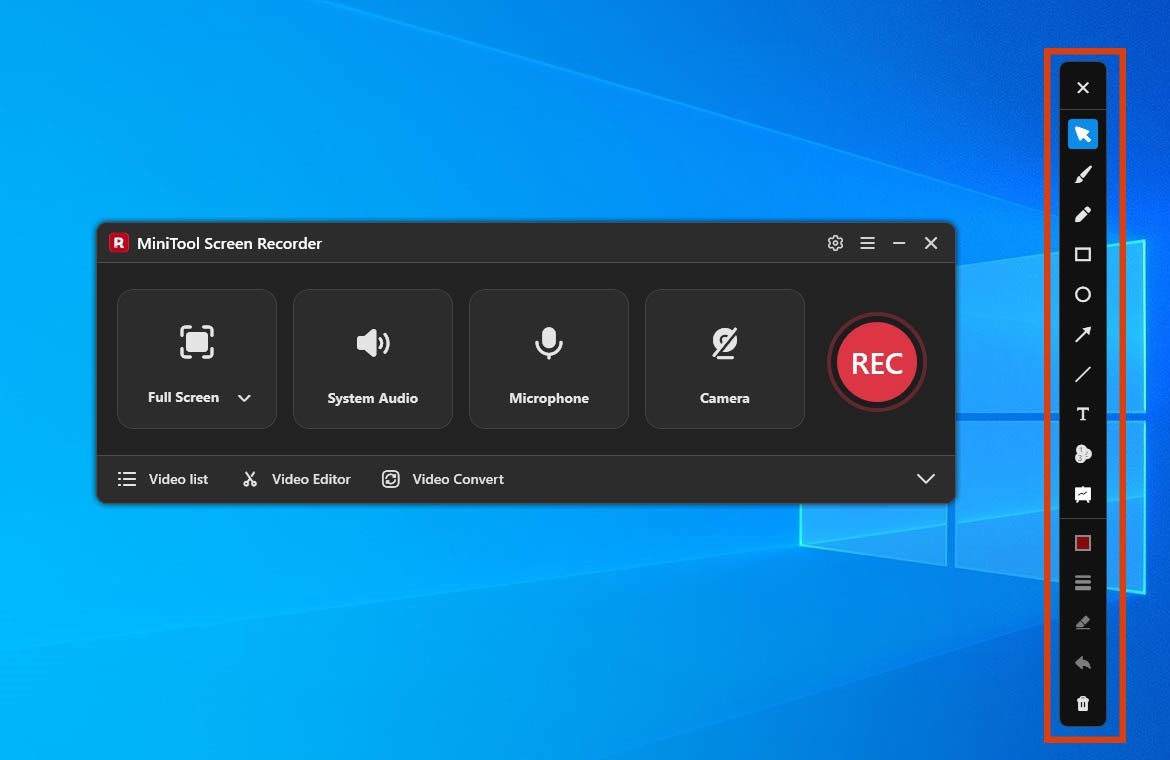
7. For a tutorial video recording task, I usually choose the tools from the annotation toolbar to mark the steps on the screen.
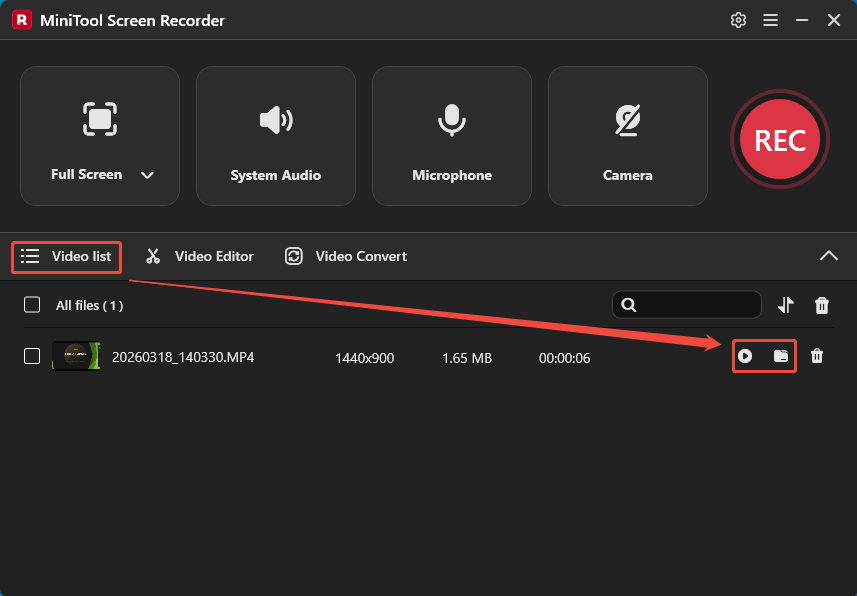
8. Then, press the F6 key to end the recording process. When the tool switches to the Video list section, click the Play icon to view the recording video and click the Folder icon to locate the video file.
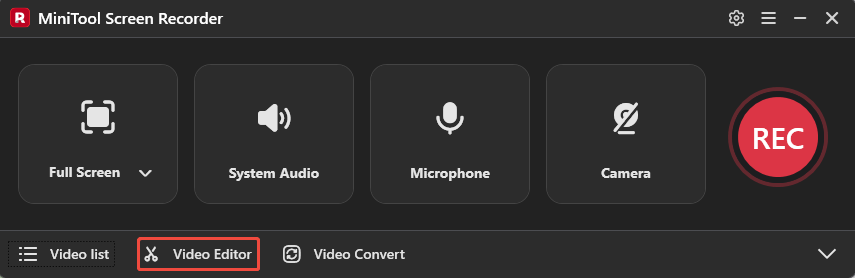
9. Finally, click the Video Editor option to access the video editing tool, MiniTool MovieMaker, for quick video and audio editing.
MiniTool MovieMakerClick to Download100%Clean & Safe
Bottom Line
Capture card vs screen recorder: The two differ in terms of recording methods, performance, image quality, compatibility, and cost. These differences make capture cards better suited for recording content from external devices, whereas screen recorders are ideal for capturing activity on the computer screen itself.
If there are any questions when using MiniTool Screen Recorder or MiniTool MovieMaker, please contact the support team at support@minitool.com.