

I imagine that for those of us who create tutorial videos, frequently switching between windows during recording often results in abrupt or disjointed visual transitions. However, I later discovered that by simply arranging the window layout effectively, it is easy to record multiple windows at once.
How Can I Capture Multiple Windows at Once
To record multiple windows smoothly, the prerequisite is using high-quality screen recording tools. After some research, I ultimately chose two tools, Snipping Tool and MiniTool Screen Recorder, to accomplish the task.
Fast Track Steps:
- Arrange the windows that need to be recorded side-by-side on the desktop.
- Launch the screen recording tool.
- Use the custom recording area option.
- Select the window interfaces by drawing a box around them.
- Control the audio and webcam recording features.
- Start the recording process.
- End recording and check the recorded video.
![How to Record a Window on Windows in 2 Ways [Pro Guide]](https://images.minitool.com/recorder.minitool.com/images/uploads/2026/06/how-to-record-a-window-on-windows-thumbnail.jpg)
Option 1: Use Snipping Tool (Better for Quick Recording)
Snipping Tool is a lightweight built-in tool in Windows 11 for taking screenshots and recording the screen. It is ideal for quick recordings: simply press the Windows + Shift + R key combination to start.
Additionally, once recording is complete, I can perform simple cropping operations directly within the tool. Here is a detailed guide on how to screen record multiple windows with Snipping Tool.
1. Make sure the windows that need to be recorded are arranged on the screen.
2. Press Windows + Shift + R keys to open the Snipping Tool.
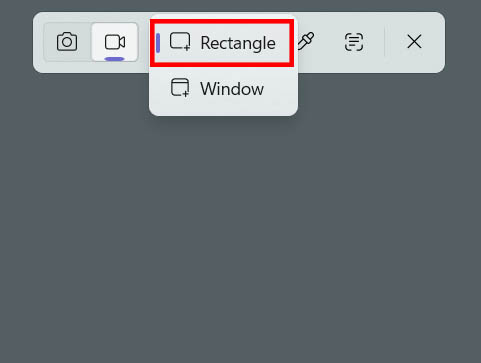
3. Click the New option in the main interface. Then, click the Recording area icon and choose the Rectangle option. Move the cursor to encircle several window targets.
4. Click the Microphone icon to enable the audio recording feature.
5. Then, click the Start option on the floating bar to record several windows on Windows.
6. To end the recording process, click the Stop recording option on the floating bar. Then, view the recorded video in the new pop-up window.
Since the Snipping Tool offers only basic recording functions, I also chose MiniTool Screen Recorder, a tool with a wide range of recording capabilities, to meet my diverse recording needs.
![Record Browser Video with 2 Efficient Methods [2026 Updated]](https://images.minitool.com/recorder.minitool.com/images/uploads/2026/07/record-browser-video-thumbnail.jpg)
Option 2: Use MiniTool Screen Recorder (Better for Flexibility)
MiniTool Screen Recorder offers a wide range of recording features, supporting flexible capture across multiple windows. I can choose to record the full screen, a specific area, a single window, or an external display based on my needs. Additionally, the tool supports recording microphone and system audio either simultaneously or separately.
A standout feature of the software is its webcam recording capability, which helps create more engaging videos. Meanwhile, its built-in annotation tools enable users to easily produce tutorial videos with greater clarity. The detailed guide on how to record multiple windows on Windows 10/11.
1. Arrange the windows that need to be recorded on the desktop.
2. Download and install MiniTool Screen Recorder, then launch it on the PC.
MiniTool Screen RecorderClick to Download100%Clean & Safe
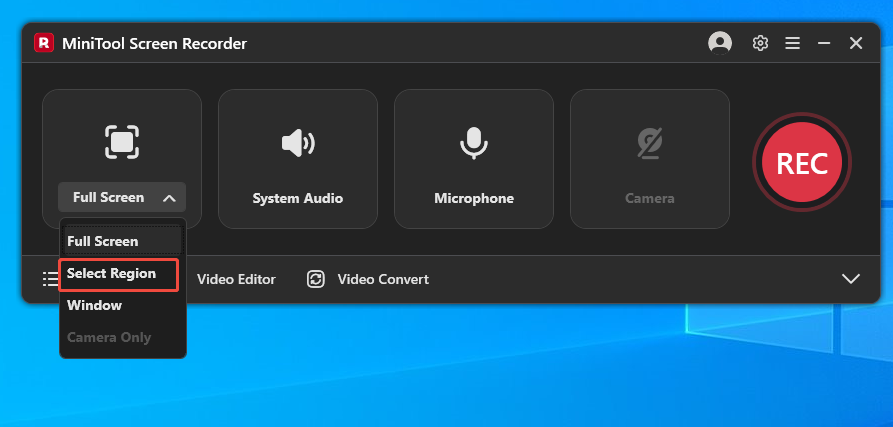
3. Expand the drop-down menu of the Full Screen option and choose the Select Region option. Then, drag the red dashed border until all the target windows are within the recording area.
4. Then, control the system audio and microphone recording feature on the floating bar based on the specific needs.
5. If there is a need to capture the webcam footage while screen recording, click the Camera icon on the floating bar.
6. To start recording multiple windows, click the REC button on the floating bar or press the F6 key.
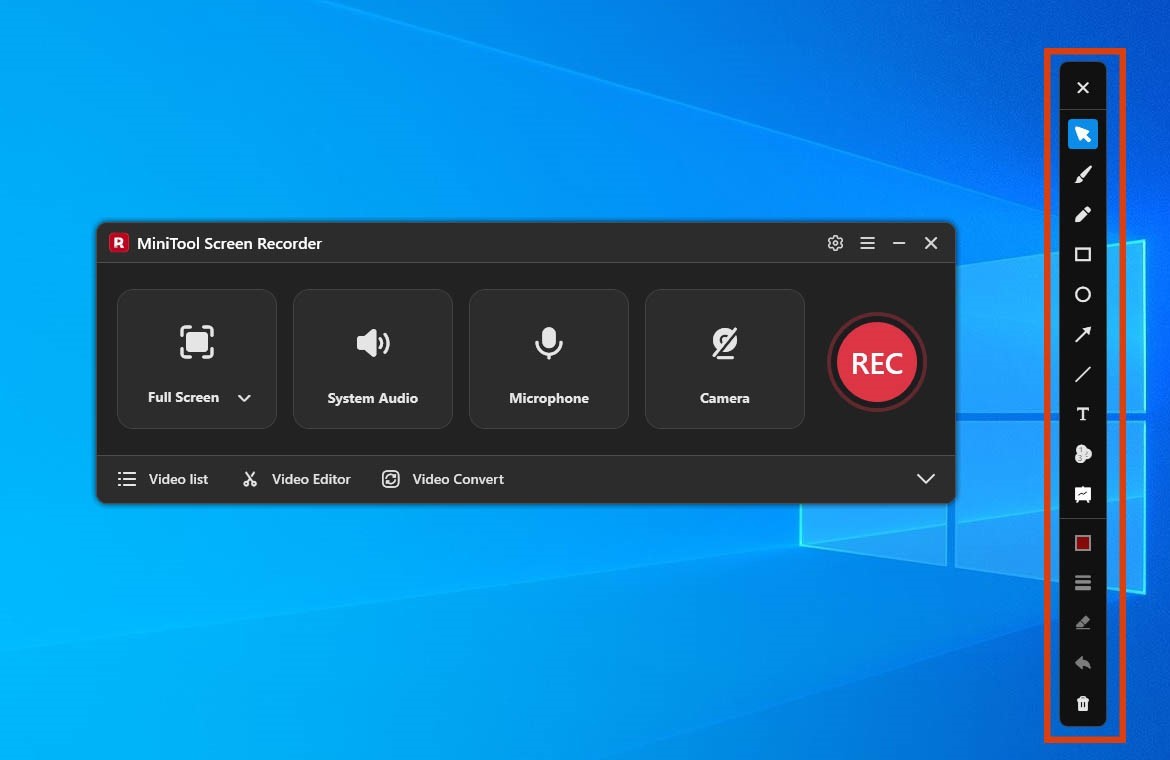
7. When there is a need to annotate the screen, select the appropriate tool from the annotation toolbar on the right.
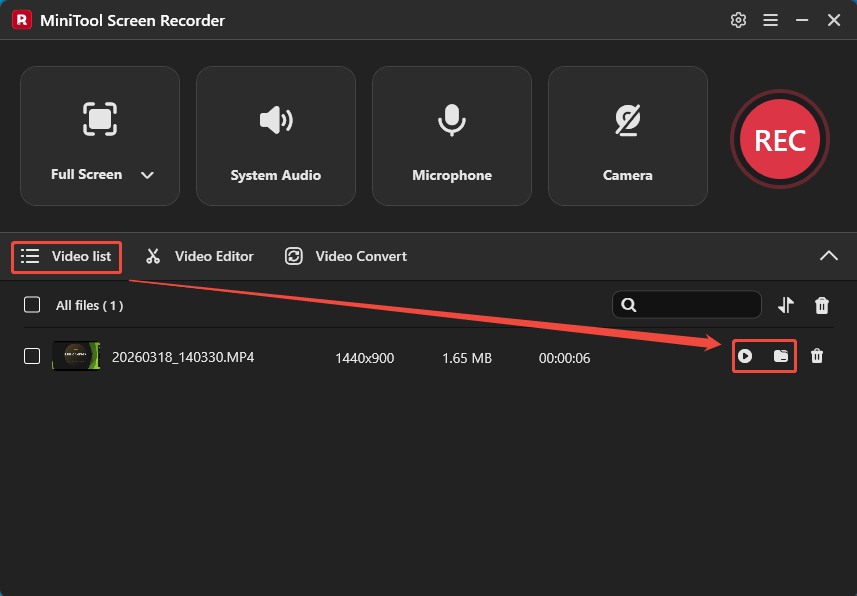
8. To end recording, press the F6 key again. Then, when the tool automatically moves to the Video list section, click the Play icon to view the recorded video and click the Folder icon to locate it on the PC.
In short, both tools can easily capture multiple windows, but they differ in their recording focus: the former is better suited for quick recordings, while the latter is an ideal choice for advanced recording needs.
How to Screen Record Multiple Windows Seamlessly
Recording multiple windows requires more preparation and post-production work than recording a single window. For instance, before I start recording, I close unnecessary applications, adjust the window layout on my desktop, and sometimes even write scripts.
After recording, I typically use MiniTool MovieMaker, a companion tool to MiniTool Screen Recorder, to crop the video, edit the audio, add text, and finally export the file in MP4 or MOV format.
MiniTool MovieMakerClick to Download100%Clean & Safe
Conclusion
How to screen record multiple windows at once? The Snipping Tool and MiniTool Screen Recorder introduced in this article can help achieve smoother recordings. In addition, the recording tips provided in this article can further enhance the final recording quality.
If there are any problems when using MiniTool Screen Recorder or MiniTool MovieMaker, please contact the support team at support@minitool.com.