This post provides a brief introduction to Webex recording formats (ARF, WRF, and MP4) and explains how to convert an old Webex recording to MP4 using the official converter. Additionally, this guide shows you how to record Webex meetings as a participant using MiniTool Screen Recorder.
Similar to other video conference platforms, Webex also provides a built-in recording tool for hosts or co-hosts to capture meetings or webinars on their computer, allowing people who cannot attend or want to review the discussions to watch them.
This post primarily covers Webex recording formats, steps to convert Webex recording to MP4, and how to record Webex meetings without restrictions.
Understanding Webex Recording Formats
This section lists three media formats used by Webex to save meeting recordings.
ARF
ARF, short for Advanced Recording Format, was used to save Webex network-based recordings. In other words, this format was designed for saving cloud recordings. Capturing meetings in the cloud is available to Webex Starter, Plus, Business, and Enterprise plans, not the Webex Free plan.
As Webex’s previous default recording format, ARF offers good-quality video and audio. However, this file type can only be played with the Network-Recording Player and cannot be directly viewed or edited by other applications. It needs to be converted to MP4 for better compatibility.
MP4
MP4 is the current and default format to save meeting recordings in the cloud and on computers. Cisco Webex Meetings (WMS33.6 and later) and Events (WMS33.6 and later) both support this format. And it offers better quality audio and video than the older ARF format.
As the most popular video format, MP4 is supported by almost all modern devices, media players, and editing software.
WRF
WRF (Webex Recording File) was the oldest Webex recording format for saving local recordings. This proprietary file can be viewed by the Webex Player software. According to the official website, a WRF file may be converted to WMV on Windows PCs with Windows Media Player 9.0 or higher installed.
![How to Record Google Meet Sessions on Windows [2 Methods]](https://images.minitool.com/recorder.minitool.com/images/uploads/2026/01/how-to-record-google-meet-thumbnail.jpg)
How to Convert Webex Recording to MP4
If you have recordings saved in the previously ARF format, you must wonder how to save Webex recording as MP4. You can easily do this using a Windows computer with the Webex Recording Converter. It can also convert WRF files to WMV.
Step 1: Download and Install Webex Recording Converter
When you first download an ARF recording from your Webex site, you are prompted to install the Webex Recording Converter to view it. If you don’t have the converter yet, you can download the software from your Webex site if your account has host permissions.
- Sign in to your Webex site.
- Select Webex Training or Webex Events from the left navigation bar.
- Go to Support and click Downloads.
- Click Recorder and Players and select Recording and Playback.
- Click Download under Webex Recording Converter.
- Open the download file and follow the on-screen steps in the wizard to install Webex Recording Converter.
Step 2: Save the ARF File to Your Local Computer
To download your old cloud recording, go to Webex User Hub and sign in with your account. Click Recordings from the navigation panel, locate your target recording, and click Download.
Step 3: Upload the File to Webex Recording Converter
After launching Webex Recording Converter, go to File and select Convert To MP4 to select the ARF file you just saved to your PC.
Step 4: Make Some Settings
- Output folder: You can select the folder to save your file in the Save as box.
- Content settings: Next, choose what to include in your MP4 file. For instance, the Video option contains the meeting video, and Chat includes all chat conversions in the meeting. Then, you can preview your settings by clicking Preview Layout.
- Video quality: Under Video Quality, choose High (a larger file size), Medium (an average file size), or Low (a smaller file size).
Step 5: Convert the Webex Recording to MP4
Click Convert now, select OK, and click OK again to convert Webex recording to MP4.
How to Record Cloud Webex Meetings for Free
As mentioned above, users with a Webex Free plan can’t record meetings in the cloud. If you don’t want to upgrade to the paid version to unlock this feature, using free third-party screen recording software like MiniTool Screen Recorder is an alternative.
MiniTool Screen Recorder is one of the best tools for recording your screen. It can capture online conferences, gameplay, lectures, training sessions, webinars, software demonstrations, and other screen activities in high quality.
Undoubtedly, you can use MiniTool Screen Recorder to record your online Webex meetings. And if you’re a participant, this program also helps you capture meetings for later review. With its annotation tools, you can also add text, shapes, and draw on the screen to make the video more engaging.
Furthermore, MiniTool Screen Recorder allows you to record a webcam or an online camera to add yourself to the recording. Easily resize, reposition, and change the shape of your camera overlay to record eye-catching picture-in-picture videos.
Here’s how to record Webex meetings using MiniTool Screen Recorder. Before that, please notify all attendees and get their permission.
Step 1: Download and Install
Click the button below to download the meeting recorder to your computer. Then, open the file and follow the instructions to complete the installation.
MiniTool Screen RecorderClick to Download100%Clean & Safe
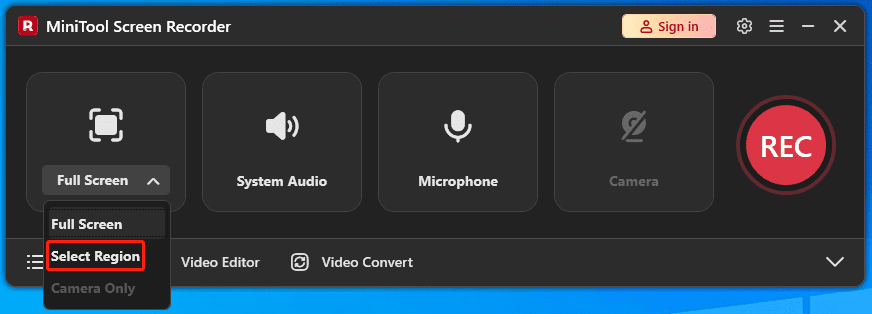
Step 2: Choose the Recording Region
By default, MiniTool Screen Recorder selects and records the entire screen. To record a custom area, click Full Screen, and click Select Region from the dropdown.
Next, go to your meeting, drag the red handles, and move the rectangle to choose the area you want to record.
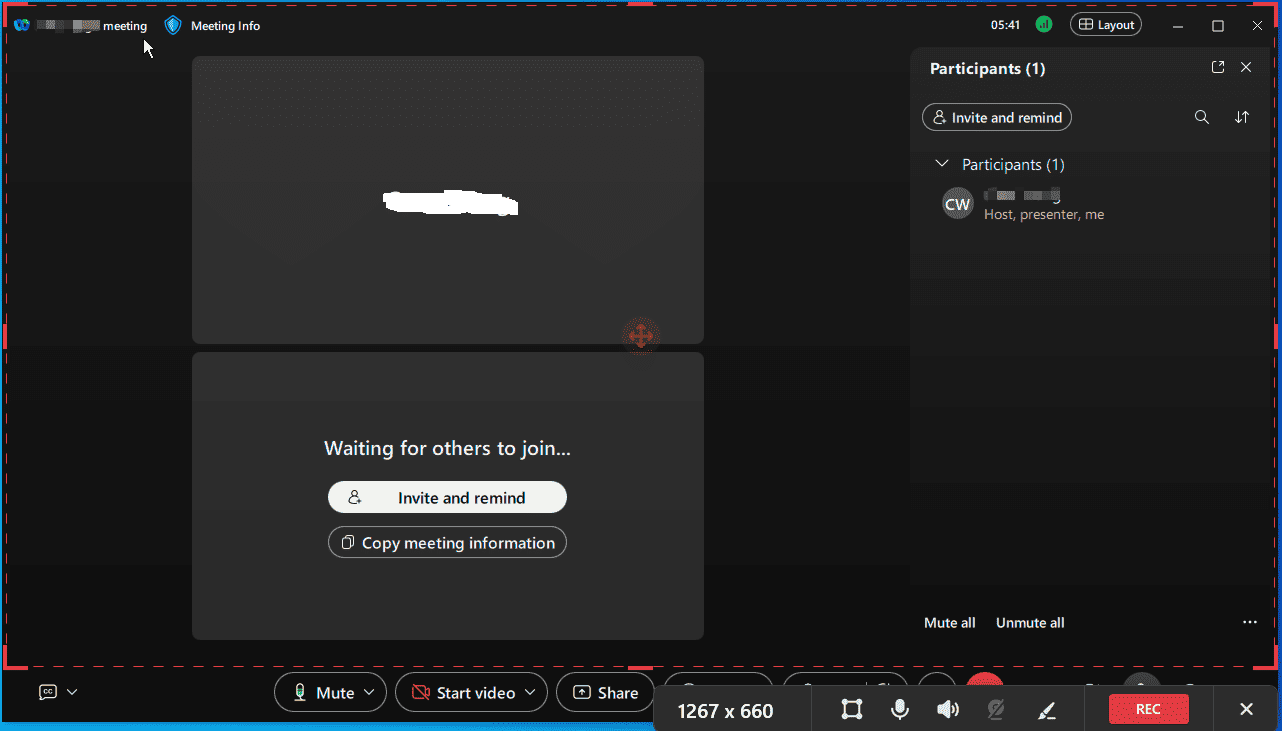
Step 3: Record the Meeting
Click the red REC button, and the recording will start after a 3-second countdown. Your meeting video, audio, and other activities in the meeting will be recorded.
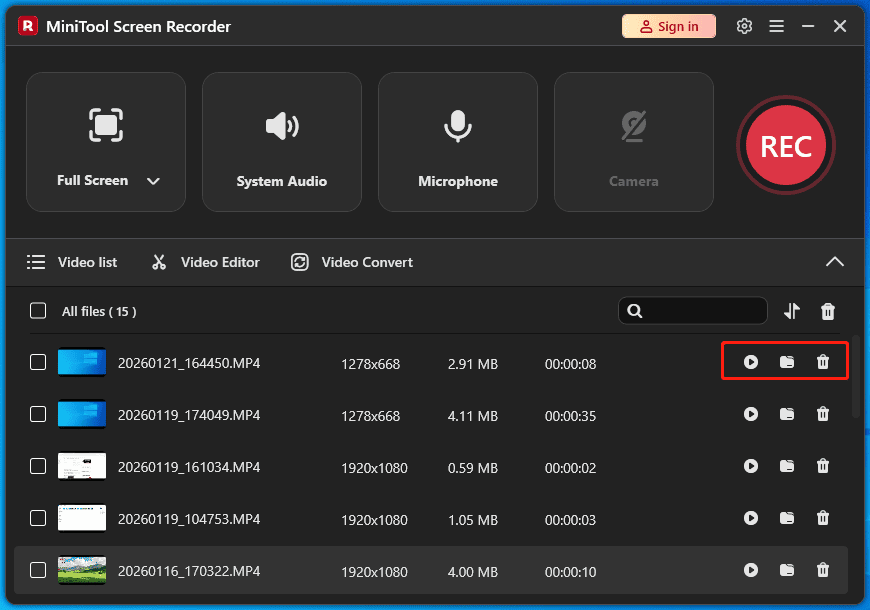
Step 4: Stop and Access the Recording
Press F6 or click the red Stop option to end the recording. Then the video will show up at the top of the Video list section. From there, you can view it with your PC’s media player, open its save path, or delete the recording.
Conclusion
MP4 is now the default format to save Webex cloud and desktop recordings. If you still have some ARF files, follow the steps above to convert your old Webex recording to MP4
Of course, you can use MiniTool Screen Recorder to record Webex meetings without restrictions. Be sure to inform other participants and obtain their consent before recording.
Finally, if you have problems while using MiniTool Screen Recorder, email us at support@minitool.com for help.