What is the best recording format? This article analyzes the pros and cons of common recording formats and concludes that MP4 is the optimal choice. Additionally, you will learn how to record your screen in MP4 format using MiniTool Screen Recorder and the Xbox Game Bar, as well as how to edit your recordings.
With the advancement of the internet, the demand for screen recording continues to grow. Throughout this process, video recording formats often significantly impact video quality, file size, and compatibility.
Therefore, to ensure a smooth recording experience, this article will compare and analyze mainstream audio and video formats, determine the optimal recording format best suited for most users, and provide guidance on how to record using the best format.
Why Recording Format Matters
Recording formats serve as containers for video and audio content and determine encoding methods. Different recording formats result in variations in playback quality, file size, and device compatibility. The following sections will explore how recording formats impact the final recording outcome across these three dimensions.
1. Audio and Video Quality
Recording formats typically need to work in tandem with codecs. Codecs directly influence the compression level of recorded audio and video data as well as the degree of raw data preservation, ultimately determining the upper limit of the recorded content's audiovisual quality.
For instance, formats utilizing H.265 video encoding and AV1 audio encoding can significantly enhance the audio and video quality performance of recorded content.
2. File Size
Similarly, the compression method employed by the codec in the recording format directly impacts file size. Typically, codecs reduce file volume by compressing recorded data, thereby minimizing storage space requirements and enabling smoother uploads or sharing.
Additionally, an optimal recording format strikes a balance between file size and quality. In short, it maintains audio and video quality while compressing the file.
3. Device Compatibility
Recording format compatibility is critical for your captured content. Different operating systems, platforms, or software typically support different formats. This means that if a format has limited compatibility, your recordings may fail to play or share on certain devices, or may not import into specific video editors for further editing and optimization.
What Is the Best Recording Format
In this section, we will analyze mainstream audio and video recording formats based on three key aspects: quality, file size, and compatibility. This analysis aims to determine the optimal recording format for most usage scenarios.
Common Video Recording Formats
Below is our detailed explanation of the currently common video recording formats: MP4, MKV, MOV, and WebM.
#1 MP4
The MP4 format typically employs the H.264 or H.265 codecs. Both codecs primarily utilize lossy compression technology, which reduces file size by discarding redundant data. However, the video still retains high-definition quality.
Additionally, the MP4 format offers extensive compatibility. It supports virtually all major operating systems, devices, web browsers, and more. For instance, software like OBS Studio and Zoom utilize MP4 as their standard recording format.
What’s more, videos recorded in MP4 format can be directly uploaded to mainstream social platforms such as YouTube, Vimeo, and TikTok for sharing without requiring additional conversion. This fully demonstrates how MP4 achieves a perfect balance between video quality, file size, and compatibility.
#2 MKV
The MKV format employs lossless compression technology, enabling near-lossless video recording that maximizes video quality preservation. However, this results in larger file sizes for recorded videos. Additionally, MKV has limited compatibility and often requires conversion to the MP4 format for playback on specific platforms, websites, or devices.
#3 MOV
The MOV format is the native format of QuickTime, supporting ultra-high-definition video quality, which results in larger file sizes. It is primarily used extensively on macOS systems. Although the MOV format is now well-supported on non-Apple operating systems, it can still cause file crashes and data corruption in certain software or devices due to incompatibility issues.
#4 WebM
WebM is an open-source format specifically designed for the web, primarily utilizing VP8 or VP9 codecs. These codecs support high-definition video quality while maintaining small file sizes. Currently, the WebM format enjoys broad support from mainstream media players and web browsers, including VLC Player, Chrome, Firefox, Opera, and more.
However, this format often encounters compatibility issues in Apple's Safari browser and older browsers, typically requiring the installation of plugins to play.
What recording format should I use? As demonstrated in the preceding analysis, MP4 is the best format for recording video for most users and scenarios.
Common Audio Recording Formats
For users needing to record podcasts or voiceovers, the audio recording format is equally crucial. Below is an analysis of four mainstream audio formats: MP3, FLAC, WAV, and AAC.
#1 MP3
The MP3 format is currently one of the most widely used digital audio formats. It supports reducing file size while preserving original sound quality. Additionally, MP3 offers strong compatibility, playing on most operating systems, devices, web pages, and media players.
#2 FLAC
The FLAC format employs lossless compression technology, enabling it to reduce file size while perfectly preserving audio quality. However, this format has limited compatibility. When playing FLAC files on music players within the macOS system, format conversion or the use of third-party players is typically required.
#3 WAV
Unlike other formats, WAV does not employ compression technology, meaning it is a lossless audio format that fully preserves the original sound quality. Consequently, such files are typically large. The WAV format offers excellent compatibility and can be played on nearly all mainstream systems, browsers, and players. However, compatibility issues may occasionally arise due to the large file size.
#4 AAC
AAC is an audio file format that employs lossy compression technology. As the default audio codec within the MP4 format, it delivers superior sound quality compared to MP3 while maintaining a smaller file size.
Furthermore, thanks to its robust compatibility, the AAC format has become the standard audio format for numerous media platforms, software applications, and web browsers. For instance, YouTube has designated AAC as its default audio format.
Therefore, compared to other formats, the AAC audio format is more suitable for recording. Furthermore, as the default audio codec format for MP4, this further demonstrates that MP4 is the best recording format.
How to Record Video in MP4 Format
Based on the above analysis, MP4 has been determined to be the optimal recording format. You can now refer to the following guide to learn how to record your screen in MP4 format.
#1 Use MiniTool Screen Recorder
MiniTool Screen Recorder is a professional MP4 screen recorder that allows users to customize video quality and frame rate. It accommodates various recording needs, including full-screen recording, region recording, and webcam recording, while supporting the capture of system audio and microphone audio separately or simultaneously.
Additionally, MiniTool Screen Recorder is an invaluable tool for recording tutorial videos. It allows users to highlight key steps or important information during recording using its built-in annotation tools. Furthermore, it supports preset recording durations to boost user productivity and offers unlimited recording time. Notably, no watermarks are added to the recorded videos.
Here is a detailed guide on how to record video in MP4 using MiniTool Screen Recorder.
Step 1: Download and Install MiniTool Screen Recorder
Click the button below to download MiniTool Screen Recorder. Then, follow the prompts to install it on your computer.
MiniTool Screen RecorderClick to Download100%Clean & Safe
Step 2: Confirm Recording Format
1. Click the Settings icon in the upper-right corner of the main interface to enter the settings interface.
2. Navigate to the Video section, and you can see that the MiniTool Screen Recorder defaults to the MP4 recording format. Then, click on OK to exit the settings interface.

Step 3: Select the Recording Area
By default, MiniTool Screen Recorder uses full-screen recording mode. If you want to customize the recording area, simply expand the drop-down menu next to the Full Screen option, then click the Select Region option.

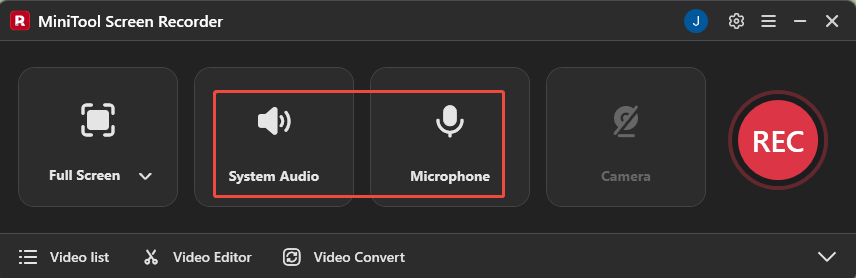
Step 4: Control the Audio
The system audio and microphone audio recording features are enabled by default. To turn off these features, click respectively on the System Audio icon and the Microphone icon.
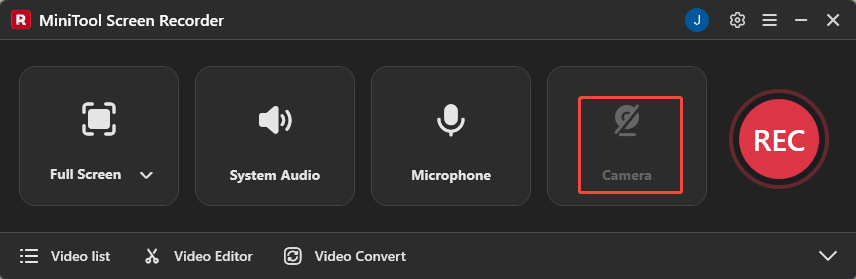
Step 5: Set the Camera Recording
If you want to capture the camera footage while screen recording, click the Camera icon on the right to turn on the webcam recording functionality.
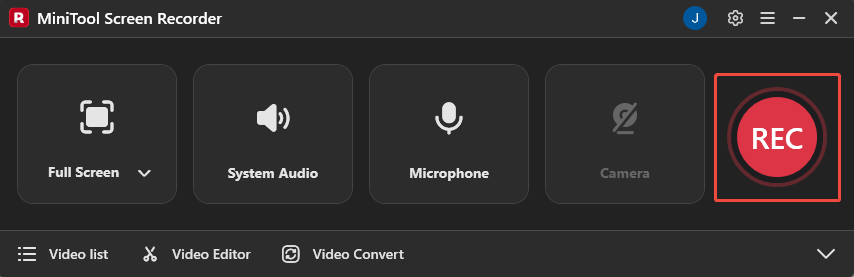
Step 6: Start and End Recording
1. When you want to start the recording process, click the REC button on the right side of the main interface or press the F6 key. After a 3-second countdown, it will automatically begin.
2. Move to the content you want to record.
2. During recording, you can press the F9 key to pause or resume the recording process.
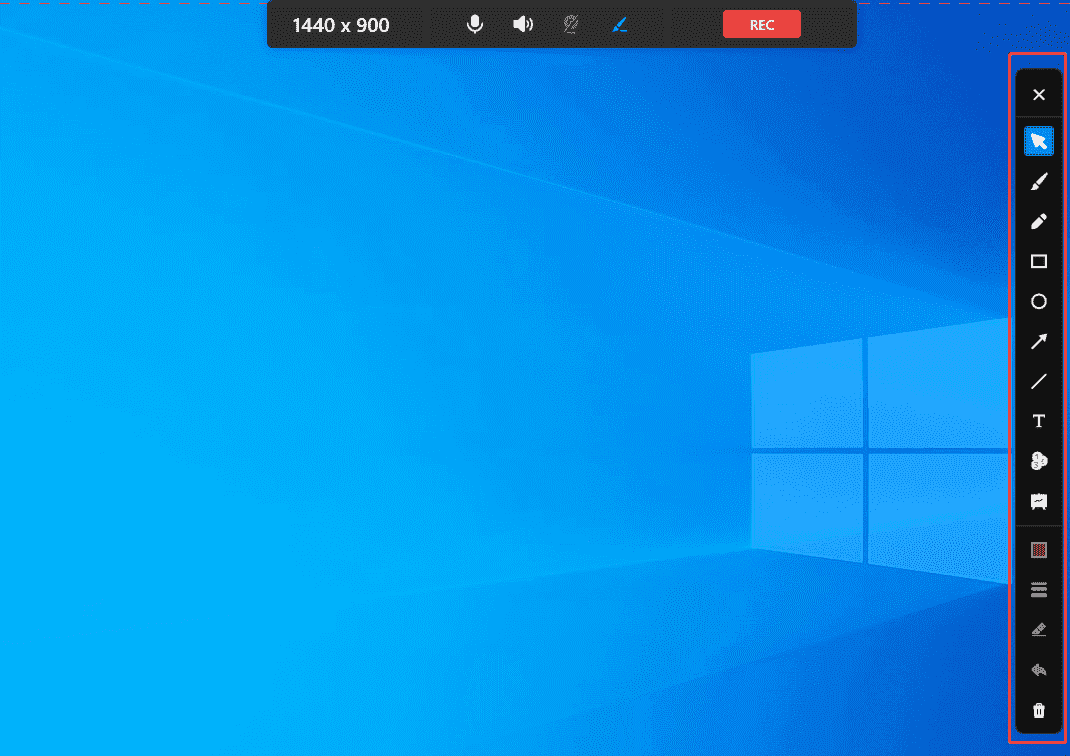
3. You can also select the appropriate tool from the annotation toolbar on the right of the screen during recording to mark key information.
4. When you want to end the recording process, press the F6 key again.
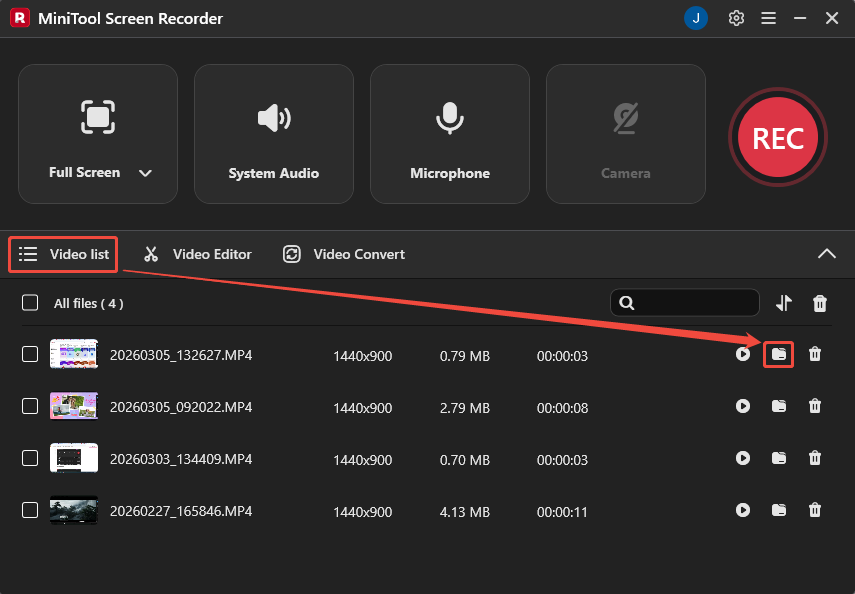
5. Finally, you can check the recorded MP4 video under the Video list section by tapping the folder icon.
#2 Use Xbox Game Bar
For users seeking a quick recording without installing third-party software, the built-in Xbox Game Bar feature in Windows can be used. This tool records in MP4 format by default.
Although primarily designed for gamers, the Xbox Game Bar can still meet users' needs for recording specific applications or windows. Additionally, it supports capturing both system audio and microphone audio simultaneously. Now, follow the steps below to record a video in MP4 using the Xbox Game Bar.
Step 1: Launch the Xbox Game Bar
Press the Windows + G key on your keyboard to open the Xbox Game Bar on your computer.
Step 2: Enable Recording Mode
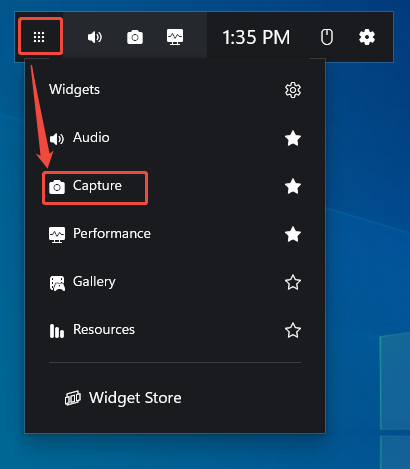
1. Click the Widget Menu option on the left side of the main panel to enter the Capture panel.
2. Then, choose the Capture option to enable the recording mode.
Step 3: Control the Audio
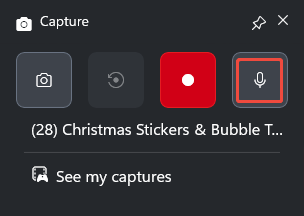
The audio recording mode is enabled by default. If you don’t want to record the audio, simply click the Microphone icon.
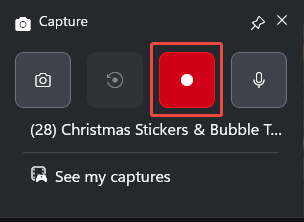
Step 4: Start and End Recording
1. To start the recording process, click the Start recording icon in the Capture panel or press the Windows + Alt + R key.
2. Move to the window or application you want to record.
3. When you want to end the recording process, press the Windows + Alt + R key again.
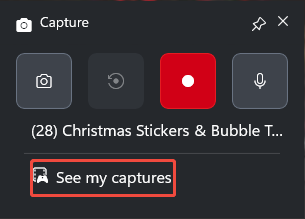
Step 5: Check the Recorded MP4 Video
Finally, you can check the recorded MP4 video under the See my captures section.
Now you should know that recording in MP4 format with the above two tools is very straightforward. However, please note that the Xbox Game Bar has a recording time limit. If you want to capture longer videos, you can try using MiniTool Screen Recorder.
Bonus: How to Edit Your MP4 Recordings
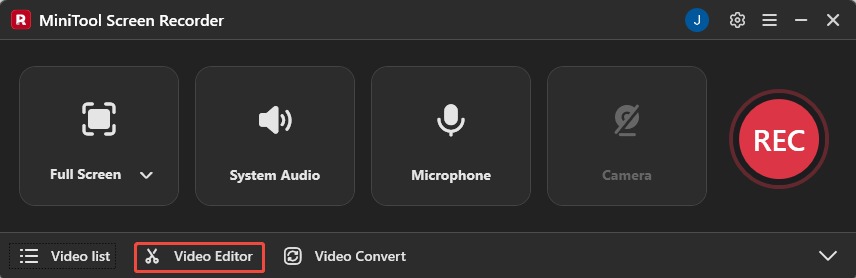
Recorded videos are typically not ready for immediate use as source material and usually require editing to trim out unnecessary segments. For creating professional streaming videos, more advanced editing features are needed. You can now get the professional video editing tool by clicking the Video Editor option at the bottom of the MiniTool Screen Recorder main interface.
Or simply click the button below to get this editing tool.
MiniTool MovieMakerClick to Download100%Clean & Safe
You can directly use MiniTool MovieMaker to trim redundant segments from MP4 videos. To enhance visual impact, add elements like transitions and titles. Additionally, applying filters through MiniTool MovieMaker can significantly elevate the overall ambiance of your footage. This editing tool also allows users to independently adjust the volume levels of the video track.
What’s more, MiniTool MovieMaker offers multiple export formats, including MP4, MKV, MOV, AVI, GIF, and more. Users can select the resolution and frame rate during export.
Conclusion
This article analyzes mainstream formats and concludes that MP4 is the best recording format for general users, as it strikes a perfect balance between high quality, efficient file compression, and broad compatibility. Additionally, you can use MiniTool Screen Recorder and the Xbox Game Bar to record video in MP4 easily.
You can also learn how to edit your MP4 recording from this article. If you encounter any issues while trying out MiniTool Screen Recorder or MiniTool MovieMaker, feel free to email us via support@minitool.com or send me a message on X for assistance.