Recording on YouTube TV is a great method that allows you to watch your favorite shows anytime, anywhere. How to record on YouTube TV? This post provides two reliable methods: use a DVR or third-party screen recorders, like the best screen recorder – MiniTool Screen Recorder.
Introduce YouTube TV
YouTube TV is a popular live TV streaming service designed for users who want to watch live television without a cable or satellite subscription. All you need is an internet connection and a device like a phone, computer, smart TV, or tablet to watch.
In addition, YouTube TV offers over 100 channels covering everything people love to watch, including news channels, sports channels like ESPN, NFL Network, and NBA TV, entertainment channels, and more.
More than that, YouTube TV also offers a generous subscription plan. You can stream content on multiple devices simultaneously, like your computer, mobile phone, etc. The app features a clean and intuitive interface where you can search by show name, genre, or channel, and create favorite channel lists for quick access.
Furthermore, YouTube TV offers DVR (Digital Video Recorder) functionality, allowing you to record your favorite shows, movies, and live streams. All content is stored in the cloud, so you never have to worry about running out of device storage space. Best of all, you can pause, rewind, or fast-forward through recordings, making it easy to skip annoying ads or rewatch your favorite moments.
Why Record on YouTube TV
YouTube TV is a top-tier live TV streaming service. Its DVR feature lets you record your favorite shows effortlessly, making TV viewing more flexible and convenient. Here are three compelling reasons to screen record on YouTube TV.
First, recording on YouTube TV ensures you never miss your favorite shows. Sometimes you might be busy with work, meetings, or family activities when your favorite programs air. But you can record the shows you want to watch. That way, whether you're at home or on the go, you can catch up whenever you have free time.
In addition, recorded shows support pause, rewind, and fast-forward functions. Just with a single tap, you can skip lengthy and annoying commercials. Missed a highlight? Rewind instantly to catch it! Screen recording on YouTube TV significantly enhances your viewing experience.
More than that, once shows are recorded, you can watch them anywhere, anytime. You can access them on your phone, tablet, laptop, or smart TV. Recording shows and saving them to local files lets you watch whenever you want, even without an internet connection.
Furthermore, YouTube TV's built-in unlimited cloud DVR is included with your YouTube TV subscription at no extra cost. It lets you record as much as you want without worrying about storage limits. Recorded content is saved for up to nine months, giving you plenty of time to watch your saved episodes.
Now, let’s see how to record on YouTube TV with its DVR feature.
How to Record on YouTube TV with Built-in DVR
YouTube TV's DVR feature offers users tremendous convenience. It lets you record TV content and securely store it online. All recorded content is saved to your YouTube TV account and can be accessed anytime from any device as long as there is an internet connection. Plus, you can schedule future recordings and don’t need to pay any additional fees or hidden charges.
Guide to Recording
To record on YouTube TV with a DVR, follow the instructions below.
Step 1: Open your YouTube TV and log in to your YouTube TV account.
Step 2: Use the Search box at the top to search for the TV show you want to record.
Step 3: You will see a + icon on the right side of the show. Click it to start recording.
How to Watch Recorded YouTube Shows
Step 1. Head to the Library section.
Step 2. Your recorded shows are organized by title. Find the recorded show you want to watch.
Step 3. Click the desired recording to play it.
How to Delete YouTube Recordings
Step 1. Go to YouTube TV’s Library section.
Step 2. Head to the Recordings menu and find the show you want to delete.
Step 3. Click on the show and choose Remove from library.
While using a DVR to record YouTube content is quite convenient, it comes with several limitations. Recorded content becomes unavailable for viewing after 9 months. Additionally, if you cancel your YouTube TV subscription, you will lose access to recorded videos after the billing cycle ends. You also cannot share recorded content with users who do not have a YouTube TV account.
To overcome these issues, I recommend using third-party screen recording tools to capture your favorite YouTube TV content. This allows you to permanently save recordings to any device and watch them offline. Below, I list three reliable free screen recording tools to help you achieve YouTube TV screen recording. Read on for more details.
How to Record on YouTube TV with Third-Party Tools
To record YouTube TV content and save it on your devices forever, use the three professional screen recorders below.
Method 1. Use MiniTool Screen Recorder
MiniTool Screen Recorder is a 100% free, secure, and easy-to-use screen recording software designed specifically for Windows users. It helps you capture high-quality screen content without time limits or watermarks.
MiniTool Screen Recorder offers flexible capture modes, including full screen, custom regions, or webcam recording. In addition, this application can capture system audio and microphone sound simultaneously or independently. It supports capturing your 4K screen smoothly, with frame rates ranging from 15 FPS to 50 FPS (15/20/25/30/50 FPS). Multiple preset quality options (High/Original/Standard) are available for selection, making it perfect for capturing TV shows, movies, live streams, etc.
Moreover, MiniTool Screen Recorder features real-time screen annotation, allowing you to highlight, draw, add arrows, rectangles, text, etc., during recording. This function is very helpful for recording online lessons, online meetings, on-screen tutorials, etc.
Furthermore, MiniTool Screen Recorder provides keyboard shortcuts to start, stop, pause, and resume. And you can modify them based on your needs. It has no ads or bundles and works offline to protect your privacy. With the intuitive user interface, even beginners can easily navigate and start recording quickly.
How to record on YouTube TV with MiniTool Screen Recorder? Follow the instructions below to complete the task.
Step 1. Download and Install MiniTool Screen Recorder
Click the download button below to download this program. Then, follow the on-screen setup instructions to install it on your PC. Then, launch the program by double-clicking its shortcut icon on the desktop.
MiniTool Screen RecorderClick to Download100%Clean & Safe
Step 2. Set the Recording Settings
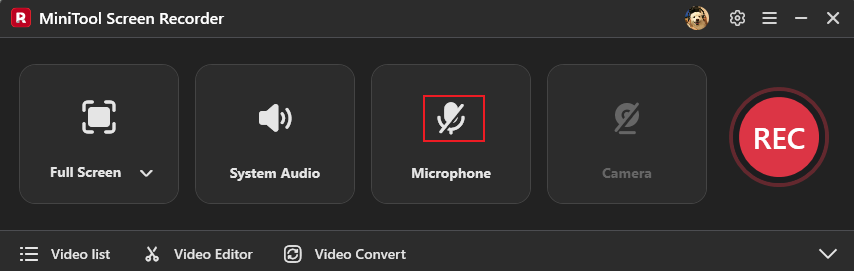
Adjust audio settings
The system audio and microphone sound are activated by default. Click the Microphone option to turn it off based on your needs.
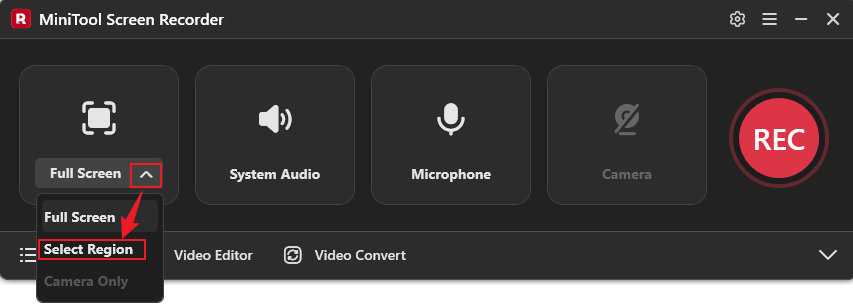
Modify the recording region
MiniTool Screen Recorder records the full screen by default. If you want to record a specified area, open the Full Screen option, then click the Select Region option and drag the mouse to define it.
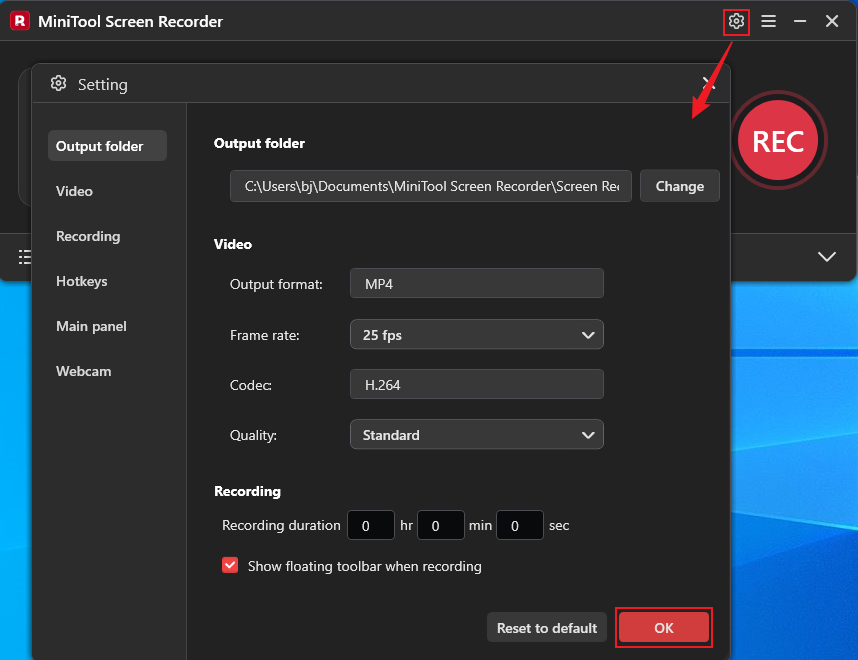
Access more settings
To enter the Settings window, click the Settings icon in the upper-right corner. There, you can change the output format, frame rate, quality, hotkeys, and other settings. To save your changes, click the OK button.
Step 3. Start Recording the YouTube TV
Click the REC button on the floating toolbar. Recording will begin after a three-second delay. During recording, press the F9 key to pause or resume.
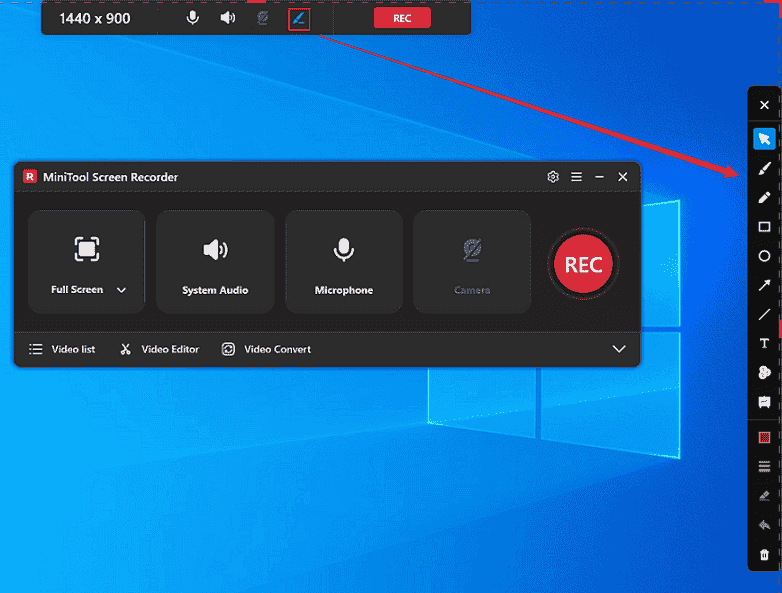
Step 4. Configure Advanced Features (Optional)
Hover your mouse over the top-center area of the screen to reveal the floating toolbar. Then, click the Brush icon to activate the annotation toolbar on the right side of the screen. Next, select the desired tool to add annotations according to your requirements.
Step 5. Stop the Recording
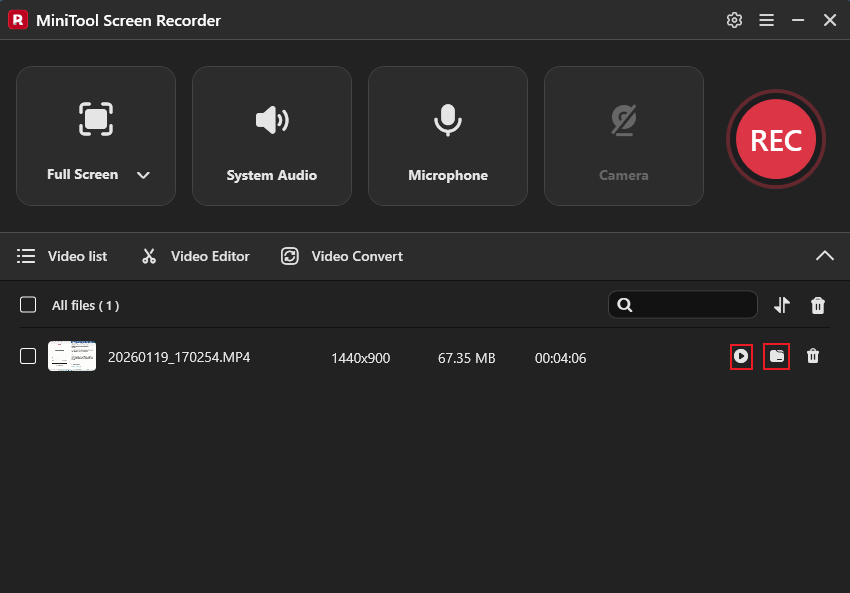
Press the F6 key to stop recording. The recorded video will appear in the Video List area. Click the Play icon here to watch the recording, or click the Folder icon to locate the video file.
That’s all! Now, you can enjoy your favorite TV shows or movies whenever you want.
Method 2. Use Bandicam
Bandicam is a professional screen recorder that excels at recording screens. It ensures fluid, blur-free graphics even during fast-paced gaming, quick screen movements, and dynamic presentations by supporting resolutions up to 4K resolution and frame speeds up to 144 FPS. This tool delivers vibrant colors and smooth motion without lag or blur, ensuring every detail remains crystal clear during high-definition recording.
Additionally, Bandicam also offers multiple HD resolution presets, including 1080P, 4K, etc., to meet diverse needs. Whether you're recording TV shows, movies, tutorial videos for clear step-by-step demonstrations, or gameplay footage for a great viewing experience, Bandicam delivers lossless high-definition output without causing system lag.
More than that, Bandicam offers flexible recording modes: full screen, custom region, specific window, and webcam overlay recording. It clearly captures both system audio and microphone voice. Common output formats are available: MP4 and AVI, making it compatible with most devices and platforms.

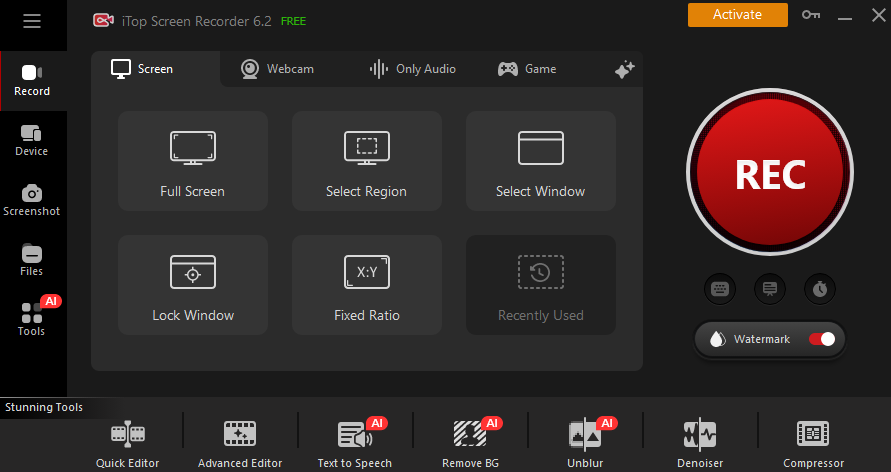
Method 3. iTop Screen Recorder
iTop Screen Recorder is a lightweight and user-friendly screen recording application for Windows users. It supports up to 4K Ultra HD resolution and frame rates of up to 120 FPS, ensuring smooth and crisp recordings ideal for TV content, gaming, dynamic tutorials, and online conference capture. With GPU hardware acceleration, iTop Screen Recorder allows for lag-free recording with minimum CPU consumption, eliminating system lag even during long HD recording.
Plus, iTop Screen Recorder offers flexible recording modes to meet diverse needs, including full-screen recording, custom regions, specific windows, and more. It captures system audio and microphone audio independently or at the same time and features a built-in noise reduction tool to make the voice clearer. Moreover, iTop Screen Recorder supports multiple output formats, including MP4, AVI, MOV, etc.
Bonus: How to Edit Your Recordings
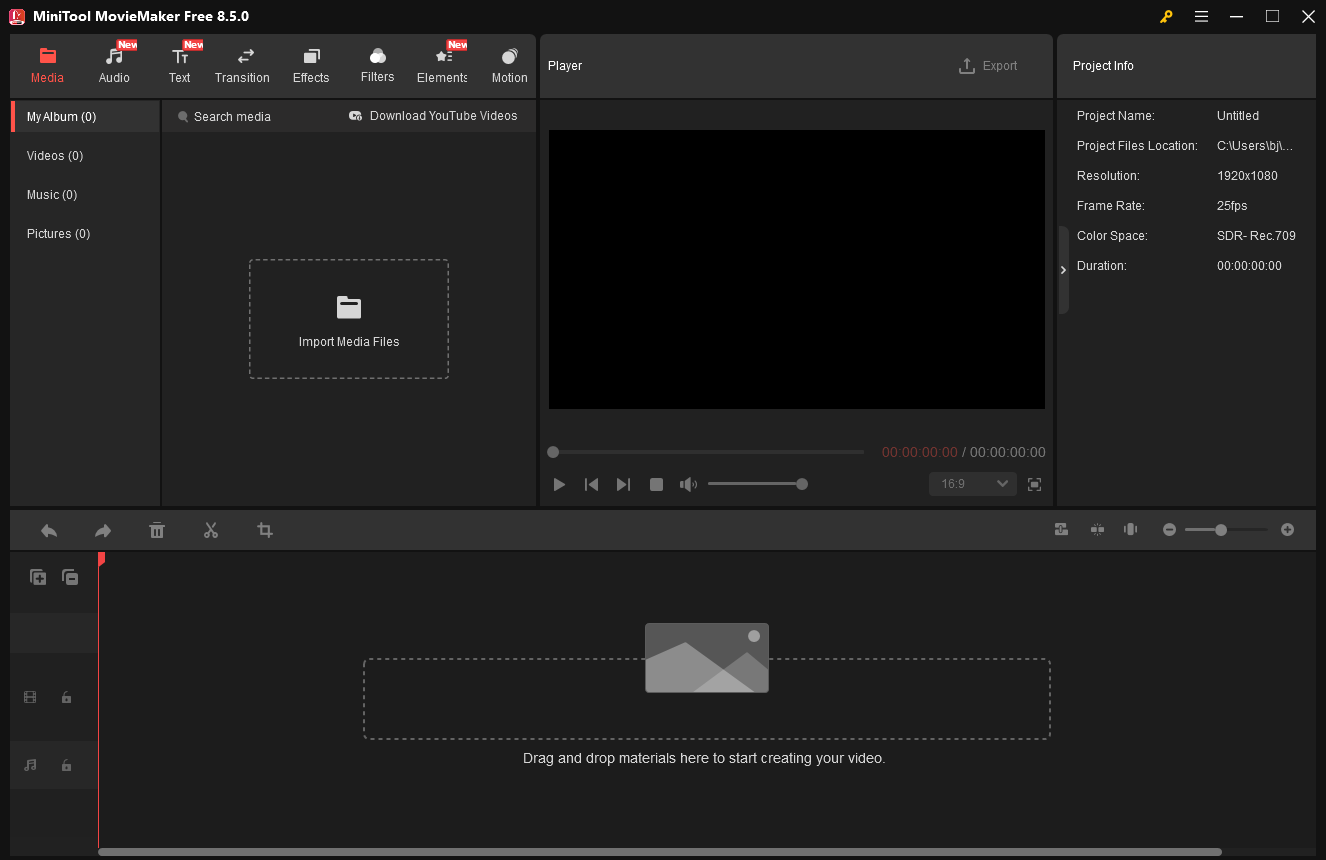
In this section, I'd like to recommend MiniTool MovieMaker, a powerful and free video editor designed to improve the visual effects of your videos. This application has a variety of editing functions, including trimming, cropping, splitting, reversing, rotating, and more. You may also customize your recordings with transitions, filters, animations, effects, text, music, and other elements.
Additionally, MiniTool MovieMaker comes with various advanced editing features, such as multi-track editing, copy and paste on the timeline, video text overlay, photo collage, GIF editing, etc. With it, you can extract highlights from TV shows, movies, or sporting events and compile them into brilliant clips.
MiniTool MovieMaker also supports various formats, including MP4, MOV, MKV, AVI, FLV, MPG, MP3, M4A, M4R, WAV, FLAC, PNG, JPG, etc. You can configure output video settings, like frame rate, quality, bitrate, and more. Click the download button below to give it a try!
MiniTool MovieMakerClick to Download100%Clean & Safe
In Summary
How to record on YouTube TV? This post offers three professional and easy-to-use screen recorders and shows you how to record YouTube TV on Windows step by step. With the three screen recorders, you can capture your favorite TV shows, movies, and sports highlights with no effort. Feel free to select the one you want. I hope this article can do you a big favor!
You can contact us via support@minitool.com if you have any questions about using MiniTool Screen Recorder or MiniTool MovieMaker. Alternatively, you can send me messages directly on X, and I will help you as soon as I can.