How to record GoToMeeting meetings on PC? This guide introduces two practical recording methods: GoToMeeting's built-in recording feature and an alternative screen recorder: MiniTool Screen Recorder. Detailed step-by-step instructions are also provided.
GoToMeeting is a video conferencing and online collaboration platform with powerful security features. It is widely used in remote offices, team meetings, online training, and other scenarios. Since important discussion content is often involved during meetings, many users want to record GoToMeeting meetings for subsequent viewing, organization, or sharing.
Can I Record a GoToMeeting Session
Absolutely yes. GoToMeeting offers a built-in meeting recording feature; however, recording permissions vary depending on the participant's role:
- Organizers and collaborators: Meeting organizers and collaborators can freely start and stop recording during the meeting.
- Participants: The built-in recording function is unavailable; third-party GoToMeeting recorders are required.
![How to Record WoW Gameplay on PC in High Quality [2026 Update]](https://images.minitool.com/recorder.minitool.com/images/uploads/2026/06/how-to-record-wow-gameplay-thumbnail.jpg)
How to Record GoToMeeting Sessions
Since GoToMeeting has certain restrictions on recording permissions, some participants cannot directly use its built-in recording function. In this case, using a third-party screen recorder becomes a more flexible solution. Personally, I usually use MiniTool Screen Recorder, which I use frequently, to record a GoToMeeting session.
The Comparison of the Two Recording Methods
| Feature | Built-in Recorder | MiniTool Screen Recorder |
| Record Other Screen Activities | No | Yes |
| Flexible Recording Area Options | No | Yes |
| System Audio Recording | Yes | Yes |
| Microphone Sound Recording | Yes | Yes |
| Webcam Recording | Yes | Yes |
| Real-time Annotate Screen | No | Yes |
The following section will provide a brief introduction to these two recording tools and then describe the specific operating steps for each.
Method 1: Use GoToMeeting Built-in Reorder
Meeting organizers and collaborators with recording permissions can record GoToMeeting sessions using the detailed instructions outlined below.
Step 1: Open GoToMeeting
Open the browser and go to the GoToMeeting official website.
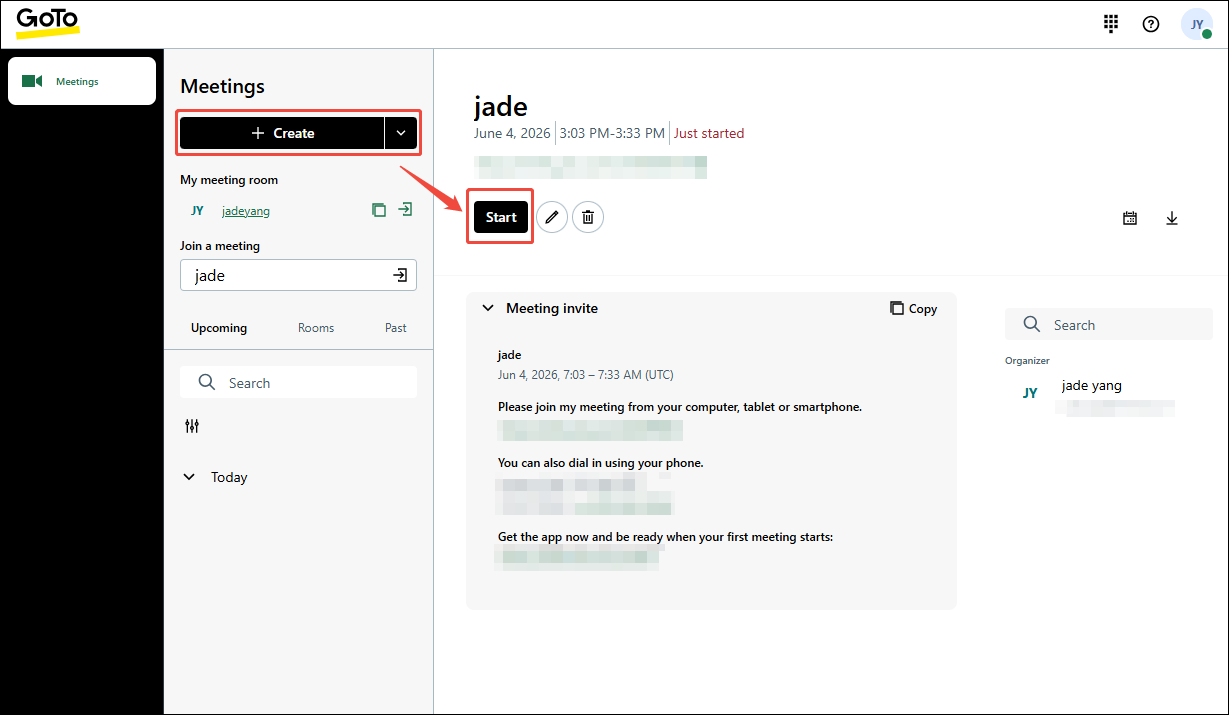
Step 2: Create and Start a New Meeting
1. Click the Create icon to create a new meeting room.
2. Then, click the Start button to begin the new meeting.
Step 3: Control the Audio and Camera Recording Settings
1. Microphone, system audio, and webcam recording are enabled by default. If any of these features are not needed, simply click the corresponding icon to disable them.
2. Then, click the Start my session option to enter the meeting room.
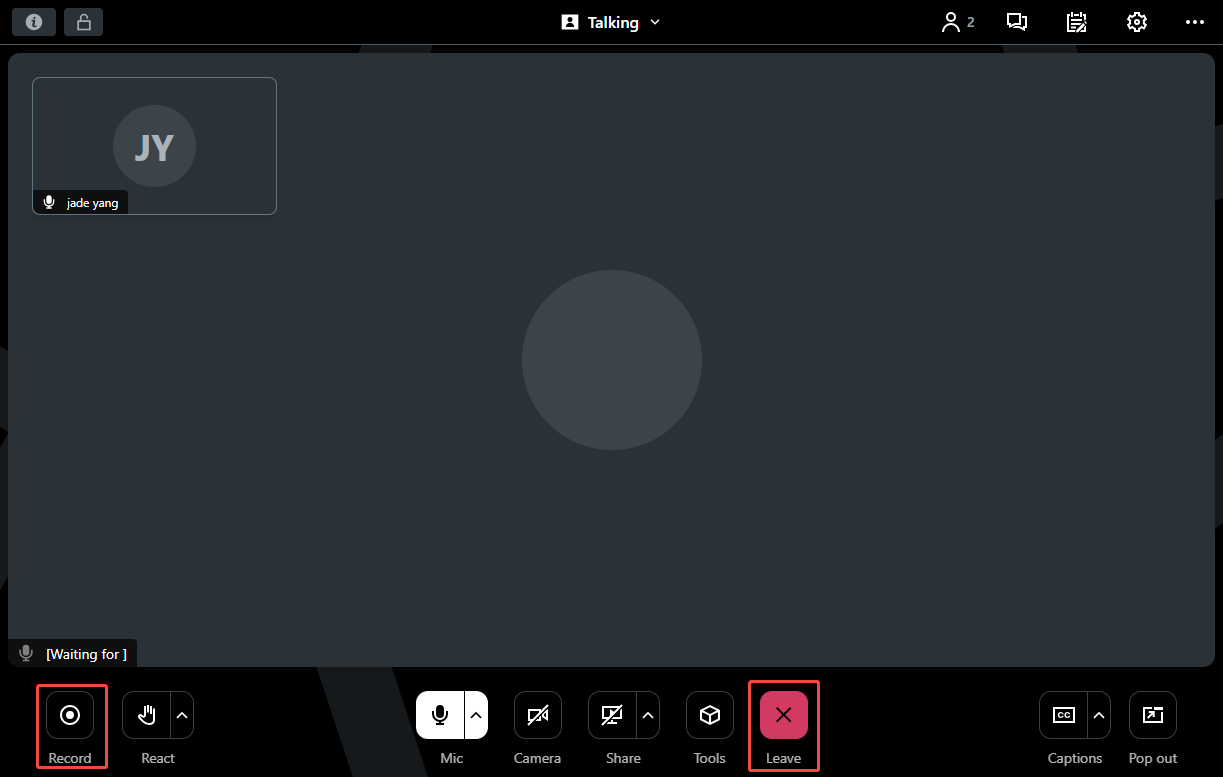
Step 4: Begin and End Recording
1. In the meeting room, click the Record icon to start recording the session.
2. Then, click the Record icon again to stop the recording process.
3. Finally, click the Leave option to end the recording.
Step 5: Check and Save the Recorded Video
1. In the main interface, switch to the Past section. Then, choose the ended meeting.
2. Then, click the Play icon to view the recorded meeting and click the Download icon to download GoToMeeting recording.

As can be seen, GoToMeeting's recording functionality is limited to capturing the meeting content itself. Recording other aspects of the meeting, or capturing sessions as a participant without built-in permissions, requires a more specialized third-party recording tool.
![How to Record Google Meet Sessions on Windows [2 Methods]](https://images.minitool.com/recorder.minitool.com/images/uploads/2026/01/how-to-record-google-meet-thumbnail.jpg)
Method 2: Use MiniTool Screen Recorder
MiniTool Screen Recorder is a free and user-friendly screen recording tool that provides multiple recording modes, including full-screen, custom region, window, and multi-monitor recording. It also supports recording system audio and microphone, either simultaneously or separately, making it suitable for capturing meetings, presentations, discussions, and voice commentary.
Beyond screen recording, MiniTool Screen Recorder offers webcam recording capabilities, enabling independent webcam capture or picture-in-picture video creation. In addition, its built-in real-time annotation tools make it easy to emphasize important information during recording, which is particularly useful for meeting documentation, tutorials, and presentations.
Here is a quick review of the recording process:
- Launch MiniTool Screen Recorder.
- Choose the recording area within the Full Screen section.
- Control the audio and webcam recording settings.
- Click the REC button to start recording.
- Join or start the meeting.
- Annotate the screen while recording if necessary.
- Press the F6 key to end recording.
To understand the process clearly, here is a detailed guide on how to record a GoToMeeting session as a participant using MiniTool Screen Recorder.
Step 1: Download and launch MiniTool Screen Recorder
1. Click the button below to download MiniTool Screen Recorder, and then follow the on-screen instructions to install it on the PC.
MiniTool Screen RecorderClick to Download100%Clean & Safe
2. Launch MiniTool Screen Recorder.
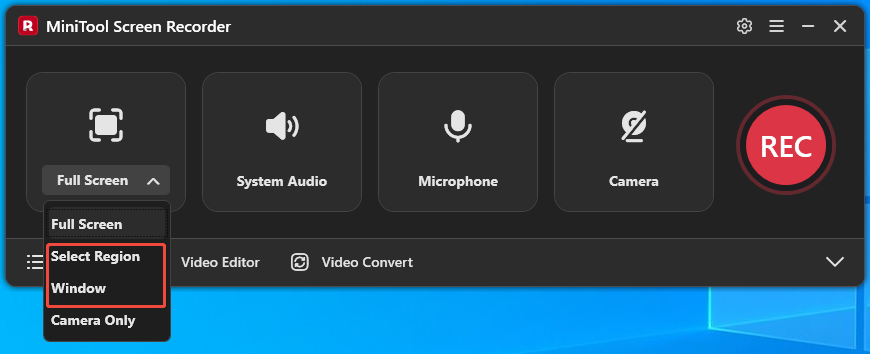
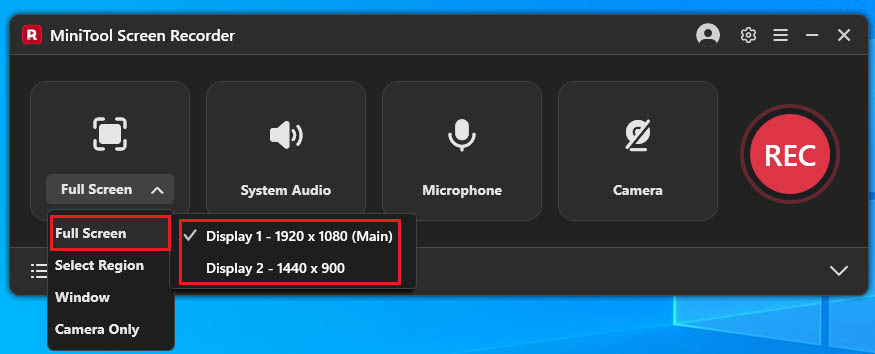
Step 2: Determine the Recording Area
1. By default, MiniTool Screen Recorder captures the entire display.
2. To record a specific portion of the screen or a particular application window, open the Full Screen drop-down menu and choose the Select Region option or the Window option.
3. When multiple monitors are connected, open the Full Screen menu and select the display that should be captured.
Step 3: Manage the Audio Recording Settings
1.MiniTool Screen Recorder enables both system sound and microphone input by default.
2. Disable either option by clicking its corresponding icon if it is not needed for the recording.
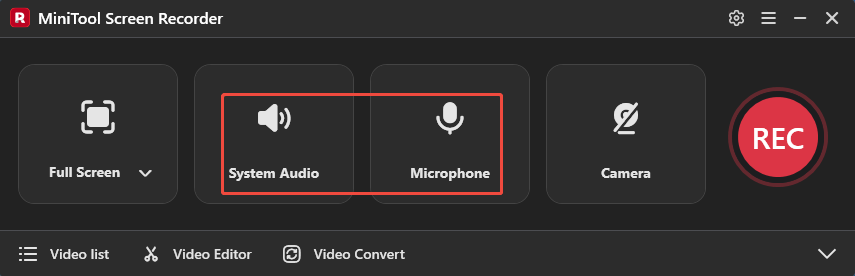
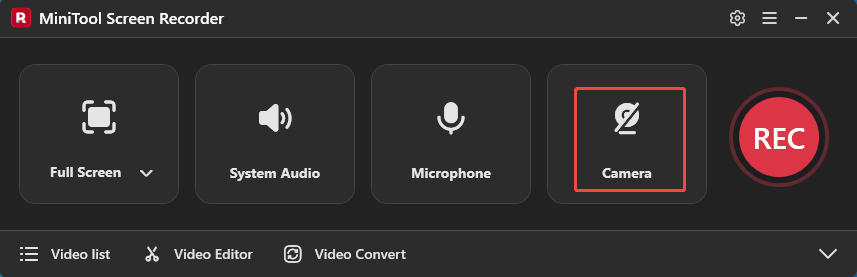
Step 4: Control the Camera Recording
Enable the webcam recording feature by clicking the Camera icon if camera footage should be included in the recording.
Step 5: Start and End Recording
1. Start the recording process by clicking the REC button or pressing the F6 key.

2. Once the 3-second countdown ends, switch to GoToMeeting and join or start a new meeting.
3. Add annotations during the recording using the toolbar on the right.
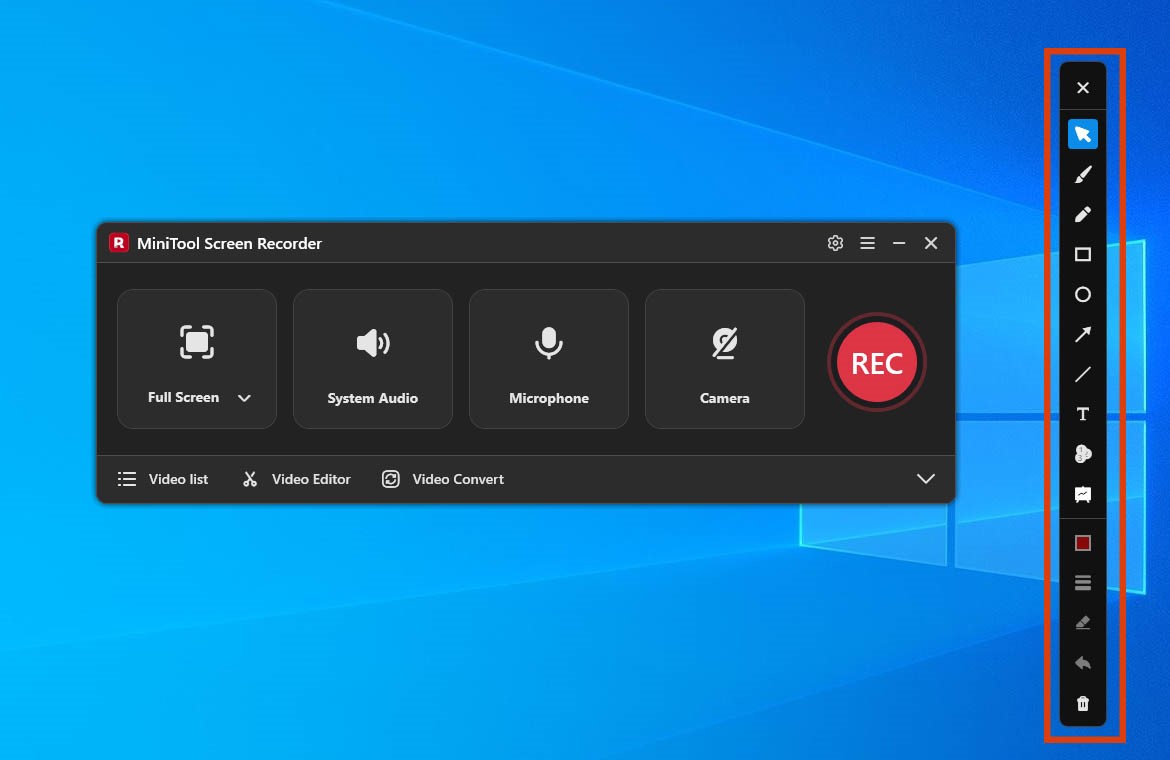
4. Press the F9 key to stop or resume recording.
5. Finally, press the F6 key again to end the recording process.
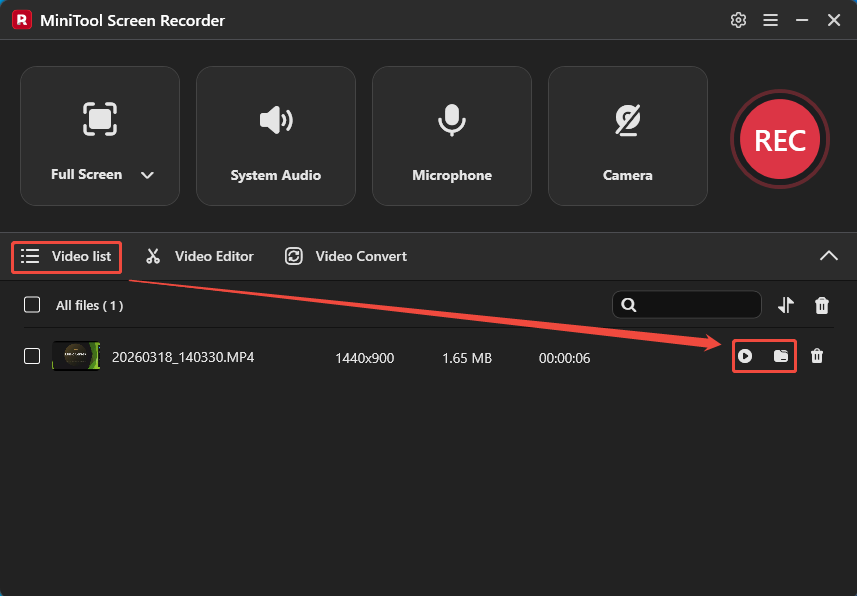
Step 6: View and Locate the Video
1. After the capture ends, MiniTool Screen Recorder automatically redirects to the Video list section and displays the latest video file.
2. Click the Play icon to view the recorded GoToMeeting session and click the Folder icon to locate it on the PC.
In summary, GoToMeeting's built-in recording feature performs admirably for users with recording permissions, whereas MiniTool Screen Recorder offers more flexible recording options and is not subject to such permissions.
Bottom Line
How to Record GoToMeeting sessions. This can be accomplished using either GoToMeeting's built-in recording feature or a professional recording tool like MiniTool Screen Recorder. The former is suitable for users with recording permissions, while the latter offers a more flexible recording solution that accommodates a wider range of recording needs.
If there are any questions about MiniTool Screen Recorder, please contact the support team at support@minitool.com.