An SB3 file is the project file format for Scratch 3.0. How to convert SB3 to MP4 for better compatibility, sharing with a wider audience, and offline viewing? This article presents two methods, including the use of TurboWarp and MiniTool Screen Recorder. Additionally, you can use a video editor to make the converted MP4 video excellent.
What Is an SB3 File
An SB3 file is the native project file format for Scratch 3.0, the visual programming platform developed by Massachusetts Institute of Technology (MIT). Designed for educational use, Scratch 3.0 lets users create interactive stories, animations, and games using drag-and-drop code blocks, making it ideal for beginners and young learners.
SB3 files replaced Scratch.SB2 files. It is essentially a compressed ZIP file containing all project resources: sprites, background images, sound clips, and the visual scripts that drive interactivity. To open an SB3 file, you need a suitable software like Scratch 3.0 or an SB3 editor – TurboWarp.
Why Convert the SB3 File
You may notice that many users are finding the same answer as you on the forum for how to convert SB3 to MP4. Before diving into the solutions, here are some common reasons for converting the SB3 files to other formats, like MP4.
Better Compatibility
The core reason for converting the SB3 file to MP4 is that SB3 files have strict usage limitations. Only using Scratch 3.0 or the Scratch editor can open the SB3 file. However, MP4 can be accessed on almost any device, including smartphones, tablets, laptops, smart TVs, and video players, without needing the original Scratch editor.
Sharing with a Wider Audience
SB3 files are not supported by social media, video platforms, or messaging apps, such as YouTube, TikTok, Instagram, Facebook, or WhatsApp. Also, the SB3 file cannot be emailed for direct playback. Platforms usually accept standard video formats like MP4.
Converting the SB3 file to MP4 format can allow you to share the Scratch project with a wider audience without asking them to download/use the Scratch editor. Plus, MP4 is easy to upload, send, or embed in web pages/forums so that a larger audience can be reached.
Offline Viewing
Viewing the SB3 file requires you to download and install Scratch 3.0 or the Scratch editor in advance and connect to the internet. For the convenience of offline viewing, you’d better convert SB3 to MP4 and access the video anytime.
All in all, converting SB3 to MP4 brings Scratch users a lot of convenience. As we mentioned above, the SB3 file is a project file format. Is it possible to convert an SB3 file to MP4? The next section gives you the answer.
Is It Possible to Convert SB3 Files to MP4
Many people are curious about the issue: Can I convert an SB3 file to MP4? The short answer is no. There is no direct conversion from SB3 to MP4. When I typed “SB3 to MP4 converter” in Google Chrome’s search box, here was an online tool appeared at the top. However, it doesn’t work.
The fundamental reason lies in the obvious difference between these two formats. MP4 is a still video format used to store audio and video data that can be played on any device or platform without additional processing. SB3 is a project file that contains not only a video but also code, sprites, and dynamic elements that are executed in response to user input.
However, everything is possible. Although there is no direct way to convert SB3 to MP4, a reliable solution is to record the playback process of the SB3 project using screen recording tools, then save the footage as MP4.
How to Record SB3 Files in MP4
The section below guides you on how to record an SB3 file to MP4 with two methods, including using MiniTool Screen Recorder and TurboWarp.
Method 1. Use MiniTool Screen Recorder
As the name suggests, MiniTool Screen Recorder is a free video recorder for Windows users. It can directly record the SB3 file to the MP4 format in high quality or original quality, which is one of the reasons I want to recommend this recorder for you.
You can choose to record the full screen of your computer or any selected area according to your needs. Recording system audio and microphone audio separately or simultaneously is available. Plus, you can record a webcam to show your face for more interaction. All the recordings are without any watermark or time limitations.
Additionally, MiniTool Screen Recorder features a screen annotation tool, enabling you to use a lot of elements to highlight the key points during recording. Now, here are the detailed guides on how to use the SB3 to MP4 converter.
Step 1. Get MiniTool Screen Recorder
Download MiniTool Screen Recorder by simply clicking the download button below. Then, follow the on-screen instructions to install it.
MiniTool Screen RecorderClick to Download100%Clean & Safe
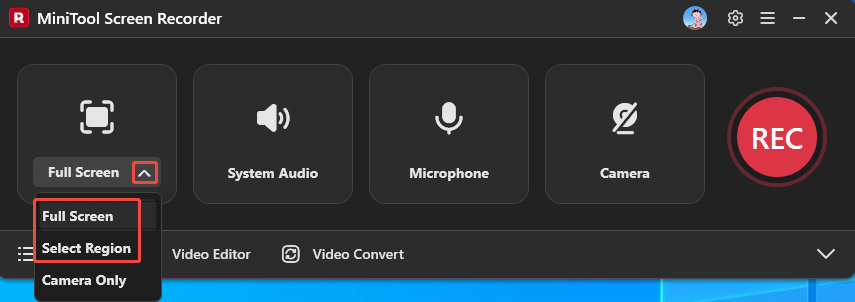
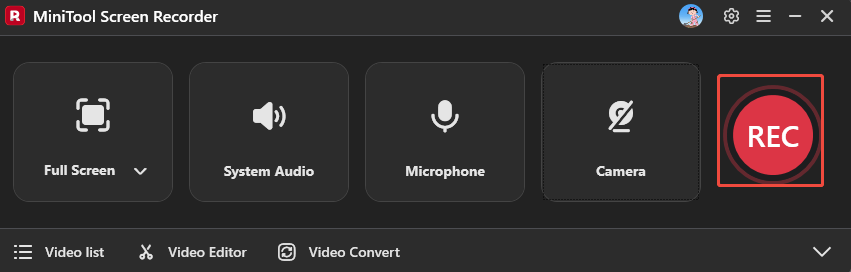
Step 2. Select the Recording Area
1. Open MiniTool Screen Recorder.
2. Expand the drop-down menu next to Full Screen to choose whether to record the full screen or a selected region.
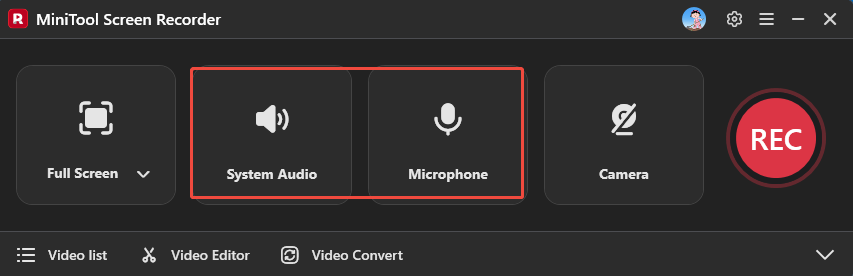
Step 3. Manage the Audio Recording
Click on the System Audio icon and the Microphone icon to turn on/off the recording of system and microphone sounds.
Step 4. Enable Webcam and Customize the Save Path
1. Click on the Camera icon to record the SB3 file with your face.
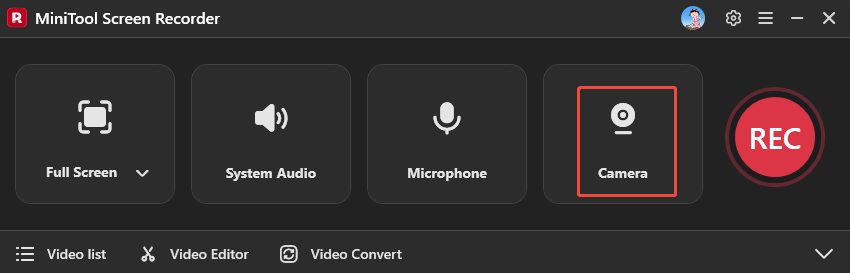
2. Click on the upper-right Settings icon to access the Settings window.
3. Then, click on Change to specify a storage location and click on OK to save the change.

Step 5. Play the SB3 File
Open your SB3 file on Scratch 3.0 or TurboWarp to be ready for playback.
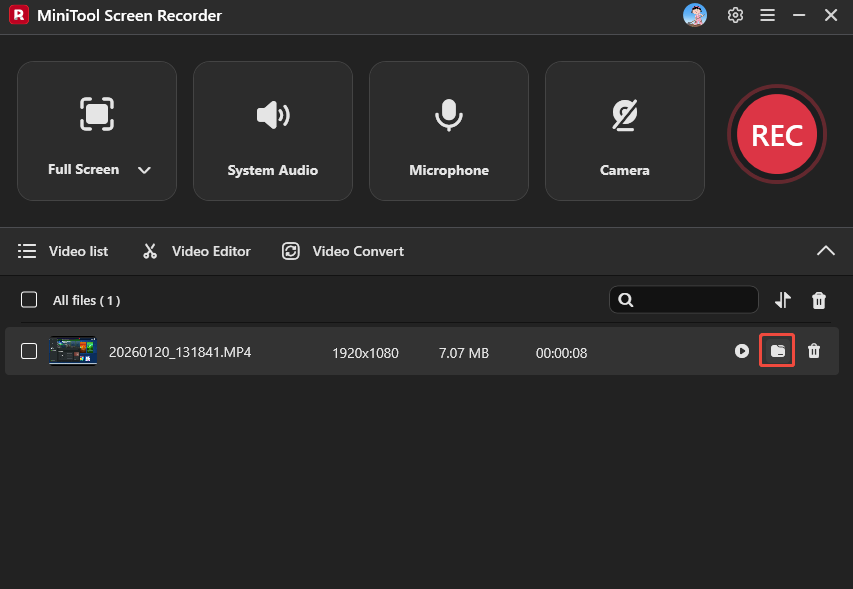
Step 6. Start/End the Recording and Find the Recorded SB3 File
1. Click the REC button, play the opened SB3 file immediately after a 3-second countdown. You can press the F9 key to pause or resume this recording. Or directly press the F6 key to end the recording.
2. When the recording process ends, click on the folder icon under the Video list to locate the recorded video.
Method 2. Use TurboWarp
If you use Scratch 3.0 frequently, I believe you will be familiar with TurboWarp. It is a lightweight and fast Scratch editor that supports SB3 files. It enables features like 60fps mode, dark mode, and full-screen control. What makes TurboWarp perfect is that it includes built-in recording functionality. It’s ideal for capturing your Scratch projects without a complicated setup by letting you run SB3 files. You can record the SB3 files directly as WebM and convert the recorded video to MP4.
As you can see, compared to MiniTool Screen Recorder, using TurboWarp to record SB3 to MP4 is a little complicated, because it requires 2 steps: record the Scratch project and convert the recorded video to MP4 format.
To record the SB3 file, please save the SB3 file from Scratch 3.0 on your computer in advance. Then, here’s a step-by-step guide on how to use TurboWarp to record SB3 and use a converter to convert WebM to MP4.
Part 1. Record SB3 File with TurboWarp
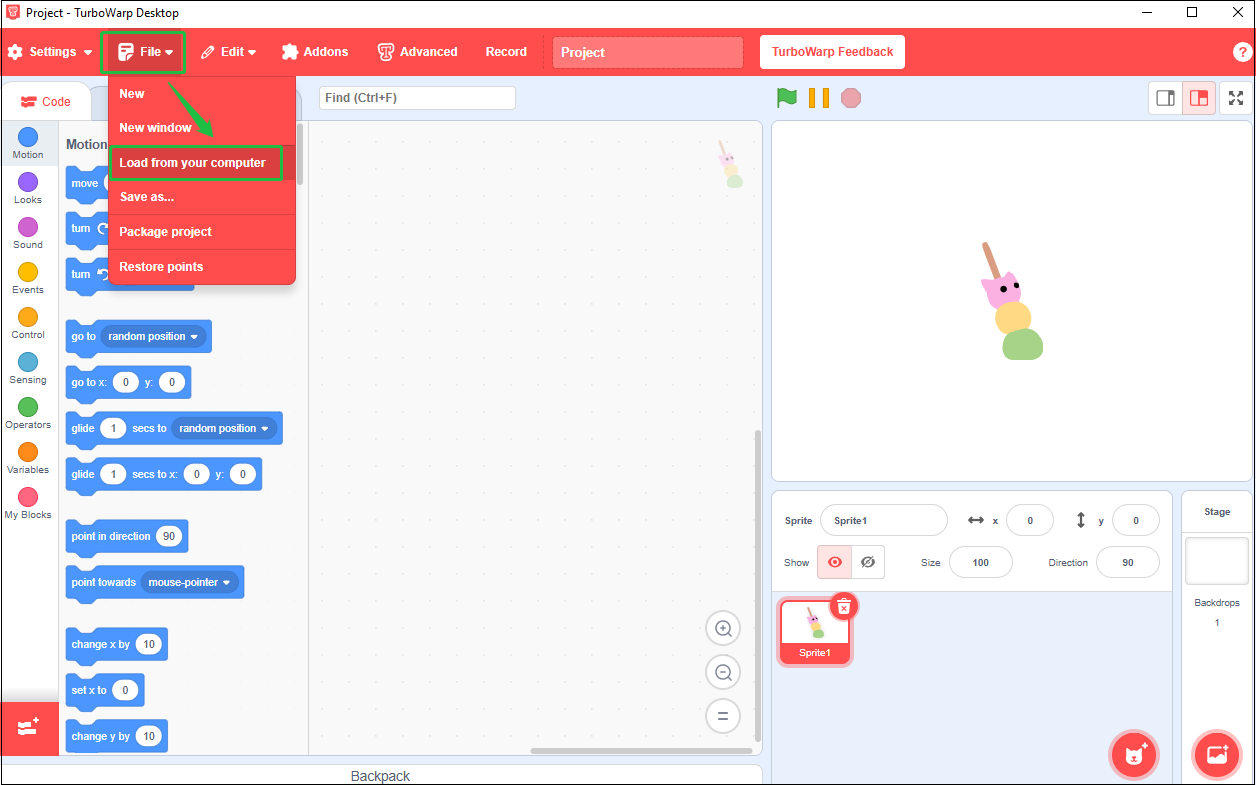
1. In the main interface of TurboWarp, click on File > Load from your computer to open the SB3 file you want to record.
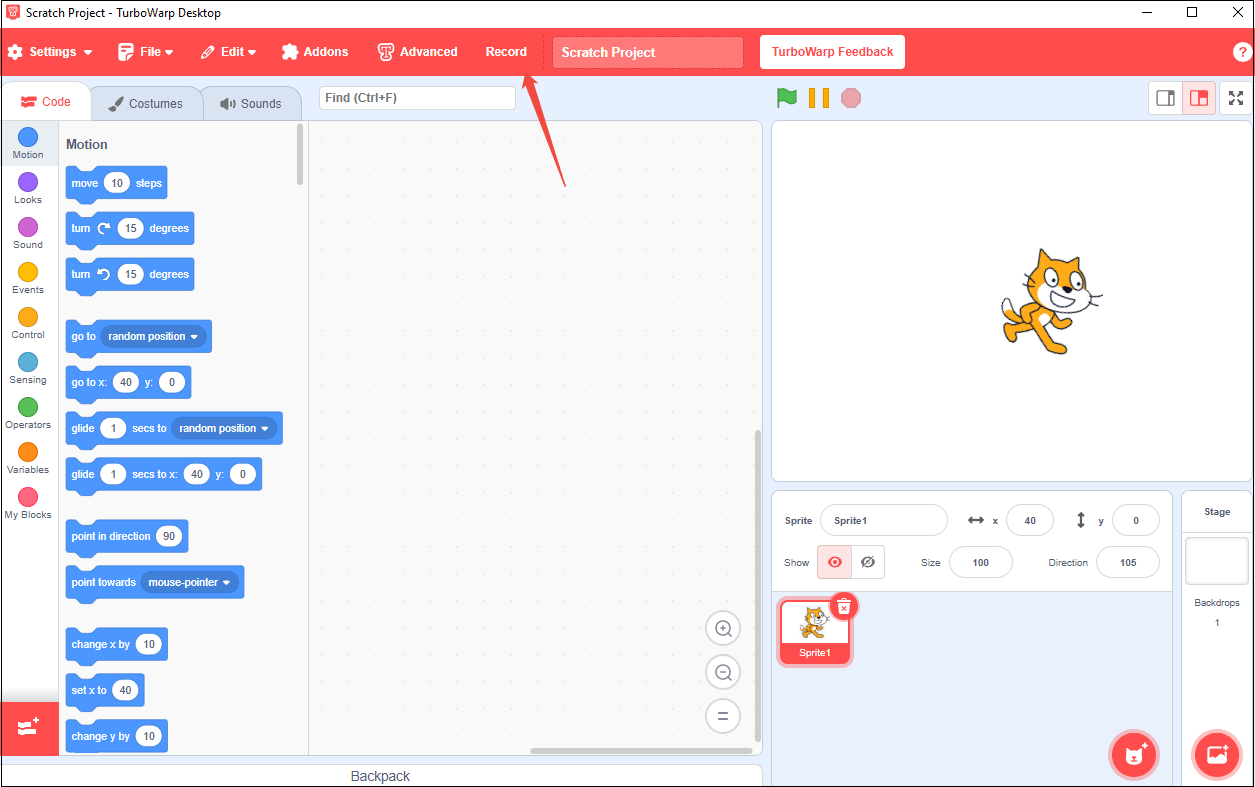
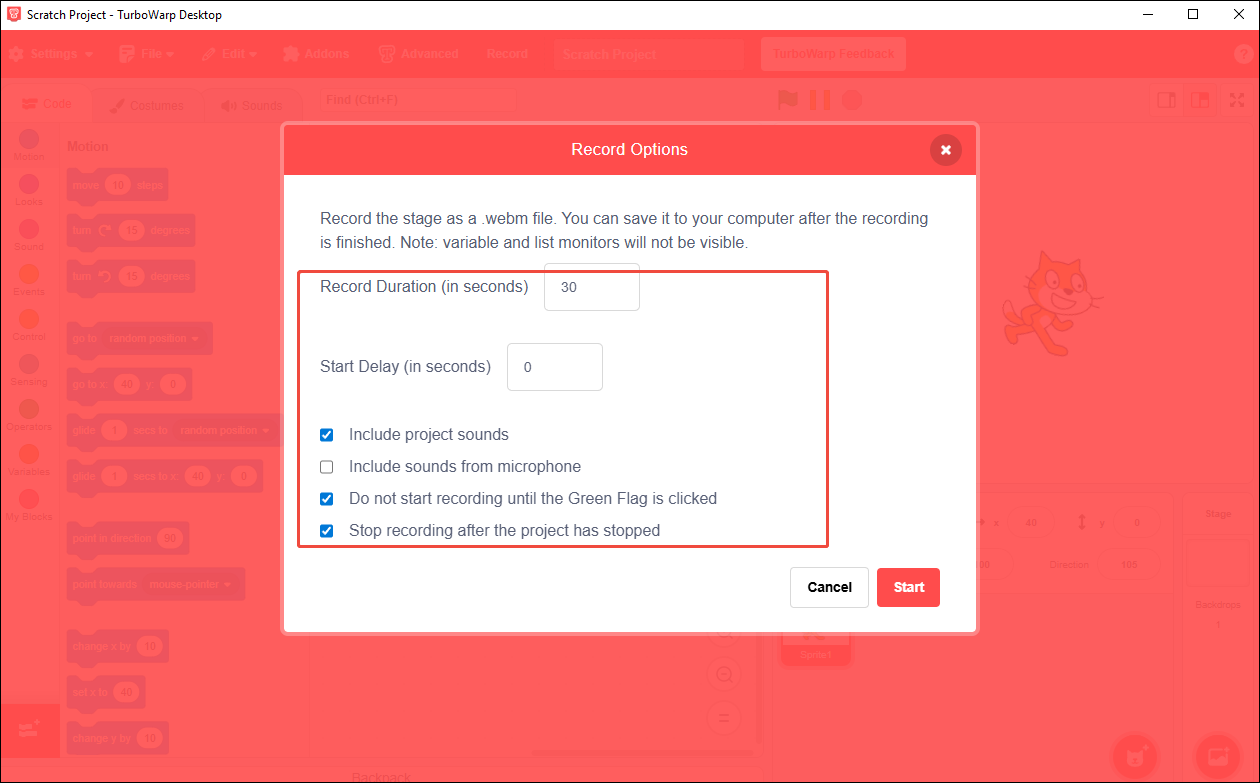
2. Once the project is loaded, click the Record button in the top toolbar to open the recording settings window.
3. Here, you can set the recording duration, enable system audio to capture project sounds, and disable the microphone audio to avoid background noise.
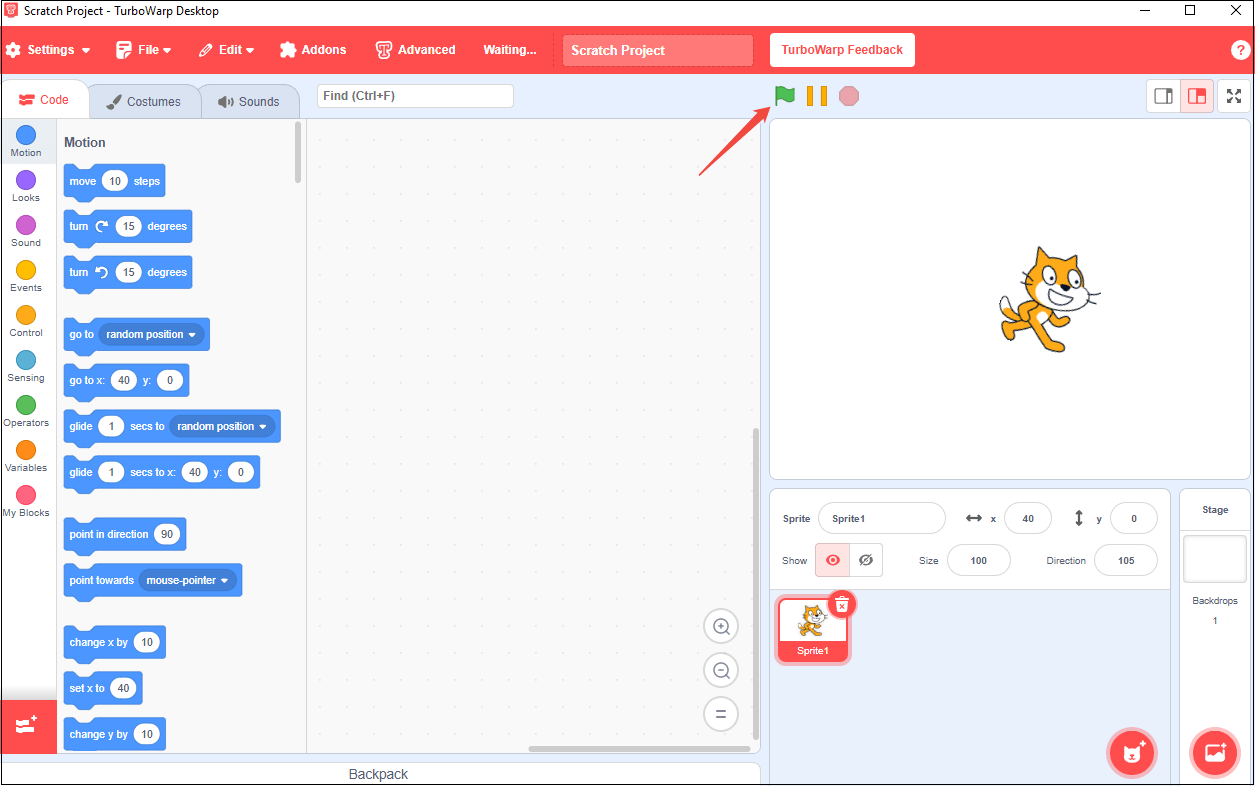
4. Click the Start button, then immediately press the green flag in TurboWarp to begin playback.
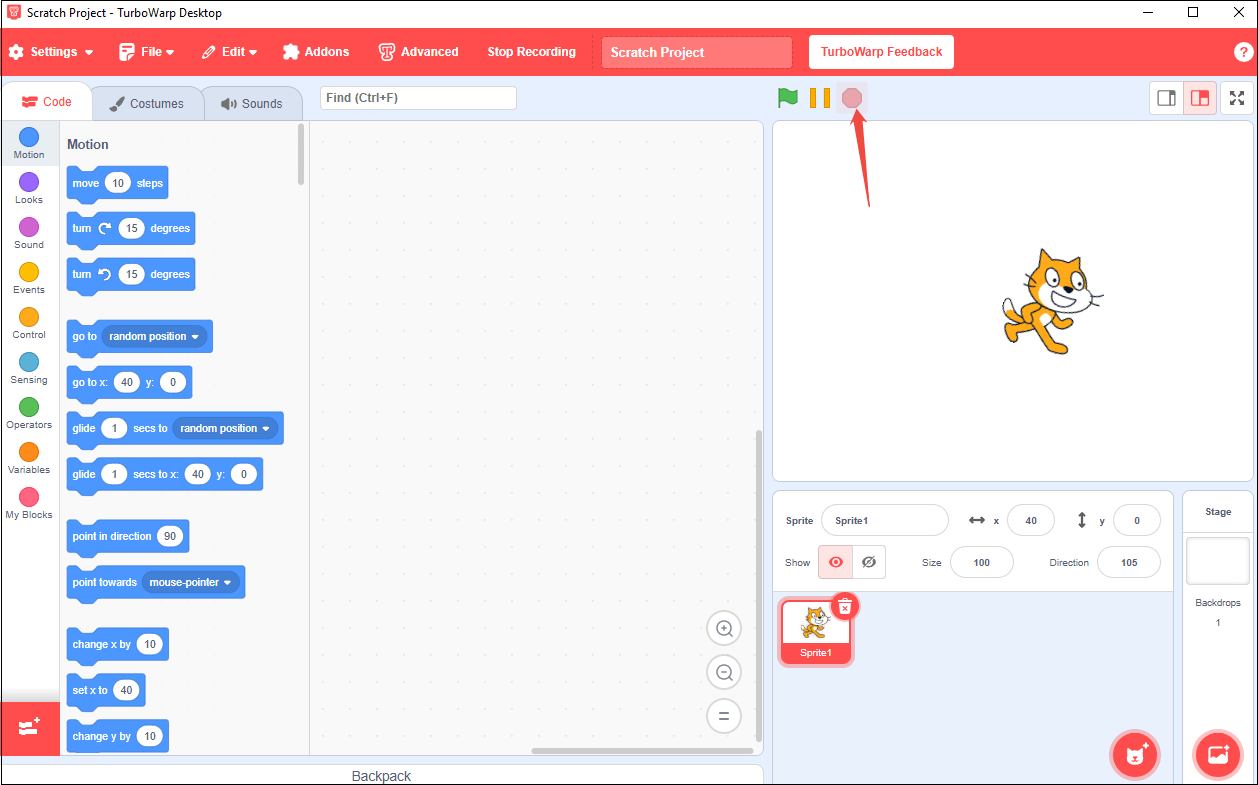
5. When the project finishes, click Stop.
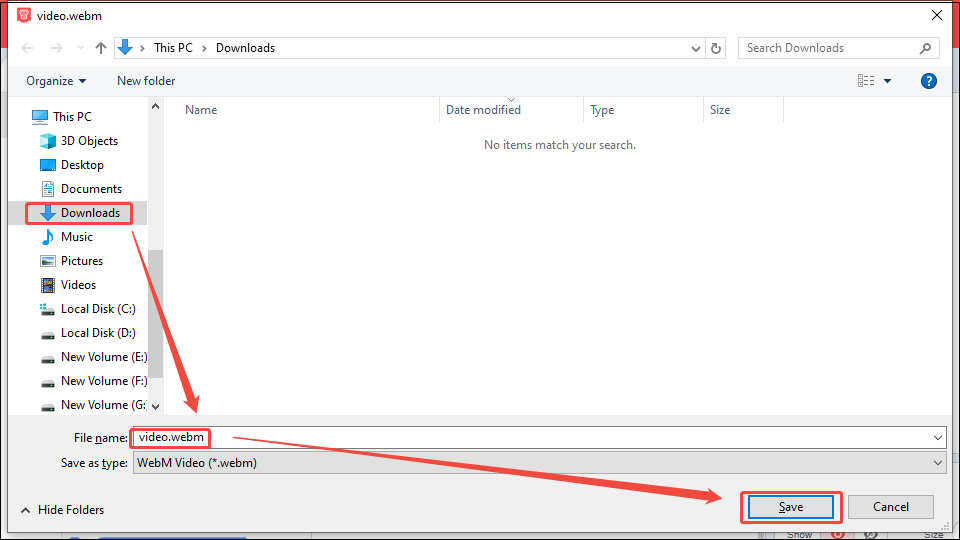
6. A pop-up window will appear. TurboWarp will prompt you to choose a save location and rename the file. Then, click on Save to save the WebM video.
Part 2. Convert the Recorded Scratch Project to MP4
WebM is a high-quality format, but MP4 offers broader compatibility with social media, video players, and presentation tools. You can convert your recorded WebM to MP4 using the recommended online converter – FreeConvert.
FreeConvert is a free and user-friendly online tool that simplifies converting WebM files to MP4 without installing software. Apart from videos, it allows users to convert various file formats, including images, audio, documents, and eBooks. It also offers options for video resizing, frame rate changes, image compression, image rotation, and more.
FreeConvert is quite safe to use. It ensures file security with 256-bit SSL encryption and automatic file deletion after a few hours. You can upload videos from cloud storage (Dropbox, Google Drive, OneDrive) by clicking the respective icons. However, if you want a file size limit higher than 1 GB, remember to sign up. You should also remember that up to 20 files per day are free to convert.
Below is a detailed, step-by-step guide to using FreeConvert to convert WebM to MP4.
Step 1. Access the WebM to MP4 Converter Interface of FreeConver
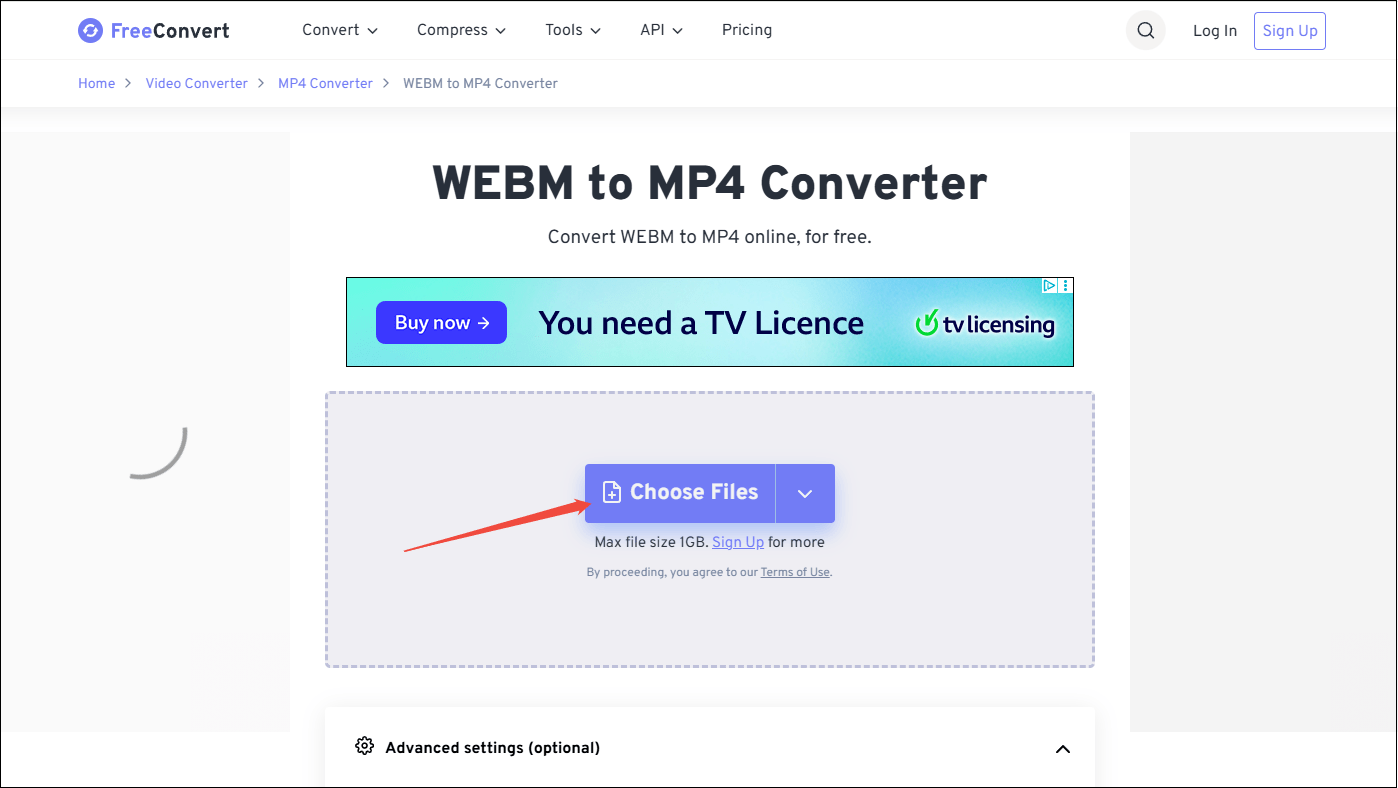
Open your web browser and navigate to https://www.freeconvert.com/webm-to-mp4.
Step 2. Upload Your WebM File
Click the Choose Files button to select the saved WebM files from your computer. Alternatively, drag and drop your WebM file directly into the upload area for a faster process.
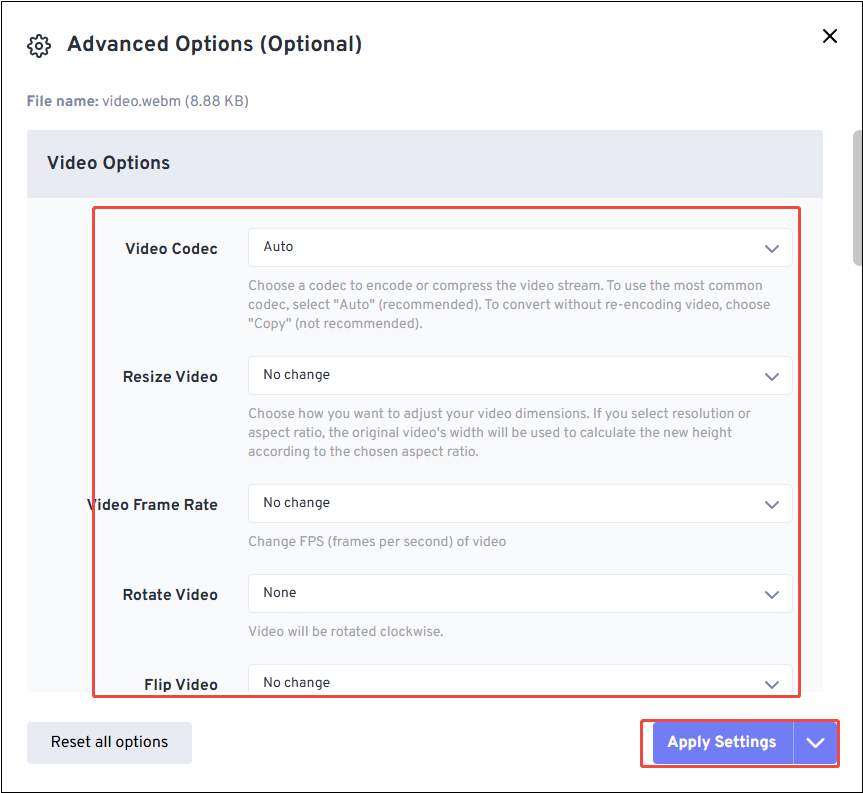
Step 3. Customize Conversion Settings (Optional)
1. FreeConvert offers advanced settings to tailor your MP4 output. Click the Advanced settings to adjust parameters like video codec, frame rate, volume, etc.
2. Then, click on the bottom-right Apply Settings button to confirm the customization.
Step 4. Start the Conversion
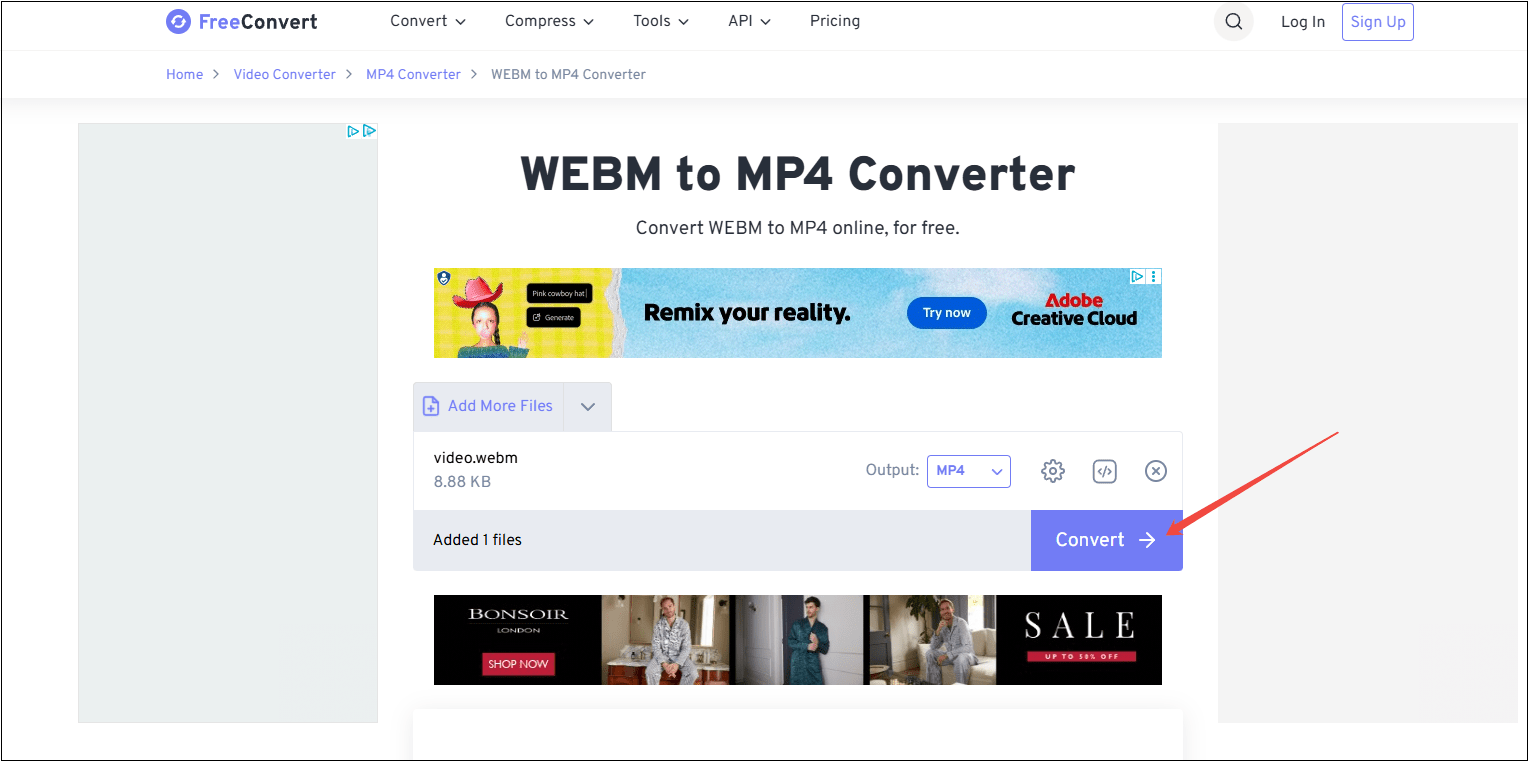
1. Please confirm the output format is set to MP4 again.
2. Click the Convert button to begin processing. The conversion time depends on file size and internet speed.
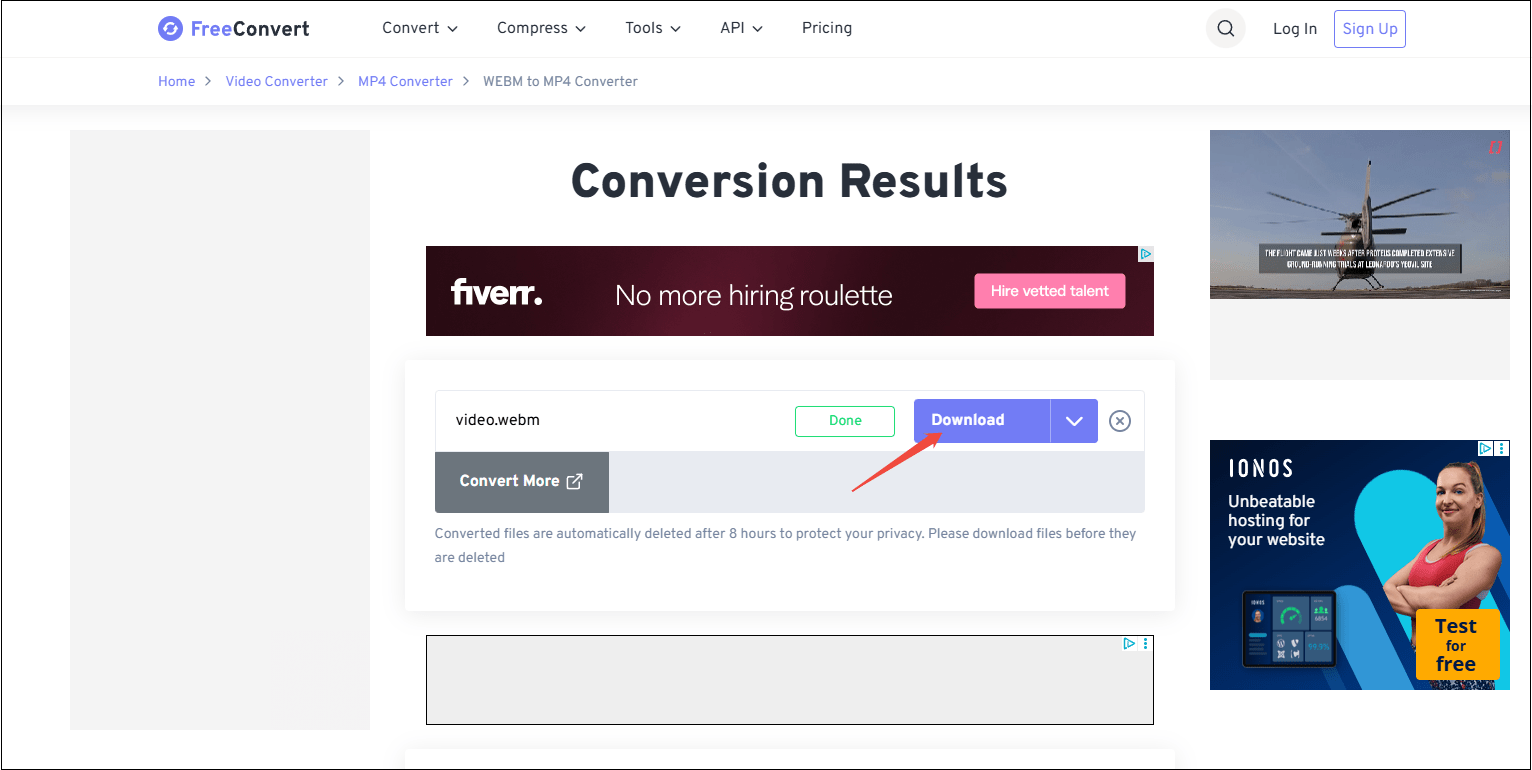
Step 5. Download the MP4 File
Once conversion completes, click the Download button to save the converted MP4 file to your computer.
All in all, I have used these two methods above to convert SB3 to MP4. For me, using MiniTool Screen Recorder is more user-friendly and simpler. It only requires one step to achieve the goal. What’s more, using a converter to convert the recorded WebM format to MP4 is unstable. The recorded WebM file by TurboWarp fails to be imported to some famous converters for conversion, such as MiniTool Video Converter, Any Video Converter, etc.
Bonus: How to Edit the SB3 Recordings
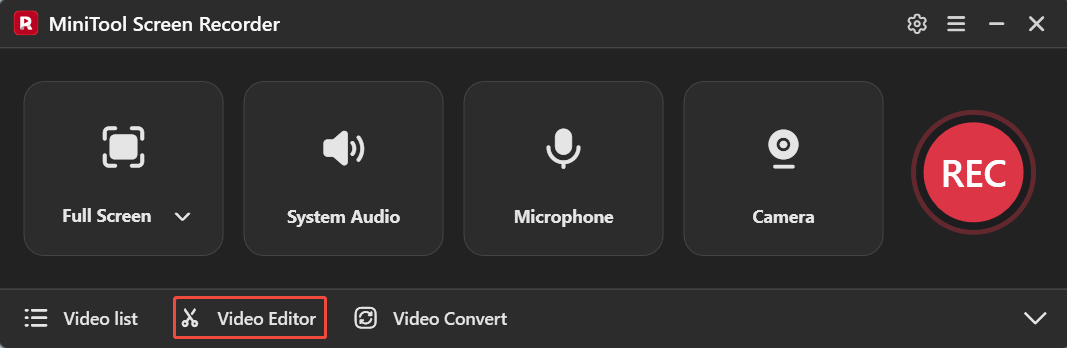
Whether you record SB3 files to share or create instructional content, further editing your recordings after capture can significantly enhance their professionalism. Now, click the Video Editor option at the bottom of the MiniTool Screen Recorder homepage to get the professional video editing software.
Alternatively, click on the button below to get this video editor on your PC.
MiniTool MovieMakerClick to Download100%Clean & Safe
This video editing tool has no ads, bundles, or watermarks. You can use it to add transitions, filters, text, music, and other elements to your recorded videos, making your content more engaging. Additionally, for basic editing, you can trim, rotate, split, and reverse footage.
Furthermore, this application supports a wide range of digital formats. If you want to convert the SB3 file to other formats rather than MP4, exporting the edited recording video is another option. The supported formats include WAV, MOV, MKV, AVI, FLV, MP3, M4A, FLAC, PNG, JPG, and more.
Conclusion
While direct SB3 to MP4 conversion is impossible, you can record your Scratch project to MP4 with suitable tools. This article shows you two methods: using MiniTool Screen Recorder or TurboWarp. The former provides a straightforward workaround that records the SB3 file to MP4 directly. Alternatively, using TurboWarp to record your interactive project as WebM, then convert to MP4 with a converter.
By following the corresponding steps for each method, you can turn your SB3 projects into accessible videos without technical expertise. If you encounter any issues while trying out MiniTool Screen Recorder or MiniTool MovieMaker, feel free to email us via support@minitool.com or send me a message on X for assistance.