Why is PowerPoint screen recording not working? Outdated software, incorrect installation, or insufficient permissions are usually the causes. This article guides you through resolving the issue by restarting the app, reinstalling it, running it as an administrator, or switching to a more reliable screen recorder like MiniTool Screen Recorder.
Can PowerPoint Record Screen?
Yes, PowerPoint supports screen recording. It supports recording any activity on your screen, including slideshows, various applications, browser web pages, game footage, and more. The recorded content is automatically added to your presentation and can also be saved as a video file to your computer.
There is no time limit for screen recording in PowerPoint. In theory, you can record for an unlimited amount of time. However, your computer’s available disk space and memory still limit the recording duration. Additionally, the built-in PowerPoint recorder records at 30 fps by default. This frame rate is suitable for most screen recording situations. If you want to record game footage, it’s best to use the Xbox Game Bar built into Windows 10 and 11, or other software that supports high frame rate screen recording.

How to Screen Record on PowerPoint?
PowerPoint screen recording feature supports capturing the entire screen and specific areas. It can also record system audio and microphone input. After recording, you can export the video as an MP4 file or embed it into a slide. Now, follow the steps below to record your screen with PowerPoint.
Step 1: Go to the Screen Recording Feature
Open PowerPoint, select the slide that you want to insert the video into. Then, switch to the Insert tab and click Screen Recording.

Step 2: Select the Recording Area
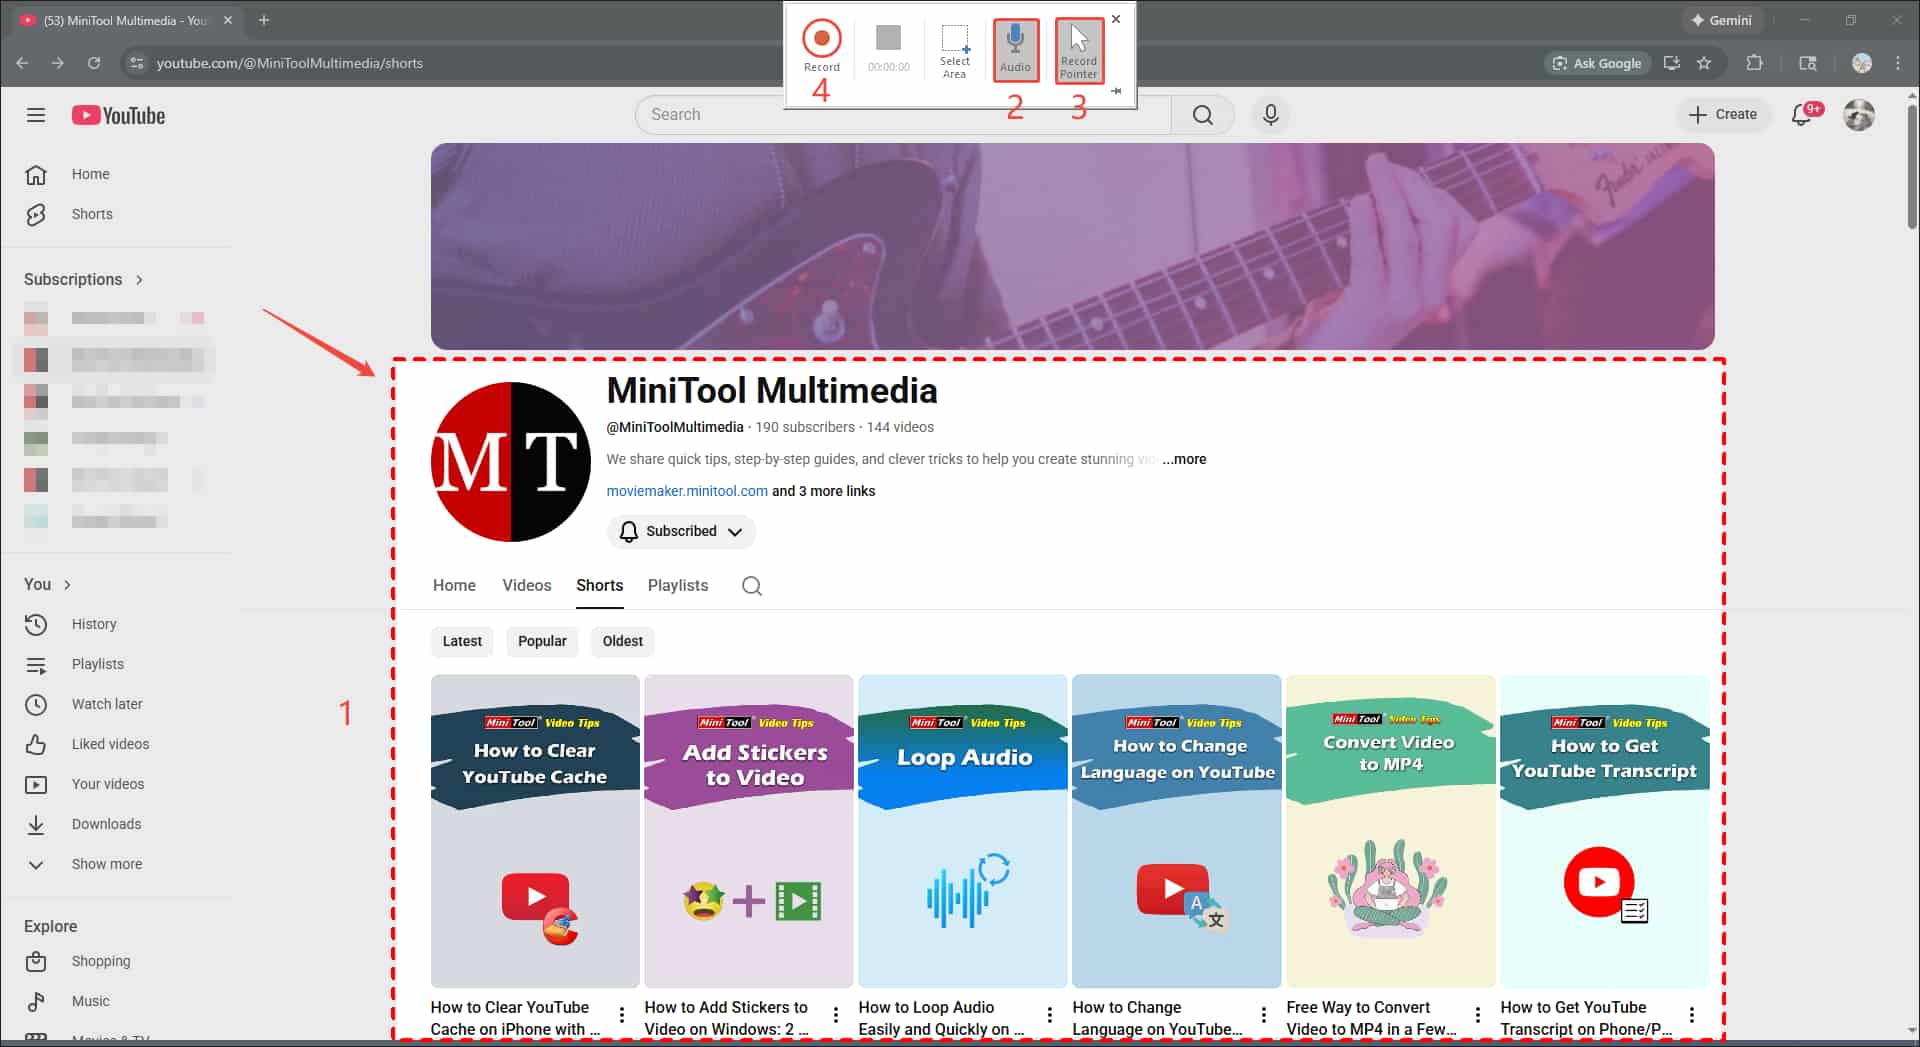
Then, the PowerPoint slide window will close automatically. Next, use your mouse to draw the recording area (full screen or a specific area) on your desktop. If you want to reselect the area after making a selection, click the Select Area option on the control bar at the top center of the screen.
Step 3: Select Whether to Record Audio and Pointer
PowerPoint records mouse movements and system audio by default. If you don’t want to record them, click the corresponding options. When the options change from gray to white, it means they will not be recorded.
Step 4: Start Recording
Click the Record icon. A three-second countdown will then appear, after which screen recording will automatically begin.
Step 5: Stop Recording
Press the Windows logo key + Shift + Q to stop recording. The recorded video will appear on the slide.
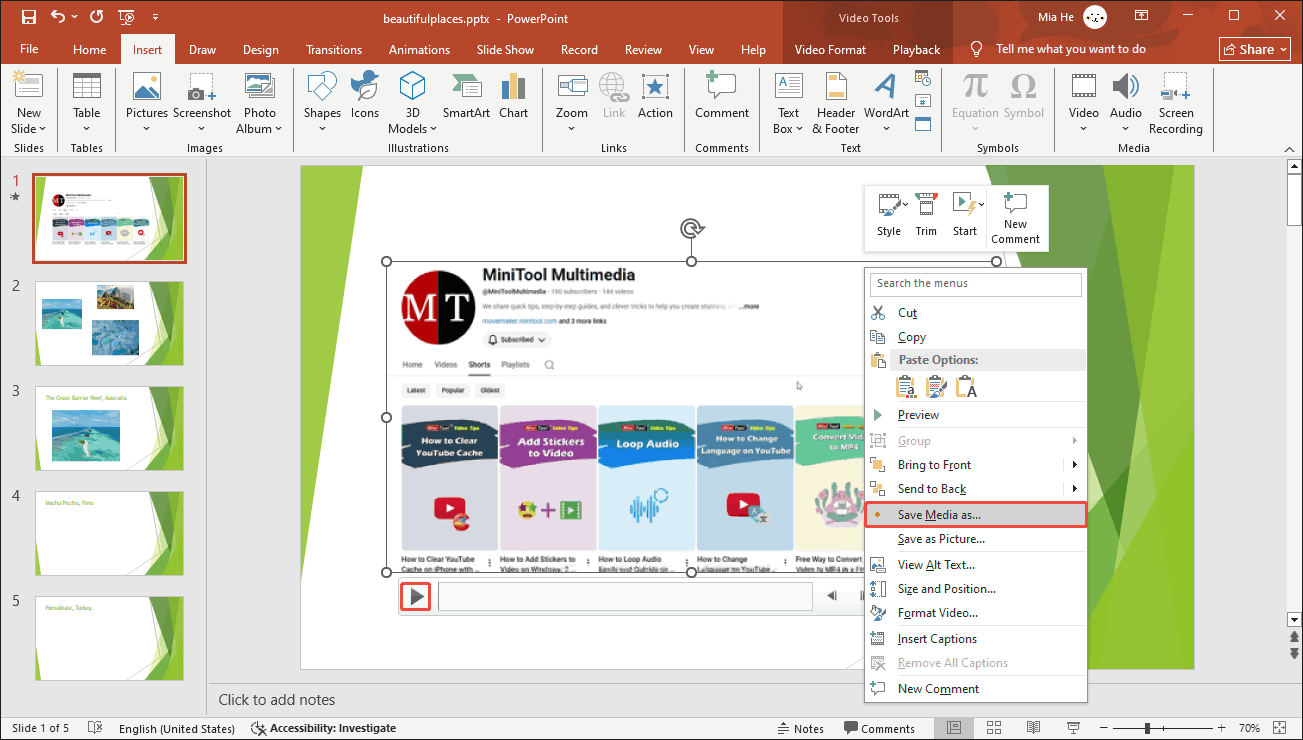
Step 6: Check and Save Recorded Video
Click the play button to check the recorded video. Then, right-click the video and select Save Media as. In the pop-up window, rename the video, and click Save to export it as MP4.
By following the steps above, you can easily capture your screen and even edit the clip right in PowerPoint (details in the last section of this article). If you encounter problems with the PowerPoint recording not working, follow the solutions in the next section.
How to Fix PowerPoint Screen Recording Not Working?
If you’re unable to record in PowerPoint, try the 7 solutions below. (All examples are based on Windows 10)
Method 1. Restart or Update Microsoft PowerPoint
PowerPoint may experience temporary issues during runtime, causing screen recording errors. In this case, try restarting the application and recording again. If the problem persists, it may be because the software is not updated to the latest version. Older versions of PowerPoint may lack proper support for the recording feature.
The following steps will tell you how to update PowerPoint:
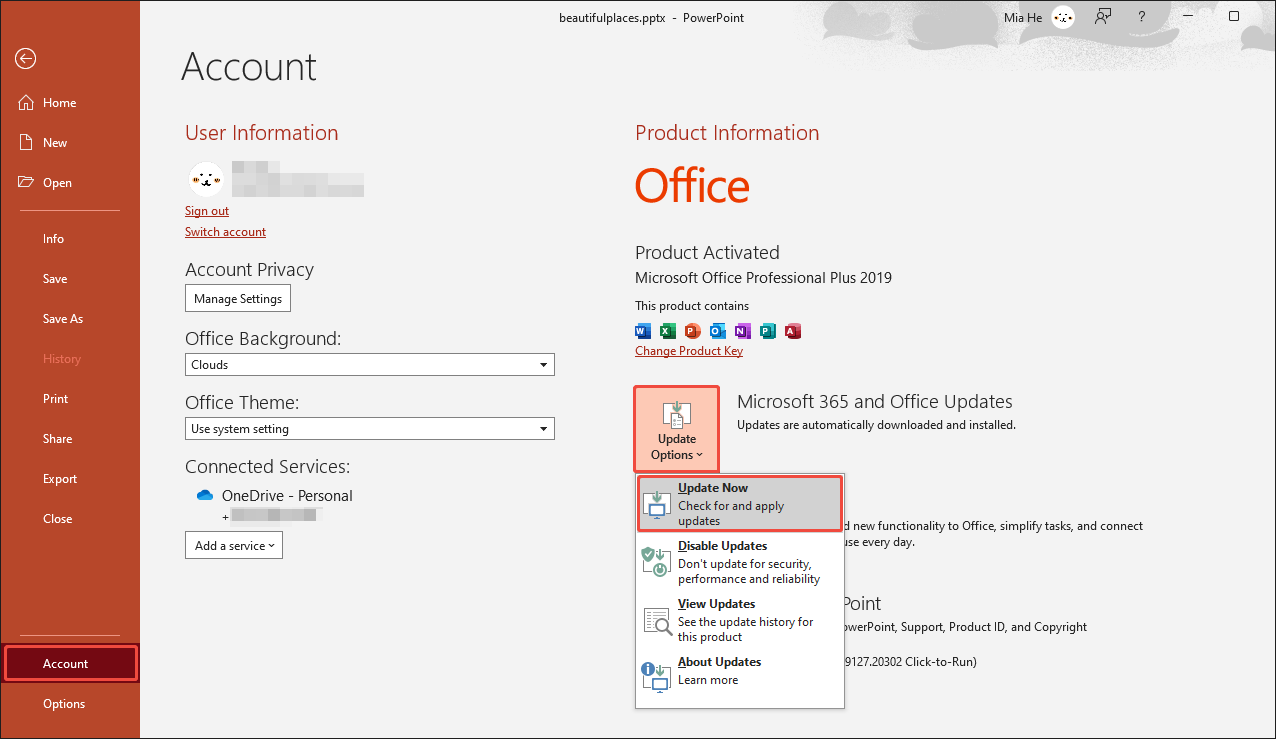
Step 1: Go to Account Information
Click the File tab at the top-left corner and choose Account in the left menu,
Step 2: Update PowerPoint
Click on Update Options and select the Update Now option from the drop-down menu.
If the update still doesn’t solve your problem, try the following other methods.
Method 2. Run PowerPoint as An Administrator
Another effective solution to resolve PowerPoint screen recording not working is to run it with administrator privileges. It ensures the application has the necessary permissions to access recording devices. You can try running PowerPoint as an administrator and using the recording feature by following the steps below.
Step 1: Go to Properties
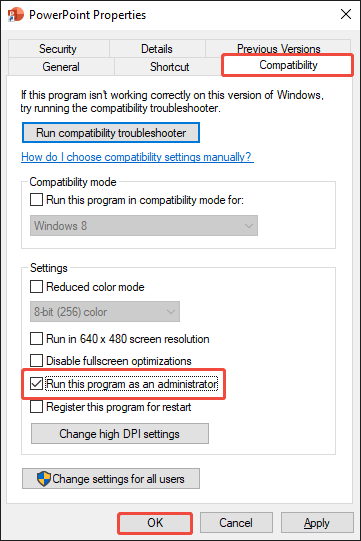
Right-click the PowerPoint icon on your desktop and select Properties.
Step 2: Configure Compatibility Settings
Go to the Compatibility tab, check Run this program as an administrator, and click OK.
Step 3: Relaunch PowerPoint
Restart PowerPoint with administrator privileges to verify that screen recording works properly.
If screen recording still isn’t working in PowerPoint, try running the application in Safe Mode.
Method 3. Use PowerPoint in Safe Mode
Safe Mode is a built-in feature of Windows. Microsoft Office uses this mode to identify and isolate problems, including problematic add-ins, corrupted settings, and startup failures. These may prevent screen recording from functioning properly.
Below are two ways to run PowerPoint in Safe Mode:
# Method 1
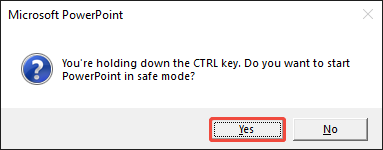
Step 1: Press Ctrl and Open PowerPoint
Hold down the Ctrl key and double-click the PowerPoint shortcut icon on your desktop.
Step 2: Confirm Run in Safe Mode
In the pop-up Microsoft PowerPoint window, select Yes to confirm starting PowerPoint in Safe Mode.
# Method 2
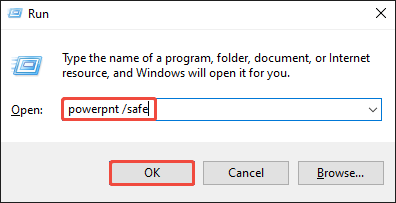
Step 1: Open the Run Dialog
Press Windows + R to launch the Run dialog.
Step 2: Run PowerPoint in Safe Mode
Type powerpnt /safe and click OK to start PowerPoint in Safe Mode.
Next, test the screen recording function in Safe Mode to verify whether the issue is resolved. If the problem persists, try other solutions below.
Method 4. Check Disk Space Storage
PowerPoint video recording generates temporary data. If your computer doesn’t have enough storage space, the screen recording may fail to save or may not start.
Here is a guide on how to free up your disk space:
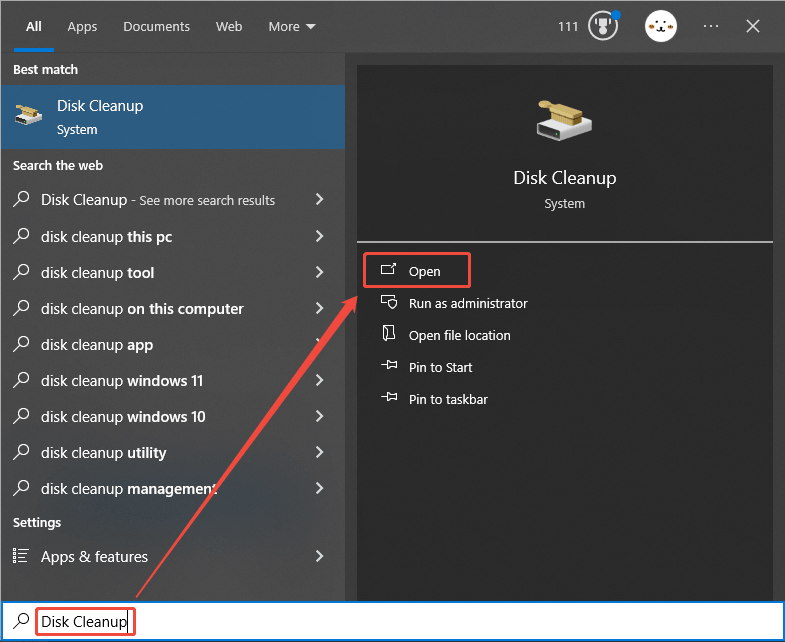
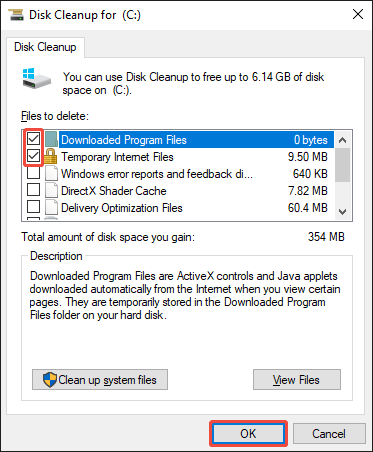
Step 1: Search Disk Cleanup
Press Windows + S to open the Windows search window. Then, type Disk Cleanup and click Open.
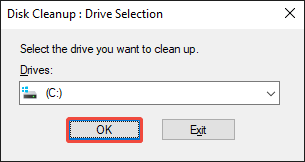
Step 2: Choose PowerPoint’s Installation Drive
Select the drive where PowerPoint is installed, then click OK.
Step 3: Delete Unnecessary Files
Select the checkboxes for items (such as Temporary Internet Files and Download Program Files) you want to remove. Then click OK, and select Delete Files.
Then, restart your computer and try recording your screen using PowerPoint to see if the problem is resolved. If not, continue to try the following methods.
Method 5. Disable Hardware Graphics Acceleration
Graphics acceleration can sometimes prevent PowerPoint from recording audio, especially if your graphics card drivers are outdated. The following steps explain how to disable hardware acceleration on your computer.
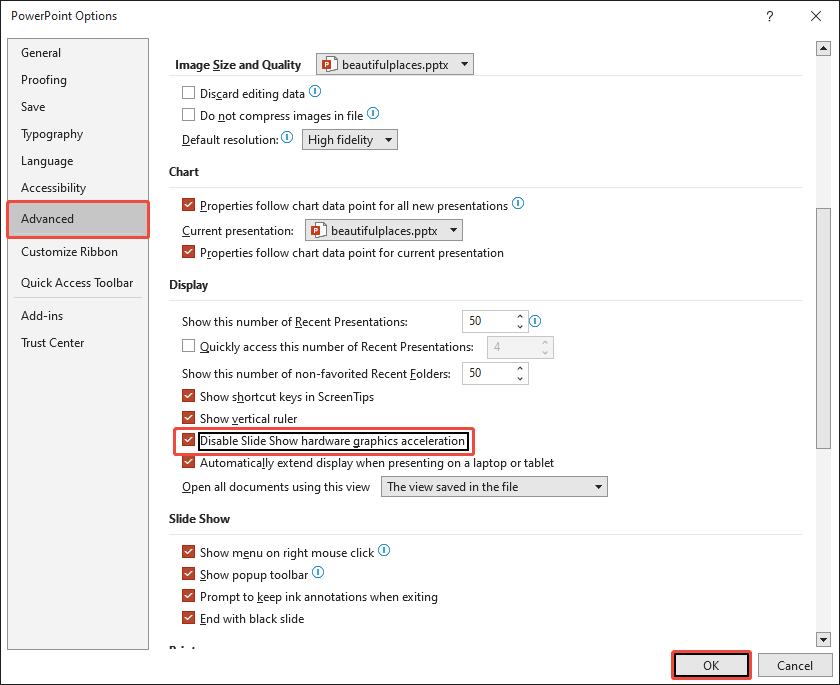
Step 1: Go to PowerPoint Options
In the PowerPoint interface, click the File tab in the upper-left corner and choose Options.
Step 2: Disable Graphics Acceleration
Choose the Advanced tab on the left, check Disable Slide Show hardware graphics acceleration in the Display section, and click OK.
If disabling graphics hardware acceleration doesn’t work, try running the Office Repair tool.
Method 6. Run Office Repair Tool
If the PowerPoint screen recording not working, try using Microsoft Office’s built-in Repair tool to fix it. This tool effectively resolves software issues without an internet connection. Here are the steps:
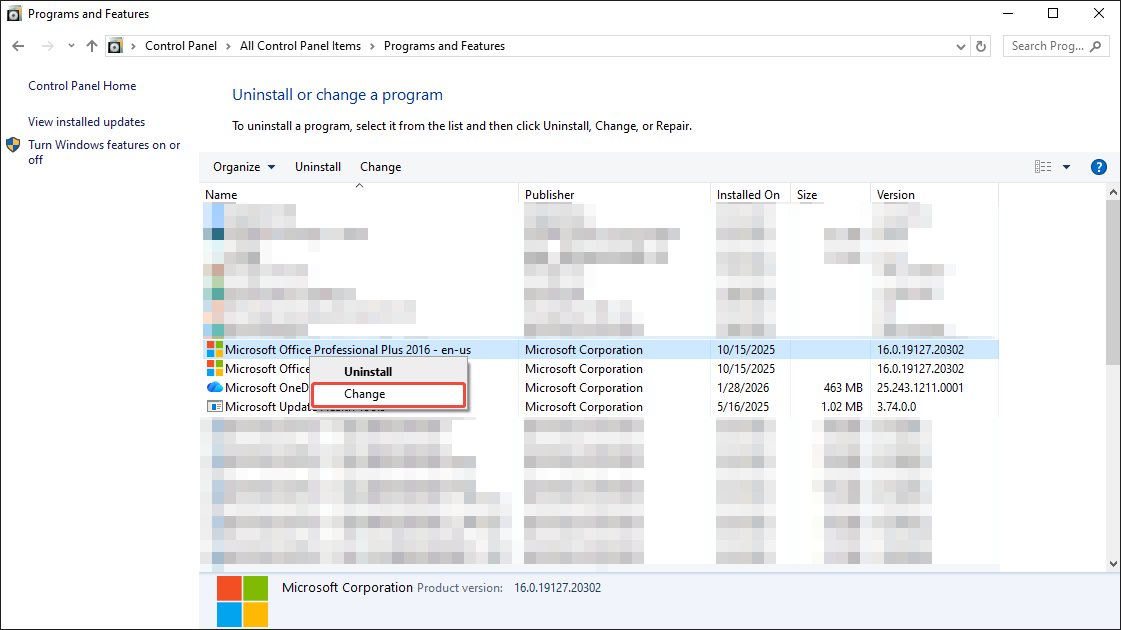
Step 1: Open Control Panel
Click the search icon in the taskbar and type Control Panel and press Enter on your keyboard.
Step 2: Find Microsoft Office
Click Programs and Features, right-click on the Microsoft Office product, and select Change.
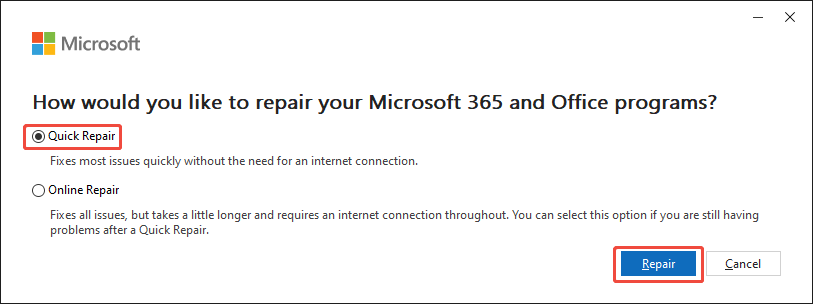
Step 3: Repair Your Microsoft Programs
In the pop-up window, select Quick Repair and click on the Repair button.
If PowerPoint’s screen recording still doesn’t work after trying the solutions above, use a different screen recording tool.
Method 7. Choose a Specific Screen Recording Tool Instead of PowerPoint
If none of the above methods work, I recommend using a dedicated recorder like MiniTool Screen Recorder. It’s a watermark-free screen recording software that supports various frame rates, including 15 fps, 20 fps, 25 fps, 30 fps, or 50 fps. It allows you record system audio, microphone audio, or both at the same time. Moreover, it’s completely free and has no recording duration limit.
Here are the key features of MiniTool Screen Recorder:
- Flexible Recording: Supports recording the entire computer screen or a specific area.
- Webcam Recording: Supports recording only the webcam or recording both the webcam and the computer screen simultaneously.
- Screen Annotation: Supports adding various annotations to the screen during recording, including shapes, arrows, text, highlighting, and more.
- Customization Options: Supports customizable keyboard shortcuts, main interface themes, and pre-recording duration.
MiniTool Screen Recorder is more stable than PowerPoint’s built-in screen recording feature, and it’s also easier to use. Here are the steps for screen recording with it:
Step 1: Launch the Screen Recorder
You can click the button below to download and install MiniTool Screen Recorder. Then, launch it.
MiniTool Screen RecorderClick to Download100%Clean & Safe
Step 2: Select Recording Area and Audio
By default, MiniTool Screen Recorder captures the full screen and both audio from your computer and microphone. If you want to record a specific area, choose Select Region. You can also click System Audio or Microphone to choose whether to record them.

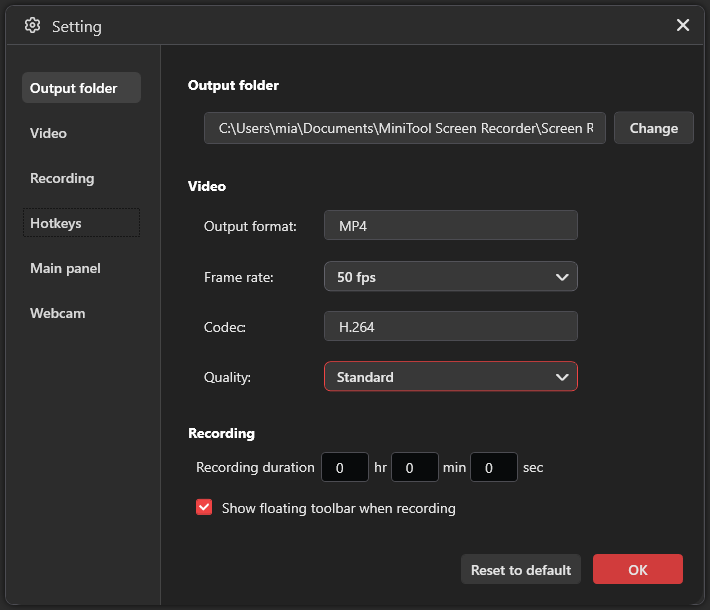
Step 3: Adjust Recording Settings
Click the gear icon in the top-right corner to open the Setting window. There, you can choose the save folder, frame rate, quality, hotkeys, or even a recording timer. Then click OK to save your settings.
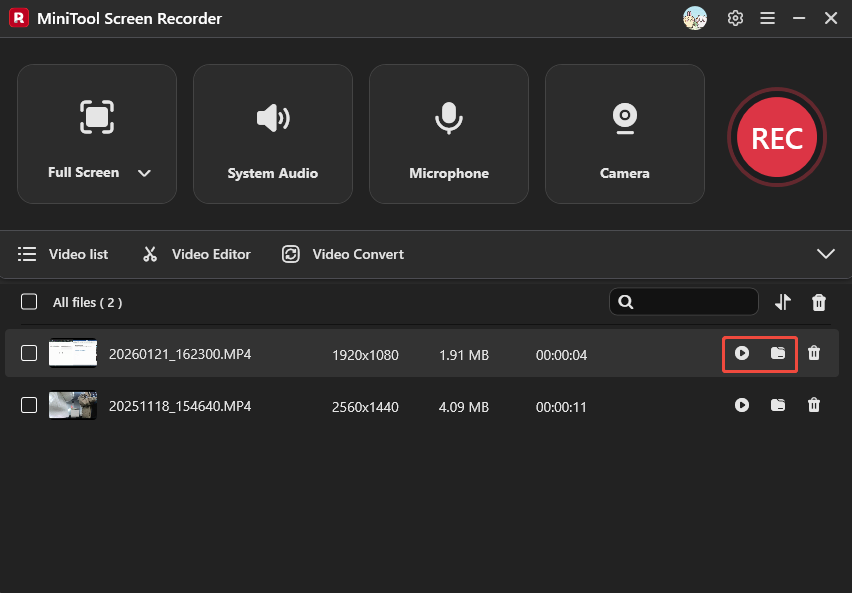
Step 4: Start and Stop Recording
Click the red REC button, and the recording will start after a 3-second countdown. Then, press F6 or your preferred custom hotkey to end the recording. The recorded video will appear in the Video list.
Both MiniTool Screen Recorder and the built-in recording tool in PowerPoint support unlimited, watermark-free screen recording. However, MiniTool Screen Recorder is more stable and less prone to issues such as black screens and dropped frames.
Bonus: PowerPoint Screen Recording Editing
Once PowerPoint’s screen recording works, you can trim, crop, and stylize the clip without ever leaving the app. Follow the guide below.
1. Trim the Recorded Video
Sometimes you haven’t yet opened the window or software you intend to capture when the recording starts, so the opening seconds of the video are usually unwanted. In that situation, you can use PowerPoint’s trim feature to remove the unnecessary part. Here are the steps:
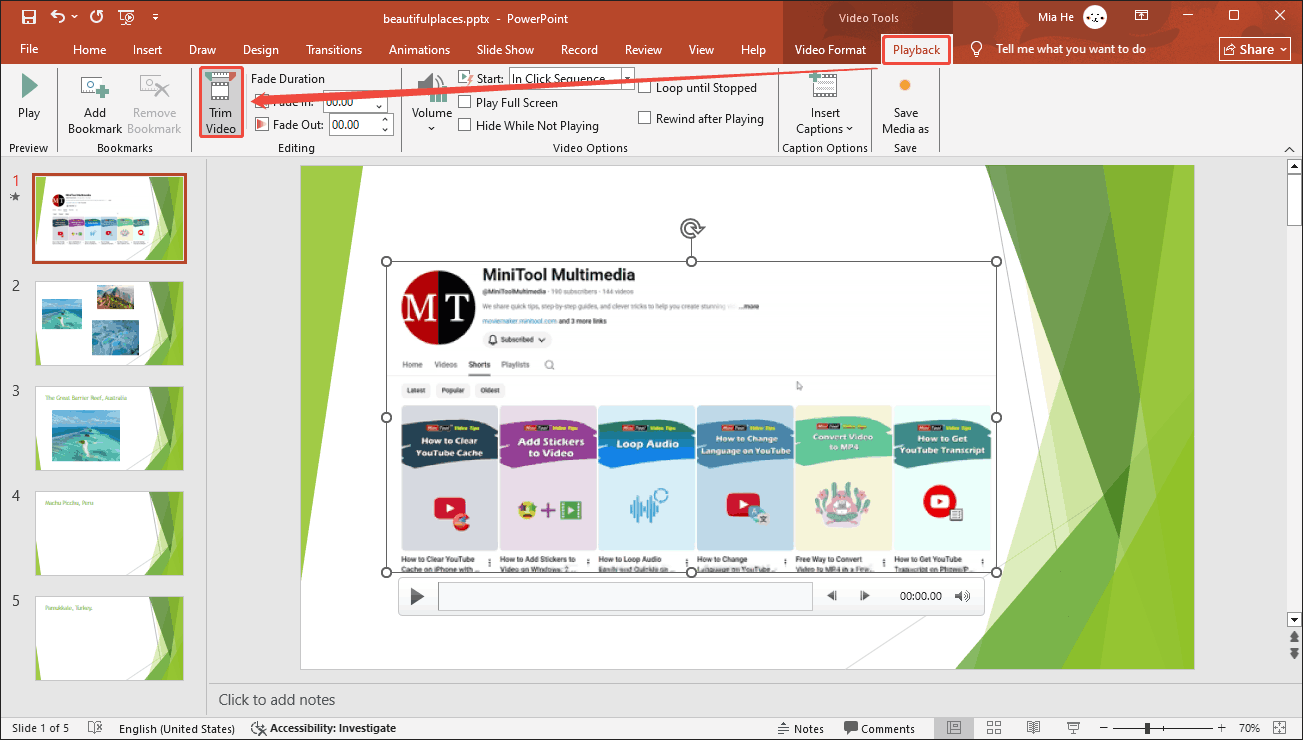
Step 1: Open the Trim Video Window
Click the Playback tab on the top menu bar and select Trim Video.
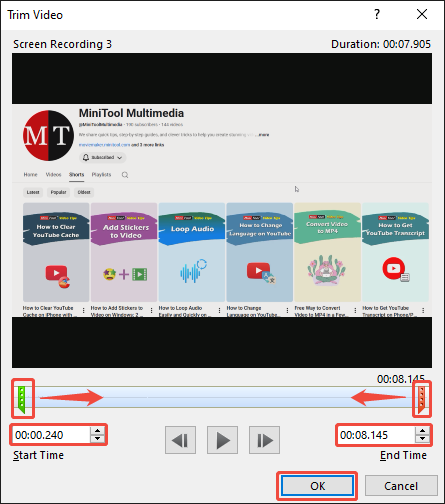
Step 2: Trim the Video
In the Trim Video window, drag the green and red handles to trim out intros and outros. Alternatively, you can enter specific time points in the boxes above Start Time and End Time. Then, click OK to save your changes.
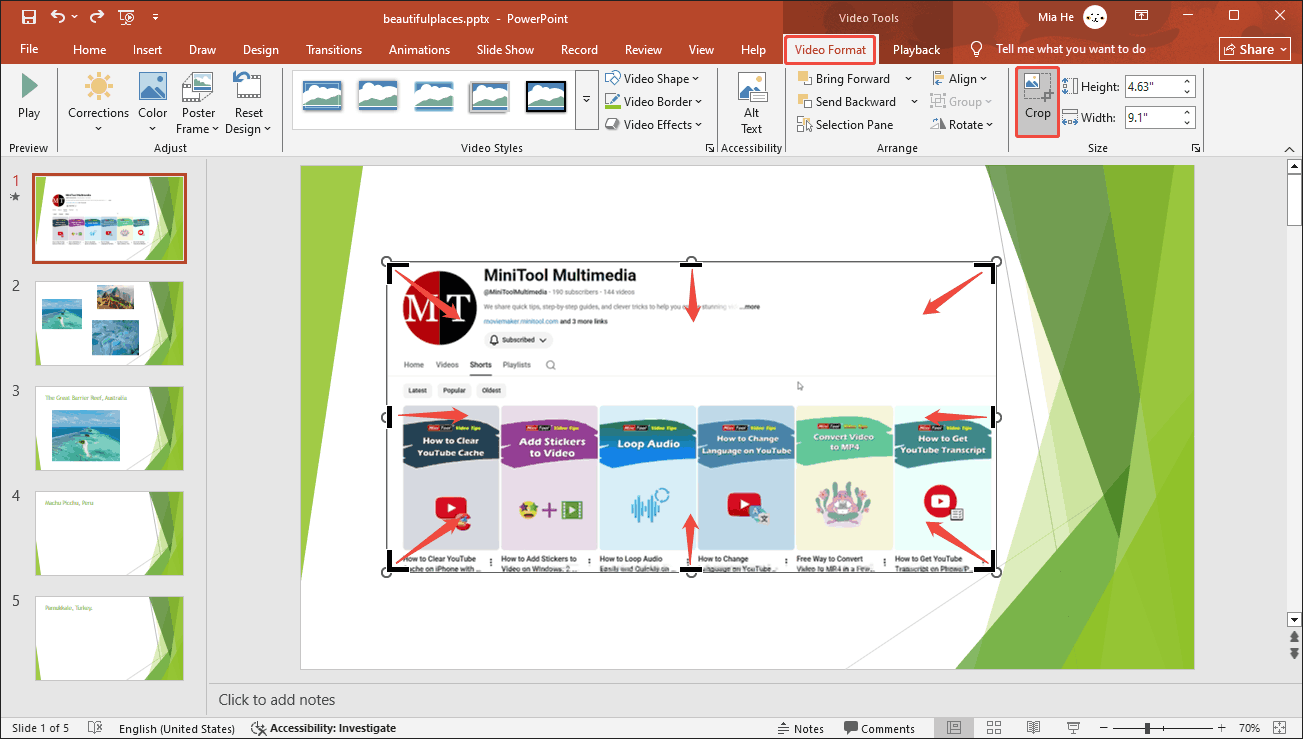
2. Crop the Recorded Video
If you want to highlight a specific element in a recorded video, remove black borders or notifications, or make the video more compatible with the aspect ratios recommended by some platforms, you can crop the video directly in PowerPoint.
Step 1: Find the Crop Feature
Choose the Video Format tab and select Crop.
Step 2: Crop the Video
Click and drag the corner or side handles that surround the video preview to shrink or enlarge the frame, keeping only the part you want to display. Then, click anywhere outside the video to confirm the new frame.
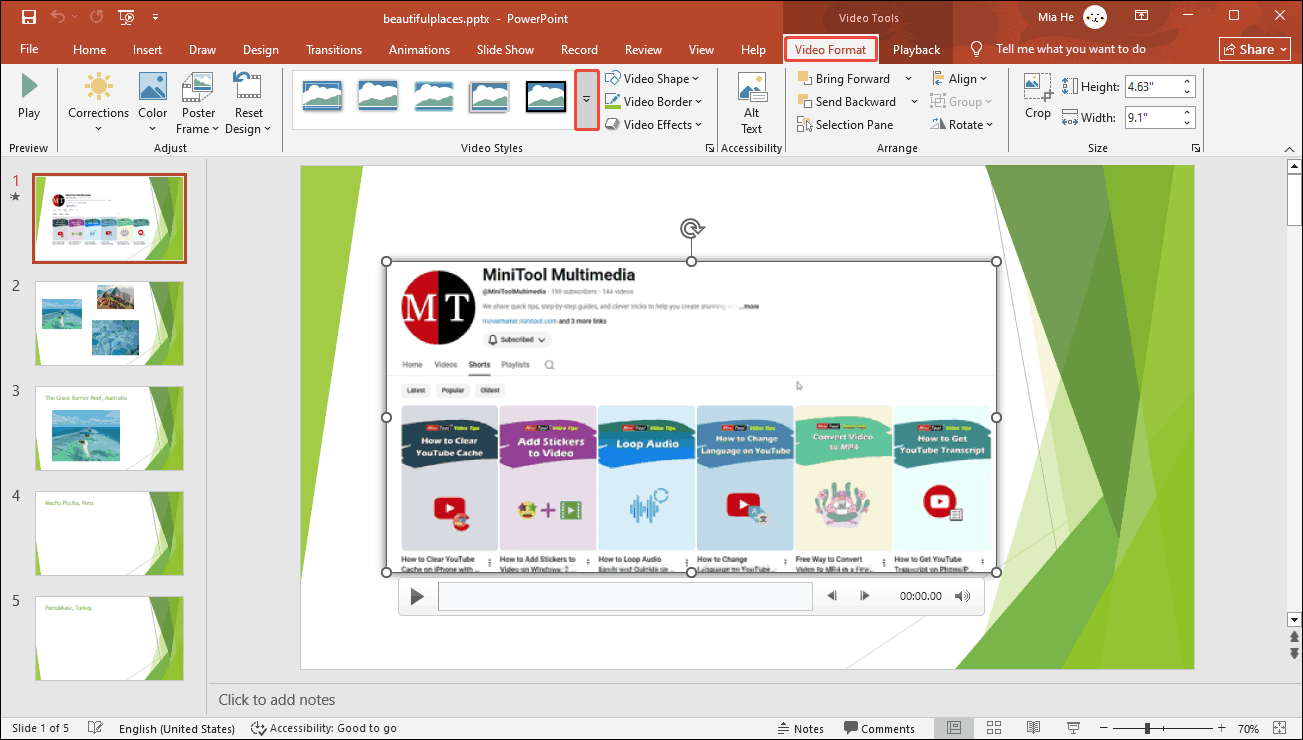
3. Adjust the Style of the Recording
PowerPoint supports setting styles for inserted videos. These styles offer different shapes, effects, and borders. To set a style, click the small arrow in the Video Styles section to open the video style library, select the style you want, and apply it immediately.
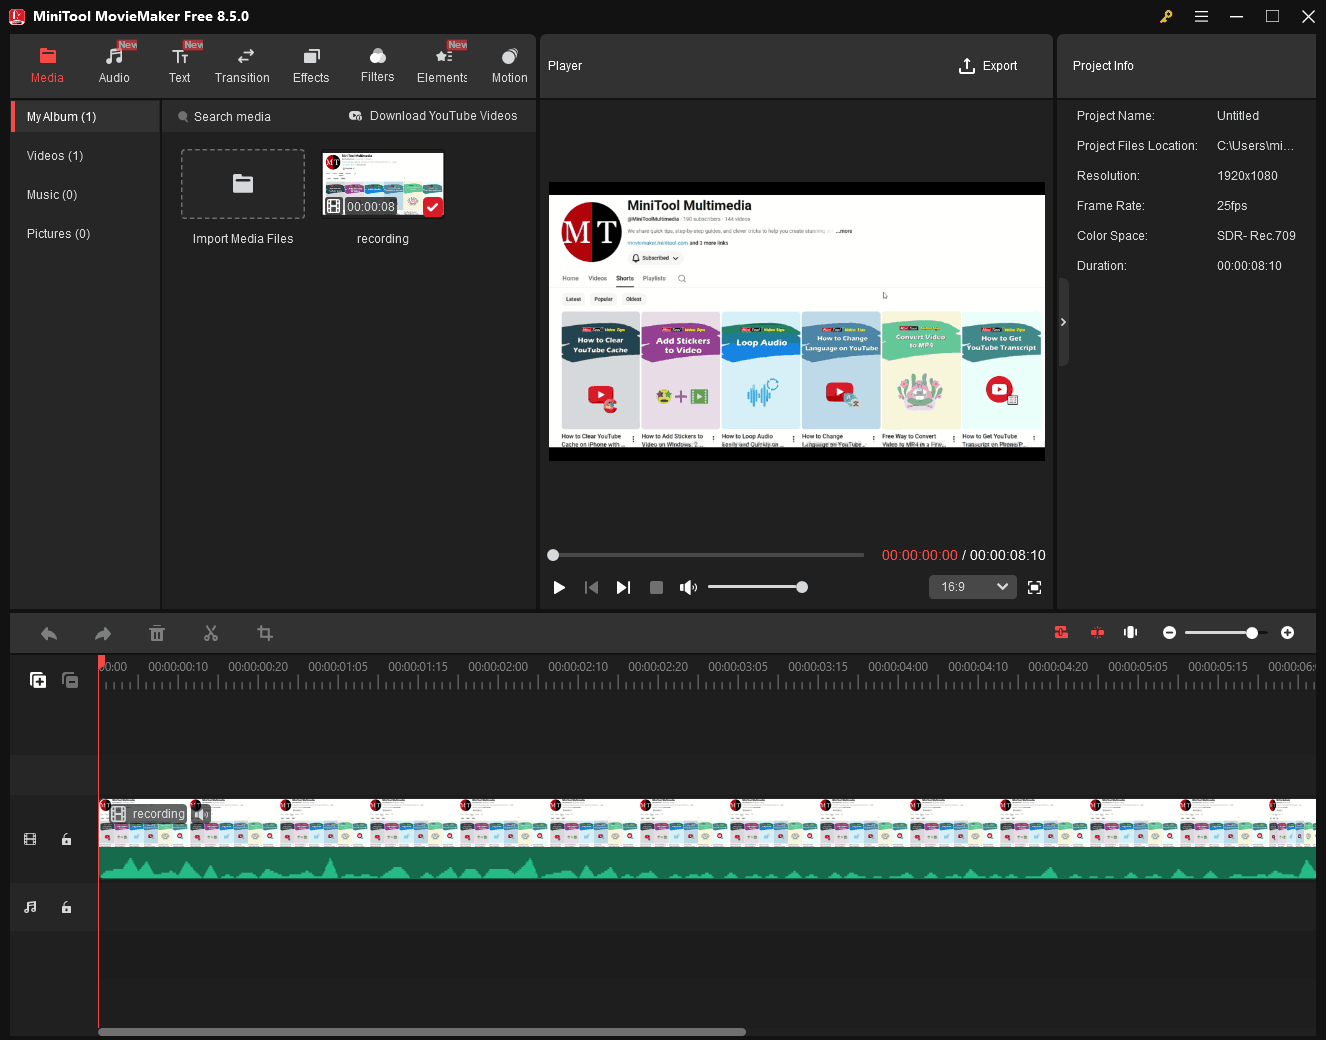
However, PowerPoint only supports basic editing functions. If you want to add various effects and stickers to the video or trim out unwanted parts of the recording, you can switch to a dedicated video editor, such as MiniTool MovieMaker.
MiniTool MovieMaker supports PowerPoint screen recording editing. It allows you to trim, split, merge, crop, flip, rotate, and reverse video clips. It also enables you to adjust video speed, add background music, and create picture-in-picture effects. Furthermore, it supports exporting to multiple formats, including MP4, WMV, AVI, F4V, MKV, 3GP, MOV, WebM, MP3, and GIF.
MiniTool MovieMakerClick to Download100%Clean & Safe
Final Words
If PowerPoint screen recording not working, it may be due to an outdated software version, software malfunction, insufficient storage space, or interference from graphics acceleration. This article provides corresponding solutions for different causes. However, if these adjustments don’t solve the problem, switch to MiniTool Screen Recorder and continue recording. To edit the recorded video, use the built-in editing feature on PowerPoint or MiniTool MovieMaker.
If you encounter any issues while using MiniTool Screen Recorder and MiniTool MovieMaker, feel free to email us via support@minitool.com or send me a message on X for assistance.