Many Windows users ask, “Why is my screen recording not working?” If you are also facing this problem, you can identify the possible cause from the 6 common reasons listed in the article and then apply the corresponding solution, one of which is switching to MiniTool Screen Recorder.
How to Record on Windows?
To make it easier for users to record gameplay directly, both Windows 10 and Windows 11 have a built-in screen recording tool: the Xbox Game Bar. This tool can be opened by pressing the Windows logo key + G. This allows you to quickly start recording gameplay without exiting the game. Note that the best experience with this tool is available on Windows versions 22H2 or higher.
Many people find that they cannot record their computer screen, even after pressing the Windows and G keys. What causes this issue? In the next section, I will outline six common reasons for this problem.
Why Is My Screen Recording Not Working on Windows?
Below are the most likely reasons for screen recording not working on Windows 10 or Windows 11.
Reason 1: Xbox Game Bar Is Disabled
To open the Xbox Game Bar, simply press Win + G. However, many people press these two keys simultaneously, and nothing happens. This is because the Xbox Game Bar is not enabled by default in Windows. You need to enable this feature first.
“Why can’t I screen record with Xbox Game Bar?” After enabling the feature, some users were still unable to record their screen and even received error codes like “0x82323007”. If you encounter this situation, it means you need to enable the Xbox app service.
Reason 2: The Microphone Is Disabled
If you can successfully record video using Xbox Game Bar, but there is no sound, this may be because your microphone is disabled. Check the Windows privacy permissions and confirm that the correct microphone is set as the default input device. Also, make sure that the Xbox Game Bar is allowed to access the microphone.
Reason 3: Not Having Enough Space
Insufficient storage space on your computer can also cause screen recording not working. The recording software needs spaces to store temporary cache files that are written and rewritten while you record. If there is insufficient hard drive space, this process will stop. Furthermore, if you have very little available space on your hard drive, the recorded video may not be saved successfully.
Reason 4: Excessive Background Applications
You may not be able to record your screen if too many applications are running in the background on your computer. Some programs may consume system resources, such as CPU (Central Processing Unit), GPU (Graphics Processing Unit), and RAM (Random Access Memory). As a result, your system may not be able to support screen capturing, causing black screens or lag. You can free up resources by closing unnecessary applications to ensure smooth screen recording.
Reason 5: The Graphic Driver Is Outdated
If you experience issues such as a black screen, dropped frames, or instability while recording your screen, it’s likely due to outdated graphics card drivers. Modern screen recording tools like Xbox Game Bar rely on the computer’s GPU. This is especially true when recording complex images such as video games, where the GPU is used to encode the video efficiently. Outdated drivers cannot perform this task.
Additionally, some newer recording features are incompatible with older versions of graphics card drivers. This can also prevent you from recording your screen.
Reason 6: The Content Is DRM-Protected
When you record movies, TV shows, or video games, you might find that the recorded video is just a black screen. This is likely because these videos are protected by DRM (Digital Rights Management). This technology prevents unauthorized recording.
Any one of the six problems mentioned above could prevent you from successfully recording videos on Windows. The next section will provide solutions for each problem.
How to Fix Screen Recording Not Working on Windows?
Why is my screen recording not working? If you also have this question, try restarting your computer first. This will help clear temporary glitches, reset the screen recording tool, and close background applications, preventing them from consuming system resources. If restarting your computer doesn’t work, here are six other solutions.
Method 1: Enable Xbox Game Bar and Xbox App Services
Screen recording can fail on Windows 10 or 11 if the Xbox Game Bar is disabled. You can enable it and start recording with the steps below (take Windows 10 as an example):
Step 1: Go to the Gaming Settings on Your PC
Click the bottom-left Start menu, choose Settings, and select the Gaming option.
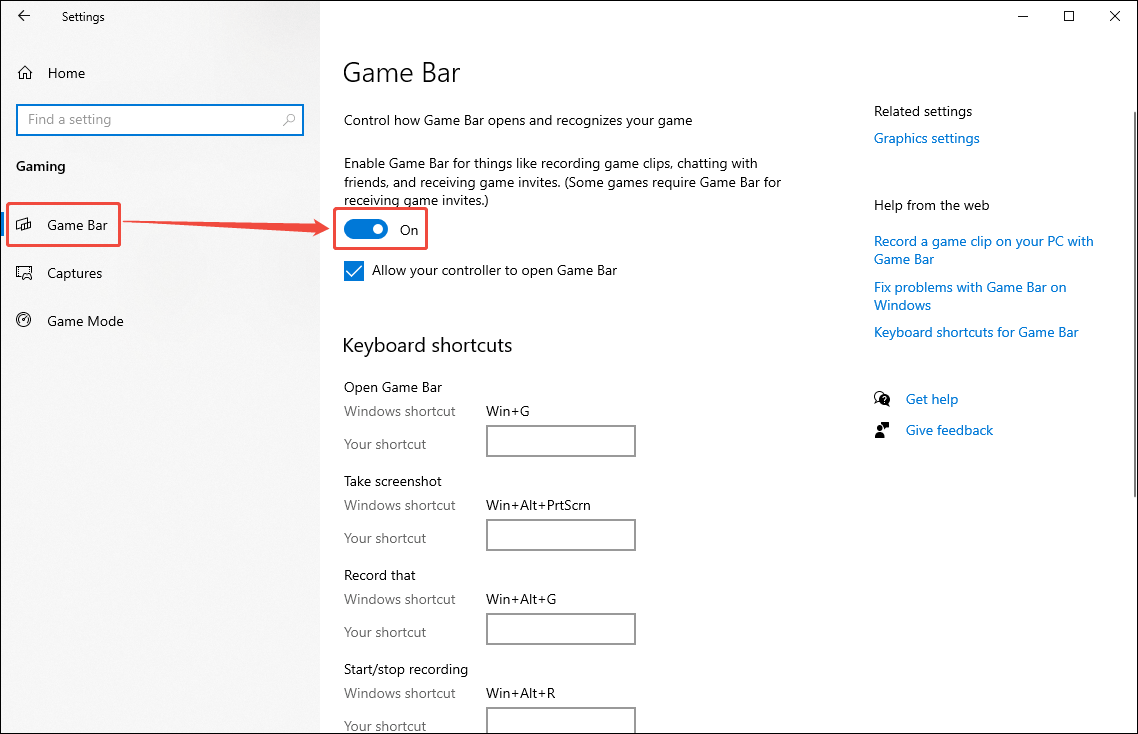
Step 2: Enable Game Bar
Under the Game Bar tab, turn on the toggle to enable Xbox Game Bar.
Step 3: Start and End Recording
After enabling Xbox Game Bar, you can start recording your screen by pressing Win + Alt + R. To end the recording, press Win + Alt + R again, or simply click the Stop Recording option on the floating window.
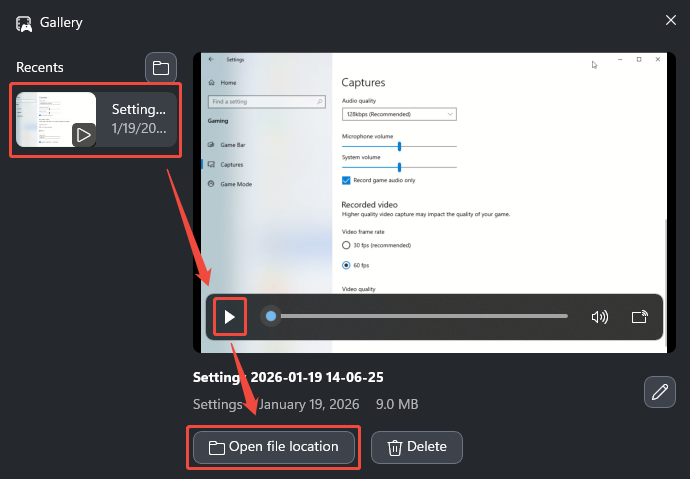
Step 4: Play and Locate the Recorded File
Click the Game clip recorded area to open the Gallery window.

In the Gallery window, select the video you just recorded, click the play icon to play the video, and click the Open file location option to locate the recorded video.
If you encounter error code 0x82323007 during recording with Xbox Game Bar, try enabling the Xbox app services:
Step 1: Open Task Manager
Press Ctrl + Shift + Esc to open Task Manager.
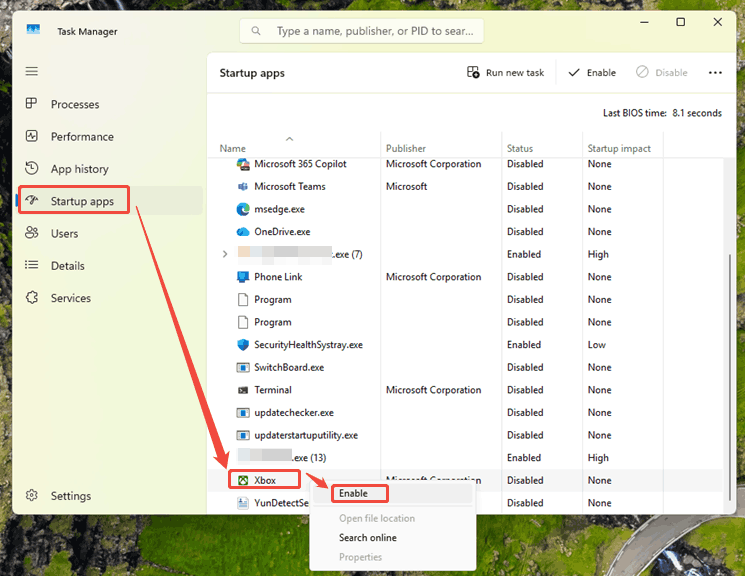
Step 2: Enable Xbox App Service
Click the Startup tab. Then, right-click Xbox App Services, then pick Enable.
Method 2: Enable Your Microphone
If your recorded video has no sound, it may be because you haven’t turned on your microphone or haven’t selected the correct microphone. Follow these steps to enable your microphone.
Step 1: Open the Sound Settings
Right-click the speaker icon at the bottom-right corner and choose Sounds.
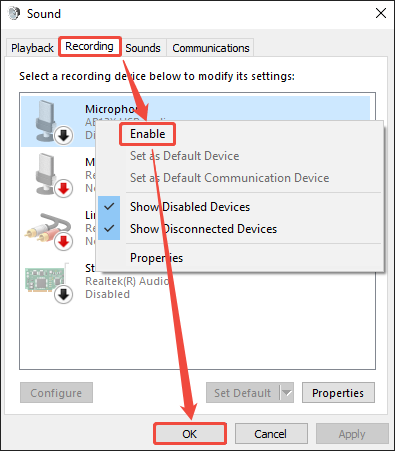
Step 2: Enable Your Microphone
In the Sound window, choose Recording, right-click the Microphone option, and choose Enable. Then, click OK to confirm your changes.
Method 3: Free Up Your Computer Space
Insufficient hard drive space can also cause screen recording to fail. You can try uninstalling some infrequently used software to free up more space so that recording can proceed normally.
Step 1: Go to the Settings
Click the bottom-left Start menu, choose Settings, and select the Apps option.
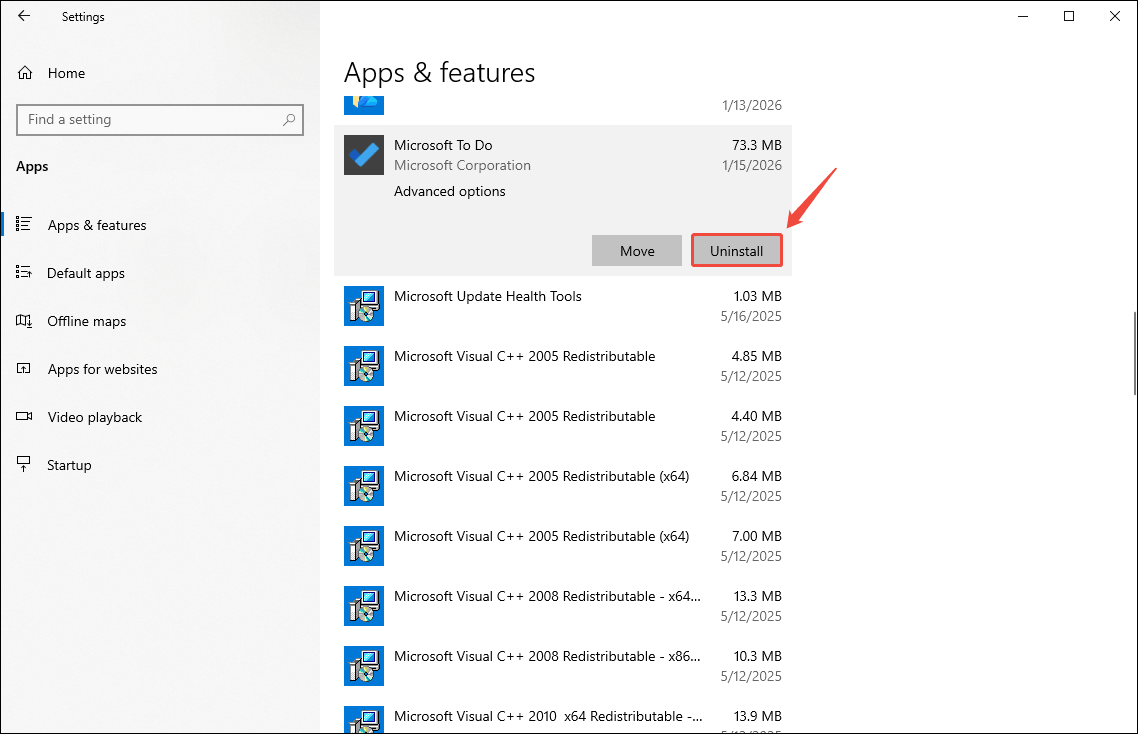
Step 2: Uninstall Infrequently Used Apps
Under the Apps & features tab, click the application you want to uninstall, and click the Uninstall button.
Method 4: Disable Conflicting Application
Background application conflicts can interfere with screen recording. Therefore, you can terminate unnecessary software processes in Task Manager. Although we don’t know which software is conflicting with the screen recording function, we can find out by closing applications one by one. Below are the detailed steps:
Step 1: Open the Task Manager
Right-click the taskbar at the bottom and select Task Manager. Or you can press Ctrl + Shift + Esc to quickly open it.
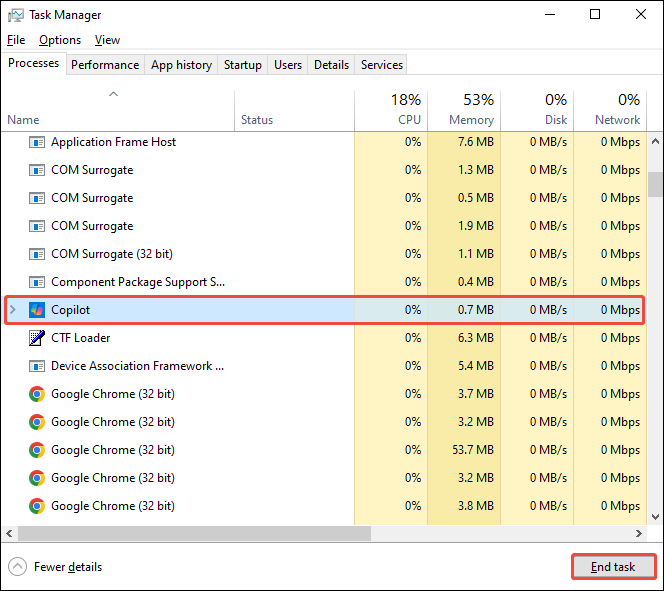
Step 2: End Software Processes
In the Task Manager window, choose the Processes tab, find any excessive background processes, and end them by clicking the End task button. To find the conflicting applications, quit one app and try recording right away. If screen recording works, the closed program was the conflict.
Method 5: Update the Graphics Driver
If you find that the recorded video is unstable, has a black screen, or drops frames, it may be that your graphics card driver is outdated. You can update it with Device Manager by following these steps:
Step 1: Open the Run Box
Press Windows + R to open the Run box.
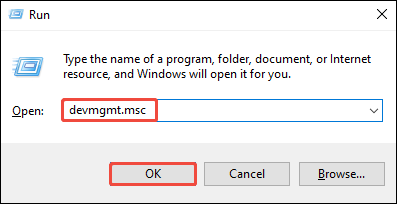
Step 2: Open the Device Manager
In the Run window, enter “devmgmt.msc” in the Open box, and click OK to open Device Manager.
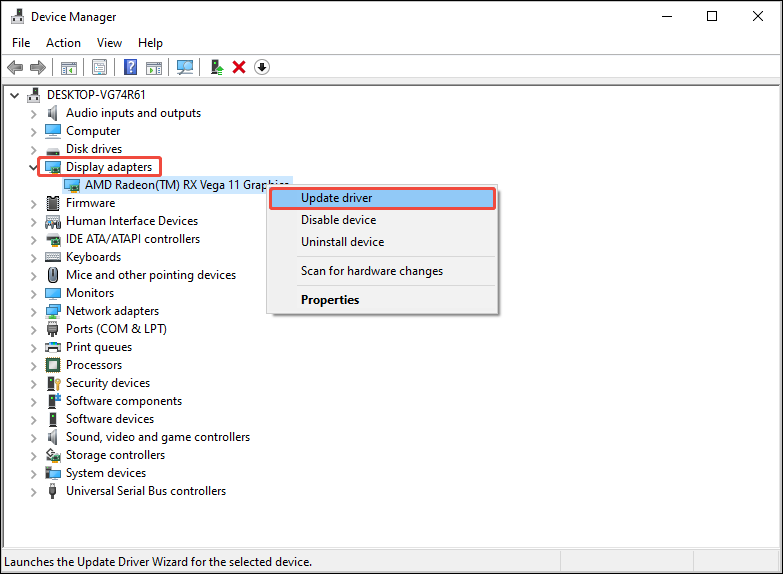
Step 3: Find Your Graphics Driver and Update It
In the Device Manager window, expand the Display adapters option, and find your graphics driver. Then, right-click it and choose Update driver. In the pop-up window, choose Search automatically for drivers.
Method 6: Use a Third-Party Screen Recording Application
Why is my screen recording not working? If none of the above six solutions solve your problem, switch to a reliable third-party recorder. Based on my experience, I’d like to recommend a very useful screen recording tool: MiniTool Screen Recorder.
MiniTool Screen Recorder is a free and professional screen recorder that can meet all your recording needs. It supports full-screen recording or recording of a specified area, webcam recording, and recording of system audio and microphone input. It’s ideal for recording games, lectures, and more.
MiniTool Screen Recorder supports adding screen annotations, including arrows, lines, circles, numbers, and text. In addition, this screen recorder has no recording time limit. You can use it to record your screen for several hours or more! Furthermore, you can set the recording duration in the settings beforehand.
Here’s how to capture your screen with this watermark-free recorder:
Step 1. Download and Install MiniTool Screen Recorder
Download MiniTool Screen Recorder by clicking on the download button below. Then, run the installer and follow the on-screen prompts to get it on your computer.
MiniTool Screen RecorderClick to Download100%Clean & Safe
Step 2. Set the Recording Area and Audio
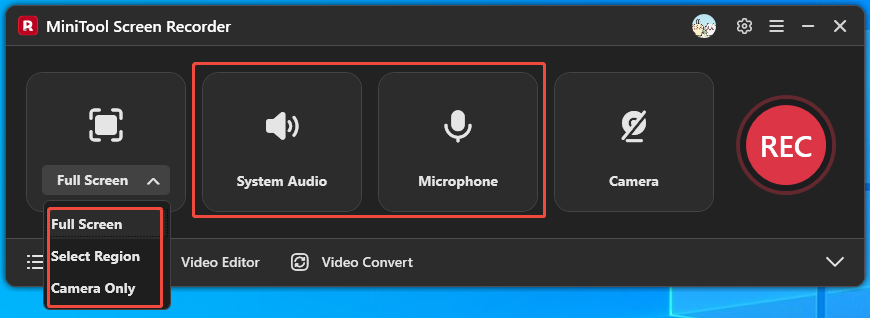
Launch MiniTool Screen Recorder. It defaults to full-screen recording. If you want to record a specific area, expand the Full Screen option, then click Select Region from the menu, and use your mouse to draw the recording area on your desktop.
Then, click on the System Audio icon and the Microphone icon to choose whether to record system sounds, your voice, or both.
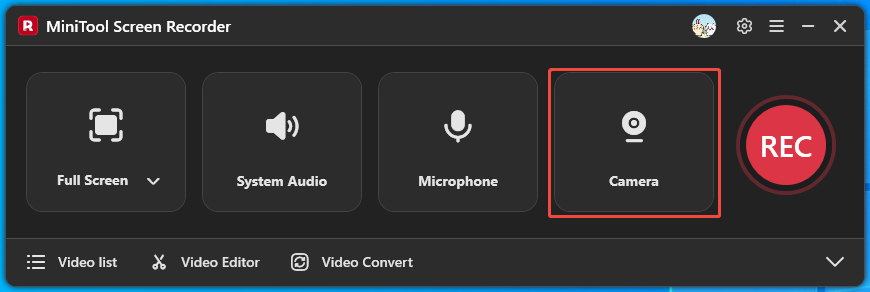
Step 3. Enable the Webcam Recording
To record your webcam, click on the Camera icon, and the webcam layout will appear on the screen.
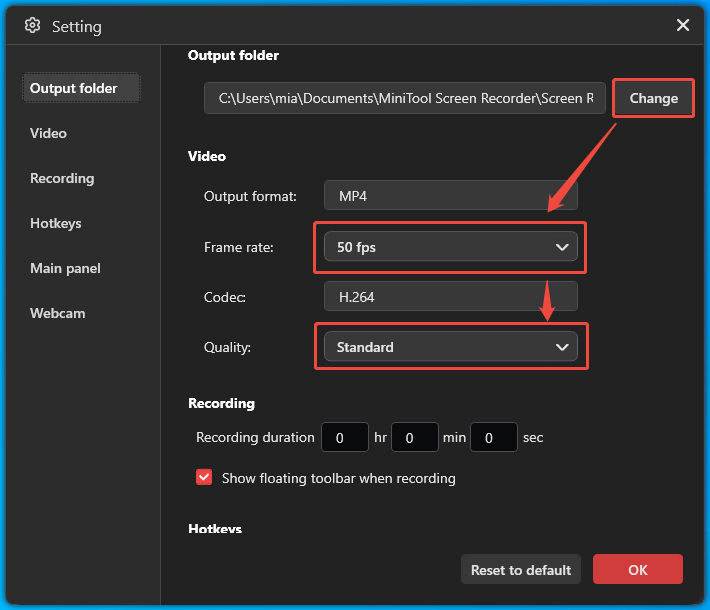
Step 4: Select a Save Location
Click the gear icon to open the Settings window. In the Output folder section, click Change to set the save folder.
Step 5: Set the Video Parameters
In the Video section, set the video frame rate (15fps, 20fps, 25fps, 30fps, or 50fps) and quality (Standard, High, or Original).
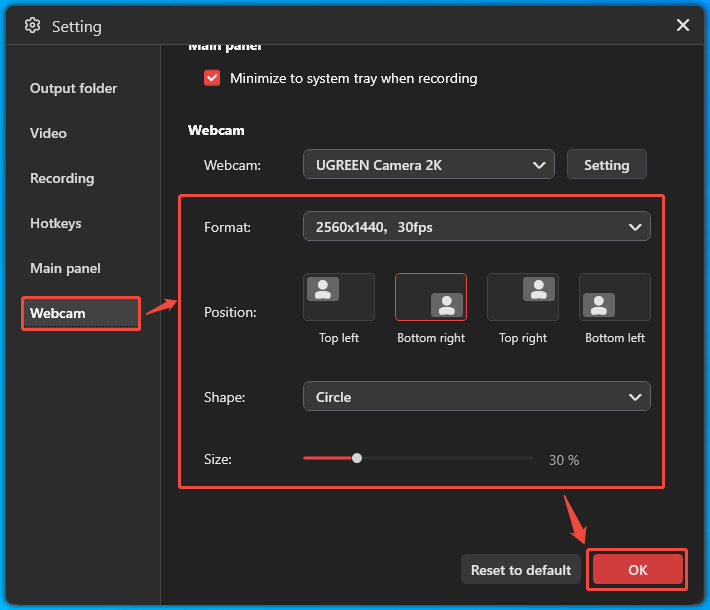
Step 6: Configure Camera Settings
In the Webcam tab, set the webcam recording resolution, frame rate, position, shape, and size. Then, click OK to confirm your changes.
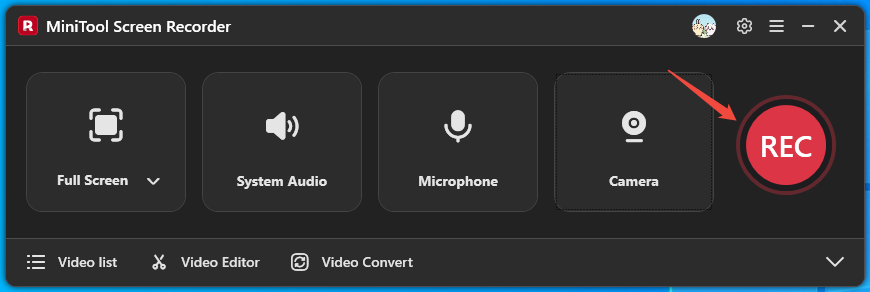
Step 7. Start and End Recording
Click the REC button to begin the recording process. Once the 3-second countdown has elapsed, screen recording will begin. Press the F6 key to stop recording.
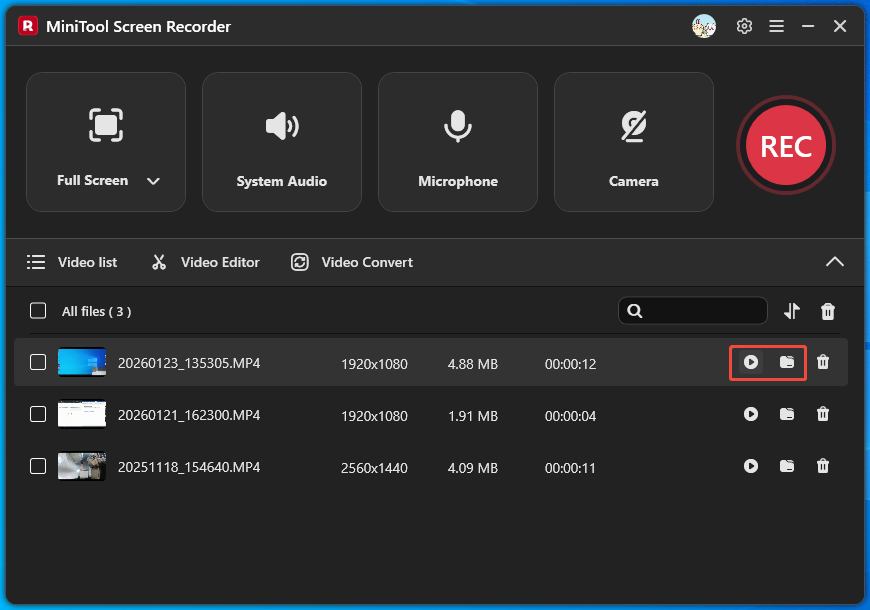
Step 8: Check the Recorded Video
Once you stop recording, the recorded video shows up instantly in the Video list section. Click the play icon to watch the clip, or the folder icon to open its save location.
MiniTool Screen Recorder can record various content on your computer screen, including File Explorer windows, different web browsers, document windows, media players, and various other applications. If you’re experiencing errors when recording your screen with Xbox Game Bar, MiniTool Screen Recorder can help!
Bonus: How to Edit Your Windows Screen Recording
Many creators post screen recordings on social media, such as gameplay videos, software tutorials, and PowerPoint presentations. If you also want to post screen recordings to a video-sharing platform, I suggest using a video editor to crop, split, add filters, transitions, effects, animations, and text to your recorded video. This will make your video more appealing.
Which video editor is easy to use? MiniTool MovieMaker is worth a try. It not only offers a wealth of editing features but also supports exporting videos without watermarks in various formats, including MP4, MOV, MKV, WebM, WMV, and more.
MiniTool MovieMakerClick to Download100%Clean & Safe

Conclusion
Why is my screen recording not working? This article lists six possible reasons and their corresponding solutions, including enabling your microphone, freeing up your space, disabling conflicting applications, updating the graphics driver, and more. If you want to record your webcam and add screen annotations, MiniTool Screen Recorder is a great option.
If you have any problems while using MiniTool Screen Recorder or MiniTool MovieMaker, please feel free to contact us at support@minitool.com. You can also describe any issue directly to me on X. I will help you as quickly as possible.