Where do Zoom recordings go? They are saved to your computer or cloud storage based on your account type. This article will guide you on managing these recordings and explain how to record Zoom as a participant using the built-in recorder and third-party software, MiniTool Screen Recorder, along with recordings optimization method.
Introduction to Zoom
Zoom is one of the world's leading video conferencing platforms, compatible with Windows, Mac, iOS, and Android systems. It can be used for business meetings, webinars, virtual classrooms, and real-time chat.
Zoom also features built-in tools to help users boost productivity, including breakout sessions, screen sharing, and virtual backgrounds. Its most notable feature is the meeting recording function, which conveniently saves important discussions, decisions, and proposals for users to review later.
Where Do Zoom Recordings Go
Where do my Zoom recordings go? By default, Zoom provides two storage locations for recorded meeting files: the local computer and Zoom cloud storage. The corresponding recording modes are local recording and cloud recording. The final storage location depends on the user's account type and the selected recording mode:
- Local Recording (Free and Paid Users):Content recorded locally will be saved directly to your computer's hard drive. Both free and paid users can utilize this recording mode. However, users must ensure their device has sufficient storage space to save Zoom meeting recordings.
- Cloud Recording (Paid Users): Cloud recordings are saved directly to the user's Zoom account cloud storage. Paid users can utilize this feature. Cloud storage does not occupy local disk space, and users can instantly share recordings in Zoom with friends or colleagues via generated links.

How to Access Zoom Recordings
Based on the above explanation, you should now have a clear understanding of where Zoom recordings are stored. Next, you can learn how to locate these recordings. Although screen recording files are primarily stored either on your computer's local disk or in the cloud, there are three methods to locate recorded Zoom meetings. Please continue reading for more detailed information.
Find Zoom Recordings on Your Computer
If users choose to record locally, the recording file will be automatically saved to the computer's default folder. Below are specific methods for locating Zoom recording files on different systems:
#1 On Windows
You can check the details below to find Zoom recordings on the Windows system.
Step 1: Open File Explorer
Launch the File Explorer on your computer.
Step 2: Check the Zoom Recordings
1. Navigate to the Documents section and open the Zoom folder.
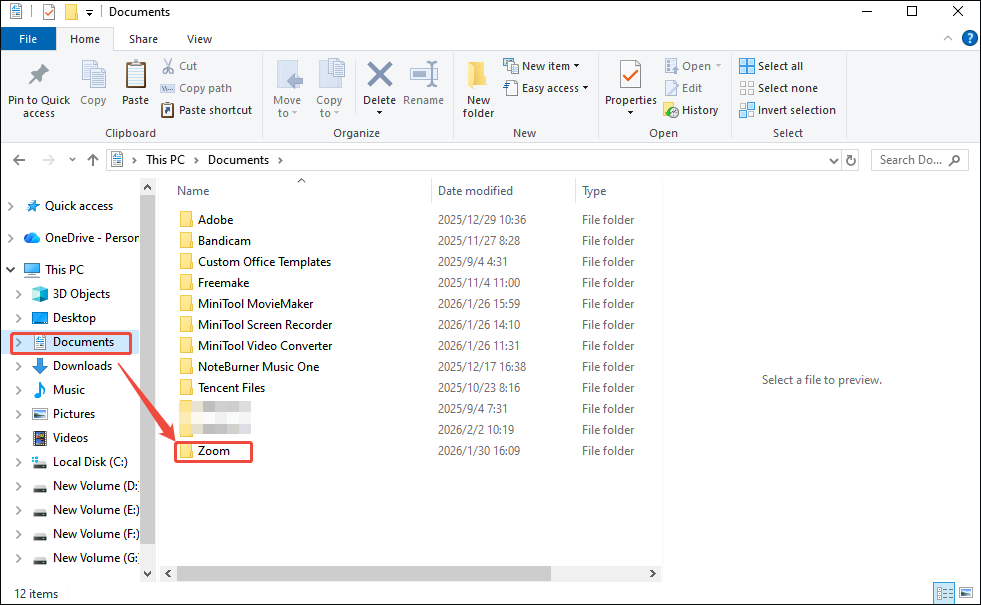
2. Then, you can locate the corresponding Zoom recording by checking the time and the person’s name in the recording filename.
#2 On Mac
Step 1: Open Finder
Launch Finder on your computer.
Step 2: Check the Zoom Recordings
Go to the Documents module and open the Zoom folder. Then you can check the Zoom recording based on the filename.
Find Zoom Recording in Zoom Cloud
Here is an easy way to locate Zoom recordings in the cloud.
Step 1: Go to the Zoom Website
Go to the Zoom official website and sign in to your Zoom account.
Step 2: Find Zoom Recordings
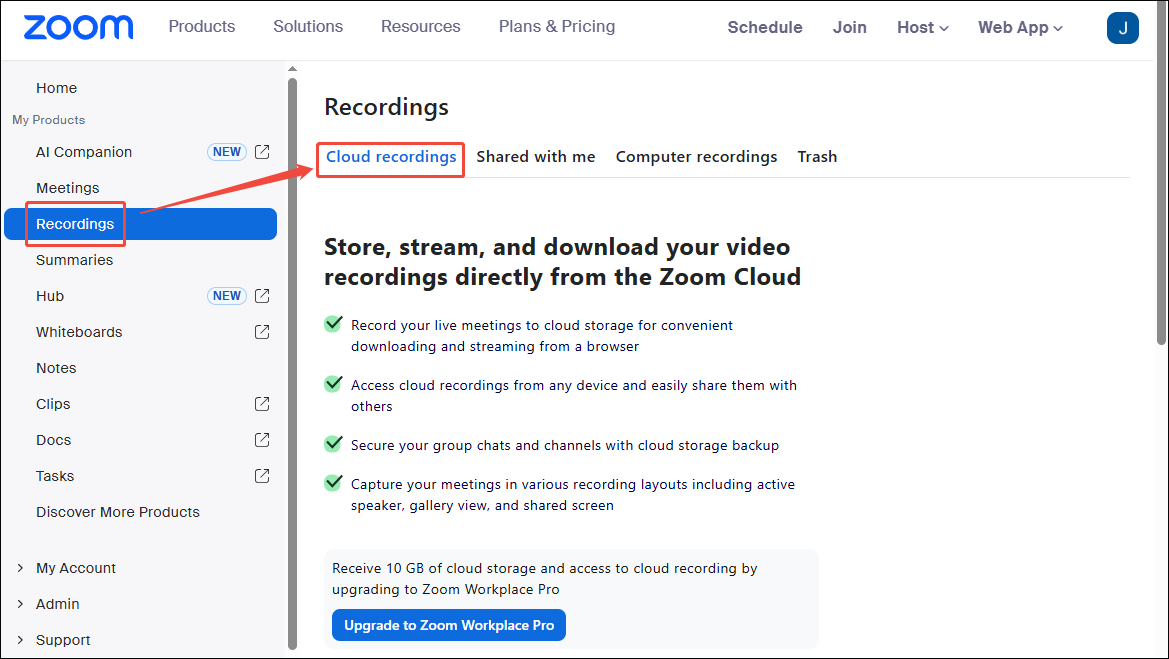
1. Go to the Recordings option in the left-hand menu bar.
2. Move to the Cloud Recordings module. Then you can access the Zoom recording based on the recording filename.
Find Zoom Recordings in the Zoom App
In addition to locating locally recorded and cloud-recorded Zoom meeting files through the two methods above, users can also access these files directly via the Zoom desktop application. The process is very straightforward.
Step 1: Launch Zoom
Open the Zoom app on your computer.
Step 2: Access Zoom Recordings
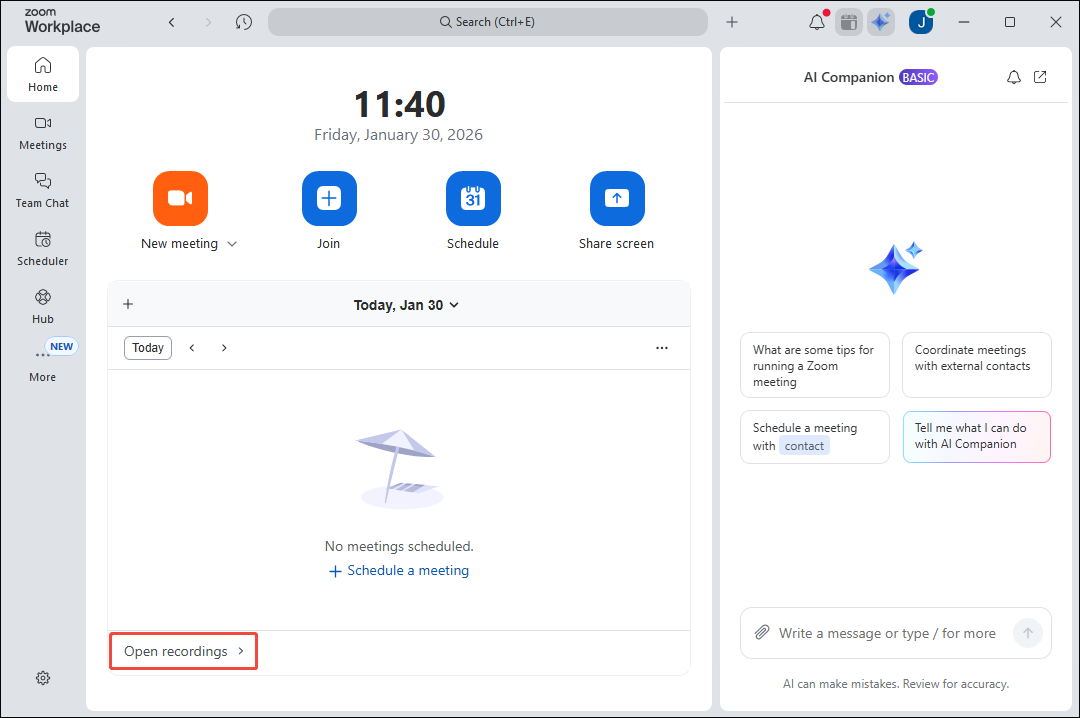
1. Click on the Open recordings option at the bottom of the Zoom homepage. Then, you will be automatically redirected to the Meeting recordings interface.
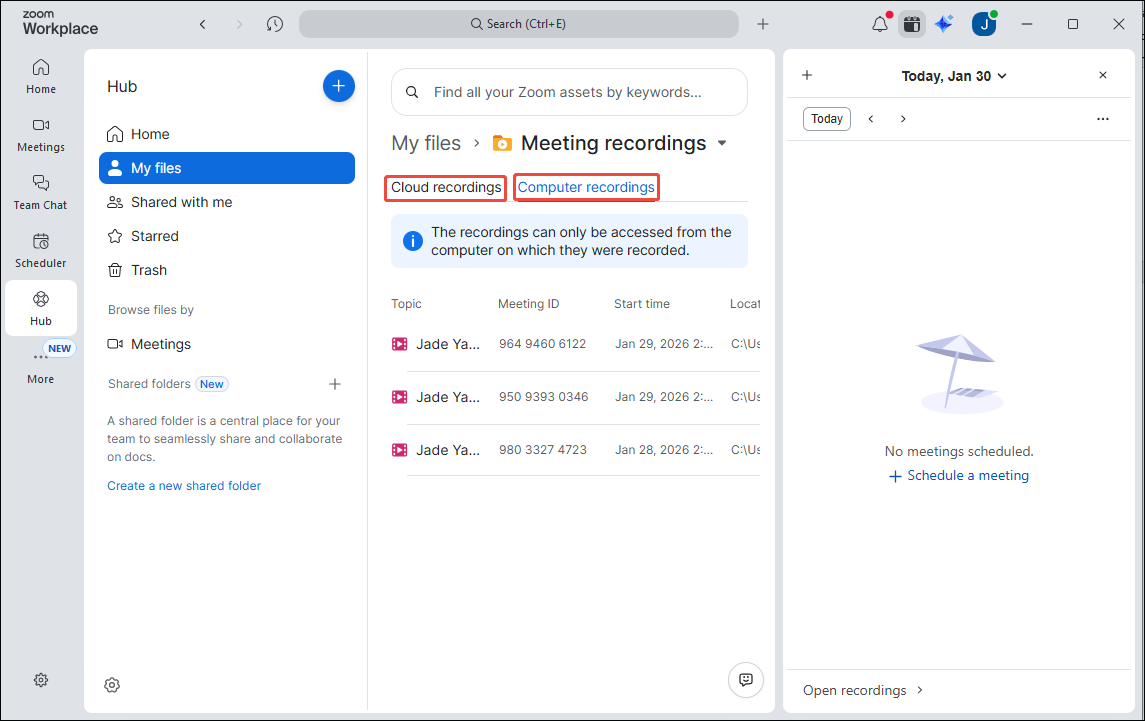
2. In the Meeting recordings interface, you can select the Cloud recordings option to locate the cloud-recorded Zoom recordings. Alternatively, you can select the Computer recordings option to access the locally recorded Zoom recordings.
After determining the recording method, you can locate the recorded content at the corresponding position using the above methods once the recording is complete. If you want to save time, you can directly use the third method.
How to Manage Zoom Recordings
After locating your recorded Zoom meetings, you can choose to share these recordings with colleagues or friends as needed for information exchange. Alternatively, you can download cloud recordings to your device for offline viewing or editing. Here are the specific methods for sharing and downloading.
Share Zoom Recordings with Others
Now, you can follow the step-by-step guide to share Zoom meetings with others.
#1 Share Cloud Recordings
Zoom recording files recorded in the cloud can be accessed using the following methods:
Step 1: Locate the Cloud Zoom Recordings
Step 2: Share the Zoom Recording
1. Click the Share button to the right of the Zoom recording file.
2. Then, in the new pop-up window, you can copy the generated link and share it with others via email or chat.
#2 Share Locally Zoom Recordings
Sharing locally recorded Zoom files is also very simple.
Step 1: Locate Locally Zoom Recordings
Step 2: Share the Locally Zoom Recording
1. Once you locate the Zoom recording file you wish to share, copy the file and then share it with others via chat.
2. Alternatively, if the file is too large and causing slow transfer speeds, you can share it to Google Drive, generate a shareable link, and then share that link instead.
Download Zoom Recordings
If you want to download Zoom recordings from the cloud for offline viewing or editing, you can use the following method:
Step 1: Locate the Cloud Zoom Recordings
Step 2: Download the Cloud Zoom Recording
1. Once you choose the Zoom recording you want to download, click on the More option to the right of the Zoom recording file.
2. In the new pop-up window, select the Download option.
3. Then, in the system prompt that appears, click the Download option again to complete the operation.

How to Record a Zoom Meeting as a Participant
By default, only the meeting host has permission to record the meeting. However, if participants wish to record the meeting, they may request recording permission from the host or use third-party screen recording tools. Below are detailed instructions for both methods for your reference.
Record with the Host's Permission
Now, you can follow these steps to record the Zoom meeting as a participant.
Step 1: Join a Zoom Meeting
Go to your Zoom app and paste the invite link to join a Zoom Meeting.
Step 2: Request Recording Permission
You may request recording permission directly from the host via chat or voice.
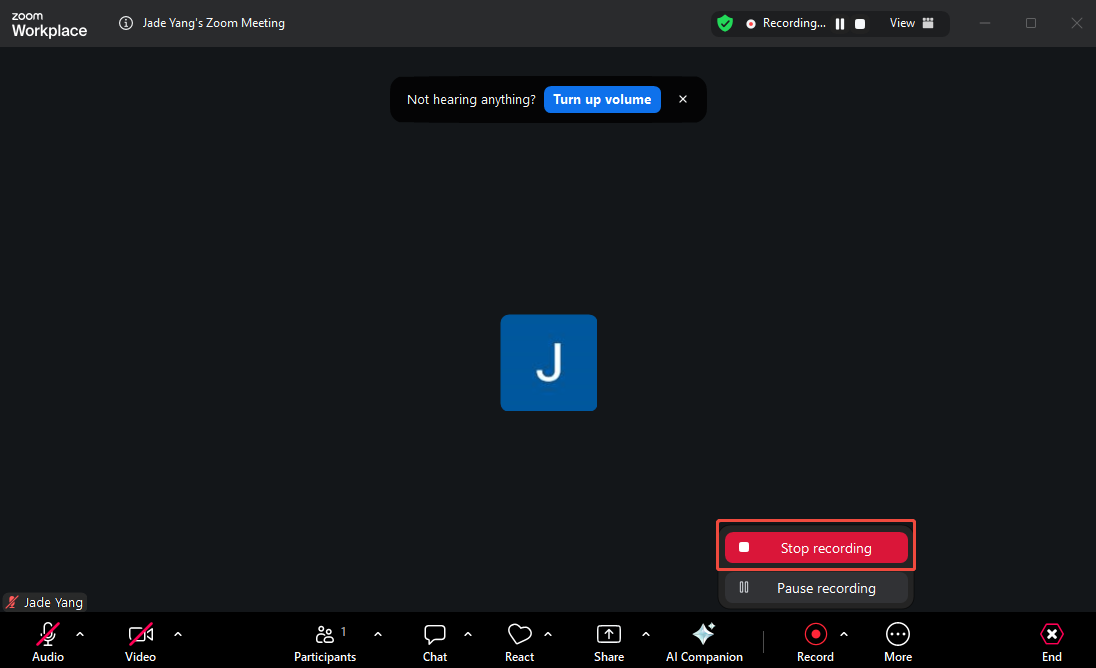
Step 3: Start and End Recording
1. Once the host approves your recording permission request, you will see the Record button in the bottom menu bar.
2. Then, you can click on the Record button to start recording the Zoom meeting.
3. When you want to end the recording process, click on the Record button again and select the Stop recording option in the new pop-up window.
Record with a Third-Party Recorder
If you are unable to obtain meeting recording permissions or wish to utilize more advanced recording features, MiniTool Screen Recorder is an indispensable third-party screen recorder.
MiniTool Screen Recorder is a free, professional Windows screen recording tool that captures all screen activities, including online meetings, gameplay, webinars, and live streams. Users can record the entire screen or a specific area as needed, with support for synchronized or separate recording of system audio and microphone audio.
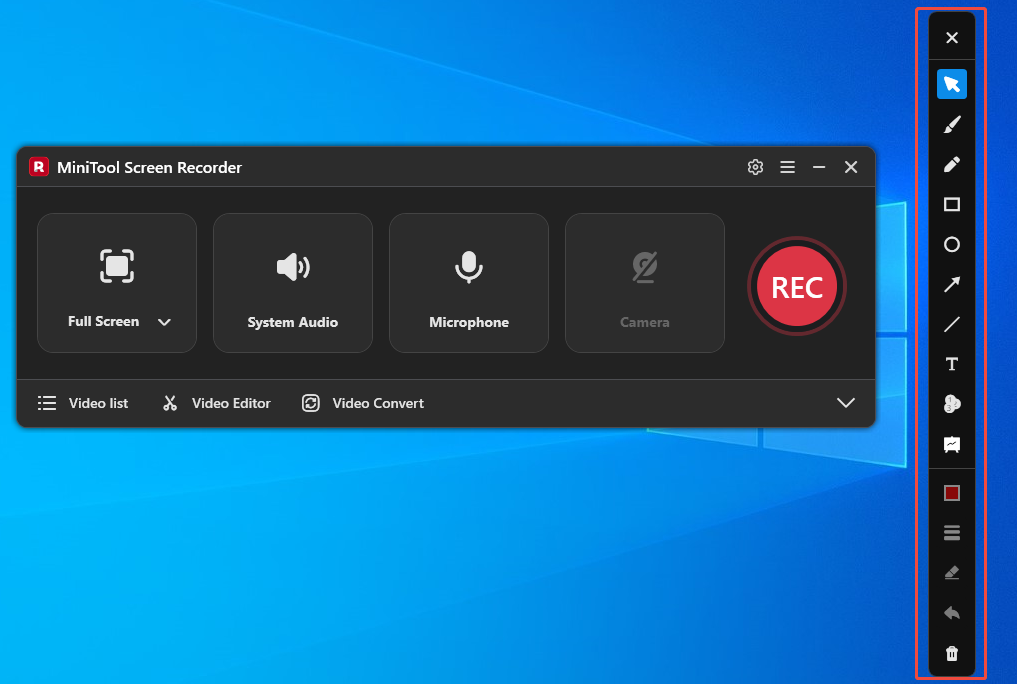
MiniTool Screen Recorder also offers webcam recording functionality to meet video creators' on-camera needs. Additionally, it features a convenient built-in annotation tool that allows users to mark key information during screen recording.
What’s more, users can customize recording parameters in the settings interface according to their requirements, such as video quality, frame rate, webcam configuration, and more. Now, follow the steps below to record your Zoom meeting using MiniTool Screen Recorder.
Step 1: Download and Install MiniTool Screen Recorder
MiniTool Screen RecorderClick to Download100%Clean & Safe
Click on the button above to download and install the latest version of the MiniTool Screen Recorder on your PC.
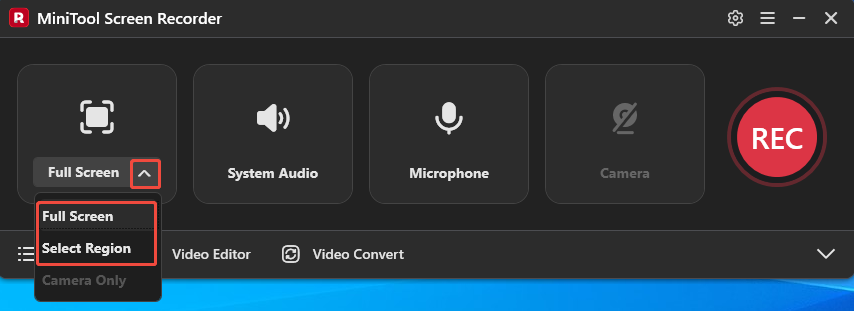
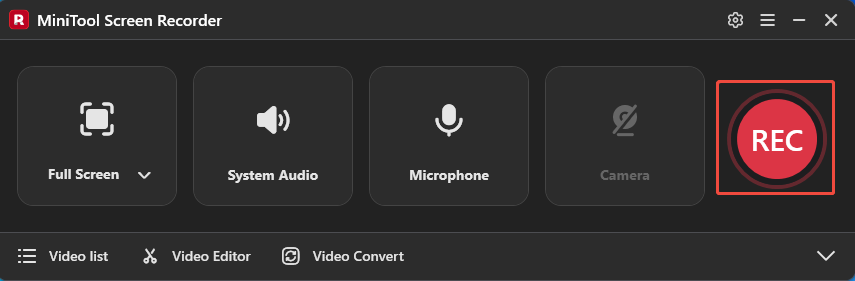
Step 2: Choose the Recording Area
1. Launch MiniTool Screen Recorder on your PC.
2. Click on the drop-down menu of the Full Screen option.
3. Then, determine whether to record the entire screen or the specific region.
Step 3: Control the Audio Recording
Click on the System Audio icon or the Microphone icon to decide whether to record the audio from the system or the microphone.

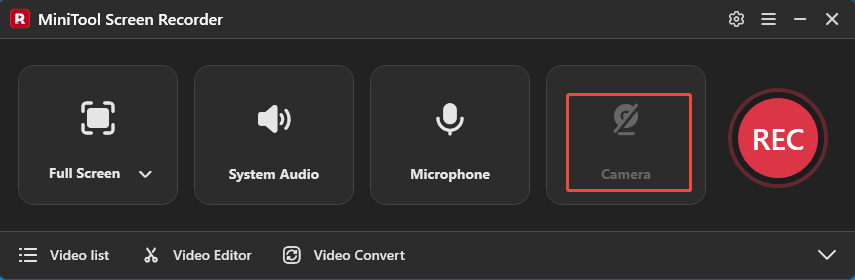
Step 4: Set the Camera Recording
Click on the Camera icon on the right to determine whether to enable the webcam recording functionality.
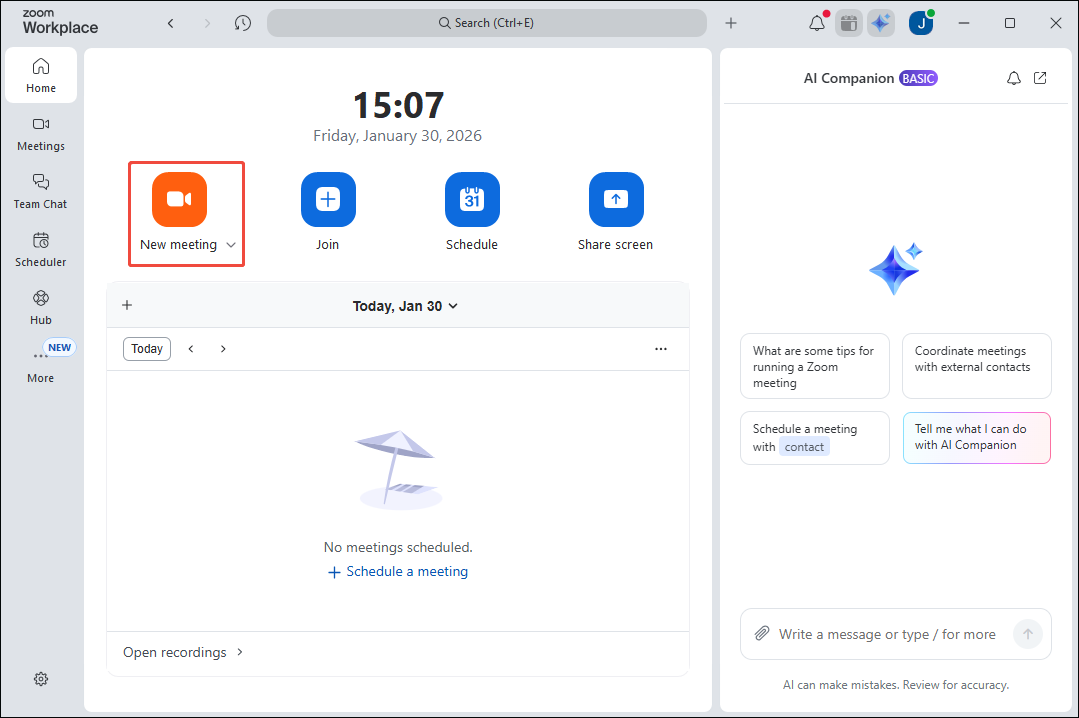
Step 5: Start a Zoom Meeting
On the Zoom app homepage, click on the New meeting option to start a Zoom meeting.
Step 6: Start and End Recording
1. To start recording the Zoom meeting, click on the REC button on the right side of the main interface or press the F6 key. After a 3-second countdown, it will start recording.
2. During the recording process, if you want to annotate important meeting information, you can select the appropriate annotation shapes from the drawing tool panel on the right side of the screen.
3. When you want to end the recording process, press the F6 key again.
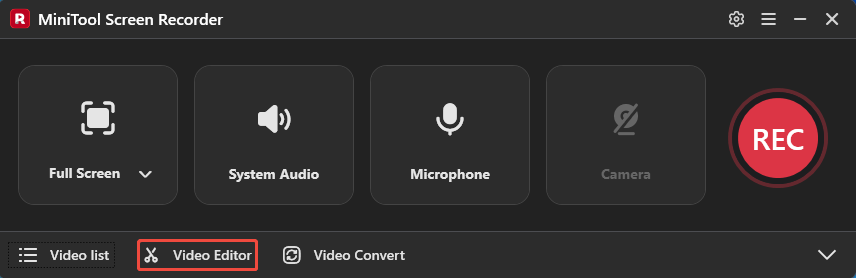
4. Finally, you can check the recorded Zoom meeting under the Video list section.

Bonus: How to Edit Your Zoom Recordings
Zoom meeting recordings tend to be excessively long and may contain content unrelated to the meeting topic. Therefore, the best way to extract usable segments from a meeting is through editing. Now, simply click the Video Editor option at the bottom of the MiniTool Screen Recorder main interface to get the video editing tool.
Alternatively, you can directly click on the button below to get this video editing tool.
MiniTool MovieMakerClick to Download100%Clean & Safe
This editing tool features a user-friendly interface that can be mastered quickly without professional expertise. Its built-in editing functions include trimming, cropping, rotating, and reversing. Therefore, you can use the trimming feature to remove irrelevant content from meetings, and add titles or subtitles to meetings using the text function in the media library.
Finally, the editing tool supports multiple export formats, including MP4, MP3, MKV, MOV, WEBM, and more, allowing flexible selection based on your needs.
Wrap Things Up
Where do Zoom recordings go? By default, they are saved to the Zoom cloud or your computer storage. This article details how to locate Zoom recording files, as well as share and download them. Additionally, we provide methods for recording Zoom meetings as a participant using the built-in recorder and the third-party tool MiniTool Screen Recorder.
You can also use the recommended video editor to enhance the recorded videos. If you encounter any issues or have suggestions while using MiniTool Screen Recorder or MiniTool MovieMaker, you can reach out for assistance by emailing us via support@minitool.com or sending a message on X.