Software to record audio helps users capture various sounds. This article gives the reasons to record audio and shows how to do it with 2 excellent audio recorders: MiniTool Screen Recorder and Xbox Game Bar.
About Audio Recording
Before learning about recording software, let's first understand some basic knowledge about audio and recording. Recording refers to the process of saving existing sound from various media using a computer, mobile phone, or other recording devices. When recording audio, people are often most concerned about the quality of the recorded audio, which directly affects the auditory experience and subsequent use.
The quality of the recorded audio is determined by many factors, such as hardware quality, digital resolution, and the recording environment. The recorded audio usually has a wide range of uses, such as being applied in creating various works, serving as important evidence, and for personal collection.
Factors Affecting Audio Recording Quality
Many factors affect audio recording quality. Understanding these factors helps in achieving optimal recorded audio quality.
1. Sample Rate and Bitrate
Sample rate is the frequency at which the sound signal in the audio is captured. This frequency is expressed in Hz (Hertz). A higher sample rate means more sound detail is captured, resulting in better audio quality.
Common sample rates include:
| Sample rate | Usage |
| 16 kHz | Voice calls/Speech recognition |
| 44.1 kHz | Major media platforms/Audio CDs |
| 48 kHz | Movie/Videos |
| 96/192 kHz | Professional-grade audio |
So, when recording audio, set an appropriate sample rate on your recording device based on your intended use.
Another major factor affecting audio quality is bit depth. Bit depth is the precision of sound measurement. This precision is expressed in dB (decibels). Different precisions correspond to different decibel ranges. Higher decibel levels indicate the ability to capture subtle volume changes that are easily lost.
Common bit depths:
| Bit depth | Scope and Usage |
| 8-bit | Telephones and traditional gaming; 50 dB dynamic range |
| 16-bit | CD and main streaming; 96 dB dynamic range |
| 24-bit | Professional studio and high-resolution audio; 144 dB dynamic range |
Recording audio is a secondary processing of the audio. An amount of precision may be lost during the recording process. Therefore, it’s best to choose a higher bit depth within the proper range for the intended use, which is good for showing more precision and post-editing.
2. Audio Compression
Compression also affects audio quality. It is divided into lossy compression and lossless compression. Lossy compression sacrifices some audio quality to reduce audio file size, while lossless compression prioritizes audio quality.
The core factor determining the type of compression is the codec, which is encapsulated in common audio and video formats, such as MP3, AAC, WMA, OGG, and ALAC. Therefore, audio compression is a significant factor affecting audio quality. When you record audio, choose lossless formats if storage permits.
3. Recording Environment and Equipment
When recording microphone audio, choose a small room with good soundproofing to minimize external noise and echo interference. To record computer system audio, try to close other applications and disable notification sounds to avoid recording unwanted system sounds that could affect audio quality.
Common Audio Sources for Recording
Recording software can typically capture 3 main types of audio.
System Audio
System audio refers to sounds emitted by your computer, such as music, video, and notification sounds. These sounds are characterized by the absence of background noise, making them suitable for recording tutorials, and live-stream audio content.
Microphone Audio
Microphone captures external sounds through the computer’s built-in microphone or an external microphone. It’s used for voice chat, interviews, sports commentary, and more. It can capture real-time human voices and environmental sounds. However, microphone is also prone to recording noise.
Call Audio
Call audio refers to the call sound in the direct message feature on various social media platforms, such as Instagram, Facebook, and X. Unlike system audio and microphone audio, it is a separate call channel. Call audio preserves the content of the call as evidence.
Why Record Audio
People record audio for many reasons. Here are 3 of the more comparatively direct ones.
#1 Record Information
When attending lectures, conferences, interviews, and classes, you may experience the frantic, unfocused note-taking that often leaves you struggling to grasp the key points. Recording audio effectively captures everything spoken. You can review it repeatedly afterward. Audio recording is faster and more accurate than manual note-taking, giving you more time to think. Furthermore, recorded audio files take up a little device memory.
#2 Save Valuable Content
Much online content may be taken down, expire, or become chargeable after a period of time. Recording audio content and saving it on your computer allows for permanent offline use. Recorded audio is also more stable and secure.
#3 Reuse Audio Materials
Besides the 2 scenarios mentioned above, recording can also collect audio from videos, courses, or films, such as sound effects, background music, or audio clips. Extracting this audio facilitates later editing, processing, and reuse.
Precautions for Recording Audio
To record high-quality audio and have a better recording experience, there are 3 suggestions you may need.
1. Enable Recording Object Permissions
Before recording audio, ensure your system and microphone have the necessary audio permissions. Without proper permissions, the recording may be completely muted or capture only strange background noise. Carefully check your sound settings and select the correct input device to avoid recording failures.
2. Reduce Background Noise
Reduce background noise to improve audio quality. Closing unnecessary applications and disabling system notification volumes also help prevent unexpected interruptions during recording. If using a microphone, record in a quiet environment without echo.
3. Check Computer Storage Space
Check your computer’s storage space beforehand. High-quality audio files require more storage space. Insufficient space may lead to system crashes, file corruption, or incomplete recordings. Therefore, ensure your hard drive has enough free space and save files to an easily accessible local folder.
Record Audio with 2 Recording Tools
Need software to record audio? This section introduces 2 audio recording tools. You can choose one from them as needed.
1. MiniTool Screen Recorder
Why is MiniTool Screen Recorder worth a try when you record audio? It supports dual audio recording. MiniTool Screen Recorder enables you to record computer audio and microphone sound separately or simultaneously, meeting your personalized needs. In addition, it allows you to record high-quality audio, effectively improving the quality of your content creation.
MiniTool Screen Recorder also supports presetting recording durations, so you don’t have to wait in front of the screen all the time. Furthermore, there’s no limit to the recording time. As long as your computer has enough storage space, you can keep recording. What’s more, MiniTool Screen Recorder is user-friendly, even for beginners.
Besides, MiniTool Screen Recorder also supports recording webcam, so you can appear in the screen recordings. Another advantage is that it supports taking screen annotations during recording, allowing you to use tools such as brushes, highlighters, shapes, and numbering during the recording process.
Key features:
- Allows you to independently turn audio and the microphone on and off without having to go into the settings window.
- Ensure audio and video synchronization to deliver high-quality content.
- Supports capturing microphone and webcam input for real-time commentary.
- No ads, watermarks, or bundles.
Below is a guide on how to record audio with MiniTool Screen Recorder for as long as you want without restrictions.
Step 1. Download and Install MiniTool Screen Recorder
Click on the download button below to download and install MiniTool Screen Recorder. Then, launch it.
MiniTool Screen RecorderClick to Download100%Clean & Safe
Step 2. Control Dual Audio
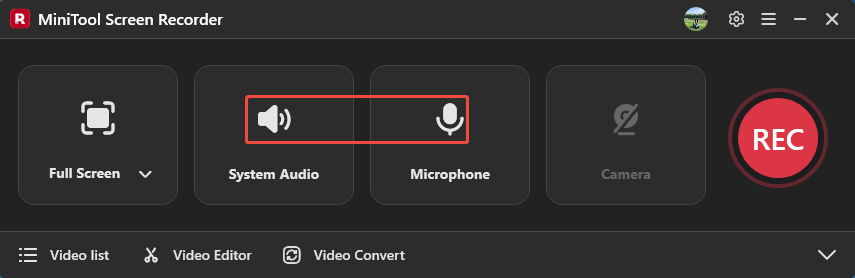
After launching MiniTool Screen Recorder, log in to it first. Then, click on the System Audio icon and the Microphone icon to confirm whether to record computer audio and voiceover.
Step 3. Specify a Storage Location
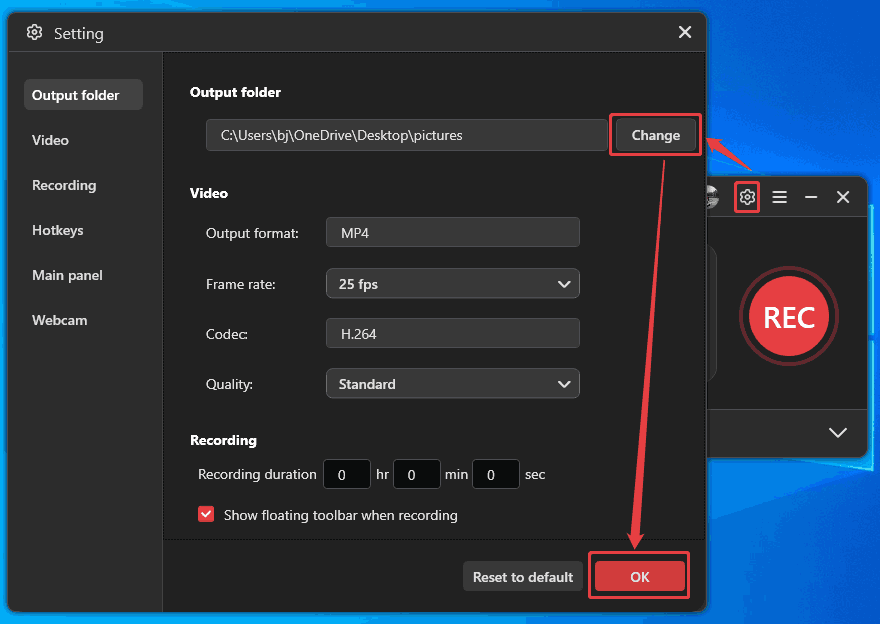
Click on the Gear icon to trigger the Setting window. There, click on the Change button to choose a saving path for the recorded audio. Then, click on the OK button to save the change.
Step 4. Start the Audio Recording
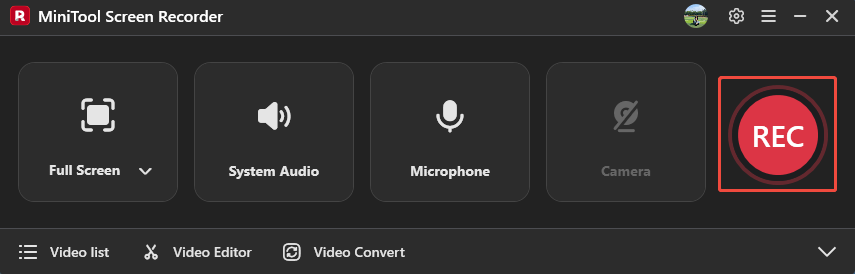
Once you set the saving path, this audio recorder will automatically go back to the main interface. Then, click on the REC button to start recording and access the target audio.
Step 5. Check and Locate the Result
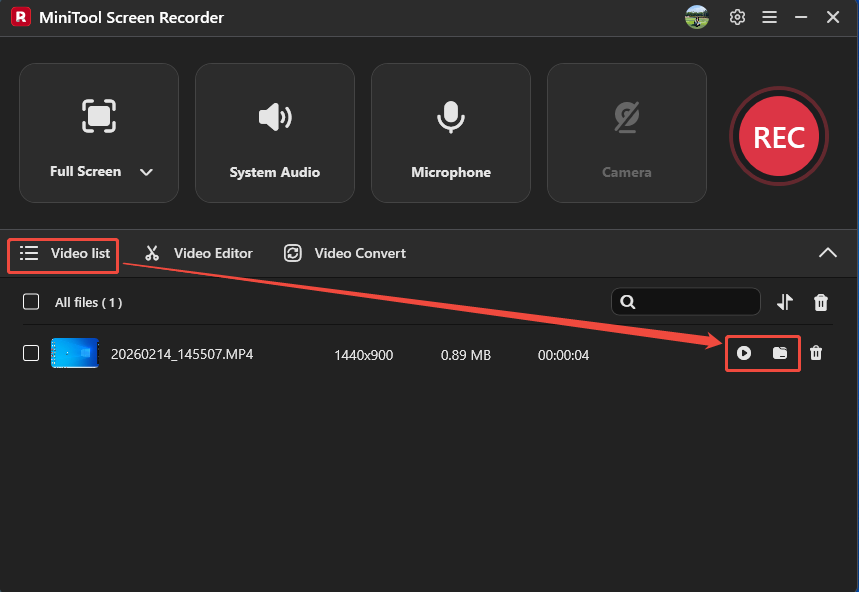
When this recording finishes, the recorded audio will appear in the Video list tab. Here, click on the Play icon to check the recorded audio. Or you can click on the Folder icon to locate it on your PC.
MiniTool Screen Recorder makes it easy to record audio. If you are looking for a free audio recorder, try it.
2. Xbox Game Bar
Xbox Game Bar is a free screen recording tool that comes pre-installed on Windows 10 and Windows 11 systems. Originally designed for recording games, Xbox Game Bar is now also ideal for recording audio from browser and application windows.
Key features:
- Supports multiple audio formats, including system audio, microphone sound, and game audio.
- Uses a 48 kHz sample rate to provide high audio quality.
- Supports background recording without interfering with other games.
- Supports real-time microphone on/off during recording, without leaving the recording interface.
- Watermark-free and no bundles.
Next, let’s try recording audio using the Xbox Game Bar in a few simple steps.
Step 1. Enable the Audio Recording of the Xbox Game Bar
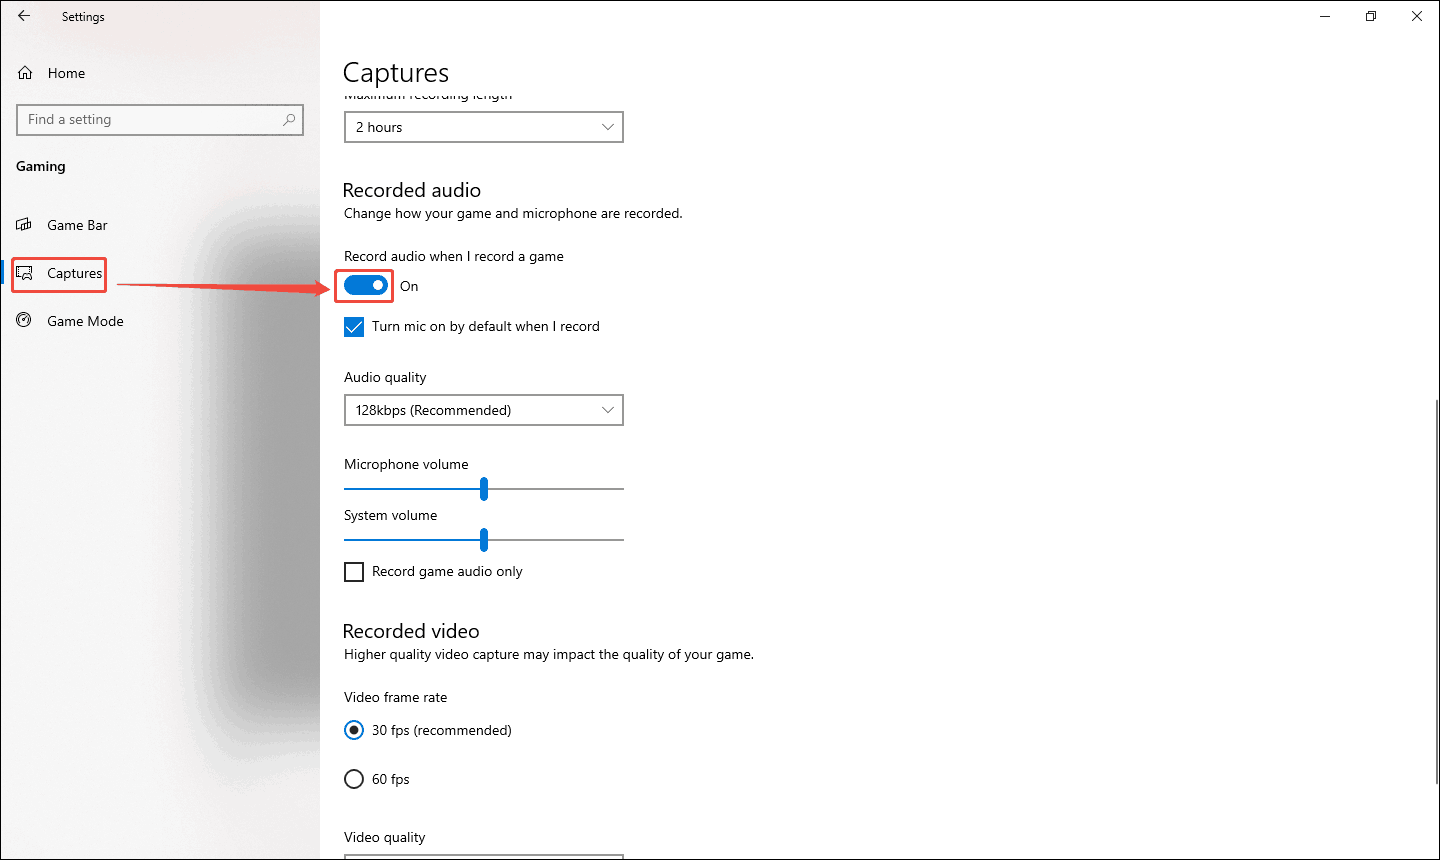
Press Win + I to open the Settings window of Windows. There, click on the Gaming option to enter the Game Bar interface. Here, select the Captures tab and enable the Record audio when I record a game option.
Step 2. Open the Xbox Game Bar and Start Recording
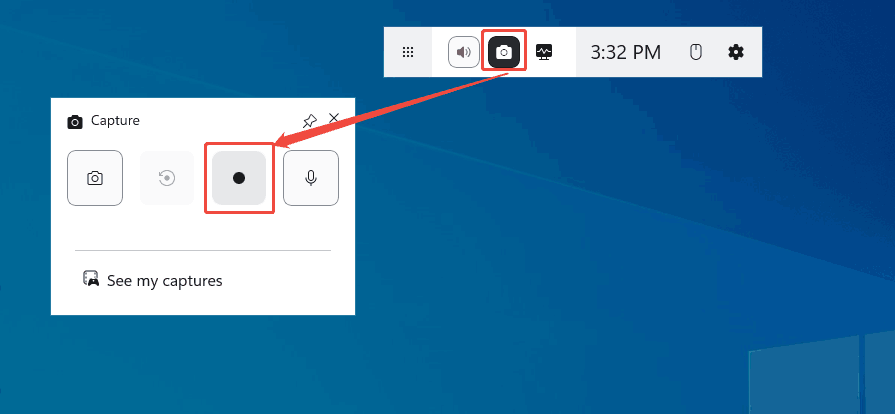
Press Win + G to the Xbox Game Bar’s toolbar. There, click on the Camera option to trigger the Capture window and click on the Record option to start recording. Then, play the audio you want to record.
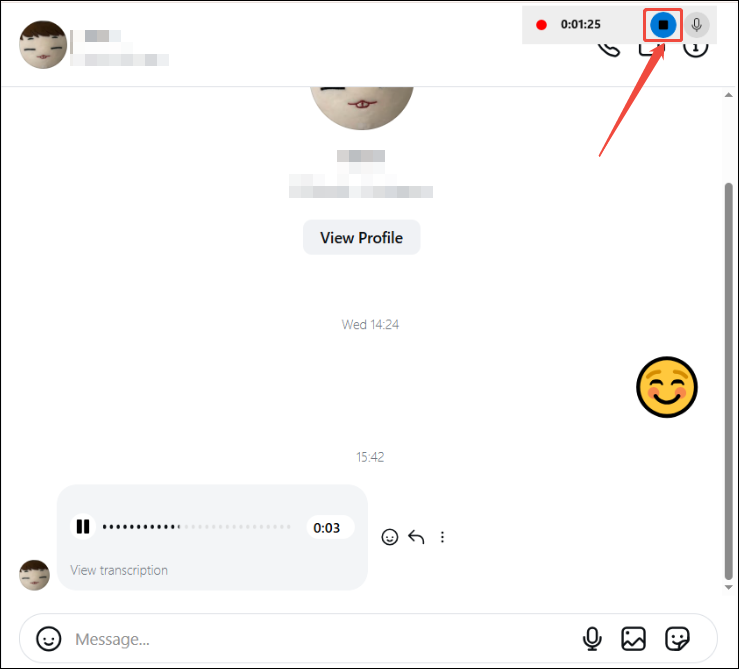
Step 3. Stop Recording
When you want to end this audio recording, click on the Stop button in the Xbox Game Bar recording floating bar. Then, a clipboard will pop up on the right side of the screen. Click the clipboard to enter the Gallery window.
Step 4. Check and Locate the Recorded Audio
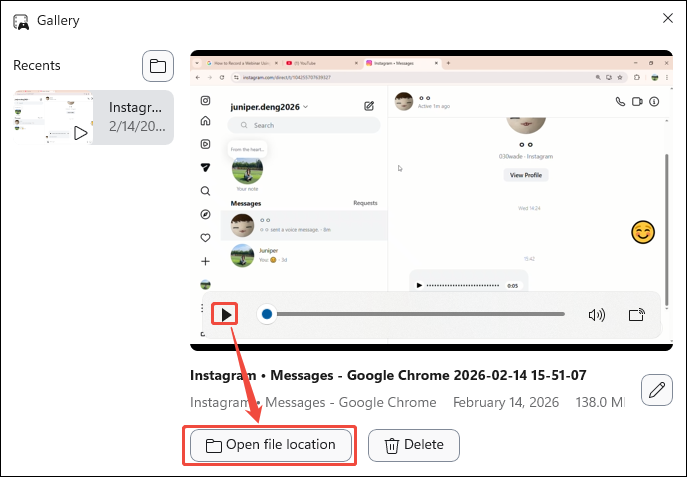
In the Gallery window, click on the Play button to check the recorded audio. Additionally, click on the Open file location to find the saving folder on your computer.
Xbox Game Bar is a convenient and free tool for recording audio. However, it has a limited recording time of only 4 hours.
Final Words
This article shows software to record audio, including MiniTool Screen Recorder and Xbox Game Bar. Both of these recording tools can help you easily record audio. However, if you prioritize recording quality without a time limit, I highly recommend using MiniTool Screen Recorder.
If you want to get more information about MiniTool Screen Recorder, please feel free to contact us via email at support@minitool.com. Additionally, you can send me a message directly on X. I will reply to you as soon as possible.