This article introduces OBS to you and explains why OBS not recording audio. Simultaneously, it offers 12 workable methods to fix that issue, including restarting OBS, checking audio settings, using an OBS alternative, and more.
In the multimedia landscape with various screen recording apps, OBS stands out due to its robust recording functions. However, recently, more and more users are confused about the OBS not recording audio error. How to fix that issue? The following content will help.
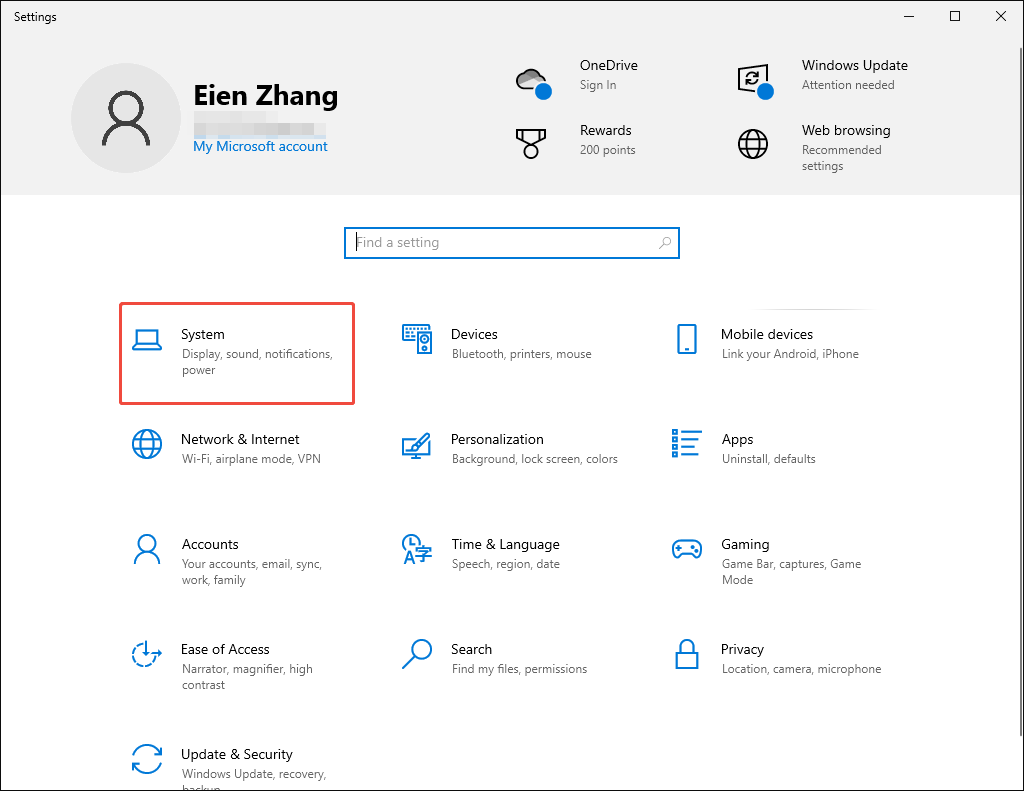
What Is OBS
OBS, also known as OBS Studio, is a free program with an open-source nature. If you want a high-quality, real-time recording experience of live streaming, it can suit your needs effortlessly.
Specifically, OBS empowers you to mix, compose, or create scenes from various sources like desktop screen captures, webcams, and games. Meanwhile, it enables you to broadcast the content to multiple platforms, including Facebook, Twitch, and YouTube.
Why Is OBS Not Recording Audio
Here are the possible reasons for OBS not capturing sounds.
Reason 1. Outdated Audio Drivers
With an outdated audio driver, the communication between the audio hardware and the operating system will fail. This way, the detection and initialization of audio data within OBS are not working, which finally leads to OBS not recording mic audio.
Reason 2. Inappropriate Audio Settings
If you haven’t configured the audio settings correctly, it is common to encounter OBS not recording game audio. For example, if the headphones or microphone you are using are not configured as the default device, OBS won’t capture any audio.
Incorrect Audio Mixer settings are also a factor for OBS Studio not recording audio. For instance, if you have muted the Audio Mixer, there will be the OBS not recording desktop audio error. On the other hand, although you have set a visible audio source in the mixer of OBS, the audio recording won’t work if the specific audio track, like Track 1, is not checked.
Reason 3. Lack of Permission
Modern operating systems, such as macOS and Windows 10/11, recognize microphones as private resources. Hence, the microphone permission is indispensable for OBS Studio to access the audio drivers.
Reason 4. Wrong Sample Rate
The sample rate mismatch will also lead to OBS not recording audio. Specifically, if you have configured the sample rate of your microphone as 44.1kHz on Windows, the sample rate within your OBS Studio also needs to be set to 44.1kHz, instead of 48kHz. Otherwise, the mismatch will quickly trigger the audio buffers empty or fill up, causing audio issues.
Fix 1. Restart OBS
To fix OBS not recording desktop audio, the easiest method is to restart OBS. This method enables you to reset the audio engine of OBS Studio. Meanwhile, such restarting enables OBS to reinitialize hardware drivers forcefully. In addition, the temporary glitches can also be cleared.
Fix 2. Check Audio Settings in OBS
As I have mentioned before, inappropriate audio settings will lead to the audio recording issues. To correct the audio settings of OBS Studio, follow the guidance below.
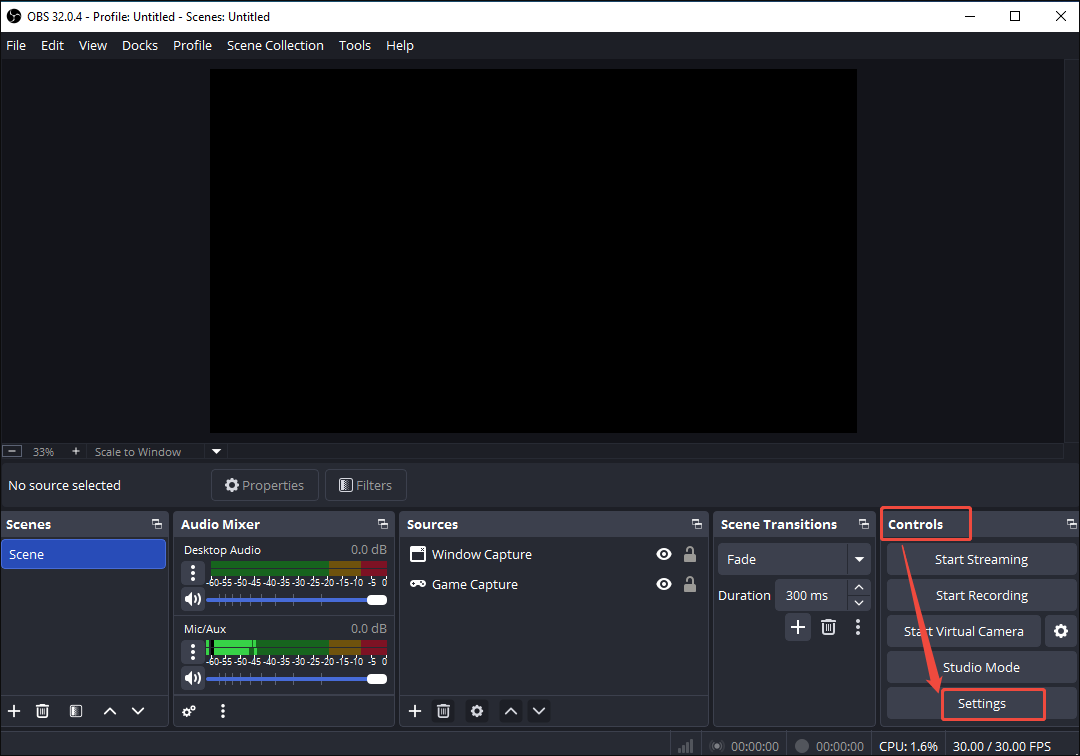
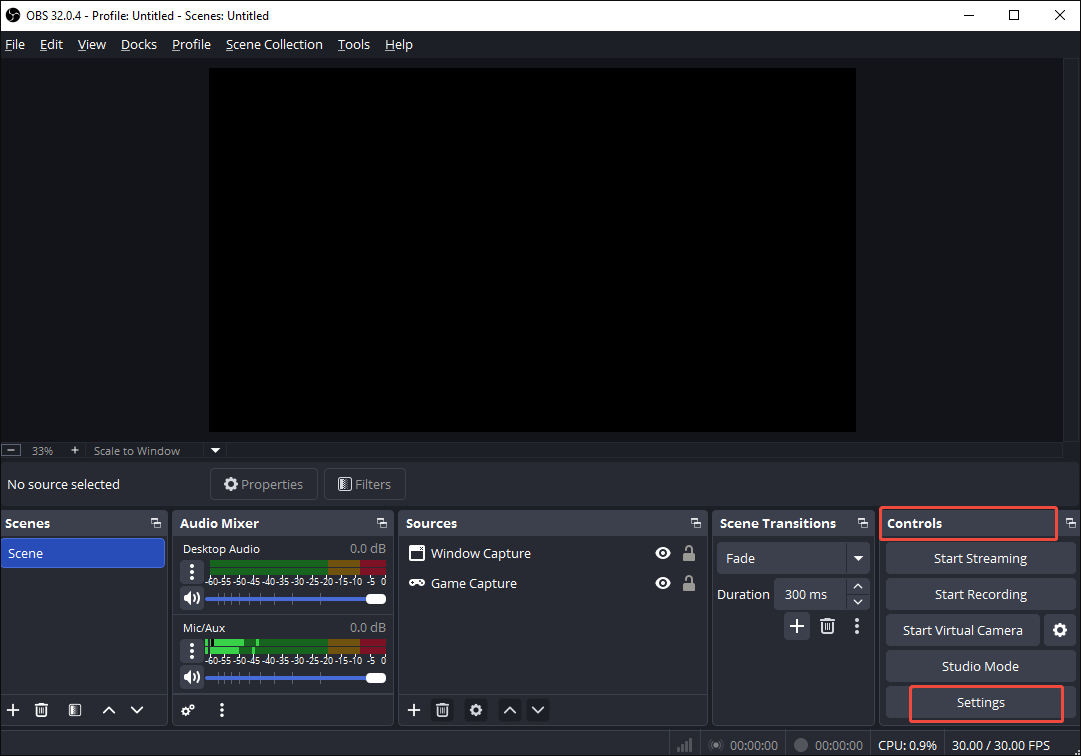
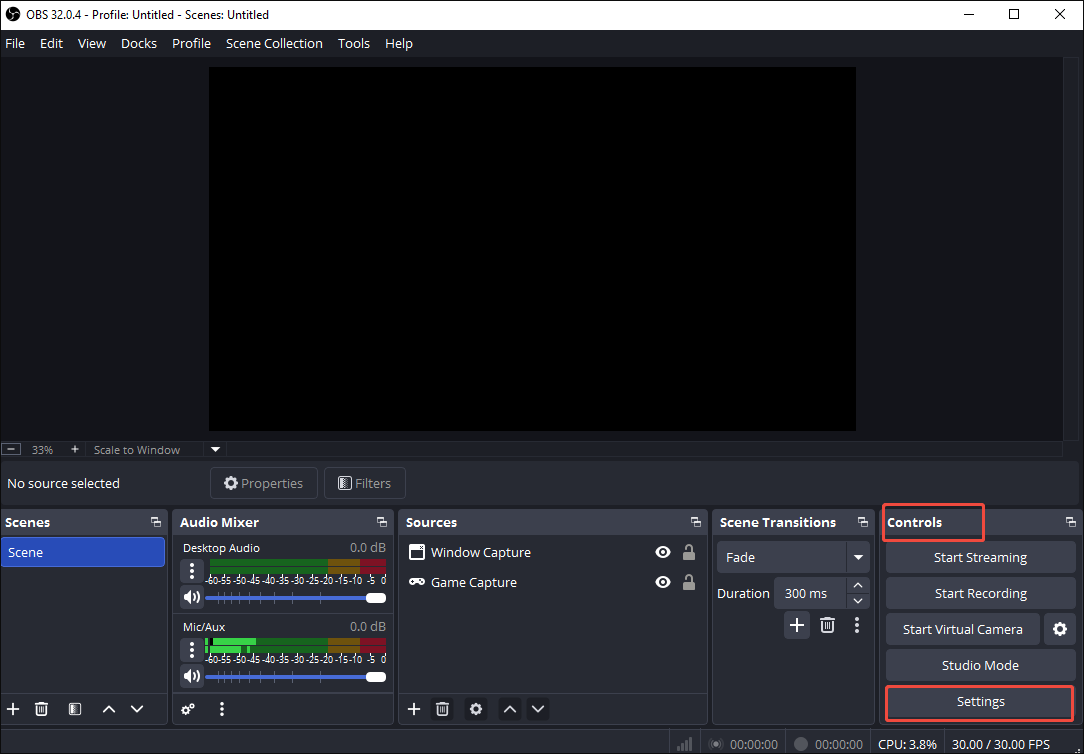
Step 1. Enter the Settings page of OBS Studio.
Run OBS Studio. Next, navigate to the Controls section. There, click on the Settings option.
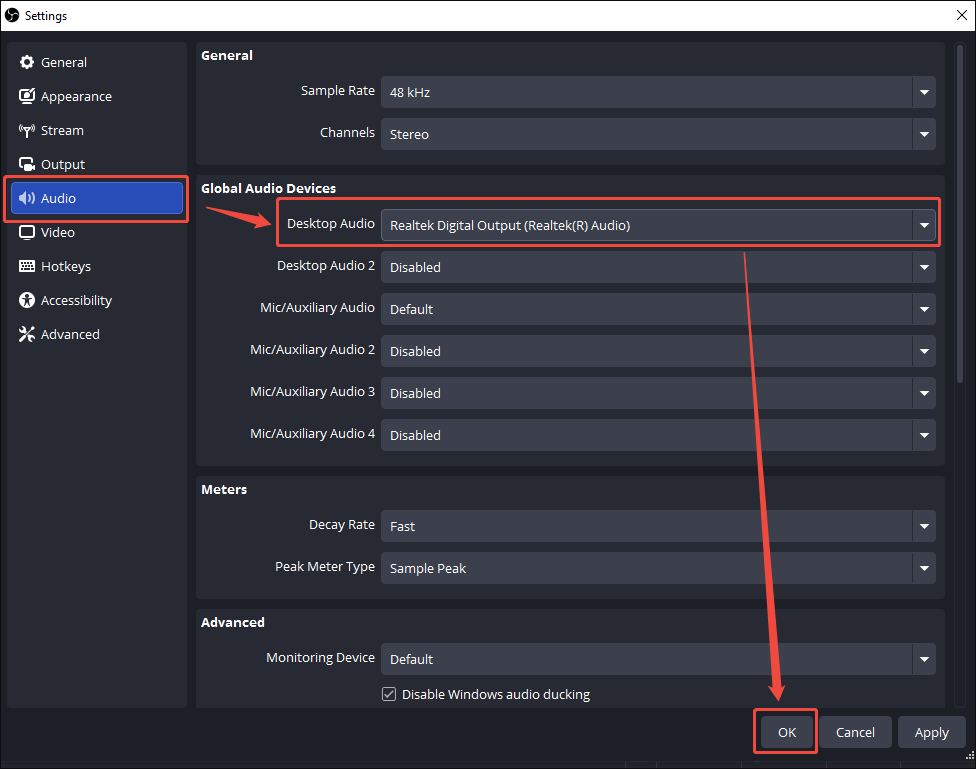
Step 2. Configure the audio settings.
Switch to the Audio tab. There, expand the Desktop Audio option under the Global Audio Devices section. Next, select the audio device you are using.
After checking the audio settings, use OBS Studio to capture the audio to check whether the issue has been fixed.
Fix 3. Check the Audio Monitoring Mode
If you have set the Audio Monitoring mode to Monitor Only on OBS, the audio you hear won’t be sent to the final recording. To fix that issue, change the mode to Monitor and Output. Follow the instructions below to do that.
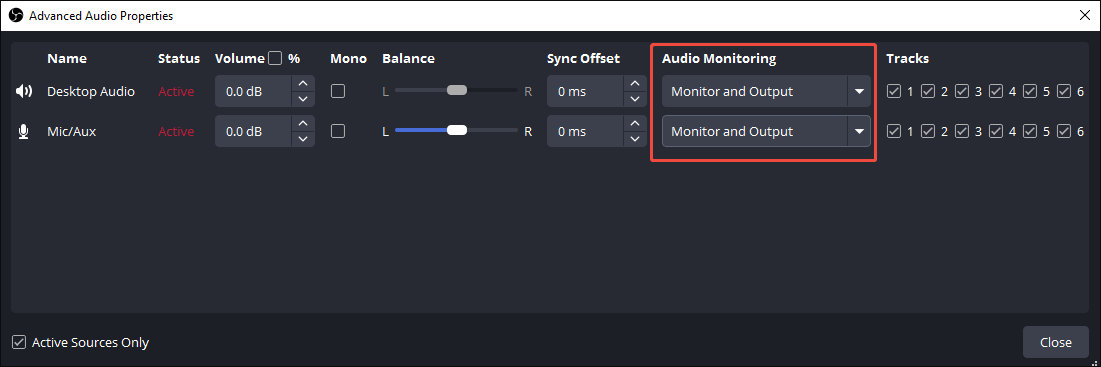
Step 1. Go to the Advanced Audio Properties window.
After launching OBS Studio, right-click anywhere under the Audio Mixer section. Next, choose the Advanced Audio Properties option.

Step 2. Check the Audio Monitoring mode.
In the pop-up Advanced Audio Properties window, expand the drop-down menus under the Audio Monitoring section. Then, choose Monitor and Output.
Then, check whether the OBS not recording audio error has been resolved.
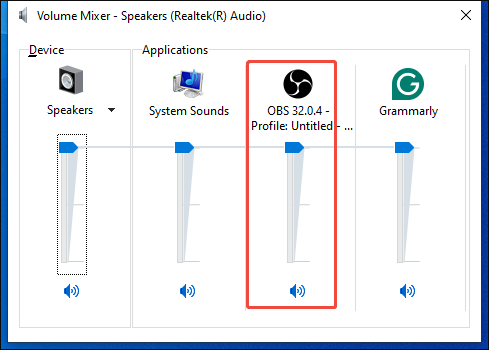
Fix 4. Check the Volume Mixer
If your OBS Studio app is muted at the system level, follow the tutorial below to check the volume mixer.
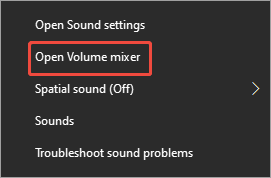
Step 1. Enter the Volume Mixer panel.
Right-click on the Loudspeaker icon at the bottom-right of the taskbar on your Windows computer. Next, select the Open Volume mixer option.
Step 2. Check the Volume Mixer of OBS Studio.
Check whether the volume slider under the OBS option is set to the lowest position. If it is, adjust the volume based on your needs.
On condition that this method is ineffective, try other methods below.
Fix 5. Check the Microphone Permission
If there is no permission for the microphone, the audio recording will be prevented. Follow the guidance below to check the microphone permissions on your PC.
Step 1. Enter the Settings interface.
Press the Windows + I keys to enter the Settings page. There, select the Privacy option.
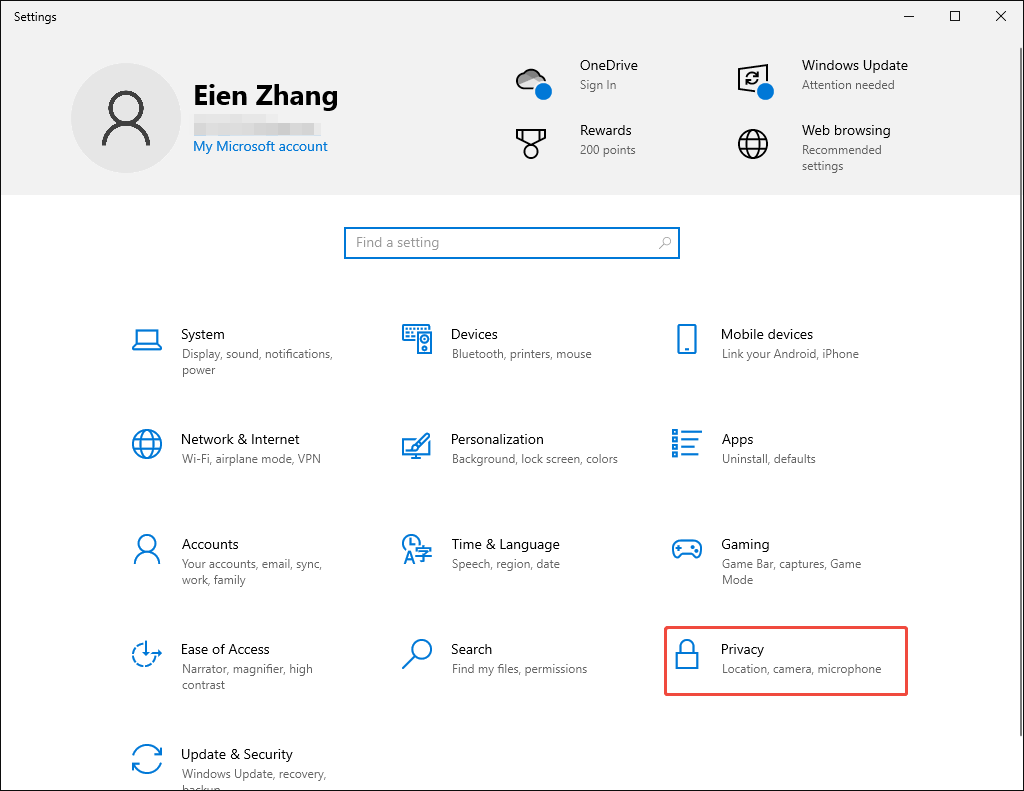
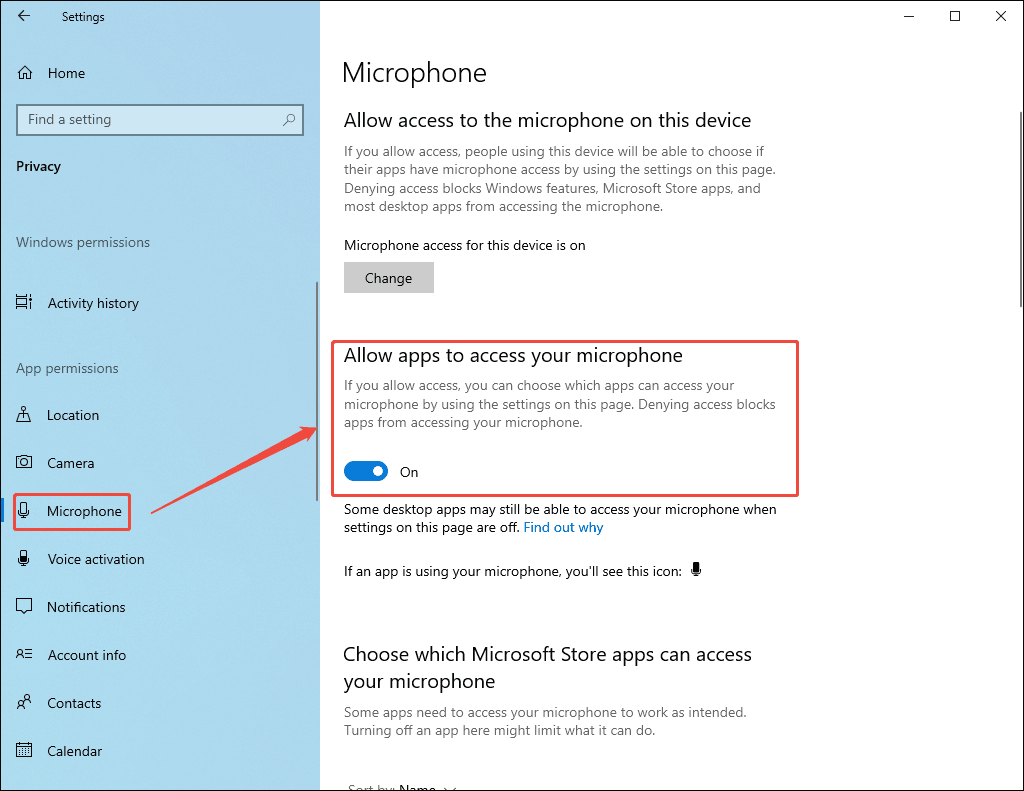
Step 2. Enable the microphone permission.
Switch to the Microphone tab. There, turn on the option under the Allows apps to access your microphone section.
After enabling the microphone permission, check whether OBS Studio can record audio.
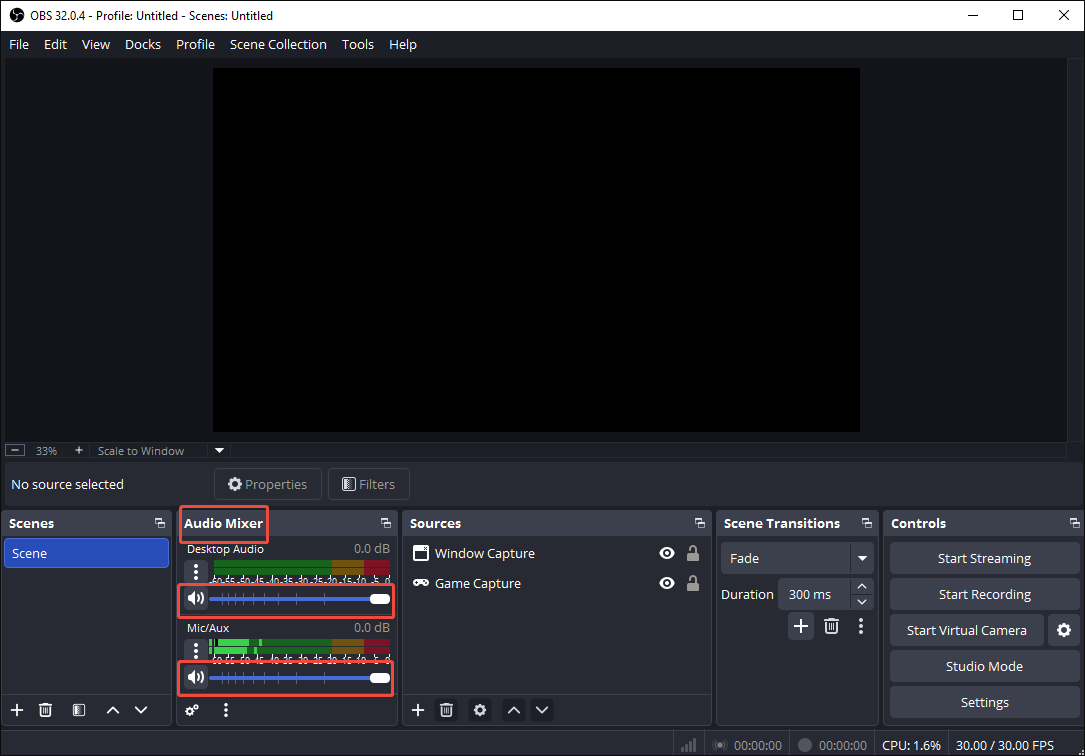
Fix 6. Verify Audio Mixer Levels
To ensure you haven’t muted the Audio Mixer, follow the steps below to verify its levels.
Step 1. Open OBS Studio.
Run the OBS Studio application.
Step 2. Verify Audio Mixer levels.
Navigate to the bottom Audio Mixer section. There, ensure that the volume slider is not moved to the leftmost position.
After verifying the volume levels, check whether the method helps fix OBS not recording audio.
Fix 7. Check the Audio Tracks
If you have disabled necessary audio tracks and found that the audio is not capturing, follow the detailed instructions to check the audio tracks.
Step 1. Enter the Settings interface of OBS Studio.
After running OBS Studio, click on the Settings option under the Controls section to enter the Settings page.
Step 2. Check the audio tracks.
Switch to the Output tab. There, expand the Output Mode option and select Advanced. Navigate to the Recording section. Check the 1, 2, and 3 options in the Audio Track part. Finally, click on the bottom-right OK button to save the changes.
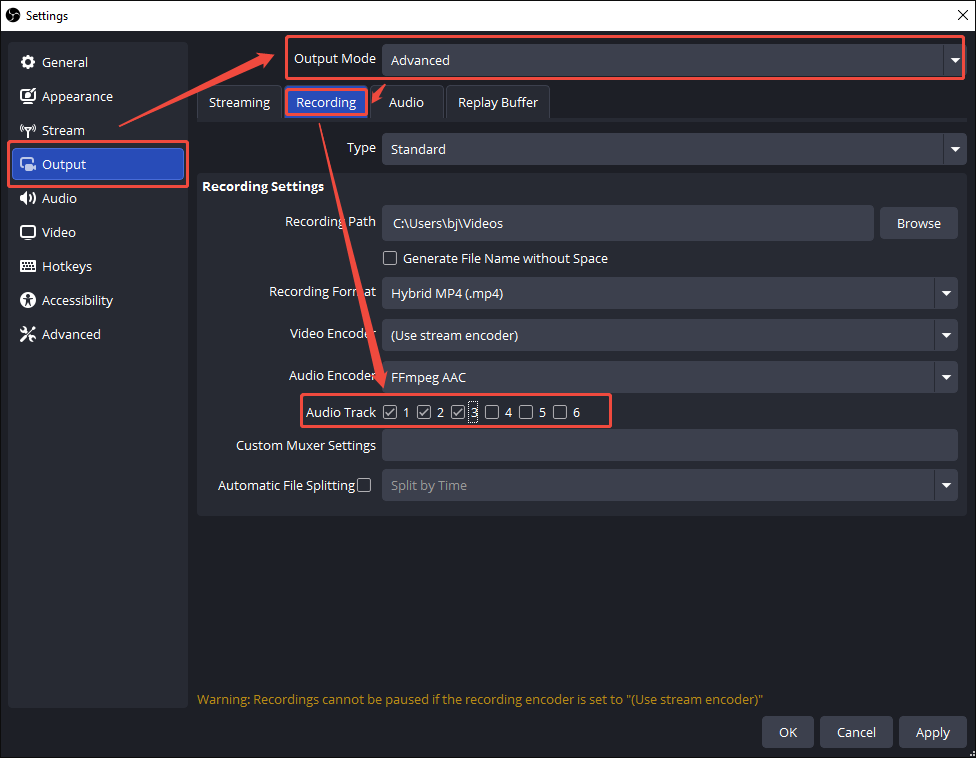
Then, check whether your OBS Studio can record the audio again.
Fix 8. Update Audio Drivers
An outdated audio driver usually leads to audio recording issues. Below are the detailed instructions on how to update the audio driver on your PC.
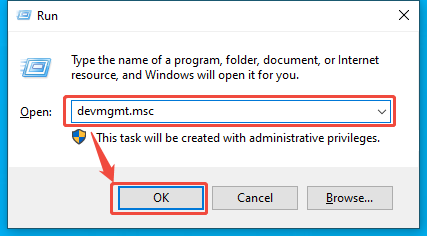
Step 1. Enter the Device Manager window.
Activate the Run window by pressing the Windows + R keys. Next, type devmgmt.msc into the box and click on the OK button to access the Device Manager window.
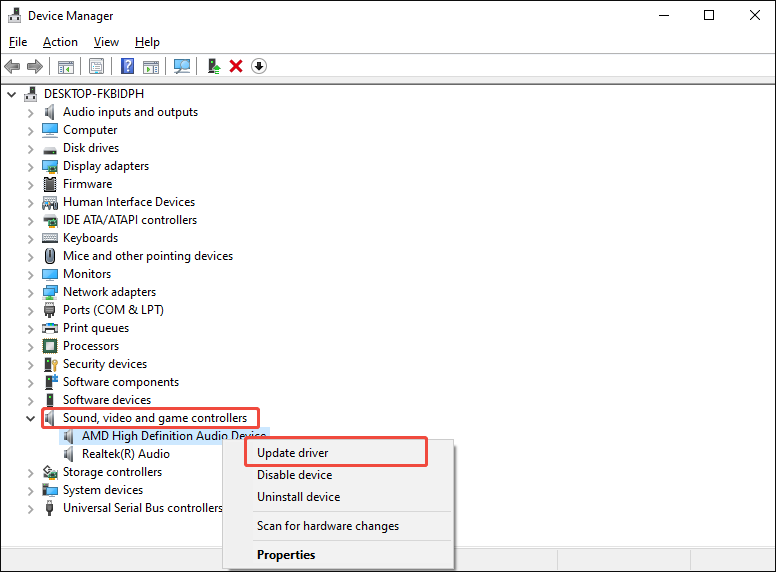
Step 2. Go to the update interface.
Expand the Sound, video and game controllers option. Then, right-click on the audio driver you select and choose the Update driver option to access the update interface.
Step 3. Start the update process.
Choose the Search automatically for drivers option to begin the update process.
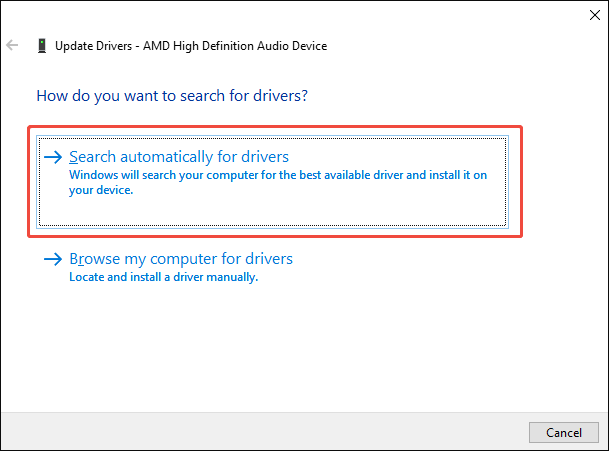
With the above-detailed steps, you can fix OBS not recording audio caused by an outdated audio driver.
Fix 9. Run OBS as an Administrator.
Running OBS as an administrator enables the screen recorder to capture the audio with sufficient system sources. This way, the audio issues are more likely to be fixed. Follow the steps below to do that.
Step 1. Access the option menu.
Right-click on the shortcut of the OBS app to enter the option menu.
Step 2. Run OBS as an administrator.
Select the Run as administrator option.
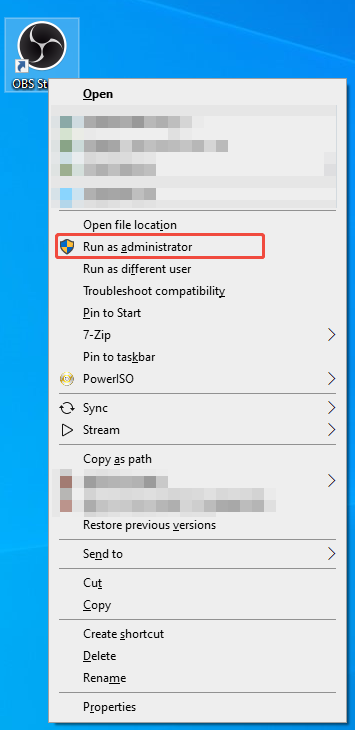
After running OBS Studio, check whether audio can be recorded within OBS. If this method doesn’t work, try other methods below.
Fix 10. Match the Sample Rate
Considering that a sample rate mismatch will also cause OBS not to capture audio, below is a detailed guide on how to configure the sample rate on OBS Studio.
Step 1. Go to the Settings window of OBS Studio.
After launching OBS Studio, click on the Settings option under the Controls section to access the Settings window.
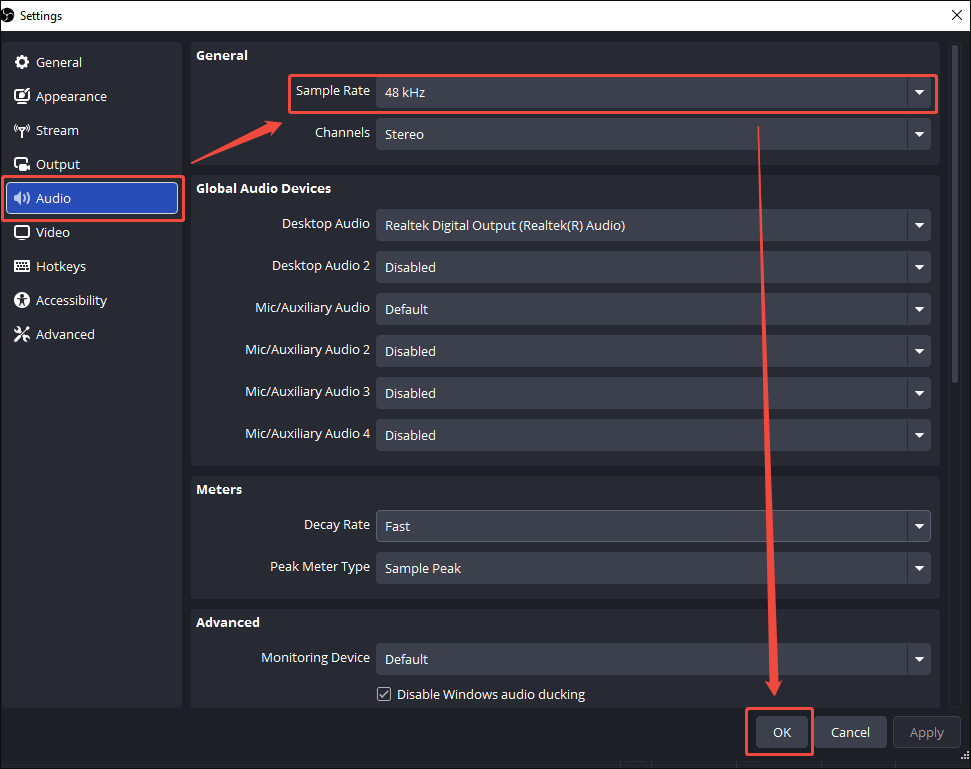
Step 2. Configure the sample rate.
Switch to the Audio tab. There, expand the Sample Rate option and choose the sample rate you want. Here, I will take 48 kHz as an example.
Next, follow the detailed steps to set the sample rate on the Windows PC.
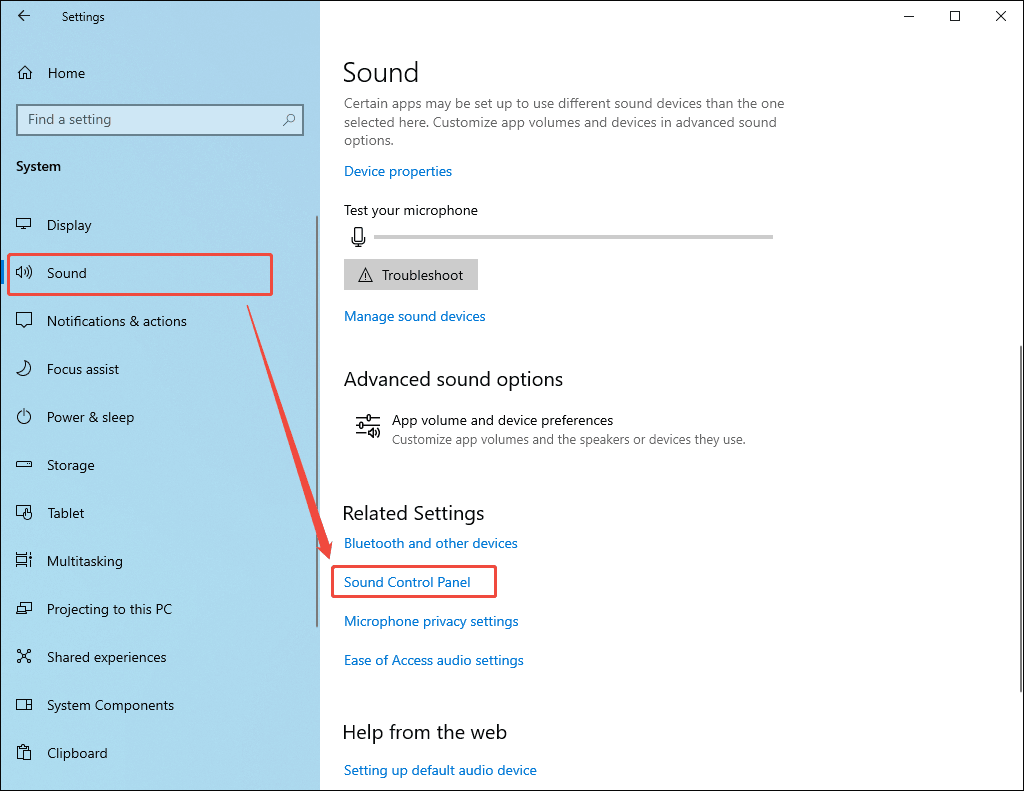
Step 1. Enter the Settings window.
Press the Windows + I keys to enter the Settings page. There, choose the System option.
Step 2. Access the Sound control panel.
Switch to the Sound tab. There, scroll down and choose the Sound Control Panel option.
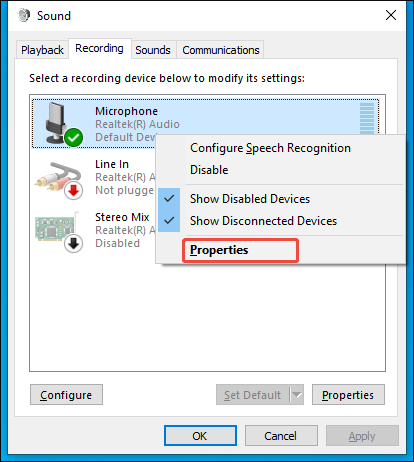
Step 3. Configure the sample rate.
In the Sound window, navigate to the Recording section. There, right-click on the audio device you are using and choose the Properties option.
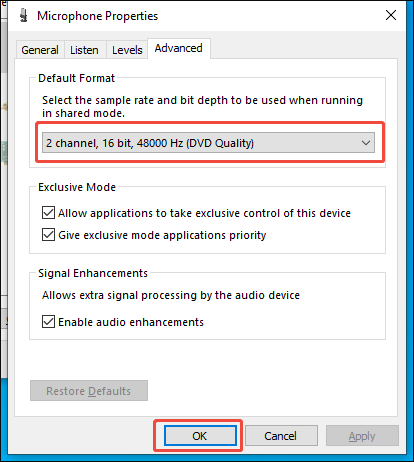
In the next window, navigate to the Advanced section. There, expand the drop-down option under the Default Format section. Next, set the sample rate to 48 kHz and click on OK.
After finishing the sample rate match, check whether the issue of OBS not recording audio has been fixed.
Fix 11. Update OBS
If all the methods are not workable, try updating your OBS app to the latest version. You can follow the steps below to finish the update process.
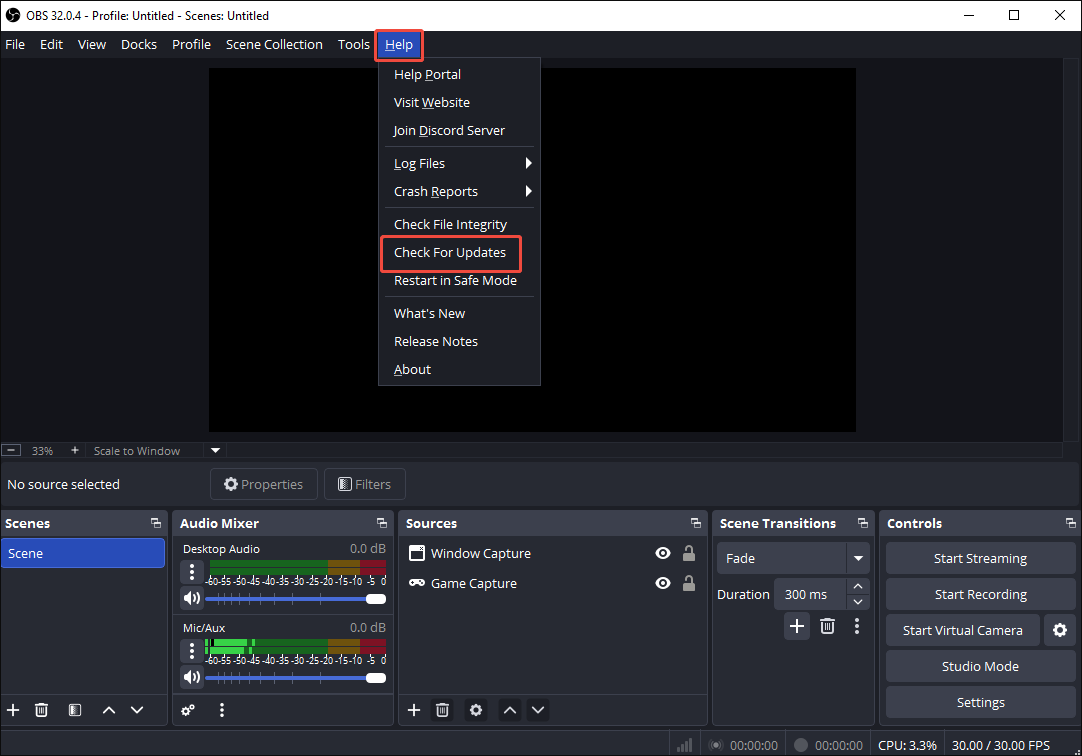
Step 1. Run OBS Studio.
Run the OBS Studio app.
Step 2. Check for the update.
Click on the upper Help option. Next, select the Check For Updates option. If the update is available, follow the on-screen prompts to complete the update. On condition that there are no prompts, it means that your OBS has been updated to the latest version.
This method enables you to update OBS effortlessly. Provided that you want to reinstall OBS Studio, go to the official website: https://obsproject.com/download.
Fix 12. Use an OBS Alternative
As an experienced user of MiniTool products, I highly recommend MiniTool Screen Recorder for your audio recording.
About MiniTool Screen Recorder
I have used MiniTool Screen Recorder to capture various audio/videos without any watermarks. More importantly, this screen recorder doesn’t set any limit for the recording duration. Plus, although I am a beginner in screen recording, MiniTool Screen Recorder, which features an intuitive interface, is easily accessible to me.
Beyond a pure screen recorder, MiniTool Screen Recorder also satisfies my other needs, such as webcam recording and screen annotation. Moreover, this OBS alternative enables me to customize various recording parameters, including recording quality and frame rate.
How to Capture Audio with MiniTool Screen Recorder
Below is a detailed guide on how to use MiniTool Screen Recorder to capture audio.
Step 1. Download and install MiniTool Screen Recorder.
MiniTool Screen RecorderClick to Download100%Clean & Safe
Download MiniTool Screen Recorder by clicking on the download button above. Then, follow the on-screen instructions to install this OBS alternative on your PC.
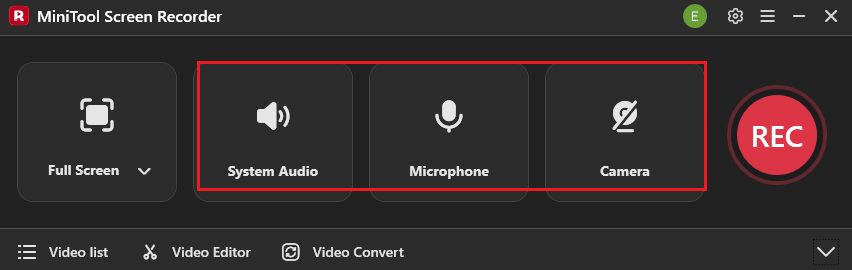
Step 2. Manage the audio recording and enable webcam recording.
If you want to turn on/off the recording of system and microphone sounds, click on the System Audio icon and the Microphone icon. For those who want to record the webcam, click on the Camera icon.
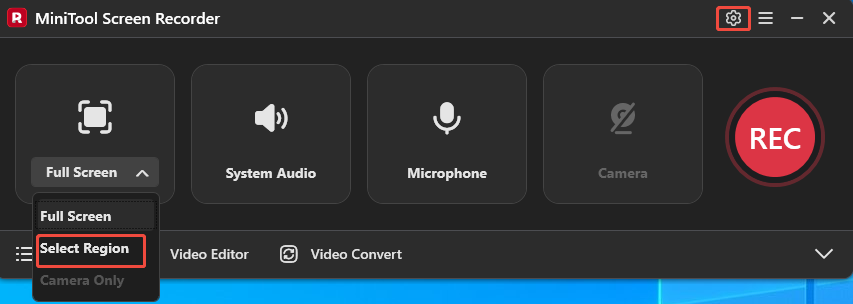
Step 3. Choose the recording area and specify other settings.
By default, MiniTool Screen Recorder will capture the whole screen. If you want to select a recording region, expand the leftmost drop-down option and choose the Select region option. Next, customize the recording area based on your needs.
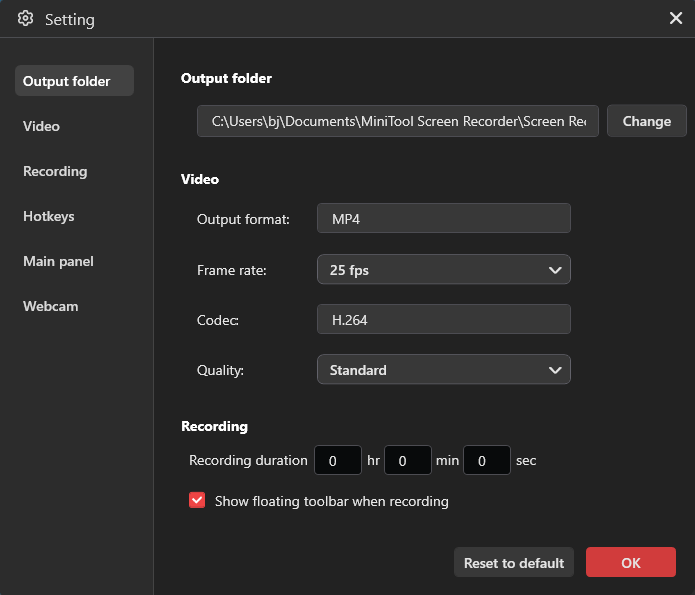
Click on the upper-right Settings icon to enter the Settings interface. There, click on the Change option to select an output folder for the recorded file. Then, expand the Frame rate option and make a choice among 15fps, 20fps, 25fps, 30fps, and 50fps. Next, expand the Quality option and choose among High, Original, and Standard. You can also preset the recording duration. Finally, click on the OK button to save the changes.
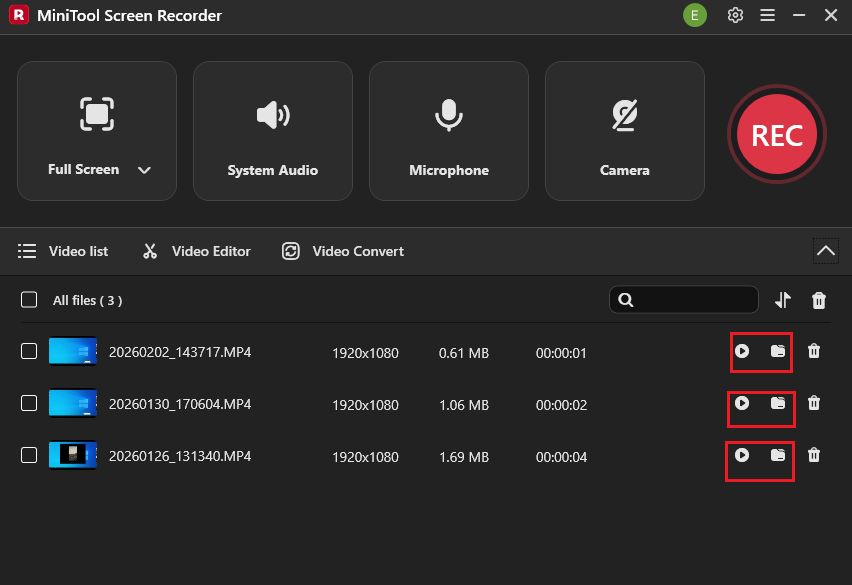
Step 4. Start/end recording and check the recorded video.
To start the recording process, press the F6 key. After a 3-second countdown, play the audio that you want to record. When you have captured what you want, end the recording by pressing the F6 key. In the expanded file list, click on the Play icon to view the recorded files. On condition that you want to locate the output files, click on the Folder icon.
As you can see, MiniTool Screen Recorder is a top-grade audio recorder that deserves a try.
MiniTool Video ConverterClick to Download100%Clean & Safe
To Wrap Things Up
Many factors, such as incorrect audio settings, outdated audio drivers, and more, will trigger the OBS not recording audio error. To tackle the error, it is feasible to restart OBS, check OBS audio settings, use an OBS alternative: MiniTool Screen Recorder, and try other methods.
If you have encountered any problems when using MiniTool Screen Recorder or MiniTool Video Converter, please ask for help by sending an email to support@minitool.com. Alternatively, you can directly share your problems with me on X. I will help you work them out as soon as possible.