Sometimes, Audacity fails to record audio on your device. This post introduces four effective methods to fix Audacity not recording audio, including checking Audacity settings, adjusting Windows settings, restarting Audacity, and using an alternative like MiniTool Screen Recorder.
Audacity is a popular free audio recording and editing tool. However, users might encounter an issue with Audacity not recording sound. If that happens, don’t worry. This guide walks you through the common reasons and shares four reliable methods to fix them, helping you record audio quickly and smoothly.
What Is Audacity
Audacity is a cross-platform as well as open-source audio recording and editing application available for Windows, MacOS, and Linux. It allows users to record sound from microphones or system audio, edit audio tracks, and export files in multiple formats at no cost. With the robust features and straightforward interface, Audacity is widely used for podcasts, voiceovers, and music production.
As audio recording is one of its core features, any issue that prevents Audacity from recording sound can seriously affect the workflow. Let’s delve into the common reasons why Audacity is not recording sound.
Why Audacity Is Not Recording Sound
Audacity may fail to record sound for several common reasons. In most cases, the issue is related to incorrect settings, conflicts between the software and your system, or other temporary problems. The following section compiles a list of troubleshooting.
Reason 1: Incorrect Audacity Settings
In some cases, incorrect settings in Audacity can prevent audio from being recorded properly. This often happens when you select the wrong audio host, recording device, or incompatible sample rate.
For example, Audacity may record silence when a Bluetooth headset is chosen as the recording device. This is because Audacity’s default project sample rate is 44,100 Hz, while most Bluetooth headsets operate at different sample rates, such as 8,000 Hz, 16,000 Hz, or 24,000 Hz. When the sample rates do not match, Audacity may fail to capture any sound.
Reason 2: System Settings
Another possible reason is that the microphone is disabled or blocked by Windows privacy settings. If microphone access is turned off, Audacity cannot receive any audio input, even though the application appears to be running normally.
In addition, Audacity may fail to record sound if the system microphone or audio input devices are disabled in Windows settings.
Reason 3: Temporary Software Issues
In some cases, temporary software glitches or an outdated version of Audacity can cause recording problems. Resetting Audacity or updating it to the latest version can often resolve these issues.
Fortunately, all these issues mentioned above can be fixed with a few simple adjustments. The following sections show how to fix Audacity not recording sound, along with detailed steps.
How to Fix Audacity Not Recording Sound Issues
There are four methods available for fixing the Audacity not recording sound problem based on the common reasons.
Method 1: Check Audacity Settings
When Audacity is not recording audio, the first step is to check its recording settings. Incorrect audio hosts, input devices, or sample rate mismatches can prevent Audacity from capturing sound.
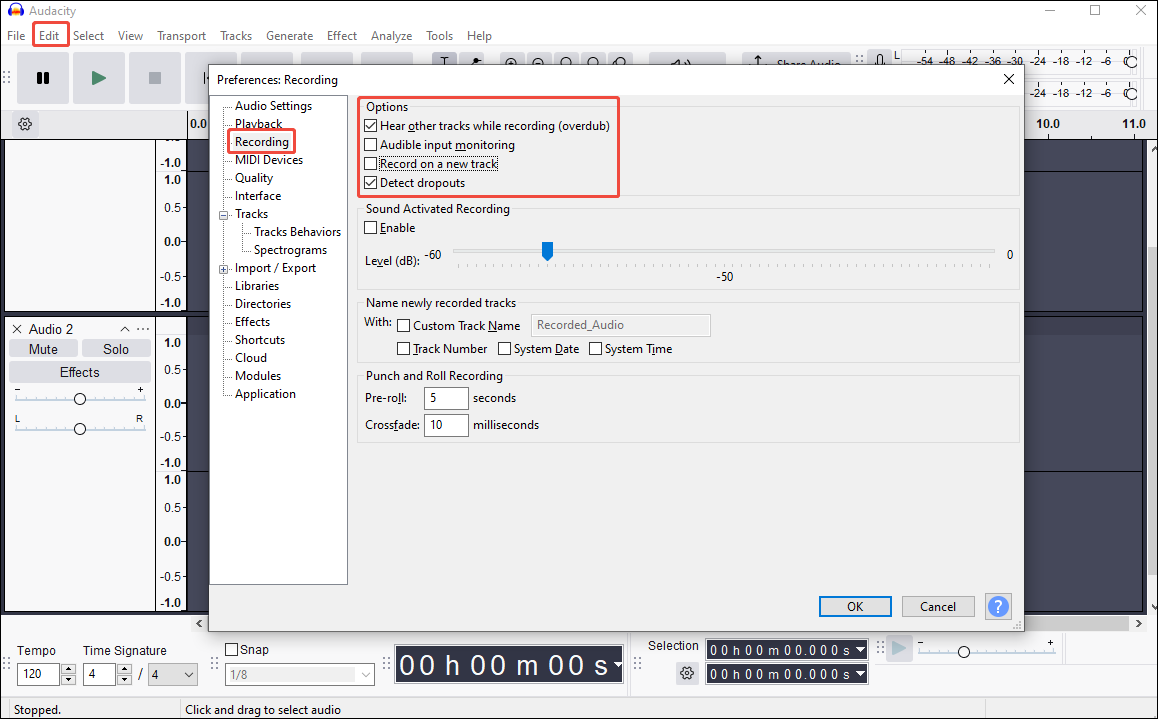
Step 1: Check Recording Settings
Open Audacity. Click Edit and select Preferences. Choose Recording in the left menu. Ensure that the Hear other tracks while recording (overdub) and Detect dropouts options are enabled correctly.
Step 2: Check the Audio Host and Recording Device
If it still doesn’t work, you need to check the audio host and recording device. Click Audio Settings in the Preferences settings window.
There are three available host options:
- MME has the best compatibility with most devices.
- WASAPI delivers lower latency and supports loopback recording.
- DirectSound offers a good balance of stability and performance.
Select MME as it is the most compatible option. Click Device under Recording to make sure the correct microphone or audio input source is selected.
Step 3: Adjust the Sample Rate
A mismatch between Audacity’s project sample rate and your system’s default sample rate may cause recording silence.
Change Default Sample Rate to match the project sample rate in the Preferences settings window.
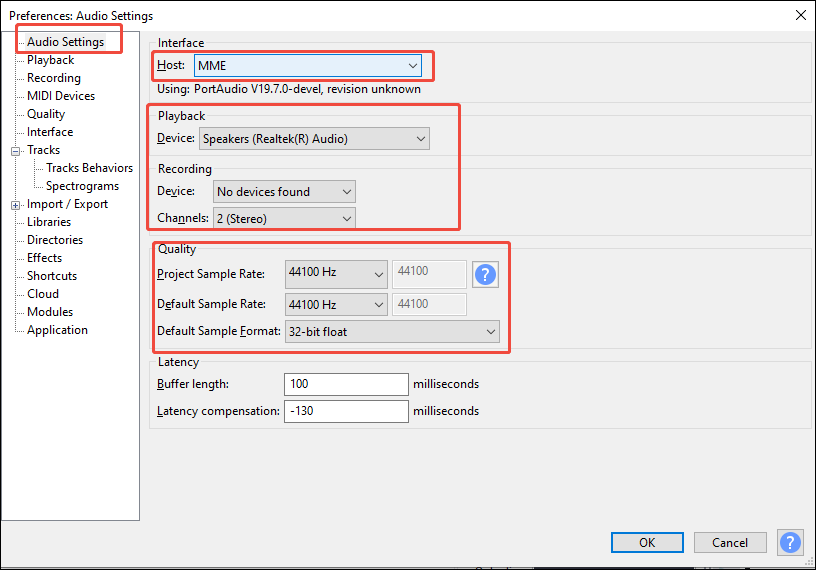
Click OK to save the adjustments. Then, restart Audacity and test the recording again.
Method 2: Adjust Windows Settings
Windows system settings can prevent Audacity from accessing your microphone. If microphone permissions or audio input devices are disabled, Audacity will not record sound properly.
1. Check Microphone Privacy Permissions
Operating systems may block microphone access for third-party applications by default. If Audacity is not allowed to use the microphone, it cannot receive any audio input.
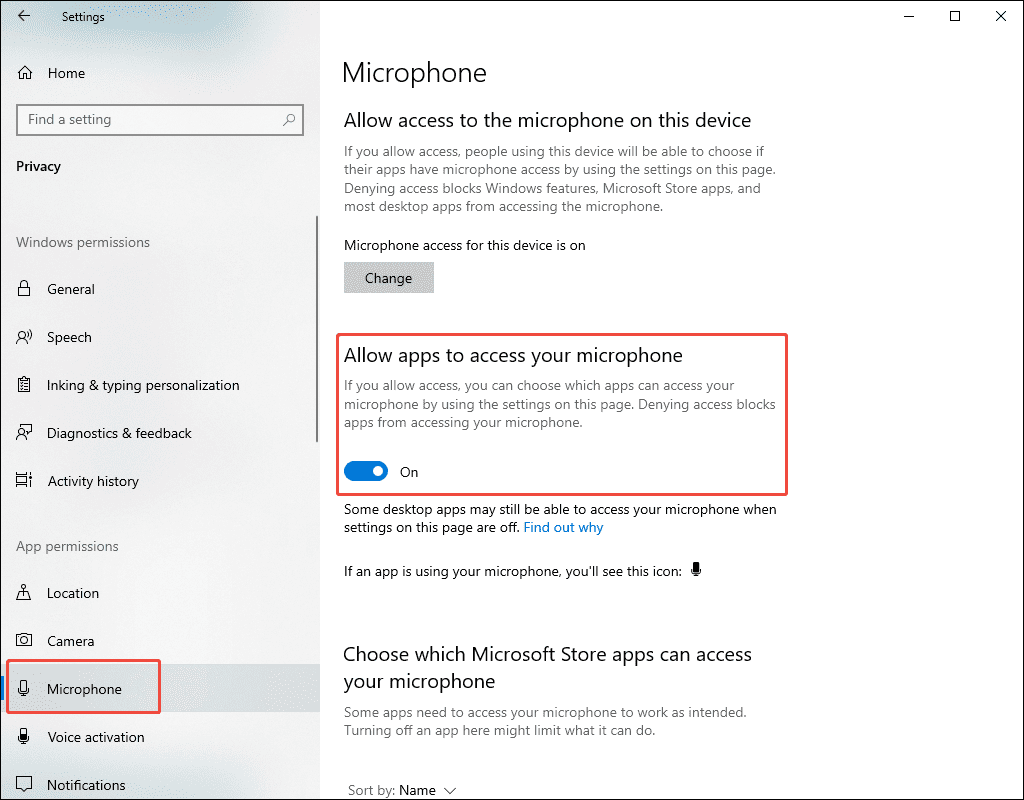
Step 1: Open Windows Privacy Settings
Press the Windows logo key on your keyboard and select Settings. Select Privacy and click Microphone under the App permissions section.
Step 2: Enable the Microphone Permissions
Turn on Allow apps to access your microphone. Scroll down and enable Allow desktop apps to access your microphone.
2. Enable the Microphone
If your microphone does not appear in Audacity > Audio Setup > Recording Device, it may be disabled at the system level.
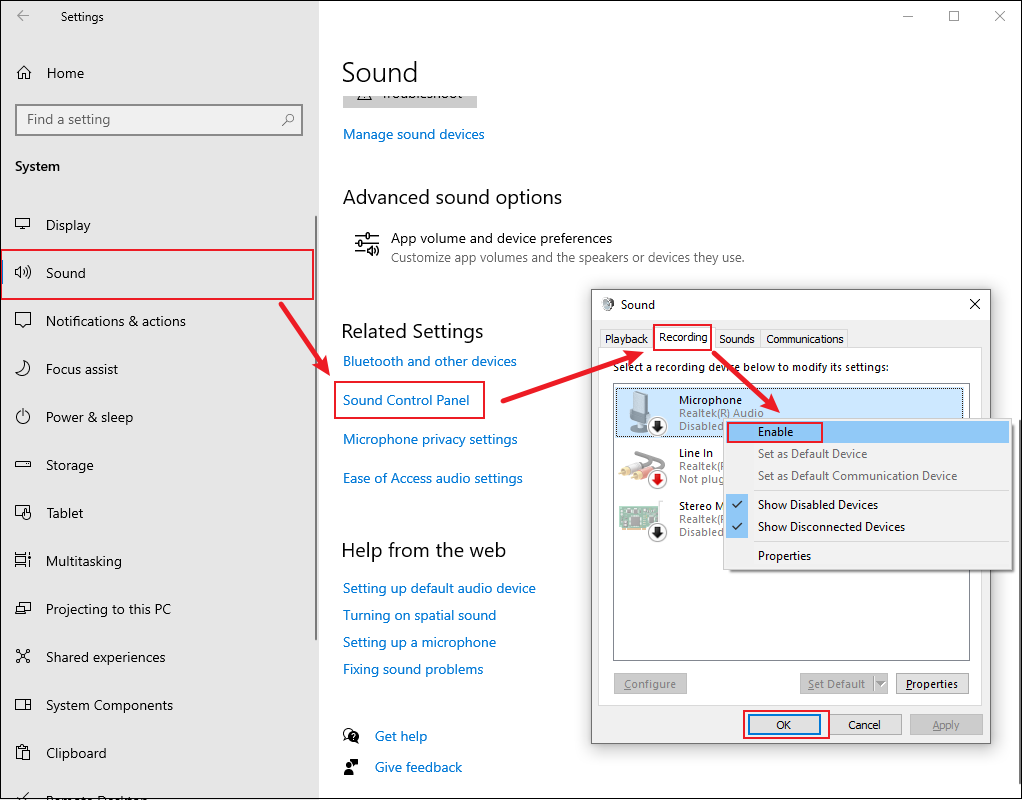
Step 1: Open Sound Settings
Press Windows + I to open the Settings window. Click System and select Sound. Click Sound Control Panel under Related Settings to enter the Sound window.
Step 2: Check the Microphone
Switch to the Recording tab, check whether your microphone is enabled. If it is disabled, right-click the Microphone option and select Enable. Click OK to save the changes.
Method 3: Update/Reset/Reinstall Audacity
If Audacity does not record audio after adjusting settings and system permissions, the issue may be caused by software bugs or a corrupted installation. Updating, resetting, or reinstalling Audacity can often resolve these problems.
Before proceeding, try restarting Audacity. If the issue persists, follow the steps below.
1. Update Audacity
Software updates often fix known bugs, improve performance, and enhance compatibility with different systems and audio devices. Using an outdated version of Audacity may result in recording issues that have already been fixed in newer releases.
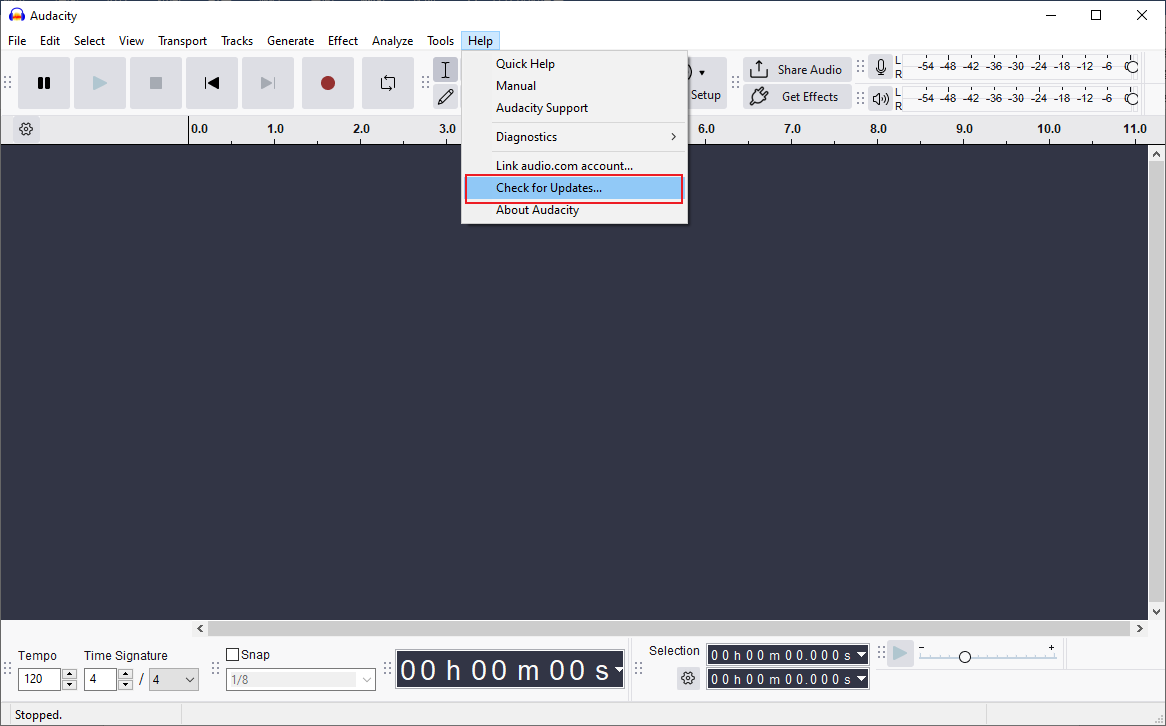
Open Audacity and click Help on the top toolbar. Select Check for Updates. When the update window appears, click Install update and follow the on-screen instructions.
2. Reset Audacity
Resetting Audacity restores the program to its default configuration. This can fix issues caused by incorrect or corrupted settings.
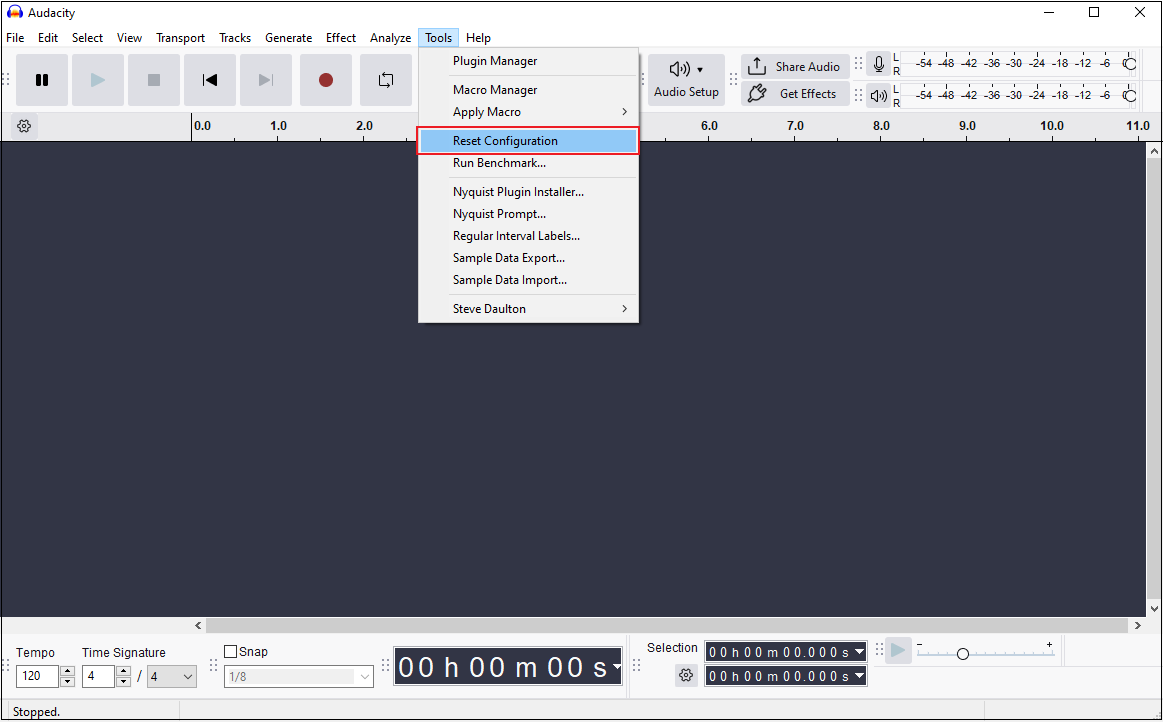
Open Audacity, click Tools, and select Reset Configuration. Audacity will restart automatically after the reset is complete.
3. Reinstall Audacity
If updating and resetting do not work, reinstalling Audacity can help resolve deeper installation-related issues.
Uninstall Audacity
Click the Start menu in the left corner of your screen and select Settings. Click Apps and find Audacity under Apps & features. Click it and choose Uninstall.
Install Audacity
Navigate to the official Audacity download website (https://www.audacityteam.org/download/) in your browser. Download and install the latest version of Audacity.
Method 4: Use an Audacity Alternative – MiniTool Screen Recorder
If none of the above methods can fix the Audacity not recording problem, you can try another recorder. Here I recommend MiniTool Screen Recorder, which comes with robust features and doesn’t have time limits or watermarks.
Overview of MiniTool Screen Recorder
MiniTool Screen Recorder is an easy-to-use screen recording tool designed for Windows users. It provides flexible control over screen capture regions and audio sources. You can record the full screen or a custom area. It also supports webcam recording. For audio recording, the software records system sound, microphone input, or both at the same time.
In addition to basic recording features, MiniTool Screen Recorder includes built-in screen annotation tools that allow you to highlight key information and add text during recording, making it suitable for tutorials and presentations. You can also preset the recording duration and adjust the frame rate, with options such as 15 fps, 20 fps, 25 fps, 30 fps, and 50 fps.
Overall, MiniTool Screen Recorder is a versatile option for both beginners and advanced users. The following section is how to record audio using MiniTool Screen Recorder.
Step 1: Download and Install
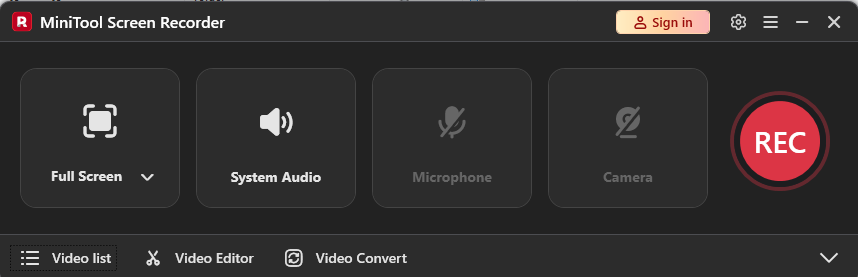
Click the button below to download and install MiniTool Screen Recorder. Then, open it to enter the main interface.
MiniTool Screen RecorderClick to Download100%Clean & Safe
Step 2: Check Audio Control
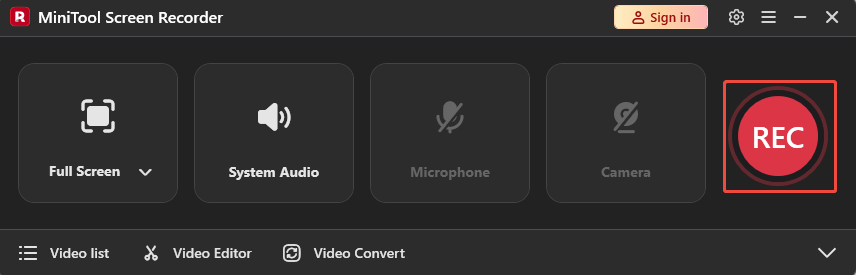
System audio and microphone input are enabled by default. Play the audio you want to capture on your computer or make sure your microphone is ready. If you only want to record system audio, click the Microphone icon to turn off the microphone input.
Step 3: Other Additional Settings
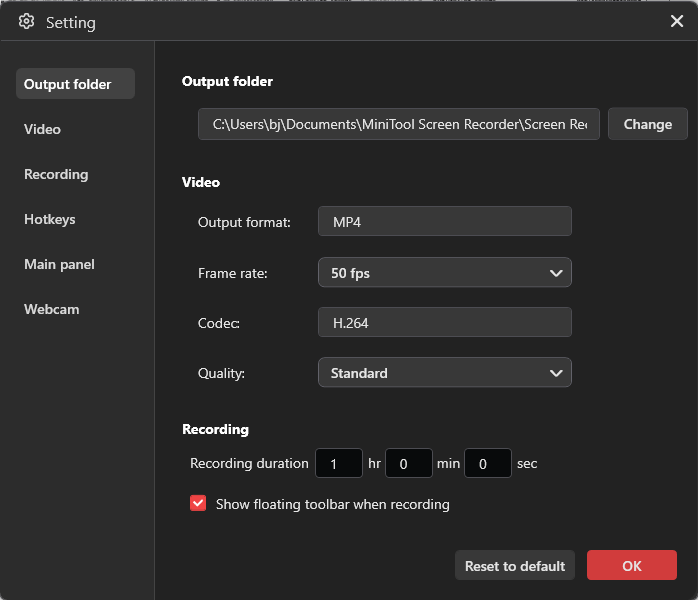
By default, MiniTool Screen Recorder records the entire screen. To capture a specific area, click the Arrow icon next to Full Screen and choose Select Region. Then, drag the red dashed border to define the recording area.
To access more options, click the Gear icon in the upper-right corner. Here, you can set a precise recording duration and adjust the video frame rate and quality according to your needs. After configuring the settings, click OK to save the changes.
Step 4: Start and End Recording
Then, click the red REC button or press the default F6 key on the keyboard. After a 3-second countdown, the recording will start automatically. Press F9 to pause recording. Once done, press F6 again to stop recording.
Step 5: Check Recording
After the recording stops, the main interface of MiniTool Screen Recorder will appear and display a list of recorded videos. The latest recording will be shown at the top of the list. Click the Folder icon to locate the file on your computer.

As a remarkable Audacity alternative, MiniTool Screen Recorder enables you to record audio on your computer easily and quickly. However, it currently supports saving recordings in MP4 format only. If you need to extract audio from recorded videos, you can use tools like MiniTool Video Converter or MiniTool MovieMaker to convert MP4 files to MP3.
How to Convert the Recorded MP4 Video to MP3
This section will use MiniTool Video Converter as an example to show you how to convert the recorded MP4 video to MP3 or other audio formats.
As an audio extractor, MiniTool Video Converter can convert MP4 and other video files to MP3, WAV, M4A, WMA, AAC, AC3, AIFF, M4B, and OGG. It also allows batch conversion of up to five files simultaneously. Additionally, you can customize audio settings like the encoder, bitrate, channel, and sample rate.
Besides format conversion, MiniTool Video Converter offers extra features, including video compression and automatic subtitle generation.
Below are the detailed steps to convert a recorded MP4 video to MP3 using MiniTool Video Converter.
Step 1: Download and Install MiniTool Video Converter
Click the button below to download and install it.
MiniTool Video ConverterClick to Download100%Clean & Safe
Step 2: Convert MP4 to MP3
Click Add Files to upload your video. Click the folder with a gear icon to open the output format list. Click the Audio tab and choose MP3 on the left. You can select the High Quality option.
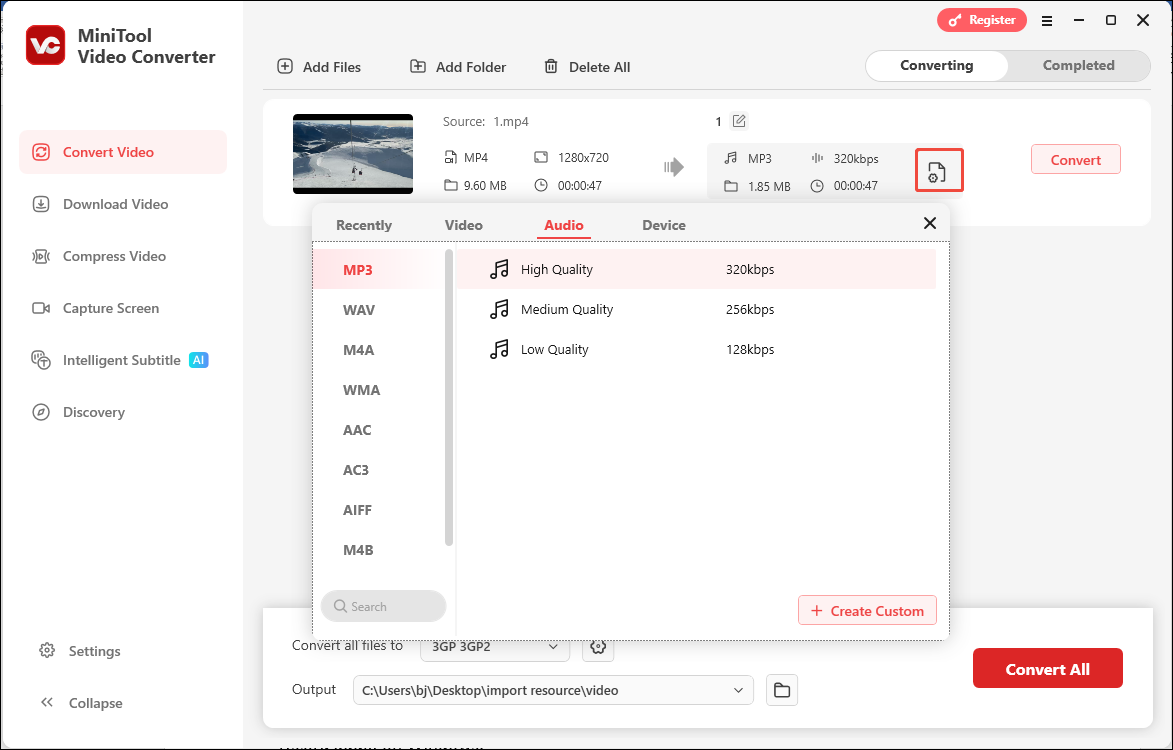
Then, click the Convert button to begin the conversion. Once finished, you will be led to the Completed tab. Click the Folder icon to locate the converted file.
Conclusion
In conclusion, Audacity not recording audio is usually caused by three main factors: incorrect Audacity settings, conflicts between Audacity and system audio settings, and temporary software issues such as outdated or corrupted program files.
To resolve these problems effectively, it is recommended to troubleshoot them at the source. You can check Audacity’s recording settings and sample rate, verify Windows microphone permissions, and update, reset, or reinstall Audacity if necessary. If Audacity still fails to work properly, using a reliable alternative like MiniTool Screen Recorder can be an effective way to record audio on Windows.
If you have any suggestions or problems when using MiniTool Screen Recorder and MiniTool Video Converter, please don’t hesitate to contact us via support@minitool.com.