Opera GX is a powerful browser designed specifically for gamers. If you want to capture and share your gameplay or other activities, you might wonder how to screen record on Opera GX. To solve this problem, this post introduces three reliable Opera GX recorders that totally cover your needs.
Before diving into the detailed steps for screen recording, let’s first take a quick review of Opera GX.
What Is Opera GX
Opera GX is a specialized version of the Opera browser available on Windows, macOS, Linux, Android, and iOS. While it offers all the essential features of the regular Opera browser, such as a built-in VPN, messenger sidebar, and ad blocker, it also includes unique features tailored specifically for gamers.
What sets Opera GX apart is its resource management tools. For example, the resource limiter allows you to control network, CPU, and memory usage, freeing up system resources for a smoother gaming experience. Additionally, features like the GX Cleaner let you easily clear cache, cookies, and other files, further optimizing your browser for gaming.
Does Opera GX Have a Built-in Screen Recorder
No, Opera GX does not have a built-in screen recorder. However, you can still record your screen using third-party screen recorders and Windows native recording tools. The next section will recommend three practical tools for recording on Opera GX.
How to Screen Record on Opera GX
This section introduces the key features of three recommended Opera GX screen recorders, including MiniTool Screen Recorder, Xbox Game Bar, and Screen Recorder Extension. It also explains how to screen record on Opera GX using each of these tools.
Method 1: Use MiniTool Screen Recorder
MiniTool Screen Recorder is a screen recording tool designed for Windows users. With its intuitive interface and versatile features, it delivers excellent performance when capturing on-screen activities, making it an ideal choice for beginners. Below are the key features that make it suitable for recording Opera GX.
Customizable Recording Region
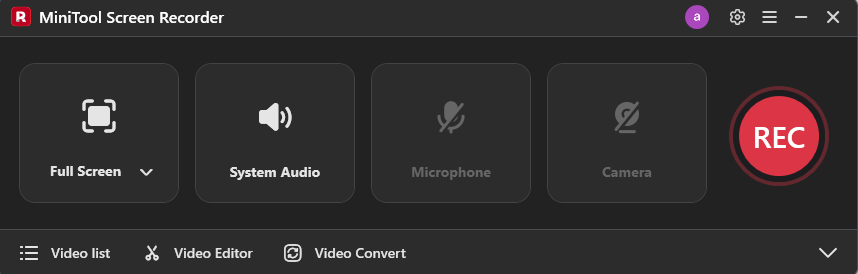
MiniTool Screen Recorder offers multiple recording modes, including full-screen, selected region, webcam-only, and screen with webcam. You can choose the recording area based on your specific needs. For example, recording gameplay in Opera GX is best done in full-screen mode for better clarity, and tutorials can benefit from the screen-with-webcam mode to add a personal touch.
Flexible Audio Control
The software provides flexible audio settings, allowing you to record system sound and microphone audio separately or simultaneously. This ensures clear narration and high-quality sound for different recording scenarios.
Adjustable Recording Settings
MiniTool Screen Recorder includes various customizable recording options. You can adjust the frame rate and video quality according to your requirements. It also allows you to preset the recording duration for scheduled recordings. When recording with a webcam, you can change the webcam’s position and shape to make your video more engaging.
Real-time Annotation Tool
Another standout feature is the real-time annotation tool, which includes drawing tools, shapes, arrows, text, step numbers, and a whiteboard. These tools are especially useful for creating tutorials or highlighting key points during online meetings in Opera GX.
In addition, MiniTool Screen Recorder can record up to 4K resolution without time limits or watermarks. Overall, it is a reliable and easy-to-use Opera GX screen recorder that is well worth trying.
How to screen record on Opera GX on Windows with MiniTool Screen Recorder? Follow the detailed guides below.
Step 1: Download and Install
Click the button below to download this free screen recorder. Install it by following the on-screen instructions. Then, launch the program to enter the main interface.
MiniTool Screen RecorderClick to Download100%Clean & Safe
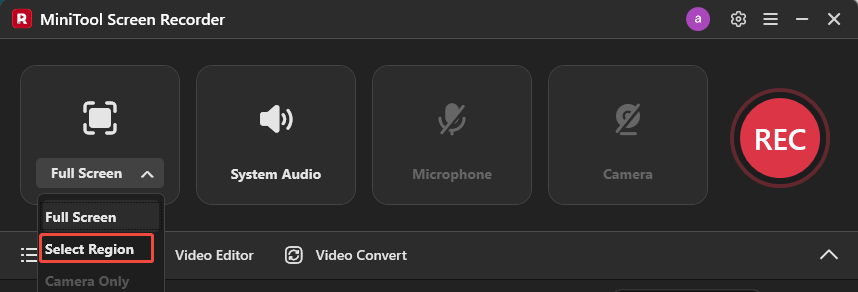
Step 2: Select the Recording Region
Open the game or other content you want to record in Opera GX.
By default, the program records in full-screen mode. If you want to capture only a specific Opera GX window or a selected area within it instead of the full screen, click the Full Screen drop-down menu and choose Select Region. Then drag the red dotted rectangle to define the recording area according to the window size.
Step 3: Configure Audio Settings
By default, both system audio and microphone audio are enabled. If you only need to record system sound, simply click the Microphone icon to turn it off.
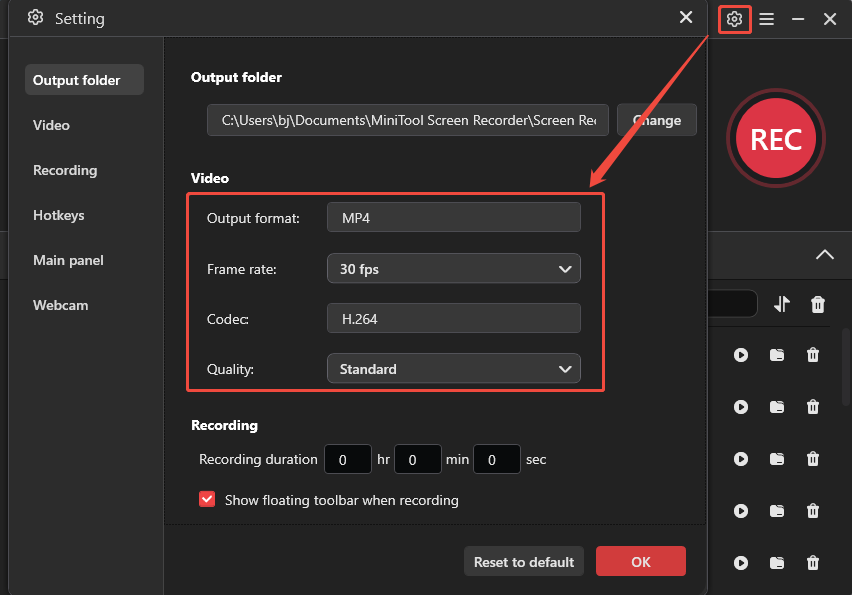
Step 4: Adjust Additional Settings
Click the Gear icon in the upper-right corner to enter the settings window. Here, you can adjust the frame rate and video quality, preset the recording duration, change the save location, and customize hotkeys.
Expand Frame rate and select 30 FPS, which provides smooth and clear playback. Then click Quality and choose an option based on your preferred balance between video clarity and file size. Switch to the Hotkeys tab on the right panel and customize shortcut keys for more convenient recording. Click OK to save all the adjustments.
Step 5: Start Recording
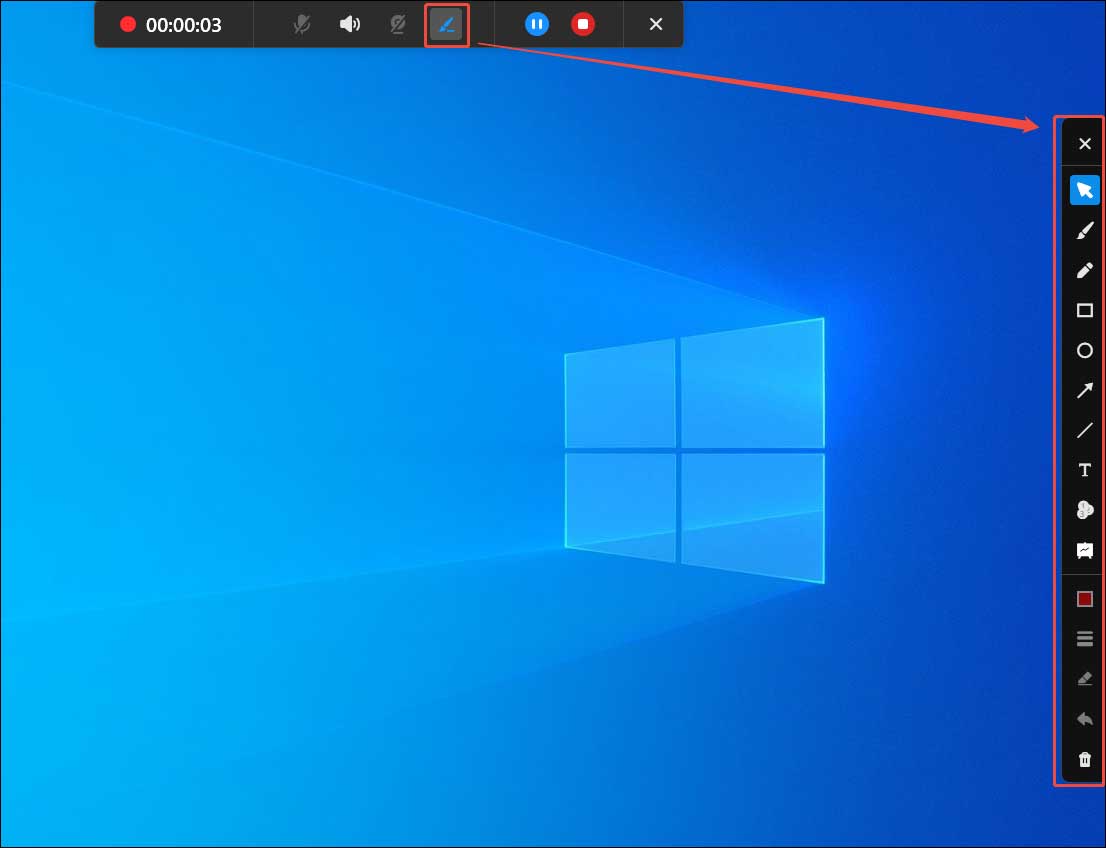
Click the red REC button on the right side of the interface or press your designated start recording hotkey on the keyboard. After a three-second countdown, the recording will begin. You can start your screen activities. If you want to pause the recording for a smooth and perfect result, press the assigned shortcut key to pause and resume recording.
To add annotations in the recording, click the Pen icon in the floating toolbar at the top of the screen. The annotation panel will appear on the right side of the screen. Select a desired tool to make notes.
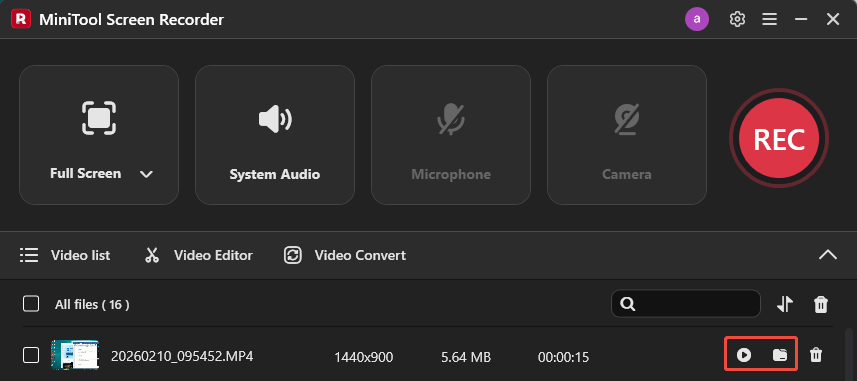
Step 6: Stop and Check Recording
Press your designated stop recording hotkey to end recording. Then, the latest recording will appear at the top of the video list module in the interface. To preview it, click the Play icon. Click the Folder icon to locate the file on your computer.
Step 7: Edit the Recording (Optionally)
After the recording is finished, you can use a video editor to fine-tune the recording. Click the Video Editor option next to the Video list option to access MiniTool MovieMaker.
As a companion video editing tool, MiniTool MovieMaker offers a wide range of editing features, including trimming, cropping, and rotating videos. It also includes a massive resource collection, such as filters, elements, text templates, and audio, helping you enhance the recording with ease.
Method 2: Use Xbox Game Bar
Xbox Game Bar is another free and easy-to-use screen recorder. As a built-in Windows tool, it eliminates the need for additional downloads and helps save storage space. In addition to capturing screenshots and recording application activities, especially gameplay clips, it also offers features such as performance monitoring and Xbox social integration.
When recording Opera GX, Xbox Game Bar can automatically detect the active application window, so you don’t need to select a recording area manually. It supports recording both system audio and microphone input, and allows you to adjust the volume of individual applications.
This user-friendly tool also provides customizable frame rate and video quality settings to meet different recording needs.
How to screen record on Opera GX using Xbox Game Bar? Here are the detailed steps.
Step 1: Enable Xbox Game Bar Recording
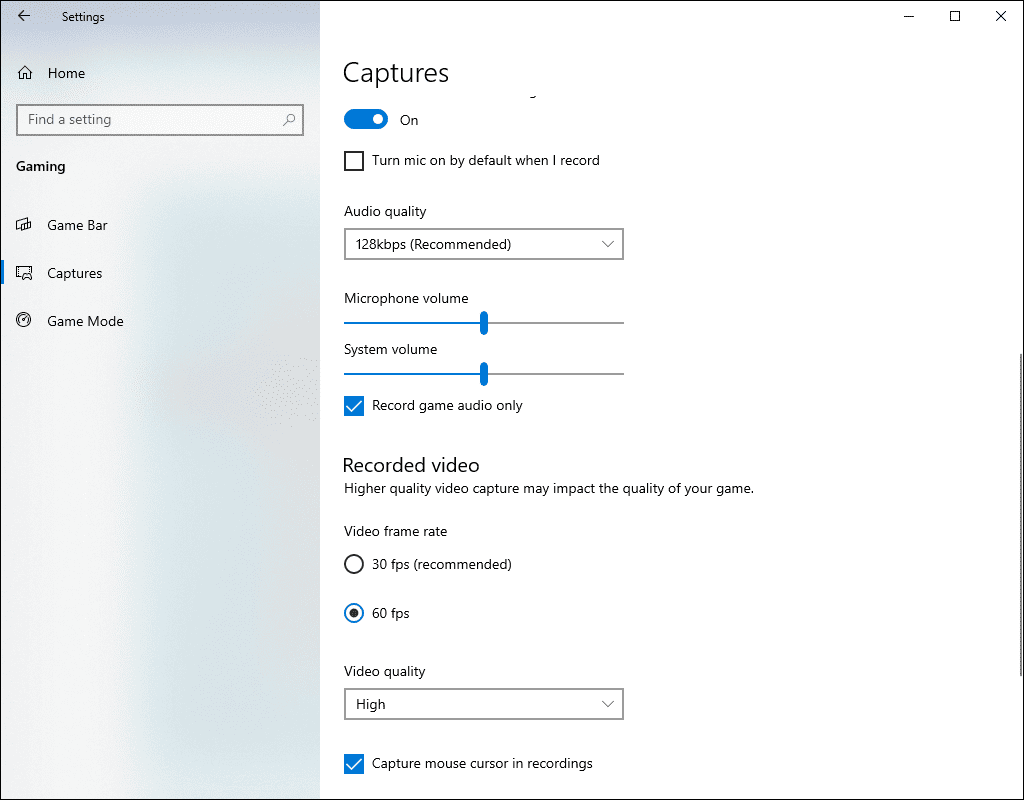
Press Windows + I to open the Settings window. Click Gaming and turn on the Allow your controller to open Game Bar option. Then, go to the Capture tab from the left panel. Here, you can change the save location, set the maximum recording length, specify the video frame rate, and quality.
For gameplay recording, it is recommended to select 60 FPS and High video quality for smoother performance.
Step 2: Start Recording
Press the default Windows + G to launch Xbox Game Bar. Open Opera GX and prepare the content you want to record. Press Windows + Alt + R to start recording.
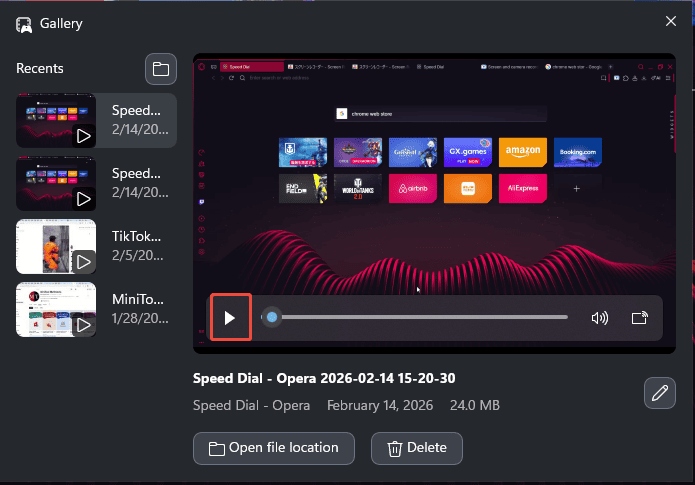
Step 3: Stop and Preview Recording
Press Windows + Alt + R again to stop recording. A notification will appear on the right side of the screen. Click it to open the Gallery window, where you can preview your recording by clicking the Play icon.
Method 3: Use Screen Recorder Extension
Screen Recorder is an online Chrome extension that allows you to record directly from your browser. With its intuitive interface, you can easily use it without creating an account.
Screen Recorder supports recording the screen, webcam, or the screen with webcam. The extension also provides flexible audio options, including microphone audio, system audio, a mix of both, or recording without audio.
When recording on Opera GX, you can choose to capture a specific browser tab, the entire Opera GX window, or the full screen. Recordings can be saved in WebM format. As a convenient Opera GX recorder, it supports recording without time limits or watermarks, making it a good option for quick recordings.
The following guide shows you how to screen record on Opera GX using Screen Recorder.
Step 1: Get Screen Recorder Extension
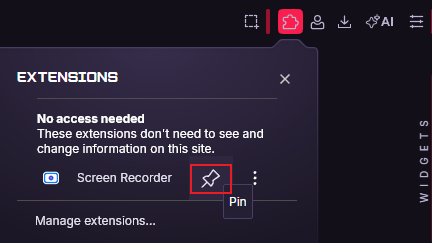
Open Opera GX and search for the Screen Recorder Extension in the Chrome Web Store. Click Add to Chrome to install it. After installation, click the Extensions icon in the browser toolbar and select the Pin icon to add the extension to the toolbar for quick access.
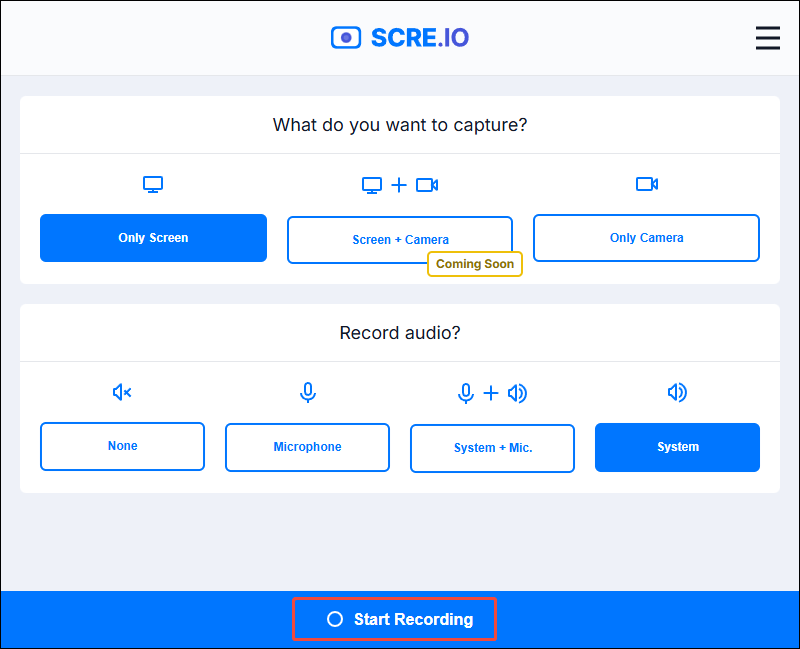
Step 2: Start Recording
Open the game or content you want to record in Opera GX. Click the Screen Recorder icon in the toolbar to open its interface. Choose whether to record the screen only or the screen with the webcam. Then select your preferred audio mode. Click Start Recording, choose the Opera GX window or specific browser tab you want to capture, and click Share to begin recording.
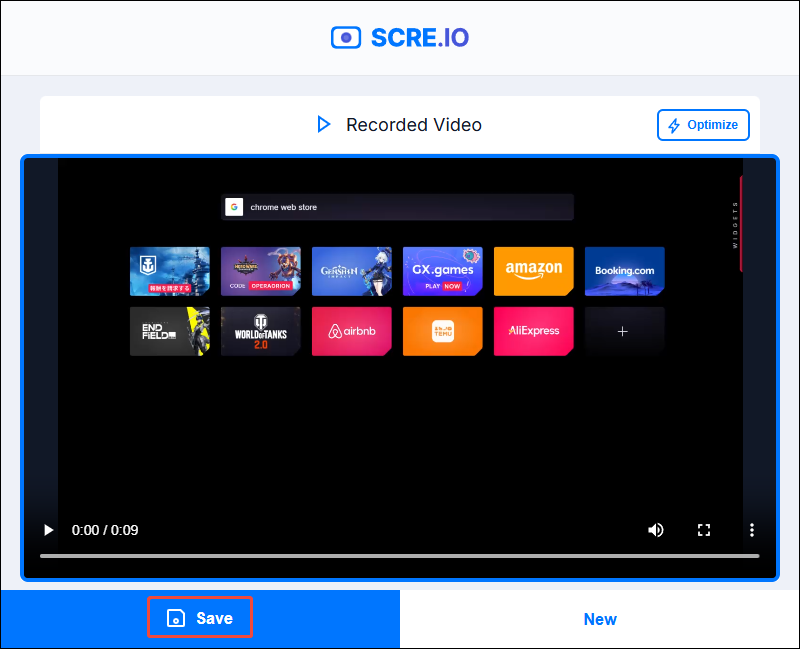
Step 3: End and Save the Recording
Click Stop to end the recording. You can preview the video by clicking the Play icon. If you are satisfied with the result, click Save to download the recording to your computer.
Conclusion
This post demonstrates how to screen record on Opera GX using MiniTool Screen Recorder, Xbox Game Bar, and the Screen Recorder browser extension.
For users who need advanced tools like annotations, MiniTool Screen Recorder is an excellent choice. For quick recordings without installing additional software, Xbox Game Bar and the browser extension are practical alternatives. You can select the Opera GX screen recorder that best suits your preference.
Finally, if you have any suggestions or encounter any problems when using MiniTool Screen Recorder and MiniTool MovieMaker, please don’t hesitate to contact us via support@minitool.com. Also, you can directly share your problems with me on X. I will help you as quickly as possible.
FAQ About Recording on Opera GX
If your computer has limited performance, you can start with 30 FPS and increase it only if needed.
You can also reduce the recording resolution or switch to recording a specific window instead of the full screen to minimize system load.